Modify the structure and appearance of text
- 7/23/2019
Documents contain text that conveys information to readers, but the appearance of the document content also conveys a message. You can provide structure and meaning by formatting the text in various ways. Word 2019 provides a variety of simple-to-use tools that you can use to apply sophisticated formatting and create a navigational structure.
In a short document or one that doesn’t require a complex navigational structure, you can easily format words and paragraphs so that key points stand out and the structure of your document is clear. You can achieve dramatic flair by applying predefined WordArt text effects. To keep the appearance of documents and other Microsoft Office files consistent, you can format document elements by applying predefined sets of formatting called styles. In addition, you can change the fonts, colors, and effects throughout a document with one click by applying a theme.
This chapter guides you through procedures related to applying character and paragraph formatting, structuring content manually, creating and modifying lists, applying styles to text, and changing a document’s theme.
Apply paragraph formatting
A paragraph is created by entering text and then pressing the Enter key. A paragraph can contain one word, one sentence, or multiple sentences. Every paragraph ends with a paragraph mark, which looks like a backward P (¶). Paragraph marks and other structural characters (such as spaces, line breaks, and tabs) are usually hidden, but you can display them. Sometimes displaying these hidden characters makes it easier to accomplish a task or understand a structural problem.
You can change the look of a paragraph by changing its indentation, alignment, and line spacing, in addition to the vertical space before and after it. You can also place borders around it and shade its background. Collectively, the settings you use to vary the look of a paragraph are called paragraph formatting.
You can modify a paragraph’s left and right edge alignment and vertical spacing by using tools on the Home tab of the ribbon, and its left and right indents from the Home tab, the Layout tab, or the ruler. The ruler is often hidden to provide more space for the document content.
)
If you modify a paragraph and aren’t happy with the changes, you can restore the original paragraph and character settings by clearing the formatting to reset the paragraph to its base style.
![]() SEE ALSO
SEE ALSO
For information about working with hidden structural characters, see “Structure content manually,” later in this chapter. For information about styles, see “Apply built-in styles to text” later in this chapter.
When you want to make several adjustments to the alignment, indentation, and spacing of selected paragraphs, it is sometimes quicker to make changes in the Paragraph dialog box than to select buttons and drag markers.
)
Configure alignment
The alignment settings control the horizontal position of the paragraph text between the page margins. There are four alignment options:
Align Left This is the default paragraph alignment. It sets the left end of each line of the paragraph at the left page margin or left indent. It results in a straight left edge and a ragged right edge.
Align Right This sets the right end of each line of the paragraph at the right page margin or right indent. It results in a straight right edge and a ragged left edge.
Center This centers each line of the paragraph between the left and right page margins or indents. It results in ragged left and ragged right edges.
Justify This alignment adjusts the spacing between words so that the left end of each line of the paragraph is at the left page margin or indent and the right end of each line of the paragraph (other than the last line) is at the right margin or indent. It results in straight left and right edges.
The icons on the alignment buttons on the ribbon depict the effect of each alignment option.
To open the Paragraph dialog box
On the Home tab or the Layout tab, in the Paragraph group, select the Paragraph Settings dialog box launcher.
On the Home tab, in the Paragraph group, select the Line and Paragraph Spacing button and then Line Spacing Options.
To set paragraph alignment
Position the cursor anywhere in the paragraph, or select all the paragraphs you want to adjust. Then do either of the following:
On the Home tab, in the Paragraph group, select the Align Left, Center, Align Right, or Justify button.
Open the Paragraph dialog box. On the Indents and Spacing tab, in the General area, select Left, Centered, Right, or Justified in the Alignment list.
Configure vertical spacing
Paragraphs have two types of vertical spacing:
Paragraph spacing The space between paragraphs, defined by setting the space before and after each paragraph. This space is usually measured in points.
Line spacing The space between the lines of the paragraph, defined by setting the height of the lines either in relation to the height of the text (Single, Double, or a specific number of lines) or by specifying a minimum or exact point measurement.
The default line spacing for documents created in Word 2019 is 1. 08 lines (Single). Changing the line spacing changes the appearance and readability of the text in the paragraph and, of course, also changes the amount of space it occupies on the page.
)
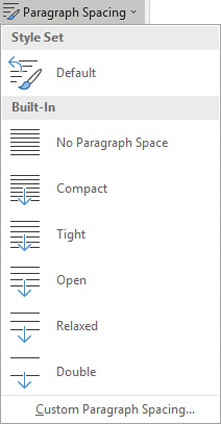
You can set the paragraph and line spacing for individual paragraphs and for paragraph styles. You can quickly adjust the spacing of most content in a document by selecting an option from the Paragraph Spacing menu on the Design tab. (Although the menu is named Paragraph Spacing, the menu options control both paragraph spacing and line spacing. ) These options, which are named by effect rather than by specific measurements, work by modifying the spacing of the Normal paragraph style and any other styles that depend on the Normal style for their spacing. (In standard templates, most other styles are based on the Normal style. ) The Paragraph Spacing options modify the Normal style in only the current document, and do not affect other documents.
The following table describes the effect of each Paragraph Spacing option on the paragraph and line spacing settings.
Paragraph spacing option |
Before paragraph |
After paragraph |
Line spacing |
Default |
Spacing options are controlled by the style set |
||
No Paragraph Space |
0 points |
0 points |
1 line |
Compact |
0 points |
4 points |
1 line |
Tight |
0 points |
6 points |
1. 15 lines |
Open |
0 points |
10 points |
1. 15 lines |
Relaxed |
0 points |
6 points |
1. 5 lines |
Double |
0 points |
8 points |
2 lines |
To quickly adjust the spacing between and within all paragraphs in a document
On the Design tab, in the Document Formatting group, select Paragraph Spacing to display the Paragraph Spacing menu.
Each paragraph spacing option controls space around and within the paragraph
Select the option you want to apply to all the paragraphs in the document.
To adjust the spacing between paragraphs
Select all the paragraphs you want to adjust.
On the Layout tab, in the Paragraph group, adjust the Spacing Before and Spacing After settings.
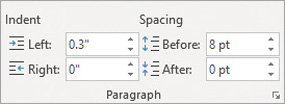
The settings in the Spacing boxes are measured in points
To adjust spacing between the lines of paragraphs
Position the cursor anywhere in the paragraph, or select all the paragraphs you want to adjust.
To make a quick adjustment to selected paragraphs, on the Home tab, in the Paragraph group, select the Line And Paragraph Spacing button, and then select any of the line spacing commands on the menu.
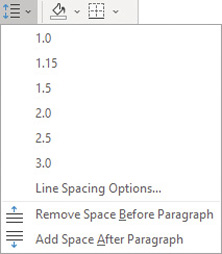
You can choose from preset internal line spacing options or adjust paragraph spacing
 TIP
TIPYou can also adjust the space before and after selected paragraphs from the Line And Paragraph Spacing menu. Selecting one of the last two options adds or removes a preset amount of space between the selected paragraphs.
Or
Position the cursor anywhere in the paragraph, or select all the paragraphs you want to adjust.
Open the Paragraph dialog box. On the Indents and Spacing tab, in the Spacing area, make the adjustments you want to the paragraph spacing, and then select OK.
Configure indents
In Word, you don’t define the width of paragraphs and the length of pages by defining the area occupied by the text; instead, you define the size of the white space—the left, right, top, and bottom margins—around the text.
![]() SEE ALSO
SEE ALSO
For information about setting margins, see “Preview and adjust page layout” in Chapter 12, “Finalize and distribute documents,” of Microsoft Word 2019 Step by Step by Joan Lambert (Microsoft Press, 2018).
Although the left and right margins are set for a whole document or for a section of a document, you can vary the position of the paragraphs between the margins by indenting the left or right edge of the paragraph.
A paragraph indent is the space from the page margin to the text. You can change the left indent by selecting buttons on the Home tab, or you can set the indents directly on the ruler. Three indent markers are always present on the ruler:
Left Indent This defines the outermost left edge of each line of the paragraph.
Right Indent This defines the outermost right edge of each line of the paragraph.
First Line Indent This defines the starting point of the first line of the paragraph.
The ruler indicates the space between the left and right page margins in a lighter color than the space outside of the page margins.
)
The default setting for the Left Indent and First Line Indent markers is 0. 0", which aligns with the left page margin. The default setting for the Right Indent marker is the distance from the left margin to the right margin. For example, if the page size is set to 8. 5" wide and the left and right margins are set to 1. 0", the default Right Indent marker setting is 6. 5".
You can arrange the Left Indent and First Line Indent markers to create a hanging indent or a first line indent. Hanging indents are most commonly used for bulleted and numbered lists, in which the bullet or number is indented less than the main text (essentially, it is outdented). First line indents are frequently used to distinguish the beginning of each subsequent paragraph in documents that consist of many consecutive paragraphs of text. Both types of indents are set by using the First Line Indent marker on the ruler.
TIP
The First Line Indent marker is linked to the Left Indent marker. Moving the Left Indent marker also moves the First Line Indent marker to maintain the first line indent distance. You can move the First Line Indent marker independently of the Left Indent marker to change the first line indent distance.
To display the ruler
On the View tab, in the Show group, select the Ruler check box.
TIPIn this book, we show measurements in inches. If you want to change the measurement units Word uses, open the Word Options dialog box. On the Advanced page, in the Display area, select the units you want in the Show Measurements In Units Of list. Then select OK.
To indent or outdent the left edge of a paragraph
Position the cursor anywhere in the paragraph, or select all the paragraphs you want to adjust. Then do any of the following:
On the Home tab, in the Paragraph group, select the Increase Indent or Decrease Indent button to move the left edge of the paragraph in 0. 25" increments.
TIPYou cannot increase or decrease the indent beyond the margins by using the Increase Indent and Decrease Indent buttons. If you do need to extend an indent beyond the margins, you can do so by setting negative indentation measurements in the Paragraph dialog box.
Open the Paragraph dialog box. On the Indents and Spacing tab, in the Indentation area, set the indent in the Left box, and then select OK.
On the ruler, drag the Left Indent marker to the ruler measurement at which you want to position the left edge of the body of the paragraph.
To create a hanging indent or first line indent
Position the cursor anywhere in the paragraph, or select all the paragraphs you want to adjust.
Open the Paragraph dialog box. On the Indents and Spacing tab, in the Indents area, select First line or Hanging in the Special box.
In the By box, set the amount of the indent, and then select OK.
Or
Set the left indent of the paragraph body.
On the ruler, drag the First Line Indent marker to the ruler measurement at which you want to begin the first line of the paragraph.
To indent or outdent the right edge of a paragraph
Position the cursor anywhere in the paragraph, or select all the paragraphs you want to adjust. Then do either of the following:
On the ruler, drag the Right Indent marker to the ruler measurement at which you want to set the maximum right edge of the paragraph.
Open the Paragraph dialog box. On the Indents and Spacing tab, in the Indentation area, set the right indent in the Right box, and then select OK.
TIPUnless the paragraph alignment is justified, the right edge of the paragraph will be ragged, but no line will extend beyond the right indent or outdent.
CONFIGURE PARAGRAPH BORDERS AND SHADING
To make a paragraph really stand out, you might want to put a border around it or shade its background. (For real drama, you can do both. ) You can select a predefined border from the Borders menu or design a custom border in the Borders And Shading dialog box.
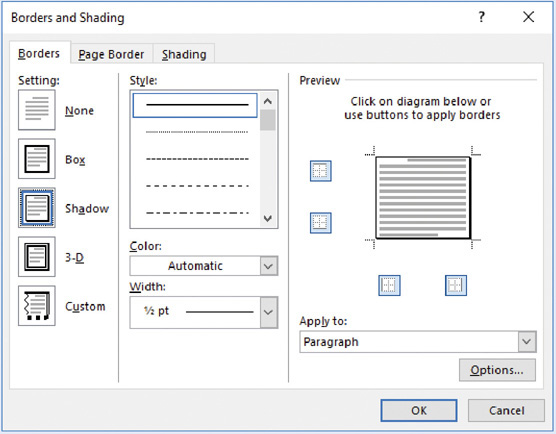
You can customize many aspects of the border
After you select the style, color, width, and location of the border, you can select Options to specify its distance from the text.