Unleashing the power of Excel with VBA


- By Bill Jelen and Tracy Syrstad
- 4/10/2019
Running a macro
If you assigned a shortcut key to your macro, you can play it by pressing the key combination. You also can assign macros to a button on the ribbon or the Quick Access Toolbar, form controls, or drawing objects, or you can run them from the Visual Basic toolbar.
Creating a macro button on the ribbon
You can add an icon to a new group on the ribbon to run your macro. This is appropriate for macros stored in the Personal Macro Workbook. Icons added to the ribbon are still enabled even when your macro workbook is not open. If you click the icon when the macro workbook is not open, Excel opens the workbook and runs the macro. Follow these steps to add a macro button to the ribbon:
Right-click the ribbon and choose Customize The Ribbon.
In the list box on the right, choose the tab name where you want to add an icon.
Click the New Group button below the right list box. Excel adds a new entry called New Group (Custom) to the end of the groups in that ribbon tab.
To move the group to the left in the ribbon tab, click the up arrow icon on the right side of the dialog box several times.
To rename the group, click the Rename button. Type a new name, such as Report Macros. Click OK. Excel shows the group in the list box as Report Macros (Custom). Note that the word Custom does not appear in the ribbon.
Open the upper-left drop-down menu and choose Macros from the list. The Macros category is fourth in the list. Excel displays a list of available macros in the left list box.
Choose a macro from the left list box. Click the Add button in the center of the dialog box. Excel moves the macro to the right list box in the selected group. Excel uses a generic VBA icon for all macros.
Click the macro in the right list box. Click the Rename button at the bottom of the right list box. Excel displays a list of 180 possible icons. Choose an icon. Alternatively, type a friendly label for the icon, such as Format Report.
You can move the Report Macros group to a new location on the ribbon tab. Click Report Macros (Custom) and use the up and down arrow icons on the right of the dialog box.
Click OK to close the Excel Options dialog box. The new button appears on the selected ribbon tab.
Creating a macro button on the Quick Access Toolbar
You can add an icon to the Quick Access Toolbar to run a macro. If a macro is stored in the Personal Macro Workbook, you can have the button permanently displayed in the Quick Access Toolbar. If the macro is stored in the current workbook, you can specify that the icon should appear only when the workbook is open. Follow these steps to add a macro button to the Quick Access Toolbar:
Right-click the Quick Access Toolbar and choose Customize Quick Access Toolbar.
If your macro should be available only when the current workbook is open, open the upper-right drop-down menu and change For All Documents (Default) to For FileName.xlsm. Any icons associated with the current workbook are displayed at the end of the Quick Access Toolbar.
Open the upper-left drop-down menu and select Macros from the list. The Macros category is fourth in the list. Excel displays a list of available macros in the left list box.
Choose a macro from the left list box. Click the Add button in the center of the dialog box. Excel moves the macro to the right list box. Excel uses a generic VBA icon for all macros.
Click the macro in the right list box. Click the Modify button at the bottom of the right list box. Excel displays a list of 180 possible icons (see Figure 1-5). Choose an icon from the list. In the Display Name box, replace the macro name with a short name that appears in the ToolTip for the icon.
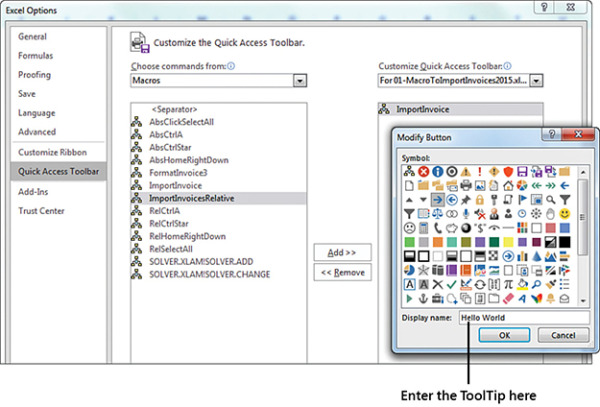
FIGURE 1-5 You can attach a macro to a button on the Quick Access Toolbar.
Click OK to close the Modify Button dialog box.
Click OK to close the Excel Options dialog box. The new button appears on the Quick Access Toolbar.
)
Assigning a macro to a form control, text box, or shape
If you want to create a macro specific to a workbook, you can store the macro in the workbook and attach it to a form control or any object on the sheet.
Follow these steps to attach a macro to a form control on the sheet:
On the Developer tab, click the Insert button to open its drop-down menu. Excel offers 12 form controls and 12 ActiveX controls in this one drop-down menu. The form controls are at the top, and the ActiveX controls are at the bottom. Most icons in the ActiveX section of the drop-down menu look identical to an icon in the form controls section of the drop-down menu. Click the Button Form Control icon at the upper-left corner of the Insert drop-down menu.
Move your cursor over the worksheet; the cursor changes to a plus sign.
Draw a button on the sheet by clicking and holding the left mouse button while drawing a box shape. Release the button when you have finished.
Choose a macro from the Assign Macro dialog box and click OK. The button is created with generic text such as Button 1.
Type a new label for the button. Note that while you are typing, the selection border around the button changes from dots to diagonal lines to indicate that you are in Text Edit mode. You cannot change the button color while in Text Edit mode. To exit Text Edit mode, either click the diagonal lines to change them to dots or Ctrl+click the button again. Note that if you accidentally click away from the button, you should Ctrl+click the button to select it. Then drag the cursor over the text on the button to select the text.
Right-click the dots surrounding the button and select Format Control. Excel displays the Format Control dialog box, which has seven tabs across the top. If your Format Control dialog box has only a Font tab, you failed to exit Text Edit mode. If this occurred, close the dialog box, Ctrl+click the button, and repeat this step.
Use the settings in the Format Control dialog box to change the font size, font color, margins, and similar settings for the control. Click OK to close the Format Control dialog box when you have finished. Click a cell to deselect the button.
Click the new button to run the macro.
Macros can be assigned to any worksheet object, such as clip art, a shape, SmartArt graphics, or a text box. In Figure 1-6, the top button is a traditional button form control. The other images are clip art, a shape with WordArt, and a SmartArt graphic. To assign a macro to any object, right-click the object and select Assign Macro.
)
FIGURE 1-6 Assigning a macro to a form control or an object is appropriate for macros stored in the same workbook as the control. You can assign a macro to any of these objects.