UWP Basics
- By Dawid Borycki
- 10/11/2018
Adapting a View to the Platform
Adapting the view to a specific platform is useful when you create universal UWP apps. Typically, to implement adaptive views, you use dedicated classes from the UWP API, such as RelativePanel, StateTrigger, and AdaptiveTrigger. Triggers are fired whenever the view layout changes—for example, due to changes to the window size. (See http://bit.ly/adaptive_layouts for more information.) Then you can handle layout updates by reorganizing controls with RelativePanel so they are optimally displayed onto the screen.
Sometimes, this approach may not work well, and you might want to completely replace the view for a specific platform. To do so, you supplement the app project with additional XAML files. The names of these files contain the name of the default view with different suffixes to represent each platform. For instance, if you want to use different versions of the MainPage view for the desktop and Mixed Reality platforms, you would add a file called MainPage.DeviceFamily-Holographic.xaml and then use this file to define the Mixed Reality view.
Let’s see how this works in practice. To add the new view, follow these steps:
Open the Solution Explorer.
Open the UWP.Basics app’s context menu and choose Add/New Item.
In the Add New Item dialog box, click the Installed/XAML tab and choose XAML View.
In the Name text box, type MainPage.DeviceFamily-Holographic. (See Figure 4-6.) Then click the Add button.
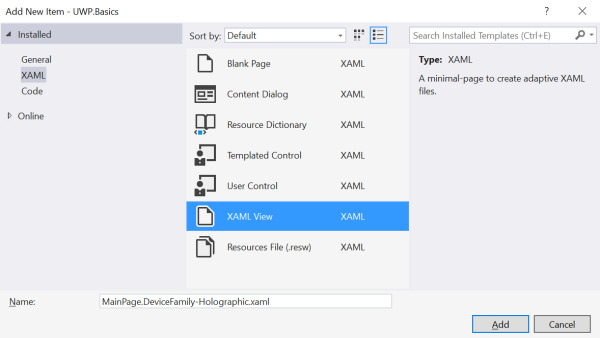
FIGURE 4-6 Adding a new XAML view to the UWP.Basics app.
)
After the new file is added to the project, modify it according to Listing 4-15.
LISTING 4-15 A definition of the holographic version of the MainPage
<Page
    x:Class="UWP.Basics.MainPage"
    xmlns="http://schemas.microsoft.com/winfx/2006/xaml/presentation"
    xmlns:x="http://schemas.microsoft.com/winfx/2006/xaml"
    xmlns:d="http://schemas.microsoft.com/expression/blend/2008"
    xmlns:mc="http://schemas.openxmlformats.org/markup-compatibility/2006"
    mc:Ignorable="d">

    <Page.Resources>
        <Style TargetType="TextBlock">
            <Setter Property="HorizontalAlignment"
                    Value="Center"/>
            <Setter Property="VerticalAlignment"
                    Value="Center"/>
            <Setter Property="FontSize"
                    Value="50"/>
            <Setter Property="FontWeight"
                    Value="Bold"/>
        </Style>
    </Page.Resources>

    <Grid Background="{ThemeResource ApplicationPageBackgroundThemeBrush}">
        <TextBlock Text="Mixed Reality"/>
    </Grid>
</Page>
The view declared in Listing 4-15 has a single label that displays the string “Mixed Reality.” To test the view, run the app in the HoloLens emulator. (See Figure 4-7.) The UWP runtime will automatically detect the new file with the view declaration and use it instead of the original one. However, the original view will still be used if the app is executed in any other UWP platform—for example, desktop, mobile, or IoT.
)
FIGURE 4-7 An XAML view for the holographic platform.
Although the view for a holographic platform is loaded from a separate file, the logic is still contained in the same code-behind file, MainPage.xaml.cs. So, a platform-specific view shares the code of the general view. You can use this feature to handle any events generated in the platform-specific view with the same or different methods as in the default view. To demonstrate this, I extended the declaration of TextBlock (refer to Listing 4-15) by adding a Tapped attribute:
<TextBlock Text="Mixed Reality" Tapped="ViewModel.DisplayPersonData"/>
As shown, this declaration invokes a DisplayPersonData method from PersonViewModel:
public async void DisplayPersonData(object sender, TappedRoutedEventArgs e)
{
    var message = $"{FirstName} {LastName}";

    var messageDialog = new MessageDialog(message, "Person data:");

    await messageDialog.ShowAsync();
}
This method combines the first and last name into one string and displays it in a modal window using the Windows.UI.Popups.MessageDialog class. When you run the app in the HoloLens emulator, the FirstName and LastName properties of the PersonViewModel are null. So, this code will generate an exception. To avoid this error, you can invoke the Button_Click method (refer to Listing 4-12) within the MainPage constructor:
public MainPage()
{
    InitializeComponent();

    if (AnalyticsInfo.VersionInfo.DeviceFamily == "Windows.Holographic")
    {
        Button_Click(this, null);
    }
}
Button_Click ensures that an instance of PersonViewModel will be correctly set up so the modal window can be displayed. Note that Button_Click is invoked only if the app is running on the holographic platform. To check a platform, use the VersionInfo.DeviceFamily property of the AnalyticsInfo class, declared under the Windows.System.Profile namespace. When you run the app in the HoloLens emulator and click the text block, a modal window will be displayed. (See Figure 4-8.) So, even when you use a different view for the specific platform, you can use the same code-behind, including all ViewModels.
)
FIGURE 4-8 Presenting a modal window.