Design data implementation
- By Haishi Bai, Santiago Fernandez Munoz, Dan Stolts
- 8/27/2018
Skill 2.4: Design for NoSQL storage
Relational databases have been very popular for a long time due to their capacity for managing data in different scenarios. Sometimes, using relational databases may not be the best option for some scenarios. Relational databases can be challenging when you need to scale out through different servers. There are also other challenges like storing JSON documents, or using key-values, or graphs structures, that do not fit well on relational databases. For example, if your application needs to store an object that does not have a defined schema, using a relational database for storing it will perform poorly with this type of data.
To address these current challenges, NoSQL storage is a new way of storing this type of data. Although models that are used on NoSQL storage vary from system to system, all of them share some common features:
Simpler horizontal scale
Flexibility on the data structure
Most of them are BASE (Basic Availability, Soft-state, Eventual consistency) instead of ACID (Atomic, Consistent, Isolated, Durable)
Schema-free
Simple API
Despite its name, NoSQL storage doesn’t always mean that it doesn’t provide you with SQL capabilities, like using indexes, having a structured query language, or being able to create relationships between elements. But they are not stored and organized as SQL databases and they provide more than just SQL features.
Azure Redis Cache
Redis Cache is an open source in-memory NoSQL data structure storage that you can use as a database, cache and message broker. This system is based on a key-value model, where keys can be of different types of data structures such as strings, hashes, list, sets and sorted sets.
Based on this open source solution, Azure Redis Cache is a managed service that can be accessed from any application from inside or outside Azure. This service is aimed to speed up your application by processing data in memory datasets.
Depending on your needs, Azure Redis Cache offers three different pricing tiers:
Basic Ideal for development and testing. Redis is deployed in a single node, available in multiples sizes. There is no SLA associated to this tier.
Standard This is the first tier that has high availability and has an SLA associated. Redis is deployed in a two-node cluster in a master/slave configuration managed by Microsoft. This tier is also available on multiple sizes.
Premium This tier extends Standard tier capabilities providing better performance, bigger workloads, disaster recovery, and enhanced security.
While you are deciding which pricing tier is more appropriate for your needs, you should bear in mind that you can always scale up in the pricing tier, because moving down from an upper tier to a lower tier is not allowed.
Since all data managed by Redis Cache is stored in a memory dataset, there are some risks of data loss in case of failure of the system. You can configure Redis Cache for persisting data in an Azure Storage account. Data from Redis Cache is persisted using RDB, which is a point-in-time representation of your data stored in a compact single file. This feature works well as a backup for your in-memory data. Data persistency is available only on the Premium tier.
You can access Azure Redis Cache from the Internet. This access from the public network is protected by using access keys, which is included in the Premium tier. You can also apply network filters based on a network address by deploying Redis Cache in an Azure Virtual Network. If you want to import or export data from your Azure Redis Cache, you can use RDB files stored in page blobs in an Azure Storage account. This enables you to migrate from other Redis Cache systems, even if they are in another cloud service, as long as they use compatible RDB files.
For those cases where you want to deploy a disaster recovery configuration, you can configure geo-replication by linking two instances of Azure Redis Cache in the Premium tier. Using this configuration, one cache is designated as the primary cache, while the other is designated as the secondary linked cache. All write operations are performed against the primary cache and replicated to the secondary cache, which becomes a read-only cache. You need to ensure that data persistence is disabled on both caches. You also need to ensure that the secondary cache is at the same service tier as the primary cache.
The size of the cache that you can create with Azure Redis Cache is limited to 53 GB for Basic and Standard tiers. If you need more capacity for the cache, you can configure a cluster with up to 10 nodes. This extends the maximum capacity of your cache up to 530GB. Creating a cluster is available only in the premium tier. The following procedure shows how to configure an Azure Redis Cache cluster using the Azure Portal:
Sign into the management portal (http://portal.azure.com).
Click on Create A Resource on the upper-left corner of the portal. On the Azure Marketplace, select Databases and then select Redis Cache.
On the New Redis Cache blade, you need to provide the information needed for creating the new cache.
In the DNS name provide a name for the cache. This name must be unique across Azure.
In the Subscription field, select the subscription where you will create the cache.
In the Resource Group field, select if you want to create a new resource group or use an existing one.
Select the Location for the cache.
Select the Pricing tier. Since we want to configure a cache cluster, you need to select a Premium pricing tier (see Figure 2-22). When you select a Premium pricing tier, Redis Cluster, Redis data persistence and Virtual Network options will be enabled.
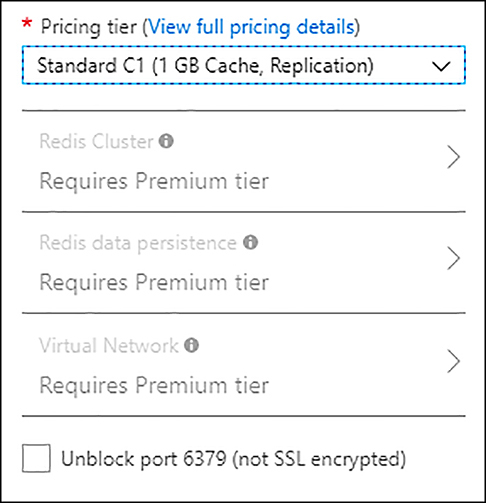
FIGURE 2-22 Selecting pricing tier
Select Redis Cluster. If this option is disabled, ensure that you selected a Premium pricing tier.
On the Redis Cluster blade, in the Clustering section, select Enabled. Once you enable this option, it can’t be changed after you create the cache.
On the Redis Cluster blade, in the Shard count section, select the number of nodes or shards that you want to assign to your cluster. You can modify the number of shards later if you need.
Click on Create.
Azure Table Storage
Based on Azure Storage Accounts, Azure Table Storage is a NoSQL service that allows you to store key-value data in the cloud. Since this service allows you to use a schemaless design, you can easily adapt your entities as the application evolves. The number of tables and entities stored in the table depends only on the available space and the limits on the Azure Storage account that you use.
You can access a table from inside or outside Azure applications. All access to the data is protected through authenticated calls. Since it’s a NoSQL service, it is ideal to store structured and non-relational data. This type of data is typically used by web scale applications, address books applications, device information applications, or any other type of application that requires you to store metadata. You can access data using the OData protocol or LINQ queries when using WCF Data Service .NET libraries.
Azure Table Storage uses a structure like the one used in an Azure Storage Account (see Figure 2-23).
)
FIGURE 2-23 Azure Table Storage structure
When you need to work with an Azure Table, you need to understand some concepts:
URL This will be the entry point for your Azure Table. The URL has the form http://<storage account name>.table.core.windows.net/<table name>.
Account This is the Azure Storage account that hosts your Azure Table.
Table This is where you store your entities. Since entities don’t have a defined schema, you can store different types of entities in the same table.
Entity An entity is a group of properties. Each entity can be up to 1 MB in size.
Properties An entity can have up to 255 properties. A property is each of the key-value pairs that store information. Azure Tables need three properties: PartitionKey, RowKey, and Timestamp, for correctly managing the entities for you. These three properties are included in the limit of 255 properties per entity, which means that you can have up to 252 custom properties. PartitionKey and RowKey conform to a clustered index for all entities in the table. You cannot create any additional index.
You can create an Azure Table in any General-Purpose Azure Storage account. Once you create the storage account, you can create a new table in the Table Service section, you only need to provide the name for your table. Once you have created your table, you can access it using the OData protocol. If you need to manually explore the data stored your table, you can also use Azure Storage Explorer (https://azure.microsoft.com/en-us/features/storage-explorer/).
Since Azure Tables is based on an Azure Storage account, it also shares all enterprise-level capabilities for replication and availability. If you still find that Azure Table doesn’t fit your needs, you can also opt for Cosmos DB Tables. We will review Cosmos DB in the last skill section of this chapter.
Azure Data Lake Store
Based on the Hadoop Distributed File System (HDFS), Azure Data Lake Store is the storage solution for Big Data applications. It can be integrated natively with any Hadoop solution that supports a WebHDFS-compatible REST API, like Azure HDInsight or Azure Data Lake Analysis.
Azure Data Lake Store provides storage with no limit on the account size, the file size, or the amount of data that can be stored. While Azure Data Lake Store doesn’t impose any limit for storage it still performs multiples copies of your data for ensuring durability of stored data. Azure Data Lake Store doesn’t impose any limit on the duration of time that the data can be stored in the account.
Data stored in an Azure Data Lake Store account doesn’t have to comply with any specific format. There is no need, from the point of view of the storage system, to make any kind of transformation for storing data in the data lake. It is the responsibility of the application that consumes the data lake to apply any transformation that may be needed for its correct function. You can create a hierarchy of folders and files inside the data lake for managing your data.
Azure Data Lake Store is the data storage solution for Big Data applications. This means that the access to the data needs to be very fast. When you store a file in a data lake, Azure divides the file into several parts and spreads each part across several storage servers, improving the read throughput of the file.
You can access data stored in a data lake using a WebHDFS compatible REST API, or by using AzureDataLakeFilesystem (adl://). This new filesystem offers further performance optimizations compared with traditional WebHDFS API. Applications and services in Hadoop environments can take advantage of this filesystem.
Some of the Azure services that you can integrate with Azure Data Lake Store are:
Azure Data Lake Analysis
Azure HDInsight
Azure Active Directory, for controlling the access to the data lakes
Azure Event Hub
Azure Data Factory
Third-party applications using Azure Data Lake Store .NET SDK
Azure SQL Data Warehouse
Azure provides several mechanisms for managing security, depending on the scope of the security. Azure Active Directory provides needed authentication mechanisms for accessing a data lake. Thanks to this integration, you have a centralized point for managing identity and authentication. Azure Active Directory provides some mechanism that directly benefits Azure Data Lake Store, like multi-factor authentication, authentication through OAuth or OpenID standard protocols, or federation with enterprise directories and cloud identity providers.
Once the user has been authenticated, you need to provide access to the resource. The authorization process is managed by two different mechanisms, depending on the scope of authorization:
Role-based access control Provides authorization control at the account level. At this level you can grant privileges on the operations that a user can make at the account level. Depending on the role, this might also grant access to the data level.
POSIX ACLs This is like Unix/Linux privileges and controls the access of user at the data level. There are three different privileges: read (r), write (w), and execute (x). You can grant privileges for users or security groups. As a best practice, you should always create security groups, add users to the security group, and grant privileges to the security group.
You can also control network access security and data protection. You can control which IP or range of IPs can access your data lake. Azure Data Lake Store provides data protection for in-transit data, by using TLS encryption, for stored data, and by optionally encrypting your data. If you opt for encrypting your data, Azure Data Lake Store automatically encrypts for you the data prior to being stored, and automatically decrypts the data when you want to read it. Data is encrypted using Master Encrypt Keys (MKEs). You can allow Data Lake Store to manage MKEs for you, or you can integrate Data Lake Store with Azure Key Vault for managing MKEs on your own. You can only select the type of encryption while you are creating the Data Lake Store account. Encryption is enabled by default. The following procedure shows how to create a Data Lake Store connected to an existing Azure Key Vault:
Sign into the management portal (http://portal.azure.com).
Click on Create A Resource on the upper-left corner of the portal. On the Azure Marketplace, select Storage and then select Data Lake Store.
On the New Data Lake Store blade, provide information for Data Lake’s name, subscription, resource group, and location. The name for the data lake needs to be lowercase and unique across Azure.
On the pricing package, select the option that better fits your need. Not all options are available for all locations.
Select Encryption Settings for opening the blade.
On the Encryption Type dropdown select Use Keys From Your Own Key Vault. Remember that you cannot change the encryption type once you create the Data Lake Store.
When you select Use keys From Your Own Key Vault option, two additional options will appear (see Figure 2-24) for configuring the key vault and the key you will use for encrypting the data in your Data Lake.
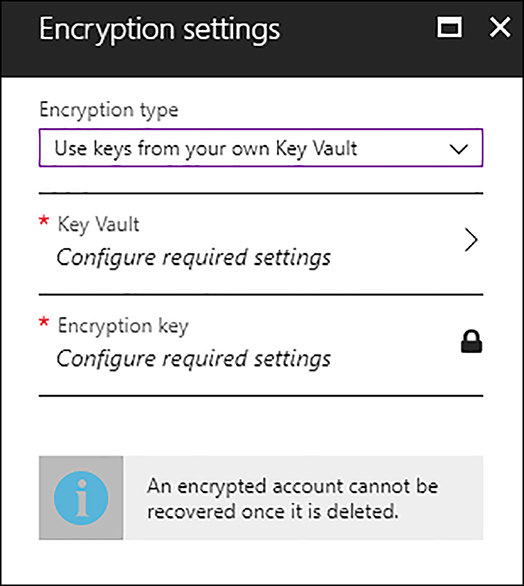
FIGURE 2-24 Encryption settings
Select Key Vault for selecting an existing key vault. If you did not create a key vault previously, you can create a new one here. Select the key vault that has the keys encryption for the Data Lake.
Select the Encryption key to select the key that will be used for encrypting data on your Data Lake. If you did not previously create an encryption key, you can do it here by selecting Create A New Key.
Once you have configured encryption settings, click OK on the Encryption Settings blade and click on Create On The New Data Lake Store Blade.
Azure Search
You can easily add search capabilities to your application by using the features provided by Azure Search service. This is a cloud solution that provides developers an API for consuming advanced search capabilities on their web, mobile, or enterprise applications. Azure Search services provides following features:
Full text search and text analysis Your application sends queries to the engine using a supported syntax. In the simplest query syntax, Azure Search supports logical operators, phrase search operators, suffix operators, and precedence operators. The Lucene query syntax extends the simple query syntax with fuzzy search, term boosting, and regular expressions.
Data integration As long as you provide the information using a JSON data structure, you can feed Azure Search with data from any kind of data source. You can also take advantages from indexers that Azure provides to you for pulling information from Azure Cosmos DB, Azure SQL Database, or Azure Blob Storage.
Linguistics analysis Azure Search provides you with language and lexical analyzers that enable you to perform searches based on phonetics matching, regular expressions, verb tenses, genders, irregular plural nouns, and more.
Geo-search Based on the proximity to the user, you can provide the user with the search results nearest to a physical location.
User experience features This is like search suggestions, faceted navigations, filters, hit highlighting, sorting, or paging.
Relevance By using scoring profiles you can model the relevance of certain items based on different criteria. This way, you can provide newer or discounted products higher scores that makes them to appear earlier in the results.
Monitoring and reporting This feature provides insights about what users type when they do their searches. There are other interesting metrics that are also collected, like queries per second, latency, or throttling that helps you to monitor and decide if you need to scale the service.
Tools for prototyping and inspection Azure Portal provides you with two important tools: Import Data Wizard and search explorer. The Import Data Wizard helps you design and configure indexes. The search explorer tool allows you to test your queries and refine scoring profiles before you make the final change in your code.
Infrastructure Depending on the pricing tier, Azure Search provides high availability and scalability.
Azure Search is offered in three different pricing tiers, Free, Basic and Standard. Standard tiers offer four additional configuration sets. Free tier doesn’t have any SLA associated. For Basic and Standard tiers, the SLA depends on the resource configuration you make. Once you have configured the service, you cannot change to a higher pricing tier. If you need to upgrade, you need to create a new search service at the new desired tier and reload your indexes.
When you configure the resources in a pricing tier, you need to know about two different concepts:
Partitions This is where the Search service stores those indexes that you create. It provides storage and I/Os for read/write operations. If your application needs more performance on the searching service, you may need to configure more partitions.
Replicas These are copies of the indexes used for load balancing. Each replica stores a single copy of an index. If you need high availability, you need to create at least two replicas for read operations HA and three replicas for read/write operations HA.
Capacity for the Search services is billed in search units (SU), where a search unit is a partition or replica. This way, you can use following formula for calculating your billing: Replica x Partitions = SU. Cost per SU depends on the pricing tier.
Time Series Insights
This service helps you with analyzing data that is based on time series like the one that comes from IoT devices or any other time-based records. You can easily recognize this type of data because it usually represents values that are bound to time. For example, you can have an IoT device that measures the temperature of a room. It may send the temperature measurement every five minutes. It is quite rare that you need to modify a time-based record, because the information comes from the evolution of the measure, the temperature in our example, during a period of time.
Time Series Insights is fully integrated with Azure IoT Hub and Azure Event Hub. Once you connect the service with one of the hub services, Time Series Insights parses the JSON data that comes from the hub and joins metadata with telemetry in a columnar store. Time Series Insight also creates needed indexes for you.
You don’t need to worry about providing a storage configuration for Time Series, since it’s automatically managed by the services. Data is stored in memory and SSD for best performance, so depending on your configuration, you can maintain data in the SSD storage for up to 400 days.
One of the big benefits of using Time Series Insight is that you don’t need to create complex graphs or integrate with other services for visualizing and analyzing the data. Time Series Insight (TSI) provides you with a graphical interface, called TSI Explorer, that allows you to visualize your data as it’s loaded in TSI, near in real-time. You can also perform queries on your data, using the query service provided by TSI. You can use this query service in TSI Explorer or use the provided REST Query API.
The key point with TSI is to work with values that change over time. Its internal database has been designed with time series data in mind. The value of this type of data comes from the evolution of the metric during the time. You can analyze this evolution using patterns and perspective views to perform root-cause analysis. These tools are present in TSI Explorer. You can also connect TSI with Azure Stream Analytics to monitor and set alerts based on these patterns that detects anomalies.
Relating information from different data sources is also another key value for this type of analysis. You can join and correlate information that comes from different data sources and locations while viewing all of this data together.
When you configure your Time Series Insight environment, you need to understand how works storage and which is the data retention time. You configure data retention time in days. You need to configure what should be the priority for TSI when the system reaches the data retention time or storage limits. There are two modes of operation:
Purge old data The objective for this mode is to keep the services running, discarding any old data.
Purge ingress In this mode, the priority is data history and data retention. Data ingress is paused if the storage capacity of the environment is hit.
Time Series Insight offers two different SKUs: S1 and S2. Storage and ingress capacity depends on the SKU you select. You should select carefully the SKU since you cannot switch between tiers once you deploy your environment. You can configure for both SKUs up to 10 units in a single environment. When you are planning your capacity needs, you should calculate total ingress that you may need on a per-month basis. Then, calculate your ingress needs per-minute. You use a per-month calculation for selecting the correct event size allocation. You use per-minute calculations for selecting the correct events count per-minute allocation. If you have a spike in your data ingress that lasts less than 24 hours, Time Series Insight provides you with a double capacity in the ingress ration without you experiencing any latency. The following procedure shows how to adjust capacity and data time retention in an existing Time Series Environment:
Sign into the management portal (http://portal.azure.com).
Select All Services at the upper-left corner of the portal. In the All Services blade, type Time series in the filter text box, and select Time Series Insight environments.
Select the name of the environment that you want to configure.
In the Time Series Insights environment, select Configure in the Settings section.
In the Configure blade, move the Capacity slider to the desired new capacity. This action has costs impacts.
In the Configure blade, adjust the data retention time (in days).
Check I Have Reviewed The Documentation Prior To Making Any Changes To The Environment, And I Am Aware Of The Potential Risk Of Data Loss, and click Save.
Design pipelines for managing recurring jobs
As discussed in skill 2.2, the Azure Data Factory allows you to automate or orchestrate the data movement between different elements in your solution. Those automating operations are defined inside Data Factory as activities, and a group of one or more activities composes a pipeline. One of the objectives of creating pipelines is performing the same task several times, so you should be able to run a pipeline automatically.
You can start the execution of a pipeline using two different methods: manually (also known as on-demand) or scheduled. The scheduled execution of a pipeline is governed by a trigger. Triggers are objects that define how and when a single or group of pipelines should be executed. This means that a single trigger can run multiples pipelines, and multiples triggers can run a single pipeline. There are two different types of triggers:
Schedule The pipeline is invoked based on a clock schedule. There is a many-to-many relationship between scheduled triggers and pipelines.
Tumbling window You define a periodic interval specifying a start time for pipeline execution. The state of the pipeline is retained. A tumbling window trigger can only reference a single pipeline.
Although both types of triggers run at scheduled intervals, there are some important differences between them:
Tumbling window triggers can be scheduled for windows in the past. This is useful for backfilling scenarios.
Tumbling window triggers are 100% reliable.
You can retry failed pipelines using tumbling window triggers.
You can configure concurrency options with tumbling window triggers. The concurrency controls the number of simultaneous rungs that can be fired for windows that are ready to be executed. This is meaningful on back fill scenarios. Imagine that you configure today a trigger and set the startTime for yesterday, the frequency for hours, and an interval to one. This will create 24 execution windows for your pipeline. If you configure a concurrency of four, then the first four windows will be executed in parallel, then the next four, and so on, until the trigger runs out of ready windows.
Tumbling window triggers can use WindowStart and WindowEnd system variables. You can use these variables as parameters in your pipeline definition.
The following procedure shows how to create a tumbling window trigger:
Sign into the management portal (http://portal.azure.com).
Select All Services at the upper-left corner in the window. In the All Services blade, type data factory in the filter text box and select Data Factories.
Select the name of the data factory that you want to configure.
In the Quick links section, select Author & Monitor (see Figure 2-25).
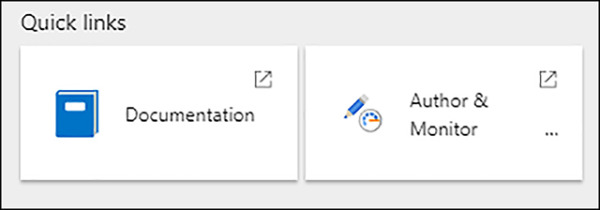
FIGURE 2-25 Quick links
In the Azure Data Factory authoring tool, select the Author button on the left margin (see Figure 2-26) to open the Authoring blade.
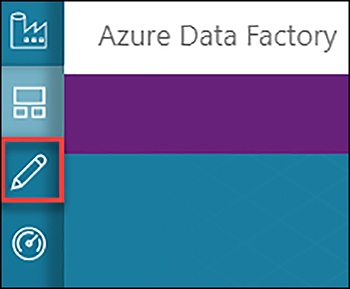
FIGURE 2-26 Azure Data Factory authoring tool menu
In the Factory Resources pane, look for the pipeline that you want to configure and select its name. This will open the pipeline editor.
In the pipeline editor select Trigger and then on New/Edit. This will open the Add Triggers blade.
In the Choose Trigger dropdown, select New.
In the New Trigger blade, fill the properties for the new trigger. In the Type selector, select Tumbling Window.
Select the start date. Since this is a tumbling window trigger, you can set this value in the past.
In the Recurrence section, select Hourly and keep every value set to one. This will execute the pipeline every hour starting at the start date you defined in step 10.
Keep No End selected for the End field. You can optionally set an end time for this trigger.
You can set a delay for starting the execution of the pipeline. This delay applies to every pipeline run.
Set the max concurrency for back filling pipelines.
Configure the Retry Policy. Count parameter controls the number of times that the trigger tries to run a pipeline before it’s marked as Failed. The Interval In Seconds option sets the time that the trigger waits between each retry.
Click on Next.
If your pipeline has any parameters, you need to configure them in this blade. Configure your pipeline parameters and click on Finish. You need to publish the pipeline for the trigger being able to run the pipeline.
)
)
)
)
In this section we reviewed some of the services that Azure offers for NoSQL storage. Although all of the options that we have reviewed are prepared for production environments and have enterprise-level capabilities, some of them may lack some features that you may need. In the next skill section we will review more advance features available through Cosmos DB, which is a NoSQL storage.