Service Fabric on Linux
- By Haishi Bai
- 8/24/2018
- Service Fabric Hello, World! on Linux
- Using Communication Listeners
- Other Service Types and Frameworks
- Using Yeoman
In this sample chapter from Programming Microsoft Azure Service Fabric, 2nd Edition, learn how to set up a development environment on Linux, use Java to write a simple Service Fabric application, and more.
Service Fabric running on Linux may come as a surprise. Why would Microsoft invest in non-Windows platforms? The reality, however, is that Service Fabric on Linux resonates with the openness of Azure strategy. Azure has never been just for Microsoft technologies. It’s an inclusive platform that welcomes all types of workloads on all technical stacks. In fact, a huge portion of Azure compute power resides on Linux. The percentage of Linux VMs on Azure was 33% in 2016 and 40% in 2017, and it continues to increase.
As a microservices platform, Service Fabric must embrace not only Windows-based workloads, but also Linux-based workloads. In the past two years, the Service Fabric team has built up native Linux support with Java tooling. This chapter introduces the Linux development experiences using the Service Fabric programming model. Chapter 13 and Chapter 14 focus on containers and container orchestrations.
 NOTE
NOTE
At the time of this writing, Service Fabric on Linux has just recently become generally available. Tooling experiences and product behaviors are subject to change. Please visit this book’s companion GitHub repository for updated samples.
Service Fabric Hello, World! on Linux
The Service Fabric team has chosen Java as its primary programming language on Linux. In this section, you’ll learn how to set up a development environment on Linux and use Java to write a simple Service Fabric application.
Setting Up Your Linux Development Environment
Follow these steps to set up your Linux development environment. (These instructions are based on Ubuntu 16.04.)
To install the Service Fabric runtime, Service Fabric common SDK, and a sfctl CLI, use the following script:
sudo curl -s https://raw.githubusercontent.com/Azure/service-fabric-scripts-and-templates/master/scripts/SetupServiceFabric/SetupServiceFabric.sh | sudo bashUse this script to set up a local cluster:
sudo /opt/microsoft/sdk/servicefabric/common/clustersetup/devclustersetup.sh
After the cluster has been configured, open a web browser and navigate to http://localhost:19080/Explorer. The Service Fabric Explorer should open. Or, if you want to try out sfctl, you can use the following command to obtain a list of node names:
sfctl cluster select –endpoint http://localhost:19080
sfct node list | grep name
Service Fabric uses Yeoman to scaffold Service Fabric applications. Yeoman is an open-source tool originally designed for this task. Use the following commands to install and configure Yeoman with Service Fabric application generators:
sudo apt-get install npm
sudo apt install nodejs-legacy
sudo npm install -g yo
sudo npm install -g generator-azuresfcontainer
sudo npm install -g generator-azuresfguest
If you plan to build Service Fabric services using Java, use the following commands to install JDK 1.8 and Gradle:
sudo apt-get install openjdk-8-jdk-headless
sudo apt-get install gradle
For the IDE, Service Fabric chose Eclipse for Java development. To install Eclipse, download the package from www.eclipse.org/downloads/eclipse-packages (this book uses the Oxygen.1 version), extract all files from the package, and launch eclipse-inst.
Service Fabric provides an Eclipse plug-in to facilitate application creation. After you install Eclipse, launch it, open the Help menu, and choose Install New Software.
In the Work With box, type http://dl.microsoft.com/eclipse. Then click the Add button.
Select the ServiceFabric plug-in. Then follow the wizard to install the plug-in.
NOTE
If you want to enable the desktop UI on your Azure Ubuntu VM, use the following commands (tested on Ubuntu 16.04):
sudo apt-get install xrdp
sudo apt-get update
sudo apt-get install xfce4
echo xfce4-session >~/.xsession
sudo service xrdp restart
Then configure networking on the VM to allow inbound RDP connections through port 3389. After that, you should be able to connect to your Ubuntu desktop using RDP.
Hello, World! Again
Now it’s time to send greetings to a brand-new world. In the following exercise, you’ll create a new Service Fabric stateless service using Eclipse. Follow these steps:
In Eclipse, open the File menu, choose New, and select Other.
Expand the Service Fabric folder, select Service Fabric Project, and click Next. (See Figure 12-1.)
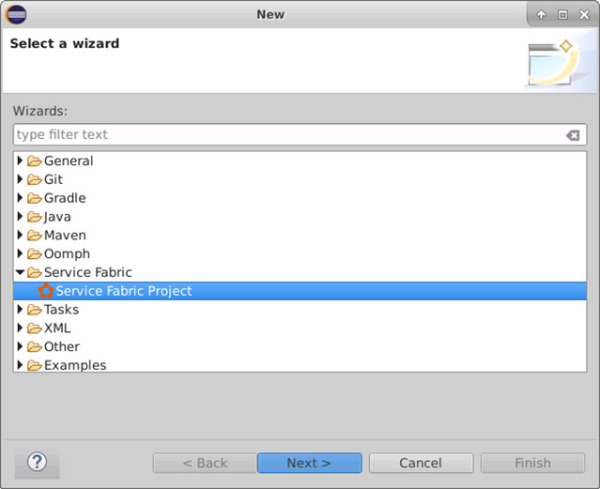
FIGURE 12-1 The Eclipse New Project wizard.
In the next screen, type HelloWorldLinux in the Project Name box and click Next.
In the Add Service screen, select the Stateless Service template, type HelloWorldService in the Service Name box, and click Finish to add the service. (See Figure 12-2.)
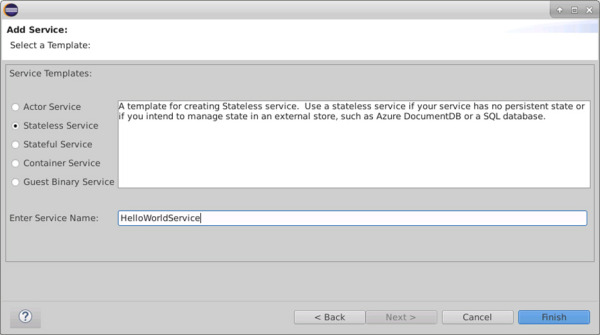
FIGURE 12-2 Add a service.
When the wizard prompts you to open the Service Fabric perspective, click Open Perspective.
After the application is created, poke around the package tree to familiarize yourself with the package structure.
Fortunately, the Java project is similar to a C# project. You can see how instance listeners are created, how the runAsync method is implemented in HelloWorldServiceService.java, and how the service is registered in HelloWorldServiceServiceHost.java. (See Figure 12-3.)
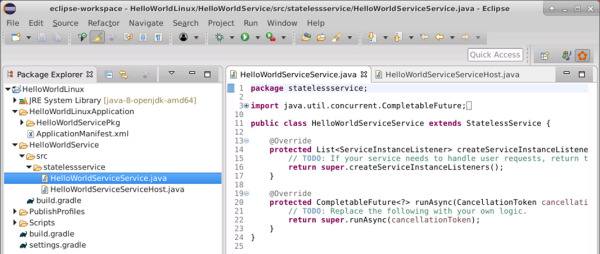
FIGURE 12-3 Java package structure.
In Package Explorer, right-click HelloWorldLinux, select Service Fabric, and choose Deploy Application to build and deploy the application. After the application is deployed, you should see your service instance running through the Service Fabric Explorer.
NOTEProvisioning a Service Fabric cluster consumes about 22 GB of your system drive. If you are running low on disk space, you may want to move the cluster to a different volume. Here’s how:
cd /opt/microsoft/sdk/servicefabric/common/clustersetup
sudo ./devclustercleanup.sh
sudo rm -rf /home/sfuser/sfdevcluster
sudo ./devclustersetup.sh --clusterdataroot=/some/other/volume
Open HelloWorldService\src\statelessservice\HelloWorldServiceService.java and examine the stateless service implementation. The scaffolded implementation isn’t exciting; indeed, it doesn’t do anything:
protected CompletableFuture<?> runAsync(CancellationToken cancellationToken) {
        return super.runAsync(cancellationToken);
}
In a moment, you’ll modify the runAsync method to make it behave in the same way as the default C# stateless service and maintain an incrementing local counter. You’ll also add a FileHandler to record log entries into files under the services’ log folder. First, though, you’ll need to import the following namespaces:
import java.util.logging.FileHandler;
import java.util.logging.SimpleFormatter;
Issue the following command to add a logger as a static member of the HelloWorldServiceService class:
private static final Logger logger =
    Logger.getLogger(HelloWorldServiceService.class.getName());
Modify the runAsync method as shown in the following code:
@Override
protected CompletableFuture<?> runAsync(CancellationToken cancellationToken) {
        try
        {
                String logPath = super.getServiceContext()
                    .getCodePackageActivationContext().getLogDirectory();
                FileHandler handler = new FileHandler(logPath
                    + "/mysrv-log.%u.%g.txt", 1024000, 10, true);
                handler.setFormatter(new SimpleFormatter());
                handler.setLevel(Level.ALL);
                logger.addHandler(handler);
        } catch (Exception exp) {
                logger.log(Level.SEVERE, null, exp);
        }
        return CompletableFuture.runAsync(() -> {
                try
                {
                        int iteration = 0;
                        while (!cancellationToken.isCancelled()) {
                                logger.log(Level.INFO, "Working-" + iteration++);
                                Thread.sleep(1000);
                        }
                } catch (Exception exp) {
                        logger.log(Level.SEVERE, null, exp);
                }
        });
}
Note a couple of things in the preceding code:
You can use the getServiceContext() method to obtain the service context, through which you can navigate an object tree that is very similar to the .NET object tree to obtain contextual information—for example to obtain the service’s log directory using the object model.
The runAsync method is supposed to return a java.util.concurrent.CompletableFuture<T> instance.
Build and deploy the application to your local cluster.
Locate the log path of your service instance on the hosting node. You’ll find generated log files under the services log folder.
)
)
)
)
)
)