Configure networking
- By Andrew Bettany and Andrew Warren
- 7/5/2018
- Skill 4.1: Configure IP settings
- Skill 4.2: Configure network settings
- Skill 4.3: Configure and maintain network security
- Thought experiments
- Thought experiment answers
- Chapter summary
Skill 4.3: Configure and maintain network security
A computer that is running Windows 10 is more likely to face threats that originate from the network than from anywhere else. This is because attacks from the network can target a large number of computers and malicious users perform them remotely, whereas other forms of attacks require physical access to the computer. In this Skill, you will learn about common network-related security threats and the steps that you can take to mitigate them.
Windows Defender Security Center
Windows 10 1703 introduces the Windows Defender Security Center. This Microsoft Store app consolidates a number of network-related security components:
Virus & threat protection
Device performance & health
Firewall & network protection
App & browser control
Family options
To access Windows Firewall settings, open Windows Defender Security Center, and on the home tab, shown in Figure 4-8, click Firewall & network protection.
)
FIGURE 4-8 Windows Defender Security Center
On the Firewall & network protection page, shown in Figure 4-9, you can view the current Windows Firewall status and access links to enable you to configure firewall behavior.
)
FIGURE 4-9 Firewall settings
Configure Windows Firewall
Windows Firewall is a software solution that comes with Windows 10 that creates a virtual barrier between a computer and the network to which it is connected for the purpose of protecting the computer from unwanted incoming traffic and protecting the network from unwanted outgoing traffic. The firewall allows specific types of data to enter and exit the computer and blocks others; settings are configured by default (but they can be changed). This type of protection is called filtering. The filters are generally based on IP addresses, ports, and protocols.
IP addresses are assigned to every computer and network resource connected directly to the network. The firewall can block or allow traffic based on an IP address of a resource (or a scope of addresses).
Port numbers identify the application that is running on the computer. For example, port 21 is associated with the File Transfer Protocol (FTP), port 25 is associated with Simple Mail Transfer Protocol (SMTP), port 53 is associated with DNS, port 80 is associated with Hypertext Transfer Protocol (HTTP), and port 443 is associated with HTTPS (HTTP Secure).
Protocol Protocols are used to define the type of packet being sent or received. Common protocols are TCP, Telnet, FTP, HTTP, Post Office Protocol 3 (POP3), Internet Message Access Protocol (IMAP), HTTPS, and User Datagram Protocol (UDP). (You should be familiar with the most common protocols before taking the exam.)
Although there are many rules already configured for the firewall, you can create your own inbound and outbound rules based on ports, protocols, programs, and more to configure the firewall to suit your exact needs. You’ll learn how later in this chapter.
Monitor the Windows Firewall
You can monitor the state of the Windows Firewall from Windows Defender Security Center. It’s easy to tell from here if the firewall is on or off, and which is the active network. However, for more information, including how you are notified when the firewall takes action, open Control Panel, click System and Security, and then click Windows Firewall, as shown in Figure 4-10.
)
FIGURE 4-10 Viewing Windows Firewall settings
To make basic changes to the state of the firewall, in the left pane click Turn Windows Firewall On Or Off. From there you can change settings for both private and public networks. There are two options for each:
Turn On Windows Firewall (this is selected by default).
Block All Incoming Connections, Including Those In The List Of Allowed Apps.
Notify Me When Windows Firewall Blocks A New App (This is selected by default).
Turn Off Windows Firewall (not recommended).
What you’ll be most interested in as a network administrator, are the options available in the left pane. Specifically, you’ll use the Allow An App Or Feature Through Windows Firewall and Advanced Settings options. You’ll learn about the Advanced Settings in the next section, but here we discuss allowing an app through the firewall that is blocked by default.
Allow an app through the Windows Firewall
Some data generated with and by specific apps is already allowed to pass through the Windows Firewall. You can see which apps are allowed by clicking Allow An App Or Feature Through Windows Firewall in the left pane of the Windows Firewall window in Control Panel. As you scroll through the list, you’ll see many apps you recognize, including Bing Food & Drink, Games, Maps, Music, and Windows Media Player. See Figure 4-11. (Once you click Change Settings and give administrator approval, the Change Settings option will appear unavailable and the options in this list will be editable, as you see here.) You will also notice that some apps are not enabled by default, including Windows Media Player Network Sharing Service (Internet), Windows Remote Management, and Remote Shutdown.
)
FIGURE 4-11 Allowing an app through Windows Firewall
To allow an app through the firewall or stop one from getting through, select the check box under the appropriate network profile for which it should be configured. As shown in Figure 4-11, there are two options for each: Private and Public. If you don’t see the app you want to allow or block, click Allow Another App. You can then select the desired app from the Add An App dialog box.
Configure Windows Firewall with Advanced Security
Although you can configure a few options in the main Windows Firewall window, most configuration tasks are performed within Windows Firewall With Advanced Security. You can open this window by clicking Advanced Settings in the Windows Firewall window as shown in Figure 4-12.
)
FIGURE 4-12 Windows Firewall with Advanced Security
Once opened, there are several options and terms with which you need to be familiar.
In the left pane, your selection determines which items appear in the middle and right panes.
Inbound Rules Lists all configured inbound rules and enables you to double-click any item in the list and reconfigure it as desired. Some app rules are predefined and can’t be modified, although they can be disabled. Explore the other nodes as time allows. You can also right-click Inbound Rules in the left pane and create your own custom rule. Rule types include Program, Port, Predefined, and Custom. They are detailed later in this section.
Outbound Rules Offers the same options as Inbound Rules, but these apply to outgoing data. You can also right-click Outbound Rules in the left pane and create your own custom rule.
Connection Security Rules Connection security rules establish how computers must authenticate before any data can be sent. IP Security (IPsec) standards define how data is secured while it is in transit over a TCP/IP network, and you can require a connection use this type of authentication before computers can send data. You’ll learn more about connection security rules in the next section.
Monitoring Offers information about the active firewall status, state, and general settings for both the private and public profile types.
In the right pane, you’ll see the options that correspond to your selection in the left pane.
Import/Export/Restore/Diagnose/Repair Policies Enables you to manage the settings you’ve configured for your firewall. Polices use the WFW extension.
New Rules Enables you to start the applicable Rule Wizard to create a new rule. You can also do this from the Action menu.
Filter By Enables you to filter rules by Domain Profile, Private Profile, or Public Profile. You can also filter by state: Enabled or Disabled. Use this to narrow the rules listed to only those you want to view.
View Enables you to customize how and what you view in the middle pane of the Windows Firewall With Advanced Security window.
When you opt to create your own inbound or outbound rule, you can choose from four rule types. A wizard walks you through the process, and the process changes depending on the type of rule you want to create. The rules are as follows:
Program A program rule sets firewall behavior for a specific program you choose or for all programs that match the rule properties you set. You can’t control apps, but you can configure traditional EXE. Once you’ve selected the program for which to create the rule, you can allow the connection, allow only if the connection is secure and has been authenticated using IPsec, or block the connection. You can also choose the profiles to which the rule will be applied (domain, private, public) and name the rule.
Port A port rule sets firewall behavior for TCP and UDP port types and specifies which ports are allowed or blocked. You can apply the rule to all ports or only ports you specify. As with other rules, you can allow the connection, allow only if the connection is secured with IPsec, or block the connection. You can also choose the profiles to which the rule will be applied (domain, private, public) and name the rule.
Predefined Sets firewall behavior for a program or service that you select from a list of rules that are already defined by Windows.
Custom A rule you create from scratch, defining every aspect of the rule. Use this if the first three rule types don’t offer the kind of rule you need.
 EXAM TIP
You might encounter questions regarding how to create a rule on the exam. Therefore, you should spend a few minutes working through the wizard a few times, selecting different rule types each time to become familiar with the process.
With Windows Firewall With Advanced Security selected in the left pane and using the Overview section of the middle pane, click Windows Firewall Properties to see the dialog box shown in Figure 4-13. From there you can make changes to the firewall and the profiles, even if you aren’t connected to the type of network you want to configure.
)
FIGURE 4-13 Viewing the Windows Firewall properties
In Figure 4-13, the Domain Profile tab is selected. If you want to, you can configure the firewall to be turned off when connected to a domain network. Additionally, you can strengthen the settings for the Public profile and customize settings for the Private profile. Finally, you can customize IPsec defaults, exemptions, and tunnel authorization on the IPsec Settings tab. Make sure to explore all areas of this dialog box and research any terms you are not familiar with.
Configure connection security rules with IPsec
You can use IPsec to ensure confidentiality, integrity, and authentication in data transport across channels that are not secure. Though its original purpose was to secure traffic across public networks, many organizations have chosen to implement IPsec to address perceived weaknesses in their own private networks that might be susceptible to exploitation.
If you implement IPsec properly, it provides a private channel for sending and exchanging potentially sensitive or vulnerable data, whether it is email, FTP traffic, news feeds, partner and supply-chain data, medical records, or any other type of TCP/IP-based data. IPsec provides the following functionality:
Offers mutual authentication before and during communications.
Forces both parties to identify themselves during the communication process.
Enables confidentiality through IP traffic encryption and digital-packet authentication.
Exploring connection security rules
A connection security rule forces authentication between two peer computers before they can establish a connection and transmit secure information. Windows Firewall with Advanced Security uses IPsec to enforce the following configurable rules:
Isolation An isolation rule isolates computers by restricting connections based on credentials, such as domain membership or health status. Isolation rules allow you to implement an isolation strategy for servers or domains.
Authentication exemption You can use an authentication exemption to designate connections that do not require authentication. You can designate computers by a specific IP address, an IP address range, a subnet, or a predefined group such as a gateway.
Server-to-server This type of rule usually protects connections between servers. When you create the rule, you specify the network endpoints between which communications are protected. You then designate requirements and the authentication that you want to use.
Tunnel This rule allows you to protect connections between gateway computers. It is typically used when you are connecting across the Internet between two security gateways.
Custom There might be situations in which you cannot configure the authentication rules that you need by using the rules available in the New Connection Security Rule Wizard. However, you can use a custom rule to authenticate connections between two endpoints.
Firewall rules and connection security rules
Firewall rules allow traffic through a firewall, but do not secure that traffic. To secure traffic with IPsec, you can create connection security rules. However, when you create a connection security rule, this does not allow the traffic through the firewall. You must create a firewall rule to do this if the firewall’s default behavior does not allow traffic. Connection security rules do not apply to programs and services. They apply only between the computers that are the two endpoints.
EXAM TIP
Connection security rules specify how and when authentication occurs, but they do not allow those connections. To allow a connection, you must create an inbound or outbound rule. During the inbound or outbound rule creation, you choose the required conditions for the connection, including requiring that the connections have been authenticated by using IPsec. When you do, connections will be secured using the settings in the IPsec properties and rules in the Connection Security Rule node.
Configure authentication exceptions
When you configure a rule to allow traffic only when the connection between the communicating computers is secured using IPsec, you are creating an authenticated exception. You configure this option from the application Action page of the Rule Wizard when creating an inbound or outbound rule. When you choose the Allow The Connection If It Is Secure option on the Action page, you are configuring the rule to allow the connection using the settings in IPsec properties and rules in the Connection Security Rule node.
To create an inbound rule that applies to a single TCP port (Telnet, port 23) and create an authenticated exception for it, follow these steps:
In Windows Firewall With Advanced Security, select and then right-click Inbound Rules.
Click New Rule.
For the rule type, click Port, and then click Next.
On the Protocol And Ports page, leave TCP selected and in the Specific Local Ports box, type 23. Click Next.
For the action to take, select Allow The Connection If It Is Secure, and click Next.
To configure authorized users or authorized exceptions, select the applicable check box, click Add, and use the Select Users Or Groups dialog box to add the applicable entries.
Repeat step 6 for authorized computers and exceptions. Click Next.
Choose the profiles to which the rules should apply. Click Next. Name the rule. Click Finish.
Configure network discovery
By default, Network Discovery is enabled for private and domain networks and disabled for public ones. Network Discovery enables a computer to locate other computers on a network and allows computers on the network to see it as well. This is fine when the network is trusted, but it isn’t a good idea when the network is not. By having these settings and others already configured for the various network types, along with the applicable settings for ports and protocols, the network administrator does not have to configure every aspect of a connection manually. There is one caveat; even if Network Discovery is disabled, a Windows 10 computer can still access network resources if the user knows the names and locations of those resources (because they can’t be discovered by browsing).
It’s possible to make changes to how Network Discovery is configured. You do this from the Network And Sharing Center by following this procedure:
Open the Network And Sharing Center.
In the left pane, click Change Advanced Sharing Settings.
Click the down arrow, if applicable, beside the network type to change the settings: Private or Guest Or Public.
Make the desired change for Network Discovery Settings. Note the other options. See Figure 4-14.
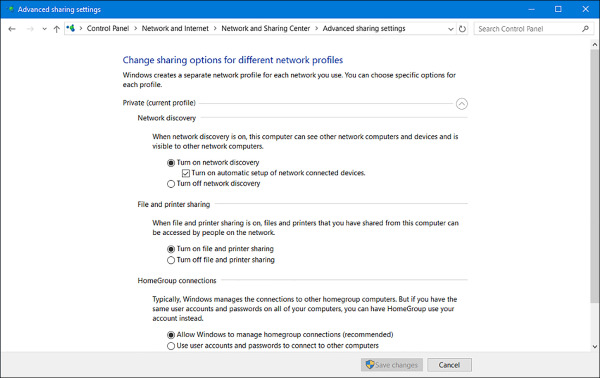
FIGURE 4-14 Advanced sharing settings
Click Save Changes.
)