Configure networking
- By Andrew Bettany and Andrew Warren
- 7/5/2018
- Skill 4.1: Configure IP settings
- Skill 4.2: Configure network settings
- Skill 4.3: Configure and maintain network security
- Thought experiments
- Thought experiment answers
- Chapter summary
In this sample chapter from Exam Ref 70-697 Configuring Windows Devices, 2nd Edition, explore the main networking components of Windows 10 and how to configure each of them.
It is important to understand the fundamentals of networking in Windows 10 to pass the 70-697, Configuring Windows Devices exam. Network connectivity is an almost universal assumption in typical Windows 10 operation, so understanding how Windows networking works will help you in many areas of the exam. This chapter will cover the basics of main networking components of Windows 10, along with how to configure each of them.
Skills in this chapter:
Skill 4.1: Configure IP settings
Skill 4.2: Configure network settings
Skill 4.3: Configure and maintain network security
Skill 4.1: Configure IP settings
The IP address is the most widely used point of contact for a Windows 10 computer that is connected to the network. A computer’s IP address uniquely identifies it on the local network segment, and it serves as the functional component for most of the ways that computers communicate on a network, including name resolution and file transfer.
Connect to a network
Networks are groups of computers and other resources. When connected, each resource that is connected (computer, network printer, server, or other host) must acquire, or have previously been assigned an exclusive address that will define it on that network. These addresses are unique, and you can’t have two hosts on the same network with the same address. This makes addressing a very important part of configuring and connecting to networks.
Understanding IP address requirements
Each host on a network must have a unique Internet Protocol (IP) address. This address, when it’s configured as an IPv4 address, is a 32-bit number that is styled as four sets of decimal numbers. For example: 192.168.4.20. Each host is also assigned a subnet mask, which determines which part of the IP address defines the network and which part defines the host. Together, the IP address and the subnet mask define the network within which a host can communicate. If the host requires communication outside of the local network segment, a gateway must be specified, which typically represents a network router that can provide network paths to other networks and the Internet. The IP address, subnet mask and default gateway together provide the full definition of IP connectivity for a network host. There are two ways to get an address to a resource: You can define it manually, or it can be assigned by a Dynamic Host Configuration Protocol (DHCP) server.
When an address can’t be assigned this way, Windows will assign its own IP address using a technology called Automatic Private IP Addressing (APIPA). APIPA addresses fall in the 169.254.x.x address range.
 EXAM TIP
Make sure to review the IP address ranges for Class A, B, and C to have an idea of how many networks and hosts each offers. Know their default subnet masks, too. Beyond that, know the private addresses available for local networks (192.x.x.x, 172.x.x.x, and 10.x.x.x for Class C, B, and A, respectively).
Understanding network terminology
Make sure that you are familiar with the following terms before continuing:
APIPA This is a link-local (IP) address that is assigned by Windows when no other addressing mechanism can be found. This enables the host to function on the local network segment. Routers do not forward packets from these kinds of addresses.
Default gateway This hardware or software device lets hosts connect to other networks. Often that network is the Internet, but it could also be another network segment in an enterprise domain.
DHCP This is a networking protocol that dynamically configures IP addresses for hosts on a network. A DHCP server assigns these addresses. These IP addresses are generally granted for a specified interval and must be renewed when the interval is up. If specific static addresses are required for clients, DHCP can be configured to allow reservations for those clients.
DHCP Scope A DHCP scope is a consecutive range of possible IP addresses that can be offered to hosts on a subnet (part of a network).
DNS Domain Name Service (DNS) is a service that enables users to type the name of the host to which they want to connect to instead of its IP address. A DNS server resolves the name.
IPv4 This is an IP address that consists of 32 bits, notated by four 8-bit octets. It has two parts: the network ID and the host ID. The network ID describes the network, and the host ID defines the specific device on it. IPv4 addresses can be Unicast, Broadcast, or Multicast.
Subnet mask This 32-bit number, notated by four 8-bit octets that consist of a set of 1s followed by a set of 0s, is used to define which part of the IPv4 address is the network ID and which part is the host ID. The 1s denote the network; the 0s denote the host. The default subnet masks are in the form 255.0.0.0 for Class A addresses, 255.255.0.0 for Class B addresses, and 255.255.255.0 for Class C addresses. Translated to binary, 255.0.0.0 looks like this: 11111111 00000000 00000000 00000000.
IPv6 The available IPv4 address combinations are dwindling, thus the need for a better option. IPv6 is that option. Instead of a 32-bit space, it’s a 128-bit space with 16-bit boundaries. This allows for many more addresses. An IPv6 address typically looks like this: 21DA:D3:0:2F3B:2AA:FF:FE28:9C5A.
Configuring IP settings
You can configure IP settings on a Windows 10 computer by accessing the Properties page for the network adapter. To open the Properties page, perform the following steps:
From the desktop, right-click the Start button, and then click Network Connections.
In Settings, click Change Adapter Options.
In the Network Connections window, shown in Figure 4-1, right-click the appropriate network adapter, and then click Properties.
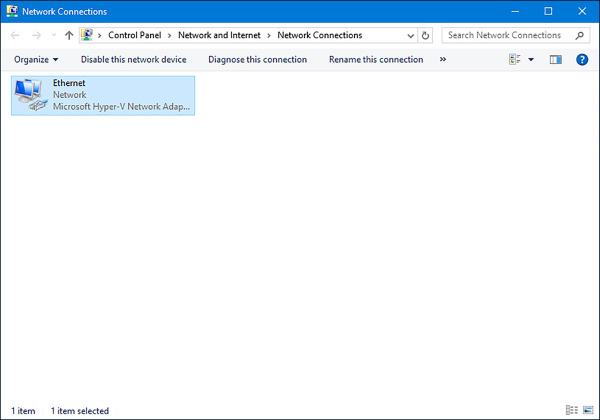
FIGURE 4-1 Configuring network connections
In the Ethernet Properties dialog box shown in Figure 4-2, select Internet Protocol Version 4 (TCP/IP4), and then click Properties.
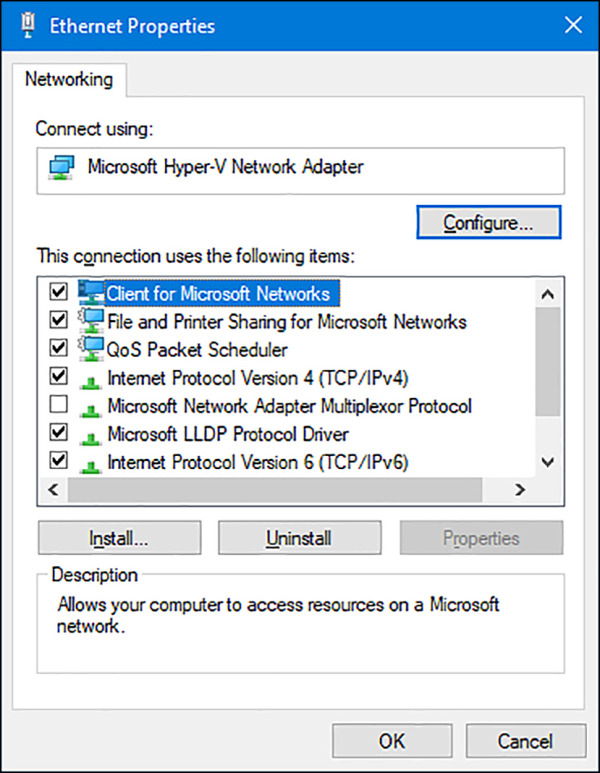
FIGURE 4-2 Configuring a network connection’s properties
In the Internet Protocol Version 4 Properties dialog box shown in Figure 4-3, select the appropriate configuration options and specify addresses, if necessary. You can choose to either obtain the IP address and DNS server addresses automatically (from a DHCP server), or specify the addresses manually. You must, at a minimum, supply an IP address and a subnet mask.
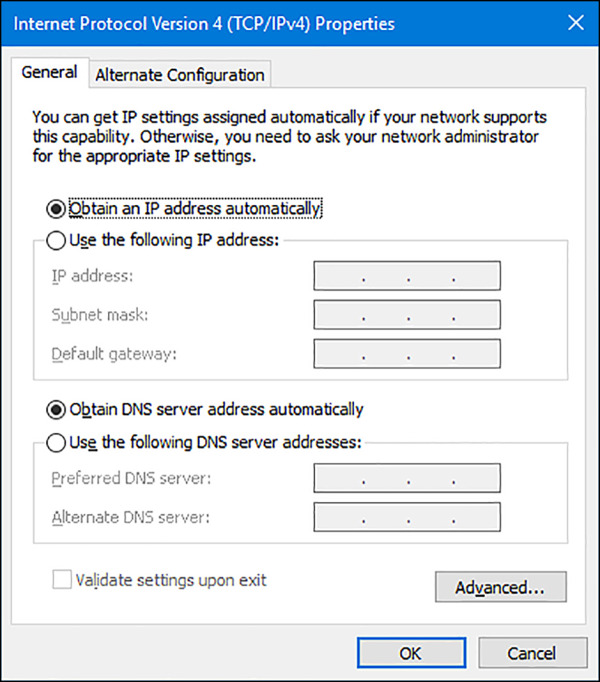
FIGURE 4-3 Configuring the TCP/IPv4 properties for a network adapter
)
)
)
EXAM TIP
You might be asked how to configure IPv4 or IPv6 addresses from the command line. The command to do this is Netsh. Make sure you understand the options associated with this command. You might be asked to select the proper command to apply a static address for a host, among other things. That command would look like this: netsh interface ipv4 set address ‘Ethernet’ static 192.168.5.12 255.255.255.0 192.168.1.10. If you want the address to come from a DHCP server, the command would look more like this: netsh interface ipv4 set address name=”Ethernet” source=dhcp.
Connecting to a network
The first time you connect to a local network, you are prompted to choose from one of these options:
No, Don’t Turn On Sharing Or Connect To Devices This option is intended for public networks and hot spots (libraries, coffee shops). The user’s computer can’t be seen or accessed by others, and the user can’t see other computers also accessing the network.
Yes, Turn On Sharing And Connect To Devices This option is intended for private, trusted networks (home, work) and homegroups. Computers sit behind a trusted router and do not connect to the Internet directly.
These two options do not appear when you connect to an Active Directory Domain Services domain. However, when they do appear and when you choose an option, settings are configured automatically for network discovery, file and printer sharing, the state of the firewall, apps that can accept incoming connections, and so on. (Computers configured as Private or Domain have network discovery enabled; Public networks do not.)
Resolving connectivity issues
When a host can’t reach a network, that host has connectivity issues. The issue might be isolated to only that device; perhaps the computer’s Ethernet cable has come unplugged or the computer’s wireless features have been disabled. Maybe there is an IP address conflict on the network and the user’s IP address needs to be released and renewed. Often, using the troubleshooting tools in the Network And Sharing Center can expose the problem and offer a solution. If the issue isn’t isolated though, you have larger problems. A network server, gateway, or other necessary resource might be down, a network segment or physical backbone might be damaged, or there could be an issue that is caused by the Internet service provider (ISP), cloud services, or other technologies that are out of your control.
NETWORK AND SHARING CENTER
The Network And Sharing Center enables you to view the status of your active networks. If there’s a problem, you can click Troubleshoot Problems to see if the Network And Sharing Center can resolve it. It can be resolved by releasing and renewing the IP address, resetting adapter settings, or uncovering a simple problem such as a disconnected Ethernet cable (which you can then reconnect).
If a problem exists, but can’t be resolved automatically, you can choose from a list of troubleshooting options that include: solving problems connecting to websites, accessing shared folders, finding computers or files in a homegroup, finding and fixing problems with wireless adapters, and troubleshooting incoming connections. When you select any option and start the troubleshooter, it generally finds the problem and performs the repair or prompts you to authorize the repair. It might also require you to do something first, like insert an ethernet cable into the ethernet port on the computer.
COMMAND-LINE TOOLS
When the Network And Sharing Center and the Action Center can’t help resolve a connectivity problem, it’s likely a more complex issue. Perhaps a domain’s (or network segment’s) gateway is offline or a router failed. Perhaps the DNS server isn’t available or has been incorrectly configured on the host, or the unique, corporate, IP address of the computer has been changed to an APIPA address because of a currently unresolved network issue.
When these kinds of problems exist, you can use command-line tools to resolve them. Here are some of the tools you can use:
Ping This tool verifies IP-level connectivity to another TCP/IP computer. To do this, it sends Internet Control Message Protocol (ICMP) Echo Request messages to the recipient. The receipt of these messages is displayed, along with round-trip times, if the connection is successful. Ping is the primary command used to troubleshoot connectivity, reachability, and name resolution.
Ipconfig and Ipconfig /all This displays all current TCP/IP network configuration values. It can also refresh DHCP and DNS settings. Used without the /all parameter, Ipconfig displays IPv4 and IPv6 addresses, the subnet mask, and the default gateway for all adapters installed on the host. Common parameters are /release, /renew, and /flushdns.
Tracert This tool determines the path taken to a destination and shows information about each hop a packet takes to get to where it’s going. A hop is a pass through a router. You can use this information to see where the transmission fails.
Netstat This displays a list of active TCP connections and the ports on which the computer is listening. It also displays Ethernet statistics, the IP routing table, and IPv4 and IPv6 statistics.
Netsh This enables you to make changes to the network configuration of the current computer at the command line.
Nslookup This tool displays information that you can use to diagnose problems with DNS.
Configure name resolution
Computers are represented by their unique IP address, and you can communicate with them using that address if you like. One way to communicate with an IP address is to do so at a command line. For instance, you can type something like ping 192.168.4.5 to troubleshoot connectivity to another host on a local area network segment. Communicating this way however, is cumbersome.
DNS enables users to type names instead of numbers; this process is called name resolution. DNS servers store information about the names and addresses of Internet computers, and the lists they maintain are distributed among thousands of DNS servers available on the Internet, which are placed all over the world. The name resolution request is forwarded to one of these servers. If the name can’t be resolved server, it’s passed to another server and another, until it is resolved.
In many cases, your DHCP server will provide DNS server addresses for your client computers to use for name resolution. This occurs if Obtain DNS Server Address Automatically is selected. You can also manually configure a host to use a specific DNS server in the connection’s Properties dialog box (shown in Figure 4-3). On a domain with a unique DNS server that the host is required to use, this is necessary. It might also be necessary in a virtual private network (VPN) or in a virtual machine.
Depending on the configuration, Windows 10 resolves host names by performing the following actions:
Checking whether the host name is the same as the local host name.
Searching the DNS resolver cache, which is populated from the local Hosts file.
Sending a DNS request to its configured DNS servers.
Troubleshooting name resolution
The primary tools for troubleshooting host name resolution are IPConfig and NSLookup, and their Windows PowerShell equivalents Get-NetIPAddress, Get-NetIPv4Protocol, and Resolve-dnsname.
If you cannot connect to a remote host, and if you suspect a name resolution problem, you can troubleshoot name resolution by using the following procedure:
Open an elevated command prompt, and then clear the DNS resolver cache by typing the following command:
IPConfig /flushdns
Or, you can use the Windows PowerShell cmdlet Clear-DnsClientCache.
Attempt to verify connectivity to a remote host by using its IP address. This helps you identify whether the issue is due to name resolution. You can use the Ping command or the Test-Connection Windows PowerShell cmdlet. If the Ping command succeeds with the IP address, but fails by the host name, the problem is with name resolution.
Attempt to verify connectivity to the remote host by its host name by using the fully-qualified domain name (FQDN) followed by a period. For example, type the following command at a Windows PowerShell command prompt:
Test-connection LON-cl1.adatum.com
You can also use the ping command.
If the test is successful, the problem is likely unrelated to name resolution.
If the test is unsuccessful, edit the C:\Windows\System32\Drivers\Etc\hosts.txt text file, and then add the appropriate entry to the end of the file. For example, add this line and then save the file:
172.16.0.51 LON-cl1.adatum.com
Perform the test-by-host-name procedure again. The name resolution should now be successful.
Examine the DNS resolver cache to verify that the name resolved correctly. To examine the DNS resolver cache, type the following command at a command prompt:
IPConfig /displaydns
You can also use the Windows PowerShell cmdlet Get-DnsClientCache.
Remove the entry that you added to the hosts file, and then clear the resolver cache once more. At the command prompt, type the following command, and then examine the contents of the filename.txt file to identify the failed stage in name resolution:
NSLookup.exe –d2 LON-cl1.adatum.com > filename.txt
The Windows PowerShell equivalent command is:
Resolve-dnsname lon-cl1.adatum.com > filename.txt
Configure network locations
The first time that you connect a computer to a network, you must select whether you trust the network. This sets appropriate firewall and security settings automatically. When you connect to networks in different locations, you can ensure that your computer is set to an appropriate security level at all times by choosing a network location.
Windows 10 uses network location awareness to uniquely identify networks to which a computer is connected. Network location awareness collects information from networks, including IP address and media access control (MAC) address data from important network components, like routers and gateways, to identify a specific network.
There are three network location types:
Domain networks These are workplace networks that attach to a domain. Use this option for any network that allows communication with a domain controller. Network discovery is on by default, and you cannot create or join a homegroup.
Private networks These are networks at home or work where you know and trust the people and devices on the network. When you select home or work (private) networks, this turns on network discovery. Computers on a home network can belong to a homegroup.
Guest or public networks These are networks in public places. This location keeps the computer from being visible to other computers. When you select the Public place network location, homegroup is not available and network discovery is turned off.
The Public networks location blocks certain programs and services from running, which protects a computer from unauthorized access. If you connect to a Public network and Windows Firewall is on, some programs or services might ask you to allow them to communicate through the firewall so that they can work properly.
To make changes to the network location, if that location is a homegroup, you can run the Homegroup Troubleshooter. This might never happen in a homegroup, but it’s worth noting that the Homegroup Troubleshooter is an option. If the location is a local network in a workgroup, you can make changes in the Settings app as follows:
In the Settings app, click Network & Internet.
On the Network & Internet page shown in Figure 4-4, click Ethernet, and then click the adapter for which you’d like to configure the network location (Ethernet, in this case).
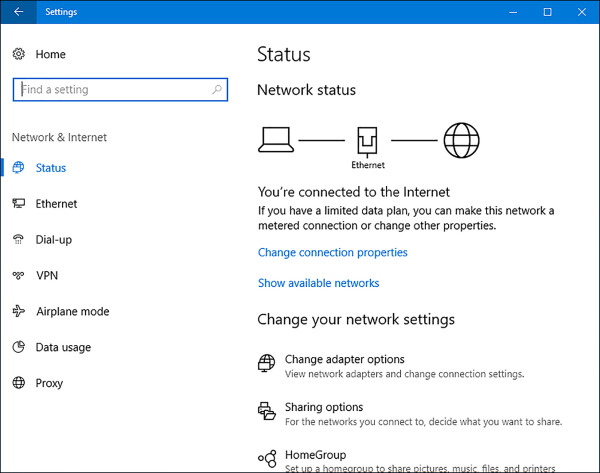
FIGURE 4-4 Viewing network status
On the Network page, under Make this PC discoverable heading, shown in Figure 4-5, change the toggle switch to Off (do not find devices, which is recommended for a public network location) or On (find devices, which is recommended for a private network location). When you choose Off, the network location profile is Public, and when you choose On, the network location profile is changed to Private. You can verify this change by clicking Sharing options on the Status tab.
)
)
FIGURE 4-5 Changing the network location profile