Configure networking
- By Andrew Bettany and Andrew Warren
- 7/5/2018
- Skill 4.1: Configure IP settings
- Skill 4.2: Configure network settings
- Skill 4.3: Configure and maintain network security
- Thought experiments
- Thought experiment answers
- Chapter summary
Skill 4.2: Configure network settings
There are many networking settings that you can configure. You can connect to wireless and broadband networks, and manage the list of wireless networks to which you’ve previously connected. You can configure location-aware printing to enable users to print to the desired local printer automatically. You can configure network adapters to reconfigure default settings and tweak performance.
Connect to a wireless network
An increasing number of devices use wireless connections as the primary method for accessing corporate intranets and the Internet. Additionally, many users have come to expect a wireless infrastructure in a corporate workplace. As a result, a good working knowledge of wireless connectivity is a requirement for today’s networking environment. In Windows 10, you can connect to a network from the network icon on the taskbar by following these steps:
From the Desktop, click the Network icon on the taskbar, as shown in Figure 4-6.
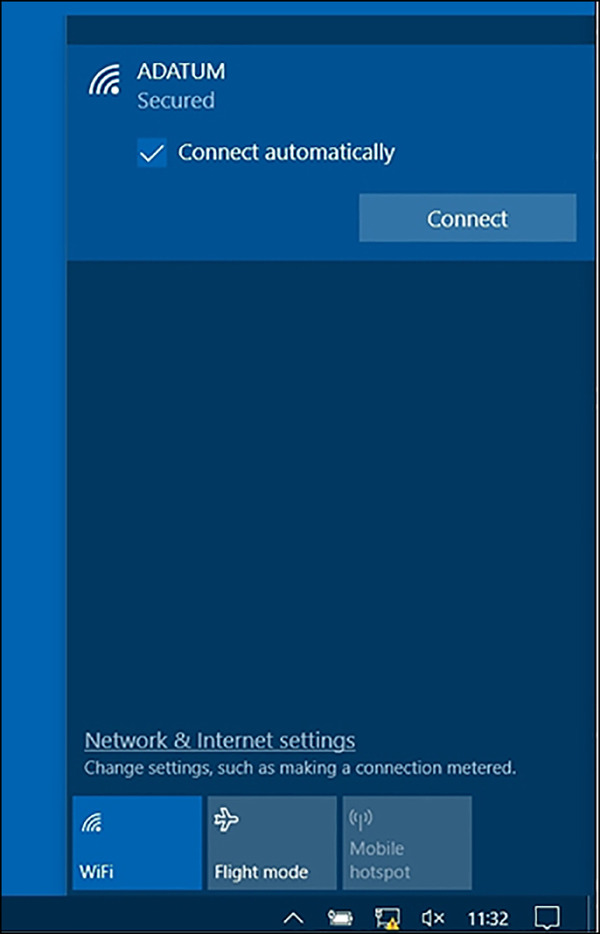
FIGURE 4-6 Connecting to a wireless network
Click the appropriate wireless network name in the list.
Optionally, select the Connect automatically check box. This option will save the network security key so you do not have to enter it each time you connect to the network.
Click Connect. If the network is secure, you will be asked to enter the network security key.
)
Manage preferred wireless networks
Windows 10 keeps track of all networks to which you connect and prioritizes them automatically. When you have more than one connection option, Windows 10 determines which type it will connect to in this order: Ethernet, Wi-Fi, and then mobile broadband. For example, if a Windows 10 computer has all three network types available, Ethernet will be its chosen first; otherwise, Wi-Fi is chosen. If both become unavailable, then broadband will be chosen (and will be chosen automatically if you’ve configured it to). When choosing from wireless networks to which you’ve connected in the past, when more than one of those is available at a given time, Windows 10 connects to the last one you used.
If you’re connected to a network automatically, but want to choose another, click it from the list of networks. You can access this list by clicking the Network icon in the taskbar’s system tray.
In Windows 10, you can manage preferred networks in one of two ways. First, you can use the Wi-Fi page in the Network Setting section of the Settings app:
Open the Settings app.
Click Network & Internet, and then click Wi-Fi.
On the Wi-Fi page, click Manage Known Networks.
At the bottom of the page, beneath Manage Known Networks, click the network you want to manage.
To configure the network, click Properties. You can configure the following properties:
Connect automatically when in range.
Make this PC discoverable.
Set as metered connection.
To remove the network, click Forget.
You can also manage wireless networks by using Netsh. To use Netsh to remove networks, perform the following steps:
From the command prompt, type the following:
Netsh wlan show profiles
Locate the profile you want to remove, and use it in the following command:
Netsh wlan delete profile name=<profile name>
Configure network adapters
When you right-click a network adapter in the Network Connections window, you can do any of the following:
Enable or disable the adapter. (This can help you solve connection problems or keep wireless adapters from searching for networks when you don’t need them to.)
Connect to or disconnect from the associated network.
See the status of the adapter or connection. (You can use this to view the number of bytes sent and received, to diagnose connection problems, to view signal quality and speed, and to view the service set identifier (SSID).)
Diagnose problems with the adapter or connection. (You can use this to run an automated tool that can assist in diagnosing connection problems.)
Bridge two or more connections. (You must select two connections that are LAN or High Speed Internet connections that are not being used by Internet Connection Sharing. A network bridge is a network device that connects to multiple network segments.)
Create a shortcut to the adapter for easier access.
Delete the entry, if the option is available.
Rename the adapter.
View the adapter’s properties. (You’ll see the Properties dialog box you learned about earlier in this chapter. From there, you can see the type of connection the adapter uses and install or uninstall protocols, Hyper-V Extensible Virtual Switch, Microsoft LLDP Protocol Driver, and more. When you select an option, you can view additional properties.)
Explore the options available from the adapters on a computer you have access to. Make sure to click Configure in any Wi-Fi Properties dialog box to view the advanced options. You can configure the computer to turn off that device to conserve power or to allow the device to wake up the computer (on the Power Management tab). You can also view events (Events tab), see adapter and driver details (Details, Driver, and General tabs), and view advanced configuration options (Advanced tab).
Configure location-aware printing
Users are not always working at the same desk, day after day. Instead, many people move around and work at different desks, and often in different offices. This means that they’ll almost certainly need to access printers in various locations.
Printers can be available on any kind of network, including a network at home, at the office, or even at a company kiosk. Having to choose a printer every time they connect to a new network can annoy users, thus the need for location-aware printing. With location-aware printing, a default printer can be set for each location from which the user prints. This also keeps the user from accidentally printing to the wrong printer, which poses a potential security risk if the printed data is confidential.
 EXAM TIP
Location-aware printing uses the Network Location Awareness service and the Network List service to determine the network location. The former collects and maintains network configuration information, and the latter identifies the network to which the computer is connected. If this feature doesn’t work, be aware that you need to check to make sure these services are running.
To configure location-aware printing, follow these steps:
In Settings, click Devices and then click Printers & scanners.
Scroll down the list of printers, and as shown in Figure 4-7, select the Let Windows manage my default printer check box.
)
FIGURE 4-7 Enabling the Let Windows manage my default printer option