Design and implement Azure PaaS compute and web and mobile services
- By Michele Leroux Bustamante, Ike Ellis, Zoiner Tejada
- 4/7/2018
- Skill 4.1: Design Azure App Service Web Apps
- Skill 4.2: Design Azure App Service API Apps
- Skill 4.3: Develop Azure App Service Logic Apps
- Skill 4.4: Develop Azure App Service Mobile Apps
- Skill 4.5: Implement API Management
- Skill 4.6: Implement Azure Functions and WebJobs
- Skill 4.7: Design and Implement Azure Service Fabric apps
- Skill 4.8: Design and implement third-party Platform as a Service (PaaS)
- Skill 4.9: Design and implement DevOps
- Thought experiment
- Thought experiment answers
- Chapter summary
Skill 4.8: Design and implement third-party Platform as a Service (PaaS)
Azure supports many third-party PaaS offerings and services through the Azure Marketplace. These can be deployed through the Azure portal, using ARM, or using other CLI tools. This skill helps you navigate those offerings.
Implement Cloud Foundry
Cloud Foundry is an open-source PaaS for building, deploying, and operating 12-factor applications developed in various languages and frameworks. It is a mature container-based application platform allowing you to easily deploy and manage production-grade applications on a platform that supports continuous delivery and horizontal scale, and supports hybrid and multi-cloud scenarios.
There are two forms of Cloud Foundry available to run on Azure:
Open-source Cloud Foundry (OSS CF) An entirely open-source version of Cloud Foundry managed by the Cloud Foundry Foundation.
Pivotal Cloud Foundry (PCF) An enterprise distribution of Cloud Foundry from Pivotal Software Inc., which adds on a set of proprietary management tools and enterprise support.
To deploy a basic Pivotal Cloud Foundry on Azure from the Azure Marketplace, follow these steps:
Navigate to the portal accessed via https://portal.azure.com.
Select Marketplace from the Azure Dashboard.
Search for “Pivotal Cloud Foundry,” and select Pivotal Cloud Foundry On Azure.
From within the Pivotal Cloud Foundry On Azure blade, click Create (Figure 4-112).
On the Basics blade, provide a storage account name prefix, paste your SSH public key, upload the azure-credentials.json Service Principal file, enter the Pivotal Network API token, choose a resource group, and location for the cluster. Click OK.
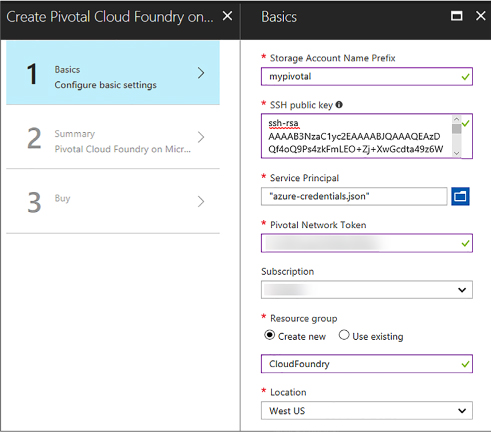
FIGURE 4-112 The selections for a new Pivotal Cloud Foundry cluster in the portal
On the Summary blade, wait for the validation to pas,s and click OK.
On the Buy blade, click Purchase.
)
To deploy the open-sourced version of Cloud Foundry on Azure, you deploy BOSH and then Cloud Foundry. The steps can be performed manually, or via Azure Resource Manager (ARM) templates. Detailed instructions can be found at https://github.com/cloudfoundry-incubator/bosh-azure-cpi-release/tree/master/docs.
Implement OpenShift
The OpenShift Container Platform is a PaaS offering from Red Hat built on Kubernetes. It brings together Docker and Kubernetes, and provides an API to manage these services. OpenShift simplifies the process of deploying, scaling, and operating multi-tenant applications onto containers.
There are two forms of OpenShift that you can deploy to Azure:
The open-source OpenShift Origin
The enterprise-grade Red Hat OpenShift Container Platform
Both are built on the same open source technologies, with the Red Hat OpenShift Container Platform offering enterprise-grade security, compliance, and container management.
Prerequisites for installing both forms of OpenShift include:
Generate an SSH key pair (Public / Private), ensuring that you do not include a passphrase with the private key.
Create a Key Vault to store the SSH Private Key.
Create an Azure Active Directory Service Principal.
Install and configure the OpenShift CLI to manage the cluster.
Some specific prerequisites for deploying Red Hat OpenShift Container Platform include:
OpenShift Container Platform subscription eligible for use in Azure. You need to specify the Pool ID that contains your entitlements for OpenShift.
Red Hat Customer Portal login credentials. You may use either an Organization ID and Activation Key, or a Username and Password. It is more secure to use the Organization ID and Activation Key.
You can deploy both from the Azure Marketplace templates, or using ARM templates.
To deploy Red Hat OpenShift Container Platform on Azure from the Azure Marketplace, perform the following steps (Figure 4-113):
)
Navigate to the portal accessed via https://portal.azure.com.
Select Marketplace from the Azure Dashboard.
Search for “OpenShift,” and select Red Hat OpenShift Container Platform (BYOL).
From within the Red Hat OpenShift Container Platform (BYOL) blade, click Create.
On the Basics blade, provide the VM Admin user name, paste the SSH public key, choose a resource group and location for the platform. Click OK.
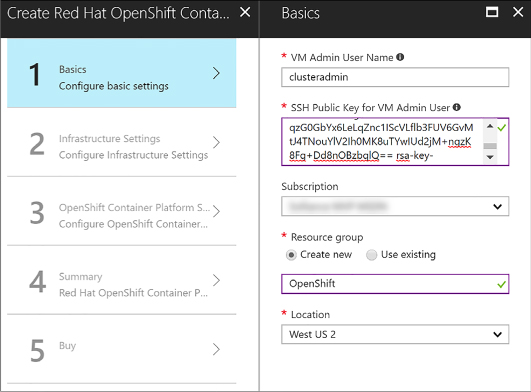
FIGURE 4-113 The selections in the Basics blade for a new Red Hat OpenShift Container Platform
On the Infrastructure Settings blade, provide an OCP cluster name prefix, select a cluster size, provide the resource group name for your Key Vault, as well as the Key Vault name and its secret name you specified in the prerequisites. Click OK (Figure 4-114).
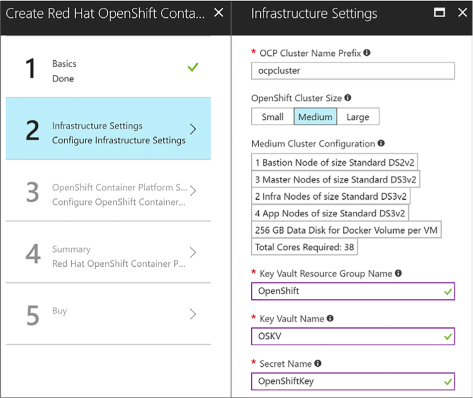
FIGURE 4-114 The selections in the Infrastructure Settings blade for a new Red Hat OpenShift Container Platform in the portal
On the OpenShift Container Platform Settings blade, provide an OpenShift Admin user password, enter your Red Hat subscription manager credentials, specify whether you want to configure an Azure Cloud Provider, and select your default router subdomain. Click OK (Figure 4-115).
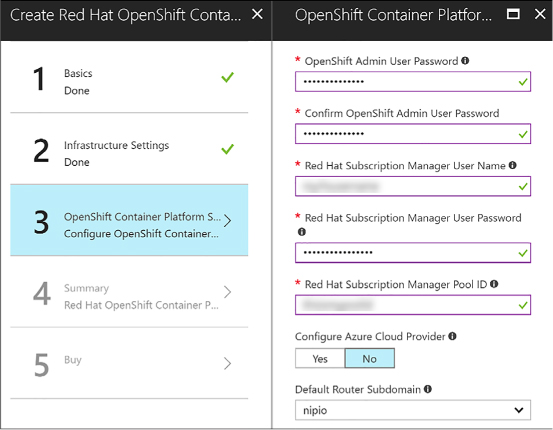
FIGURE 4-115 The selections in the OpenShift Container Platform Settings blade for a new Red Hat OpenShift Container Platform in the portal
On the Summary blade, wait for the validation to pass, and click OK.
On the Buy blade, click Purchase.
)
)
Provision applications by using Azure Quickstart Templates
Azure Quickstart Templates are community-contributed Azure Resource Manager (ARM) templates that help you quickly provision applications and solutions with minimal effort. You can search available Quickstart Templates in the gallery located at https://azure.microsoft.com/resources/templates.
Resources that are deployed as part of a Quickstart template can be thought of as related and interdependent parts of a single entity. ARM templates allow you to deploy, update, or delete all of the resources within the solution in a single, coordinated operation. You use a template for deployment and that template can work for different environments such as testing, staging, and production, while ensuring your resources are deployed in a consistent state.
Depending on the Quickstart Template you select, you will provide a set of parameters that get passed into the deployment command.
You can deploy a Quickstart Template using one of these methods (based on the example at https://azure.microsoft.com/resources/templates/101-hdinsight-hbase-replication-geo):
Using PowerShell, use the New-AzureRmResourceGroupDeployment cmdlet. You are prompted to supply values for the parameters. For example:
New-AzureRmResourceGroupDeployment -Name <deployment-name> -ResourceGroupName
<resource-group-name> -TemplateUri https://raw.githubusercontent.com/azure/azure-
quickstart-templates/master/101-hdinsight-hbase-replication-geo/azuredeploy.json
Using the Azure Command-Line Interface (CLI), use the group deployment create command. You are prompted to supply values for the parameters. For example:
azure config mode arm

azure group deployment create <my-resource-group> <my-deployment-name> --template-
uri https://raw.githubusercontent.com/azure/azure-quickstart-templates/master/101-
hdinsight-hbase-replication-geo/azuredeploy.json
Click the Deploy to Azure button, if provided. This opens a form for the Quickstart template in Azure, allowing you to enter the parameter values from within the portal (Figure 4-116).
)
FIGURE 4-116 An Azure Quickstart Template form in the Azure Portal after clicking a Deploy to Azure button
Build applications that leverage Azure Marketplace solutions and services
The Azure Marketplace is an online applications and services marketplace that enables start-ups and independent software vendors (ISVs) to offer their solutions to Azure customers around the world. The marketplace makes it easier for consumers to search, purchase, and deploy a wide range of applications and services in just a few clicks. Some such applications and services include virtual machine images and extensions, APIs, applications, Machine Learning services, and data services.
You can subscribe to and deploy a product from the Azure Marketplace by visiting https://azuremarketplace.microsoft.com/ or by clicking the Marketplace tile on the Azure Portal dashboard.
Pricing varies based on product types. ISV software charges and Azure infrastructure costs are charged separately through your Azure subscription. Pricing models include:
BYOL Model Bring-your-own-license. You obtain outside of the Azure Marketplace the right to access or use the offering and are not charged Azure Marketplace fees for use of the offering in the Azure Marketplace.
Free Free SKU. Customers are not charged Azure Marketplace fees for use of the offering.
Free Software Trial (Try it now) Full-featured version of the offer that is promotionally free for a limited period of time. You are not charged Azure Marketplace fees for use of the offering through a trial period. Upon expiration of the trial period, customers are automatically be charged based on standard rates for use of the offering.
Usage-Based You are charged or billed based on the extent of your use of the offering. For Virtual Machines Images, you are charged an hourly Azure Marketplace fee. For Data Services, Developer services, and APIs, you are charged per unit of measurement as defined by the offering.
Monthly Fee You are charged or billed a fixed monthly fee for a subscription to the offering (from date of subscription start for that particular plan). The monthly fee is not prorated for mid-month cancellations or unused services.
You can find the offer-specific pricing details on the solution details page.