Design and implement Azure PaaS compute and web and mobile services
- By Michele Leroux Bustamante, Ike Ellis, Zoiner Tejada
- 4/7/2018
- Skill 4.1: Design Azure App Service Web Apps
- Skill 4.2: Design Azure App Service API Apps
- Skill 4.3: Develop Azure App Service Logic Apps
- Skill 4.4: Develop Azure App Service Mobile Apps
- Skill 4.5: Implement API Management
- Skill 4.6: Implement Azure Functions and WebJobs
- Skill 4.7: Design and Implement Azure Service Fabric apps
- Skill 4.8: Design and implement third-party Platform as a Service (PaaS)
- Skill 4.9: Design and implement DevOps
- Thought experiment
- Thought experiment answers
- Chapter summary
In this sample chapter from Exam Ref 70-532 Developing Microsoft Azure Solutions, 2nd Edition, explore Azure App Services and the skills needed to design, develop, and implement apps.
The Azure platform provides a rich set of Platform-as-a-Service (PaaS) capabilities for hosting web applications and services. The platform approach provides more than just a host for running your application logic; it also includes robust mechanisms for managing all aspects of your web application lifecycle, from configuring continuous and staged deployments to managing runtime configuration, monitoring health and diagnostic data, and of course, helping with scale and resilience. Azure Apps Services includes a number of features to manage web applications and services including Web Apps, Logic Apps, Mobile Apps and API Apps. API Management provides additional features with first class integration to APIs hosted in Azure. Azure Functions and Azure Service Fabric enable modern microservices architectures for your solutions, in addition to several third-party platforms that can be provisioned via Azure Quickstart Templates. These key features are of prime importance to the modern web application, and this chapter explores how to leverage them.
Skills in this chapter:
Skill 4.1: Design Azure App Service Web Apps
Skill 4.2: Design Azure App Service API Apps
Skill 4.3: Develop Azure App Service Logic Apps
Skill 4.4: Develop Azure App Service Mobile Apps
Skill 4.5: Implement API Management
Skill 4.6: Implement Azure Functions and WebJobs
Skill 4.7: Design and implement Azure Service Fabric Apps
Skill 4.8: Design and implement third-party Platform as a Service (PaaS)
Skill 4.9: Design and implement DevOps
Skill 4.1: Design Azure App Service Web Apps
Azure App Service Web Apps (or, just Web Apps) provides a managed service for hosting your web applications and APIs with infrastructure services such as security, load balancing, and scaling provided as part of the service. In addition, Web Apps has an integrated DevOps experience from code repositories and from Docker image repositories. You pay for compute resources according to your App Service Plan and scale settings. This section covers key considerations for designing and deploying your applications as Web Apps.
Define and manage App Service plans
An App Service plan defines the supported feature set and capacity of a group of virtual machine resources that are hosting one or more web apps, logic apps, mobile apps, or API apps (this section discusses web apps specifically, and the other resources are covered in later sections in this chapter).
Each App Service plan is configured with a pricing tier (for example, Free, Shared, Basic, and Standard), and each tier describes its own set of capabilities and cost. An App Service plan is unique to the region, resource group, and subscription. In other words, two web apps can participate in the same App Service plan only when they are created in the same subscription, resource group, and region (with the same pricing tier requirements).
This section describes how to create a new App Service plan without creating a web app, and how to create a new App Service plan while creating a web app. It also reviews some of the settings that can be useful for managing the App Service plan.
Creating a new App Service plan
To create a new App Service plan in the portal, complete the following steps:
Navigate to the portal accessed via https://portal.azure.com.
Select New on the command bar.
Within the Marketplace (Figure 4-1) search text box, type App Service Plan and press Enter.

FIGURE 4-1 The Marketplace search for App Service Plan.
Select App Service Plan from the results.
On the App Service Plan blade, select Create.
On the New App Service Plan blade (Figure 4-2), provide a name for your App Service plan, choose the subscription, resource group, operating system (Windows or Linux), and location into which you want to deploy. You should also confirm and select the desired pricing tier.

FIGURE 4-2 The settings for a new App Service Plan
Click Create to create the new App Service plan.
Following the creation of the new App Service plan, you can create a new web app and associate this with the previously created App Service plan. Or, as discussed in the next section, you can create a new App Service plan as you create a new web app.
Creating a new Web App and App Service plan
To create a new Web App and a new App Service plan in the portal, complete the following steps:
Navigate to the portal accessed via https://portal.azure.com.
Select New on the command bar.
Within the Marketplace list (Figure 4-3), select the Web + Mobile option.
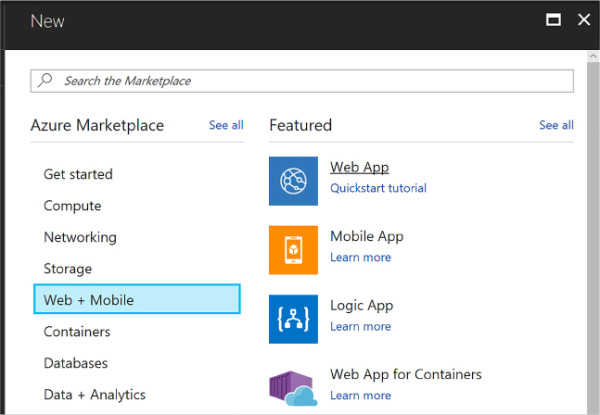
FIGURE 4-3 The Marketplace list for Web + Mobile
On the Web + Mobile blade, select Web App.
On the Web App blade (Figure 4-4), provide an app name, choose the subscription, resource group, operating system (Windows or Linux), and choose a setting for Application Insights. You also select the App Service plan into which you want to deploy.
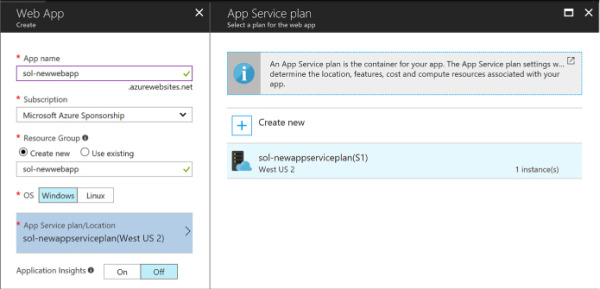
FIGURE 4-4 The selections for a new App Service.
When you click the App Service plan selection, you can choose an existing App Service plan, or create a new App Service plan. To create a new App Service plan, click Create New from the App Service Plan blade.
From the New App Service Plan blade (Figure 4-5), choose a name for the App Service plan, select a location, and select a pricing tier. Click OK and the new App Service plan is created with these settings.
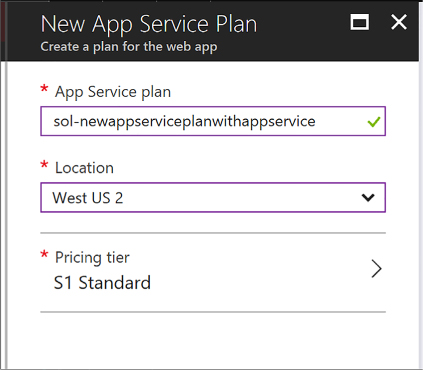
FIGURE 4-5 Options for a new App Service Plan.
From the Web App blade, click Create to create the web app and associate it with the new App Service plan.
)
)
Review App Service plan settings
Once you’ve created a new App Service plan, you can select the App Service plan in the portal and manage relevant settings including managing web apps and adjusting scale.
To manage an App Service plan, complete the following steps:
Navigate to the portal accessed via https://portal.azure.com.
Select More Services on the command bar.
In the filter text box, type App Service Plans, and select App Service Plans (Figure 4-6).
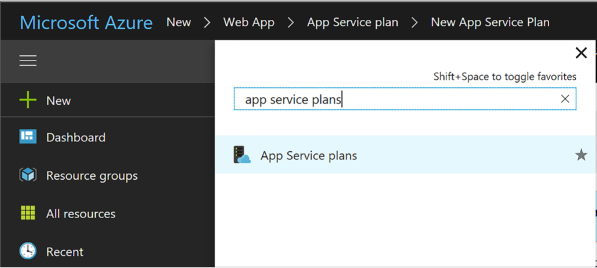
FIGURE 4-6 Search results for App Service plans
Review the list of App Service plans (Figure 4-7). Note the number of apps deployed to each is shown in the list. You can also see the pricing tiers. Select an App Service plan from the list to navigate to the App Service Plan blade.
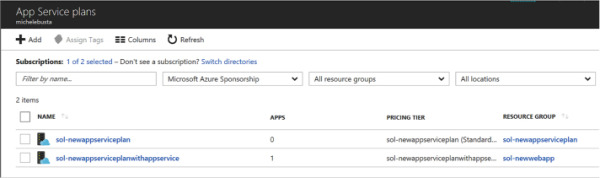
FIGURE 4-7 List of App Service plans
From the left navigation pane, select Apps to view the apps that are deployed to the App Service plan (Figure 4-8). You can select from the list of apps to navigate to the app blade and manage its settings.
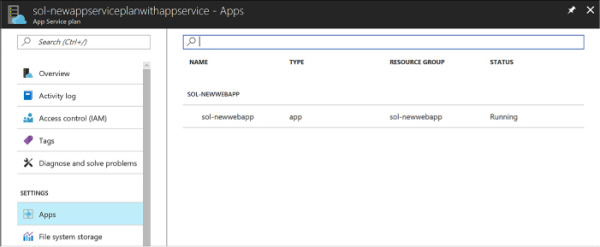
FIGURE 4-8 List of apps deployed to the App Service plan.
From the left navigation pane, select Scale Up to choose a new pricing tier for the App Service plan.
From the left navigation pane, select Scale Out to increase or decrease the number of instances of the App Service plan, or to configure Autoscale settings.
)
)
Configure Web App settings
Azure Web Apps provide a comprehensive collection of settings that you can adjust to establish the environment in which your web application runs, as well as tools to define and manage the values of settings used by your web application code. You can configure the following groups of settings for your applications:
Application type and library versions
Load balancing
Slot management
Debugging
App settings and connection strings
IIS related settings
To manage Web App settings follow these steps:
Navigate to the blade of your web app in the portal accessed via https://portal.azure.com.
Select the Application settings tab from the left navigation pane. The setting blade appears to the right.
Choose from the general settings required for the application:
Choose the required language support from .NET Framework, PHP, Java, or Python, and their associated versions.
Choose between 32bit and 64bit runtime execution.
Choose web sockets if you are building a web application that leverages this feature from the browser.
Choose Always On if you do not want the web application to be unloaded when idle. This reduces the load time required for the next request and is a required setting for web jobs to run effectively.
Choose the type of managed pipeline for IIS. Integrated is the more modern pipeline and Classic would only be used for legacy applications (Figure 4-9).
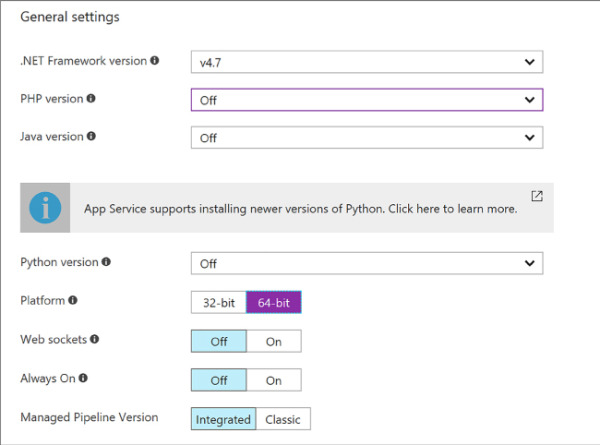
FIGURE 4-9 General settings section for application settings
Choose your setting for ARR affinity (Figure 4-10). If you choose to enable ARR affinity your users will be tied to a particular host machine (creating a sticky session) for the duration of their session. If you disable this, your application will not create a sticky session and your application is expected to support load balancing between machines within a session.

FIGURE 4-10 ARR affinity settings
When you first create your web app, the auto swap settings are not available to configure. You must first create a new slot, and from the slot you may configure auto swap to another slot (Figure 4-11).
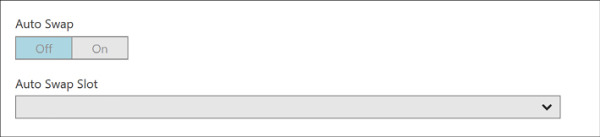
FIGURE 4-11 Auto Swap settings
Enable remote debugging (Figure 4-12) if you run into situations where deployed applications are not functioning as expected. You can enable remote debugging for Visual Studio versions 2012, 2013, 2015, and 2017.
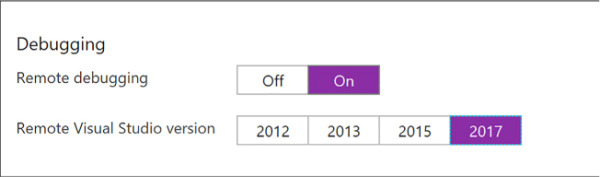
FIGURE 4-12 Remote debugging settings for the web app
Configure the app settings required for your application. These app settings (Figure 4-13) override any settings matching the same name from your application.

FIGURE 4-13 Application settings
Configure any connection strings for your application (Figure 4-14). These connection string settings override any settings matching the same key name from your application configuration. For connection strings, once you create the settings, save, and later return to the application settings blade; those settings are hidden unless you select it to show the value again.

FIGURE 4-14 Connection string settings
Configure IIS settings related to default documents, handlers, and virtual applications and directories required for your application (Figure 4-15). This allows you to control these IIS features related to your application.
)
)
)
)
)
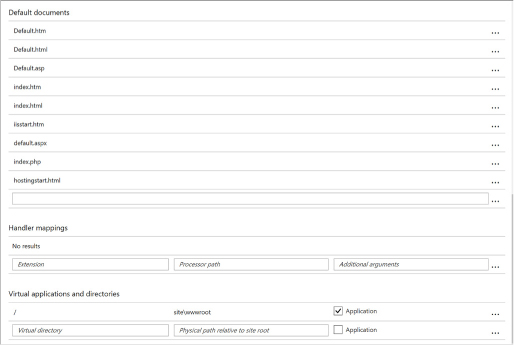
FIGURE 4-15 IIS settings
Configure Web App certificates and custom domains
When you first create your web app, it is accessible through the subdomain you specified in the web app creation process, where it takes the form <yourwebappname>.azurewebsites.net. To map to a more user-friendly domain name (such as contoso.com), you must set up a custom domain name.
If your website will use HTTPS to secure communication between it and the browser using Transport Layer Security (TLS), more commonly (but less accurately) referred to in the industry as Secure Socket Layer (SSL), you need to utilize an SSL certificate. With Azure Web Apps, you can use an SSL certificate with your web app in one of two ways:
You can use the “built-in” wildcard SSL certificate that is associated with the *.azurewebsites.net domain.
More commonly you use a certificate you purchase for your custom domain from a third-party certificate authority.
Mapping custom domain names
Web Apps support mapping to a custom domain that you purchase from a third-party registrar either by mapping the custom domain name to the virtual IP address of your website or by mapping it to the <yourwebappname>.azurewebsites.net address of your website. This mapping is captured in domain name system (DNS) records that are maintained by your domain registrar. Two types of DNS records effectively express this purpose:
A records (or, address records) map your domain name to the IP address of your website.
CNAME records (or, alias records) map a subdomain of your custom domain name to the canonical name of your website, expressed as <yourwebappname>.azurewebsites.net.
Table 4-1 shows some common scenarios along with the type of record, the typical record name, and an example value based on the requirements of the mapping.
TABLE 4-1 Mapping domain name requirements to DNS record types, names, and values
Requirement |
Type of Record |
Record Name |
Record Value |
contoso.com should map to my web app IP address |
A |
@ |
138.91.240.81 IP address |
contoso.com and all subdomains demo.contoso.com and www.contoso.com should map to my web app IP address |
A |
* |
138.91.240.81 IP address |
www.contoso.com should map to my web app IP address |
A |
www |
138.91.240.81 IP address |
www.contoso.com should map to my web app canonical name in Azure |
CNAME |
www |
Canonical name in Azure |
Note that whereas A records enable you to map the root of the domain (like contoso.com) and provide a wildcard mapping for all subdomains below the root (like www.contoso.com and demo.contoso.com), CNAME records enable you to map only subdomains (like the www in www.contoso.com).
Configuring a custom domain
To configure a custom domain, you need access to your domain name registrar setup for the domain while also editing configuration for your web app in the Azure portal.
 EXAM TIP
Use of a custom domain name is not supported by the Free App Service plan pricing tier. All other pricing tiers including Shared, Basic, Standard, and Premium support custom domains.
These are the high-level steps for creating a custom domain name for your web app:
Navigate to the blade of your web app in the portal accessed via https://portal.azure.com.
Ensure your web app uses an App Service plan that supports custom domains.
Click Custom Domains from the left navigation pane.
On the Custom Domains blade (Figure 4-16) note the external IP address of your web app.
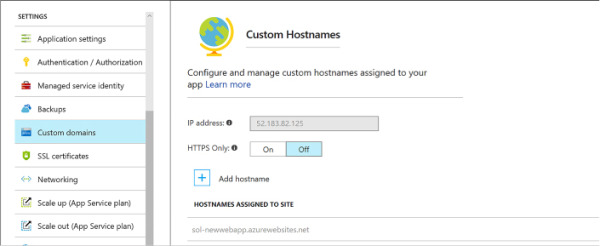
FIGURE 4-16 Part of the custom domain blade for the web app
Select Add Hostname to open the Add Hostname blade. Enter the hostname and click Validate for the portal to validate the state of the registrar setup with respect to your web app. You can then choose to set up an A record or CNAME record (Figure 4-17).
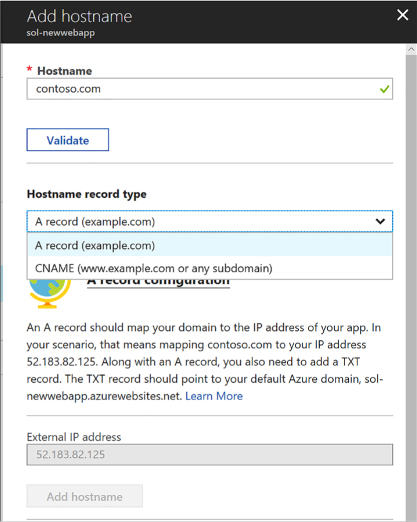
FIGURE 4-17 Part of the Add hostname blade
To set up an A record, select A Record and follow the instructions provided in the blade. It guides you through the following steps for an A record setup:
You first add a TXT record at your domain name registrar, pointing to the default Azure domain for your web app, to verify you own the domain name. The new TXT record should point to <yourwebappname>.azurewebsites.net.
In addition, you add an A record pointing to the IP address shown in the blade, for your web app.
To set up a CNAME record, select CNAME record, and follow the instructions provided in the blade.
If using a CNAME record, following the instructions provided by your domain name registrar, add a new CNAME record with the name of the subdomain, and for the value, specify your web app’s default Azure domain with <yourwebappname>.azurewebsites.net.
Save your DNS changes. Note that it may take some time for the changes to propagate across DNS. In most cases, your changes are visible within minutes, but in some cases, it may take up to 48 hours. You can check the status of your DNS changes by doing a DNS lookup using third-party websites like http://mxtoolbox.com/DNSLookup.aspx.
After completing the domain name registrar setup, from the Custom Domains blade, click Add Hostname again to configure your custom domain. Enter the domain name and select Validate again. If validation has passed, select Add Hostname to complete the assignment.
)
Configuring SSL certificates
To configure SSL certificates for your custom domain, you first need to have access to an SSL certificate that includes your custom domain name, including the CNAME if it is not a wildcard certificate.
To assign an SSL certificate to your web app, follow these steps:
Navigate to the blade of your web app in the portal accessed via https://portal.azure.com.
Click SSL certificates from the left navigation pane.
From the SSL certificates (Figure 4-18) blade you may choose to import an existing app service certificate, or upload a new certificate.
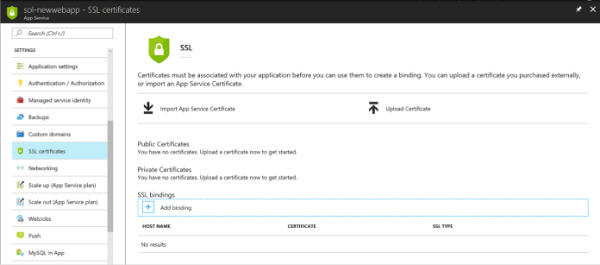
FIGURE 4-18 SSL certificates blade
You can then select Add Binding to set up the correct binding. You can set up bindings that point at your naked domain (contoso.com), or to a particular CNAME (www.contoso.com, demo.contoso.com), so long as the certificate supports it.
You can choose between Server Name Indication (SNI) or IP based SSL when you create the binding for your custom domain (Figure 4-19).
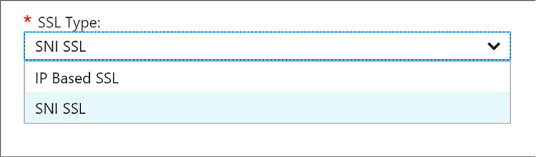
FIGURE 4-19 Part of the Add Binding blade
)
Manage Web Apps by using the API, Azure PowerShell, and Xplat-CLI
In addition to configuring and managing Web Apps via the Azure portal, programmatic or script-based access is available for much of this functionality and can satisfy many development requirements.
The options for this include the following:
Azure Resource Manager (ARM) Azure Resource Manager provides a consistent management layer for the management tasks you can perform using Azure PowerShell, Azure CLI, Azure portal, REST API, and other development tools. For more information on this see https://docs.microsoft.com/en-us/azure/azure-resource-manager/.
REST API The REST API enables you to deploy and manage Azure infrastructure resources using HTTP request and JSON payloads. For more details on this see https://docs.microsoft.com/en-us/rest/api/resources/.
Azure PowerShell Azure PowerShell provides cmdlets for interacting with Azure Resource Manager to manage infrastructure resources. The PowerShell modules can be installed to Windows, macOS, or Linux. For additional details see https://docs.microsoft.com/en-us/powershell/azure/overview.
Azure CLI Azure CLI (also known as XplatCLI) is a command line experience for managing Azure resources. This is an open source SDK that works on Windows, macOS, and Linux platforms to create, manage, and monitor web apps. For details see https://docs.microsoft.com/en-us/cli/azure/overview.
Implement diagnostics, monitoring, and analytics
Without diagnostics, monitoring, and analytics, you cannot effectively investigate the cause of a failure, nor can you proactively prevent potential problems before your users experience them. Web Apps provide multiple forms of logs, features for monitoring availability and automatically sending email alerts when the availability crosses a threshold, features for monitoring your web app resource usage, and integration with Azure Analytics via Application Insights.
EXAM TIP
App Services are also governed by quotas depending on the App Service plan you have chosen. Free and Shared apps have CPU, memory, bandwidth, and filesystem quotas; when reached the web app no longer runs until the next cycle, or the App Service plan is changed. Basic, Standard, and Premium App Services are only limited by filesystem quotas based on the SKU size selected for the host.
Configure diagnostics logs
A web app can produce many different types of logs, each focused on presenting a particular source and format of diagnostic data. The following list describes each of these logs:
Event Log The equivalent of the logs typically found in the Windows Event Log on a Windows Server machine, this is a single XML file on the local file system of the web application. In the context of web apps, the Event Log is particularly useful for capturing unhandled exceptions that may have escaped the application’s exception handling logic and surfaced to the web server. Only one XML file is created per web app.
Web server logs Web server logs are textual files that create a text entry for each HTTP request to the web app.
Detailed error message logs These HTML files are generated by the web server and log the error messages for failed requests that result in an HTTP status code of 400 or higher. One error message is captured per HTML file.
Failed request tracing logs In addition to the error message (captured by detailed error message logs), the stack trace that led to a failed HTTP request is captured in these XML documents that are presented with an XSL style sheet for in-browser consumption. One failed request trace is captured per XML file.
Application diagnostic logs These text-based trace logs are created by web application code in a manner specific to the platform the application is built in using logging or tracing utilities.
To enable these diagnostic settings from the Azure portal, follow these steps:
Navigate to the blade of your web app in the portal accessed via https://portal.azure.com.
Select the Diagnostics Logs tab from the left navigation pane. The Diagnostics Logs blade (Figure 4-20) will appear to the right. From this blade you can choose to configure the following:
Enable application logging to the file system for easy access through the portal.
Enable storing application logs to blob storage for longer term access.
Enable Web Server logging to the file system or to blob storage for longer term access.
Enable logging detailed error messages.
Enable logging failed request messages.
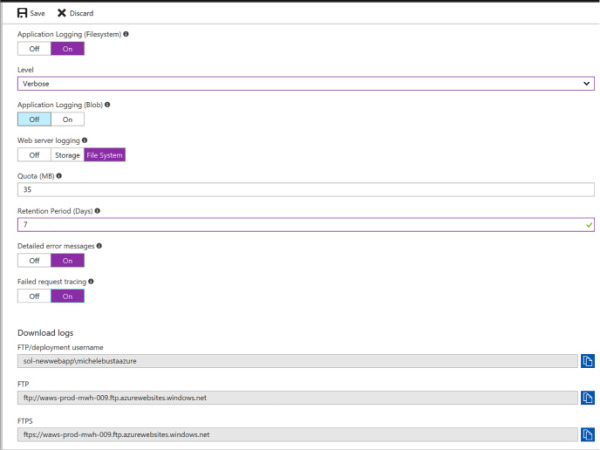
FIGURE 4-20 The diagnostics logs blade
If you enable files system logs for application and Web Server logs, you can view those from the Log Streaming tab (Figure 4-21).

FIGURE 4-21 The log streaming blade
You can access more advanced debugging and diagnostics tools from the Advanced Tools tab (Figure 4-22).
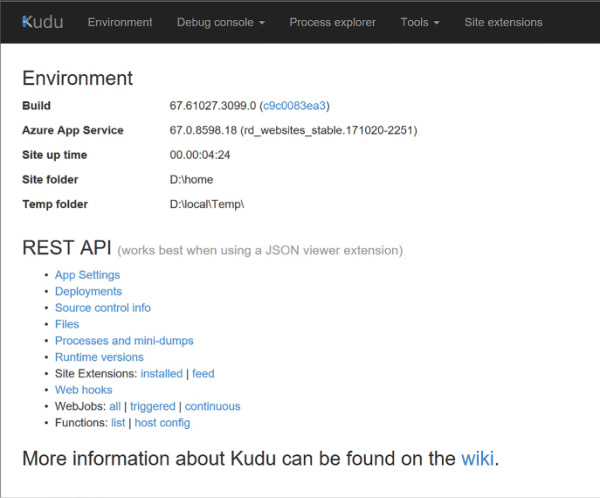
FIGURE 4-22 The Kudu web site
)
)
)
Table 4-2 describes where to find each type of log when retrieving diagnostic data stored in the web app’s local file system. The Log Files folder is physically located at D:\home\LogFiles.
TABLE 4-2 Locations of the various logs on the web app’s local file system
Log Type |
Location |
Event Log |
\LogFiles\eventlog.xml |
Web server logs |
\LogFiles\http\RawLogs\*.log |
Detailed error message logs |
\LogFiles\DetailedErrors\ErrorPage######.htm |
Failed request tracing logs |
\LogFiles\W3SVC*\*.xml |
Application diagnostic logs (.NET) |
\LogFiles\Application\*.txt |
Deployment logs |
\LogFiles\Git. This folder contains logs generated by the internal deployment processes used by Azure web apps, as well as logs for Git deployments |
EXAM TIP
You can retrieve diagnostics logs data by using Visual Studio Server Explorer, the Site Control Management (SCM) website (also known as Kudu), the command line in Windows PowerShell or the xplat-cli, or direct download via FTP to query Table or Blob storage.
Configure endpoint monitoring
App Services provide features for monitoring your applications directly from the Azure portal. There are many metrics available for monitoring, as listed in Table 4-3.
TABLE 4-3 List of available metrics that are monitored for your web apps
METRIC |
DESCRIPTION |
Average Response Time |
The average time taken for the app to serve requests in ms. |
Average memory working set |
The average amount of memory in MiBs used by the app. |
CPU Time |
The amount of CPU in seconds consumed by the app. |
Data In |
The amount of incoming bandwidth consumed by the app in MiBs. |
Data Out |
The amount of outgoing bandwidth consumed by the app in MiBs. |
Http 2xx |
Count of requests resulting in a http status code >= 200 but < 300. |
Http 3xx |
Count of requests resulting in a http status code >= 300 but < 400. |
Http 401 |
Count of requests resulting in HTTP 401 status code. |
Http 403 |
Count of requests resulting in HTTP 403 status code. |
Http 404 |
Count of requests resulting in HTTP 404 status code. |
Http 406 |
Count of requests resulting in HTTP 406 status code. |
Http 4xx |
Count of requests resulting in a http status code >= 400 but < 500. |
Http Server Errors |
Count of requests resulting in a http status code >= 500 but < 600. |
Memory working set |
Current amount of memory used by the app in MiBs. |
Requests |
Total number of requests regardless of their resulting HTTP status code. |
You can monitor metrics from the portal and customize which metrics should be shown by following these steps:
Navigate to the blade of your web app in the portal accessed via https://portal.azure.com.
Select the Overview tab from the left navigation pane. This pane shows a few default charts for metrics including server errors, data in and out, requests, and average response time (Figure 4-23 and 4-24).
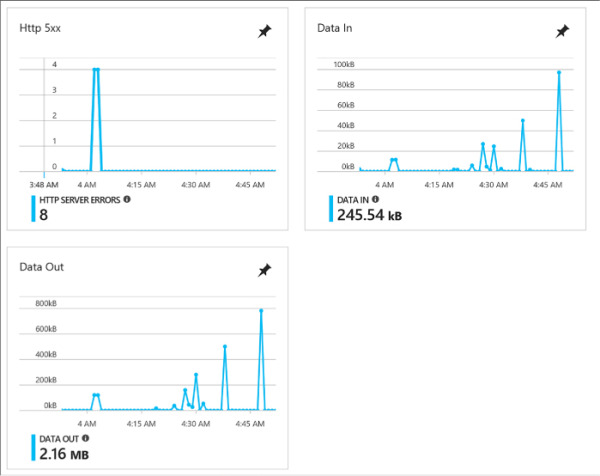
FIGURE 4-23 Metrics showing http server errors, data in, and data out
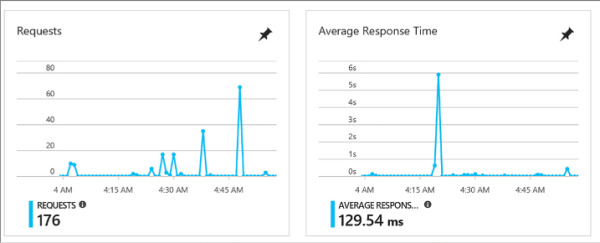
FIGURE 4-24 Metrics showing requests and average response time
You can customize the metrics (Figure 4-25) shown by creating new graphs and pinning those to your dashboard.
Click one of the graphs. You’ll be taken to edit the metrics blade for the graph, limited to compatible metrics for the selection.
Select the metrics to add or remove from the graph.
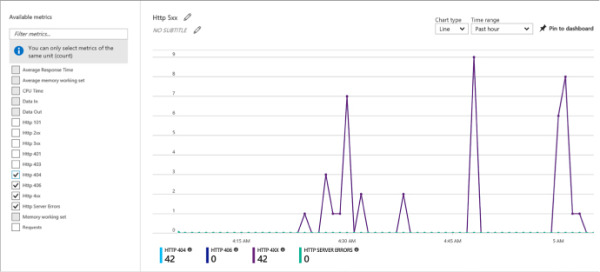
FIGURE 4-25 Selecting metrics to show on the graph
Save the graph to the dashboard. You can now navigate to your portal dashboard to view the selected metrics without having to navigate to the web app directly. From here you can also edit the graph by selecting it, editing metrics, and saving back to the same pinned graph.
You can also add alerts for metrics. From the Metrics blade click Add Metric alert from the command bar at the top of the blade. This takes you to the Add Rule blade (Figure 4-26) where you can configure the alert. To configure an alert for slow requests, as an example, do the following:
Provide a name for the rule.
Optionally change the subscription, resource group, and resource but it will default to the current web app.
Choose Metrics for the alert type.
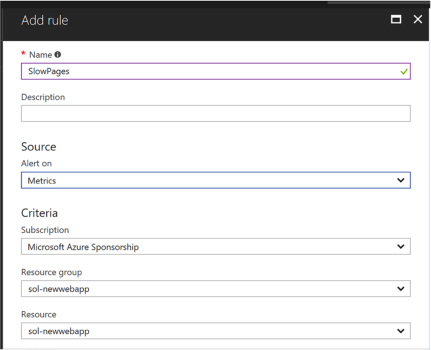
FIGURE 4-26 Part of the Add rule blade
Choose the metric from the drop-down list (Figure 4-27), in this case Average Response Time with a condition greater than a threshold of 2 seconds over a 15 minute period.
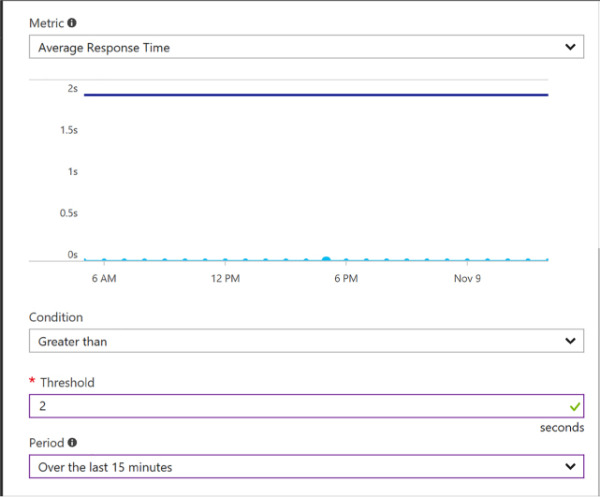
FIGURE 4-27 Part of the Add rule blade where you can set the metric values
From the same blade you can also indicate who to notify, configure a web hook, or even configure a Logic App to produce a workflow based on the alert.
Click OK to complete the alert configuration.
You can view the alerts from the Alerts tab of the navigation pane.
)
)
)
)
Design and configure Web Apps for scale and resilience
App Services provide various mechanisms to scale your web apps up and down by adjusting the number of instances serving requests and by adjusting the instance size. You can, for example, increase the number of instances (scale out) to support the load you experience during business hours, but then decrease (scale in) the number of instances during less busy hours to save costs. Web Apps enable you to scale the instance count manually, automatically via a schedule, or automatically according to key performance metrics. Within a datacenter, Azure load balances traffic between all of your Web Apps instances using a round-robin approach.
You can also scale a web app by deploying to multiple regions around the world and then utilizing Microsoft Azure Traffic Manager to direct web app traffic to the appropriate region based on a round robin strategy or according to performance (approximating the latency perceived by clients of your application). Alternately, you can configure Traffic Manager to use the alternate regions as targets for failover if the primary region becomes unavailable.
In addition to scaling instance counts, you can manually adjust your instance size (scale up or down). For example, you can scale up your web app to utilize more powerful VMs that have more RAM memory and more CPU cores to serve applications that are more demanding of memory consumption or CPU utilization, or scale down your VMs if you later discover your requirements are not as great.
EXAM TIP
Web Apps provide a high availability SLA of 99.9 percent using only a single standard instance. You do not need to provision more than one instance to benefit from this SLA.
To scale your web app, follow these steps:
Navigate to the blade of your web app in the portal accessed via https://portal.azure.com.
Select the App Service plan tab from the left navigation pane. This takes you to the App Service Plan blade.
Select the Scale Up tab from the left navigation pane and you’ll be taken to a blade to select the new pricing tier for your web app VMs.
Select the Scale Out tab and you’ll be taken to the Scale Out blade to choose the number of instances to scale out or into (Figure 4-28).
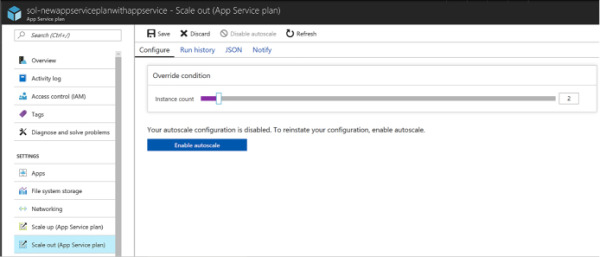
FIGURE 4-28 The scale out blade.
If you select Enable autoscale, you can create conditions based on metrics and rules in order for the site to automatically adjust instance count.
)
)
)
)
)
)
)
)
)
)