Design and implement Azure PaaS compute and web and mobile services
- By Michele Leroux Bustamante, Ike Ellis, Zoiner Tejada
- 4/7/2018
- Skill 4.1: Design Azure App Service Web Apps
- Skill 4.2: Design Azure App Service API Apps
- Skill 4.3: Develop Azure App Service Logic Apps
- Skill 4.4: Develop Azure App Service Mobile Apps
- Skill 4.5: Implement API Management
- Skill 4.6: Implement Azure Functions and WebJobs
- Skill 4.7: Design and Implement Azure Service Fabric apps
- Skill 4.8: Design and implement third-party Platform as a Service (PaaS)
- Skill 4.9: Design and implement DevOps
- Thought experiment
- Thought experiment answers
- Chapter summary
Skill 4.7: Design and Implement Azure Service Fabric apps
Azure Service Fabric is a platform that makes it easy to package, deploy, and manage distributed solutions at scale. It provides an easy programming model for building microservices solutions with a simple, familiar, and easy to understand development experience that supports stateless and stateful services, and actor patterns. In addition, to providing a packaging and deployment solution for these native components, Service Fabric also supports the deployment of guest executables and containers as part of the same managed and distributed system.
The following list summarizes these native and executable components:
Stateless Services Stateless Fabric-aware services that run without managed state.
Stateful Services Stateful Fabric-aware services that run with managed state where the state is close to the compute.
Actors A higher level programming model built on top of stateful services.
Guest Executable Can be any application or service that may be cognizant or not cognizant of Service Fabric.
Containers Both Linux and Windows containers are supported by Service Fabric and may be cognizant or not cognizant of Service Fabric.
This skill provides an overview of the Service Fabric programming experience.
Create a Service Fabric application
A Service Fabric application can consist of one or more services. The application defines the deployment package for the services, and each service can have its own configuration, code, and data. A Service Fabric cluster can host multiple applications, and each has its own independent deployment and upgrade lifecycle.
In this skill you create a new Service Fabric application that has a stateful service. This service is reachable via RPC and is called by a web front end created in the next section. The service is called Lead Generator and returns the current count for the number of leads that have been generated and persisted with the service. Figure 4-103 illustrates the service endpoint.

FIGURE 4-103 A simple stateful service endpoint supporting RPC communication
To create a new Service Fabric application, follow these steps:
Launch Visual Studio, and then select File > New > Project.
In the New Project dialog, select Service Fabric Application within the Cloud category. Provide a name and location for your new project, nd then click OK. In this example the name is LeadGenerator (Figure 4-104).

FIGURE 4-104 The New Project dialog where you can select Service Fabric Application as the project type
Select Stateful Service from the list of service templates and provide a name, LeadGenerator.Simulator as shown here.
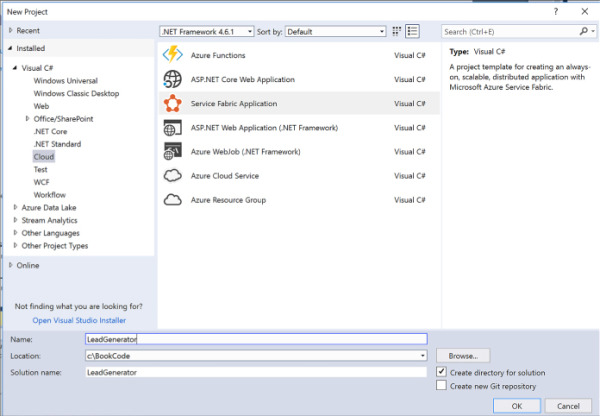
FIGURE 4-105 The New Service Fabric Service dialog where you can select Stateful Service as the service template
From Solution Explorer, expand the new LeadGenerator.Simulator node and expand the PackageRoot folder where you’ll find ServiceManifest.xml. This file describes the service deployment package and related information. It includes a section that describes the service type that is initialized when the Service Fabric runtime starts the service:
<ServiceTypes>
  <StatefulServiceType ServiceTypeName="SimulatorType" HasPersistedState="true" />
</ServiceTypes>
A service type is created for the project; in this case the type is defined in the Simulator.cs file. This service type is registered when the program starts, in Program.cs, so that the Service Fabric runtime knows which type to initialize when it creates an instance of the service.
private static void Main()
{
    try
    {
        ServiceRuntime.RegisterServiceAsync("SimulatorType",
            context => new Simulator(context)).GetAwaiter().GetResult();
        ServiceEventSource.Current.ServiceTypeRegistered(Process.
GetCurrentProcess().Id,
 typeof(Simulator).Name);
        Thread.Sleep(Timeout.Infinite);
    }
    catch (Exception e)
    {
        ServiceEventSource.Current.ServiceHostInitializationFailed(e.ToString());
        throw;
    }
}
The template produces a default implementation for the service type, with a RunAsync method that increments a counter every second. This counter value is persisted with the service in a dictionary using the StateManager, available through the service base type StatefulService. This counter is used to represent the number of leads generated for the purpose of this example.
protected override async Task RunAsync(CancellationToken cancellationToken)
{
    var myDictionary = await this.StateManager.GetOrAddAsync<IReliableDictionary<s
tring, long>>("myDictionary");
    while (true)
    {
        cancellationToken.ThrowIfCancellationRequested();
        using (var tx = this.StateManager.CreateTransaction())
        {
            var result = await myDictionary.TryGetValueAsync(tx, "Counter");
            ServiceEventSource.Current.ServiceMessage(this.Context, "Current
Counter Value: {0}",
                result.HasValue ? result.Value.ToString() : "Value does not
exist.");
            await myDictionary.AddOrUpdateAsync(tx, "Counter", 0, (key, value)
 => ++value);
            await tx.CommitAsync();
       }
       await Task.Delay(TimeSpan.FromSeconds(1), cancellationToken);
   }
}
This service will run, and increment the counter as it runs persisting the value, but by default this service does not expose any methods for a client to call it. Before you can create an RPC listener you add the required nuget package, Microsoft.ServiceFabric.Services.Remoting.
Create a new service interface using the IService marker interface from the Microsoft.ServiceFabric.Services.Remoting namespace, that indicates this service can be called remotely:
using Microsoft.ServiceFabric.Services.Remoting;
using System.Threading.Tasks;
public interface ISimulatorService : IService
{
 Task<long> GetLeads();
}
Implement this interface on the Simulator service type, and include an implementation of the GetLeads method to return the value of the counter:
public async Task<long> GetLeads()
{
    var myDictionary = await StateManager.GetOrAddAsync<IReliableDictionary<stri
ng, long>>("myDictionary");
    using (var tx = StateManager.CreateTransaction())
 {
        var result = await myDictionary.TryGetValueAsync(tx, "Counter");
        await tx.CommitAsync();
        return result.HasValue ? result.Value : 0;
    }
}
To expose this method to clients, add an RPC listener to the service. Modify the CreateServiceReplicaListeners() method in the Simulator service type implementation, to add a call to CreateServiceReplicaListeners() as shown here:
        protected override IEnumerable<ServiceReplicaListener>
CreateServiceReplicaListeners() {
            yield return new ServiceReplicaListener(this.
CreateServiceRemotingListener);
        }
)
)
Add a web front end to a Service Fabric application
The previous section reviewed creating a simple stateful service that returns the value of a counter over RPC. To illustrate calling this service from a client application, this section reviews how to create a web front end and call a stateful service endpoint, as illustrated in Figure 4-106.
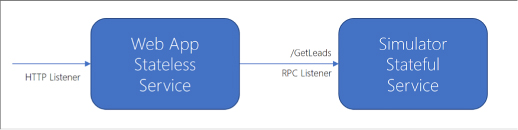
FIGURE 4-106 An HTTP listener-based web app calling a stateful service over RPC
Follow these steps to add a web app to an existing Service Fabric application:
From the Solution Explorer in Visual Studio, expand the Service Fabric application node. Right-click the Services node, and select New Service Fabric Service (Figure 4-107).

FIGURE 4-107 The context menu for adding a new Service Fabric service to the existing application services
From the New Service Fabric Service dialog, select Stateless ASP.NET Core for the service template. Supply the service name LeadGenerator.WebApp, and click OK (Figure 4-108).
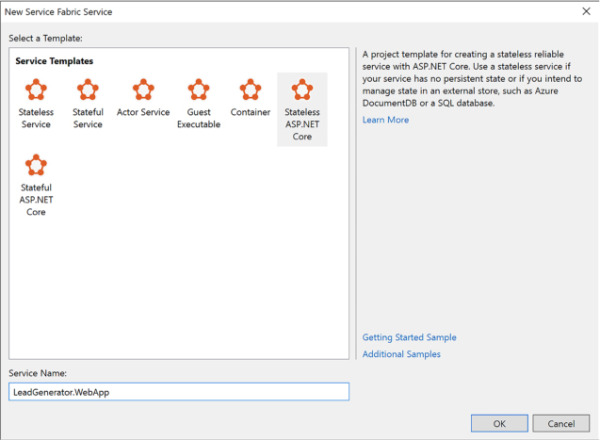
FIGURE 4-108 The New Service Fabric Service dialog where you can choose the Stateless ASP.NET Core template
From the New ASP.NET Core Web Application dialog select Web Application (Model-View-Controller) template. Click OK.
From Solution Explorer, expand the new LeadGenerator.WebApp node, and expand the PackageRoot folder where you’ll find ServiceManifest.xml. Alongside the service type definition there is a section that describes the HTTP endpoint where the web app will listen for requests:
 <Endpoints>"
  <Endpoint Protocol="http" Name="ServiceEndpoint" Type="Input" Port="8168" />
</Endpoints>
The new WebApp type is defined in WebApp.cs, which inherits StatelessService. For the service to listen for HTTP requests, the CreateServiceInstanceListeners() method sets up the WebListener as shown in this listing for the type:
internal sealed class WebApp : StatelessService
{
public WebApp(StatelessServiceContext context) : base(context)
{ }
protected override IEnumerable<ServiceInstanceListener>
CreateServiceInstanceListeners()
{
    return new ServiceInstanceListener[]
    {
        new ServiceInstanceListener(serviceContext =>
            new WebListenerCommunicationListener(serviceContext,
"ServiceEndpoint", (url, listener) =>
            {
                ServiceEventSource.Current.ServiceMessage(serviceContext,
$"Starting WebListener on {url}");
                return new WebHostBuilder().UseWebListener()
                            .ConfigureServices(services =>
                                services
                                .AddSingleton<StatelessServiceContext>(serviceCon
text))
                            .UseContentRoot(Directory.GetCurrentDirectory())
                            .UseStartup<Startup>()
                            .UseApplicationInsights()
                            .UseServiceFabricIntegration(listener,
ServiceFabricIntegrationOptions.None)
                            .UseUrls(url)
                            .Build();
            }))
    };
}
}
)
)
Next you call the stateful service that returns the leads counter value, from the stateless web application just created.
Make a copy of the service interface defined for the service type, in this case ISimulatorService:
public interface ISimulatorService : IService
{
 Task<long> GetLeads();
}
Modify the ConfigureServices instruction in WebApp.cs to inject an instance of the FabricClient type (change shown in bold):
return new WebHostBuilder().UseWebListener()
  .ConfigureServices(services => {
  services
  .AddSingleton<StatelessServiceContext>(serviceContext)
  .AddSingleton(new FabricClient());
})
Now that FabricClient is available for dependency injection, modify the HomeController to use it:
private FabricClient _fabricClient;
public HomeController(FabricClient client) { _fabricClient = client; }
Modify the Index method in the HomeController to use the FabricClient instance to call the Simulator service:
public async Task<IActionResult> Index()
{
    ViewData["Message"] = "Your home page.";
    var model = new Dictionary<Guid, long>();
    var serviceUrl = new Uri("fabric:/LeadGenerator/Simulator");
    foreach (var partition in await
_fabricClient.QueryManager.GetPartitionListAsync(serviceUrl))
    {
        var partitionKey = new ServicePartitionKey
(((Int64RangePartitionInformation)partition.PartitionInformation).LowKey);
        var proxy = ServiceProxy.Create<ISimulatorService>(serviceUrl,
partitionKey);
        var leads = await proxy.GetLeads();
        model.Add(partition.PartitionInformation.Id, leads);
    }
    return View(model);
}
Update Index.cshtml to display the counter for each partition:
@model IDictionary<Guid, long>
<h2>@ViewData["Title"].</h2>
<h3>@ViewData["Message"]</h3>
<table class="table-bordered">
    <tr>
        <td><strong>PARTITION ID</strong></td>
        <td><strong># LEADS</strong></td>
    </tr>
    @foreach (var partition in Model)
    {
        <tr>
            <td>@partition.Key.ToString()</td>
            <td>@partition.Value</td>
        </tr>
    }
</table>
To run the web app and stateful service, you can publish it to the local Service Fabric cluster. Right-click the Service Fabric application node from the Solution Explorer and select Publish. From the Publish Service Fabric Application dialog, select a target profile matching one of the local cluster options, and click Publish (Figure 4-109).
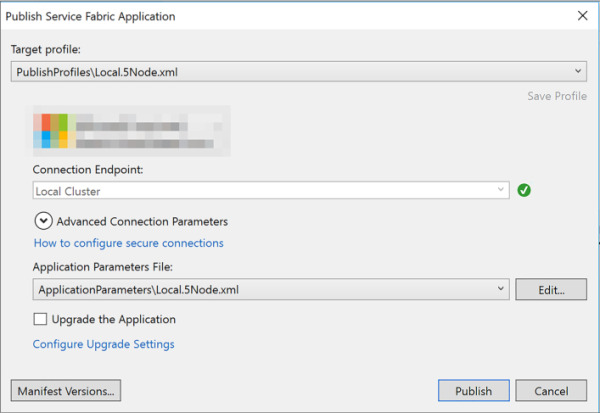
FIGURE 4-109 The Publish Service Fabric Application dialog
Once the application is deployed, you can access the web app at http://localhost:8162 (or, whatever the indicated port is in the service manifest for the web app. The home page triggers a call to the stateful service, which will increment as the counter is updated while it runs.
)
Build an Actors-based service
The actor model is a superset of the Service Fabric stateful model. Actors are simple POCO objects that have many features that make them isolated, independent unit of compute and state with single-thread execution.
To create a new Service Fabric application based on the Actor service template, follow these steps:
Launch Visual Studio, then select File > New > Project.
In the New Project dialog, select Service Fabric Application within the Cloud category. Provide a name and location for your new project, and then click OK.
Select Actor Service from the list of service templates and provide a name, such as SimpleActor.
This generates a default implementation of the Actor Service.
Monitor and diagnose services
All applications benefit from monitoring and diagnostics to assist with troubleshooting issues, evaluating performance or resource consumption, and gathering useful information about the application at runtime. For more information about Service Fabric specific approaches to this, see https://docs.microsoft.com/en-us/azure/service-fabric/service-fabric-diagnostics-overview.
Deploy an application to a container
Service Fabric can run processes and containers side by side, and containers can be Linux or Windows based containers. If you have an existing container image and wish to deploy this to an existing Service Fabric cluster, you can follow these steps to create a new Service Fabric application and set it up to deploy and run the container in your cluster:
Launch Visual Studio, nd then select File > New > Project.
In the New Project dialog, select Service Fabric Application within the Cloud category. Provide a name and location for your new project, and then click OK.
From the New Service Fabric Service dialog, choose Container for the list of templates and supply a container image and name for the guest executable to be created (Figure 4-110).
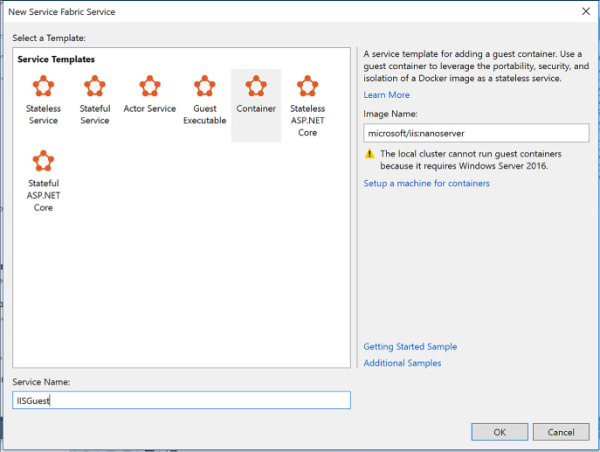
FIGURE 4-110 The New Service Fabric Service dialog with Container selected, and an image name specified
From Solution Explorer, open the ServiceManifest.xml file and modify the <Resources> section to provide a UriScheme, Port and Protocol setting for the service endpoint.
  <Resources>
    <Endpoints>
      <Endpoint Name="IISGuestTypeEndpoint" UriScheme="http" Port="80"
Protocol="http"/>
    </Endpoints>
  </Resources>
From Solution Explorer, open the ApplicationManifest.xml file. Create a policy for container to host <PortBinding> policy by adding this <Policies> section to the <ServiceManifestImports> section. Indicate the container port for your container. In this example the container port is 80.
  <ServiceManifestImport>
    <ServiceManifestRef ServiceManifestName="IISGuestPkg"
ServiceManifestVersion="1.0.0" />
    <ConfigOverrides />
    <Policies>
      <ContainerHostPolicies CodePackageRef="Code">
        <PortBinding ContainerPort="80" EndpointRef="IISGuestTypeEndpoint"/>
     </ContainerHostPolicies>
   </Policies>
 </ServiceManifestImport>
Now that you have the application configured, you can publish and run the service.
)
)
)
 EXAM TIP
Currently, you cannot run containers in the local Service Fabric cluster because it requires Windows Server 2016 with container support.
Migrate apps from cloud services
You can migrate your existing cloud services, both web and worker roles, to Service Fabric applications following instructions in the following reference at https://docs.microsoft.com/en-us/azure/service-fabric/service-fabric-cloud-services-migration-worker-role-stateless-service.
Scale a Service Fabric app
In order to scale a Service Fabric app, the following terms are important to understand: Instances, Partitions, and Replicas.
By default, the Service Fabric tooling produces three publish profiles that you can use to deploy your application:
Local.1Node.xml To deploy against the local 1-node cluster.
Local.5Node.xml To deploy against the local 5-node cluster.
Cloud.xml To deploy against a Cloud cluster.
These publish profiles indicate the settings for the number of instances and partitions for each service. Consider this example of the parameters to a Local.5Node.xml:
<Parameters>
  <Parameter Name="WebApp_InstanceCount" Value="3" />
  <Parameter Name="Simulator_PartitionCount" Value="3" />
  <Parameter Name="Simulator_MinReplicaSetSize" Value="3" />
  <Parameter Name="Simulator_TargetReplicaSetSize" Value="3" />
 </Parameters>
WebApp_InstanceCount Specifies the number of instances the WebApp service must have within the cluster.
Simulator_PartitionCount Specifies the number of partitions (for the stateful service) the Simulator service must have within the cluster.
Simulator_MinReplicaSetSize Specifies the minimum number of replicas required for each partition that the WebApp service should have within the cluster.
Simulator_TargetReplicaSetSize Specifies the number of target replicas required for each partition that the WebApp service should have within the cluster.
Consider the following diagram illustrating the instances and partitions associated with the stateless Web App and stateful simulator service, as shown in the Local.5Node.xml configuration (Figure 4-111).
)
FIGURE 4-111 The instances for a stateless service, and partitions for a stateful service
The Web App instance count is set to 3. As the diagram illustrates, when published to a Service Fabric cluster in Azure requests would be load balanced across those three instances.
The Simulator service is assigned three partitions, each of which have replicas to ensure durability of each instance’s state.
EXAM TIP
Sometimes the terms instances and replicas are used interchangeably, however, instances are for stateless services whereas replicas are for stateful services.
Create, secure, upgrade, and scale Service Fabric Cluster in Azure
To publish your Service Fabric application to the Azure in production, you’ll create a cluster, learn how to secure it, learn how to upgrade applications with zero downtime, and configure the application to scale following some of the practices already discussed. The following references will start you off with these topics:
For an introduction to creating a Service Fabric Cluster see:
For details on securing Azure Service Fabric Clusters in production, see this reference:
For details on upgrading clusters, see this reference:
You can scale clusters manually or programmatically as described in these references: