Design and implement Azure PaaS compute and web and mobile services
- By Michele Leroux Bustamante, Ike Ellis, Zoiner Tejada
- 4/7/2018
- Skill 4.1: Design Azure App Service Web Apps
- Skill 4.2: Design Azure App Service API Apps
- Skill 4.3: Develop Azure App Service Logic Apps
- Skill 4.4: Develop Azure App Service Mobile Apps
- Skill 4.5: Implement API Management
- Skill 4.6: Implement Azure Functions and WebJobs
- Skill 4.7: Design and Implement Azure Service Fabric apps
- Skill 4.8: Design and implement third-party Platform as a Service (PaaS)
- Skill 4.9: Design and implement DevOps
- Thought experiment
- Thought experiment answers
- Chapter summary
Skill 4.5: Implement API Management
Azure API Management is a turnkey solution for publishing, managing, securing, and analyzing APIs to both external and internal customers in minutes. You can create an API gateway for back-end services hosted anywhere, not just those hosted on Azure. Many modern APIs protect themselves by rate-limiting consumers, meaning, limiting how many requests can be made in a certain amount of time. Traditionally, there is a lot of work that goes into that process. When you use API Management to manage your API, you can easily secure it and protect it from abuse and overuse with an API key, JWT validation, IP filtering, and through quotas and rate limits.
If you have several APIs as part of your solution, and they are hosted across several services or platforms, you can group them all behind a single static IP and domain, simplifying communication, protection, and reducing maintenance of consumer software due to API locations changing. You also can scale API Management on demand in one or more geographical locations. Its built-in response caching also helps with improving latency and scale.
Hosting your APIs on the API Management platform also makes it easier for developers to use your APIs, by offering self-service API key management, and an auto-generated API catalog through the developer portal. APIs are also documented and come with code examples, reducing developer on-boarding time using your APIs.
API Management is made up of the following components:
The API gateway is the endpoint that:
Accepts API calls and routes them to your backends.
Verifies API keys, JWT tokens, certificates, and other credentials.
Enforces usage quotas and rate limits.
Transforms your API on the fly without code modifications.
Caches backend responses where set up.
Logs call metadata for analytics purposes.
The publisher portal is the administrative interface where you set up your API program. Use it to:
Define or import API schema.
Package APIs into products.
Set up policies like quotas or transformations on the APIs.
Get insights from analytics.
Manage users.
The developer portal serves as the main web presence for developers, where they can:
Read API documentation.
Try out an API via the interactive console.
Create an account and subscribe to get API keys.
Access analytics on their own usage.
Create managed APIs
The API Management service is the platform on which the API gateway, publisher portal, and developer portal are hosted. As such, before you can create APIs, you must first create a service instance.
Create an API Management service
Navigate to the portal accessed via https://portal.azure.com.
Select New on the command bar.
Select Developer Tools, and then API Management (Figure 4-75).
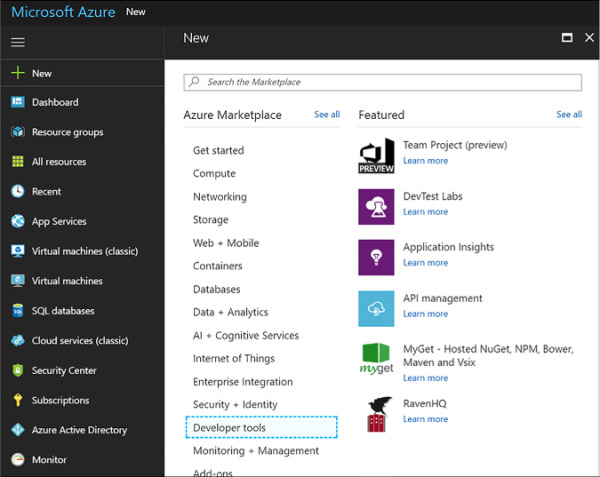
FIGURE 4-75 Creating a new API Management service instance from the Azure Portal
Provide a unique name, select a resource group and location, enter an organization name that will appear on the developer portal and emails, an administrator email, your pricing tier, select Pin To Dashboard, and then click Create.
)
Add a product
Before you can publish an API, it needs to be added to a product. A product in API Management contains one or more APIs, as well as constraints such as a usage quota and terms of use. This is a great way to add API access levels, like starter (limit to five calls/minute) or unlimited. You can create several products to group APIs with their own usage rules. Developers can subscribe to a product once it is published, and then begin using its APIs.
Follow these steps to add and publish a new product:
Navigate to your API Management service on the portal.
Select Publisher Portal on the top of the overview blade.
Select Products on the left-hand menu, and then click Add Product.
Within the new product form, provide a Title, which should be a descriptive name for your product that appears on the developer and admin portals. Provide a Description that explains the product’s purpose and any other information you want to display. The remaining fields allow you to set your level of protection, meaning, whether your product requires a subscription, and if so, whether the subscription needs to be approved by an administrator, and whether developers can subscribe more than once. Once finished, click Save.
Once the product has been added, you need to add one or more APIs to it before you can publish it. Select a product, and then click the Add API To Product link. This gives you a list of APIs that you can assign to the product.
Create a new API
Navigate to your API Management service on the portal.
Select Publisher Portal on the top of the overview blade.
Select APIs on the left-hand menu, and then click Add API.
Within the new product form (Figure 4-76):
Provide a unique Web API Name, which should be a descriptive name for your API that appears on the developer and publisher portals.
Enter the Web Service URL, which is the HTTP endpoint for your API.
Enter the Web Service URL suffix, which is unique to your API, and is the last part of the API’s public URL.
Select the desired Web API URL Scheme (HTTP or HTTPS (default)).
Select the product you created and any others you want to add it to.
When finished, click OK.
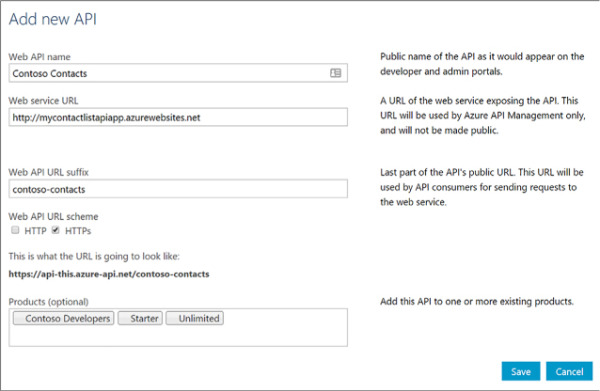
FIGURE 4-76 Completing the Response action form for the logic app
)
Add an operation to your API
Before you can use your new API, you must add one or more operations. These operations do things like enable service documentation, the interactive API console, set per operation limits, set request/response validation, and configure operation-level statistics.
Navigate to your API Management service on the portal.
Select Publisher Portal on the top of the overview blade.
Select APIs on the left-hand menu, select your API from the list, and then select the Operations tab.
Click + Add Operation.
By default, the Signature tab will be selected. The Signature is the URL template used to send requests to the underlying API. Here you select (Figure 4-77):
The HTTP verb (GET, POST, etc.).
Type in the URL template (e.g. /contacts/{id}).
Type in a display name, and description.
You can also add a rewrite URL template to call the back-end with a converted URL.
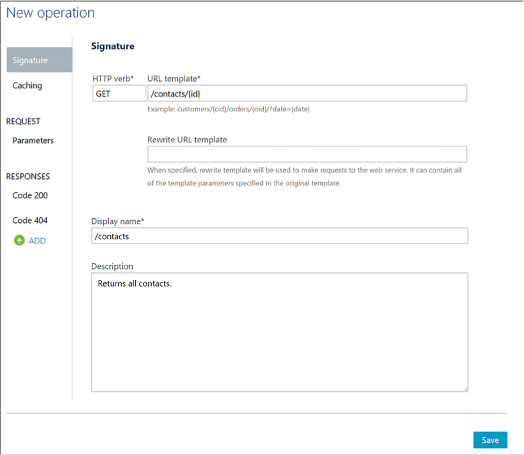
FIGURE 4-77 Adding a new operation to a managed API
Select the Parameters tab. New query parameters are automatically generated based on the URL template defined in the signature. In our case, an id template parameter was generated because the URL template of our signature for this operation is /contacts/{id}. Specify the type (string, number, etc.) and provide a description for each query parameter (Figure 4-78).
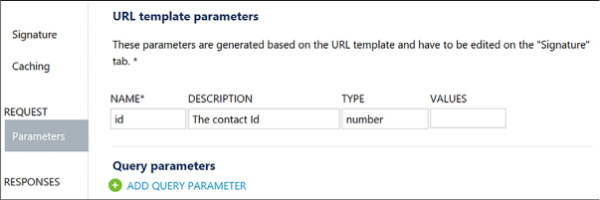
FIGURE 4-78 URL template parameters
You can optionally use the other tabs to specify caching and responses for the operation. Click Save when finished.
)
Publish your product to make your API available
The last step to making your API available to other developers is to publish your product to which this and any other APIs have been added.
To publish your product, follow these steps:
Navigate to your API Management service on the portal.
Select Publisher portal on the top of the overview blade.
Select Products on the left-hand menu, and then click select your product from the list.
The summary tab will indicate whether your product has been published, and any associated APIs. You must have at least one API added before you can publish. Click the Publish link.
When the confirmation appears, click Yes, and then publish it.
After publishing, select the Visibility tab. Choose which roles, such as developers, you want to be able to see the product on the developer portal and subscribe to the product. Click Save when finished.
Configure API Management policies
API Management policies allow you, as the publisher, to determine the behavior of your APIs through configuration, requiring no code changes. You define a policy definition, which is a collection of statements that are executed sequentially on the request or response of your API. There are many policies you can select from, such as whether to allow cross domain calls, how to authenticate requests, find and replace strings in the body, setting rate limits, and many more.
Because the API gateway receives all requests to your APIs, the policies you defined are applied at this level. The policies statements you choose affect both inbound requests and outbound responses. Policies can be applied globally, or scoped to the Product, API, or Operation level.
To configure a policy, follow these steps:
Navigate to your API Management service on the portal.
Select Publisher Portal on the top of the overview blade.
Select Policies on the left-hand menu.
At the top of the policies page, you will find select lists to define the policy scope at the Product, API, and Operations levels. If you do not select a specific operation, all operations are included in this policy. To create a policy scoped globally, simply deselect any options from these select lists (Figure 4-79).
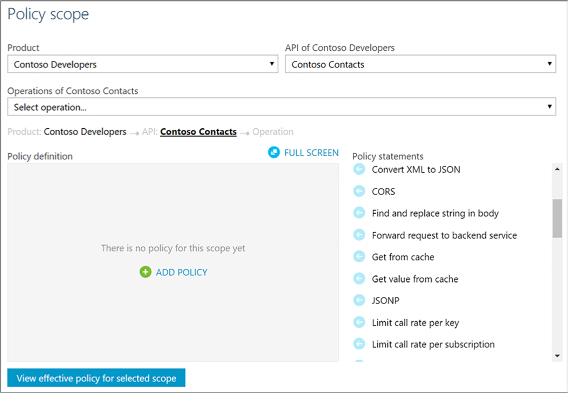
FIGURE 4-79 Policies page for an API Management service in the Publisher portal
To add a new policy to the selected policy scope, select + Add Policy link in the Policy definition area.
The policy definition will appear in XML format. To add an inbound policy that limits the call rate per key, place your cursor just inside the content of the inbound XML element, and then click the Limit Call Rate Per Key policy statement on the right. This adds the statement to rate limit inbound requests to the number of calls you specify within your defined period of time in seconds, and any other conditions you desire (Figure 4-80).
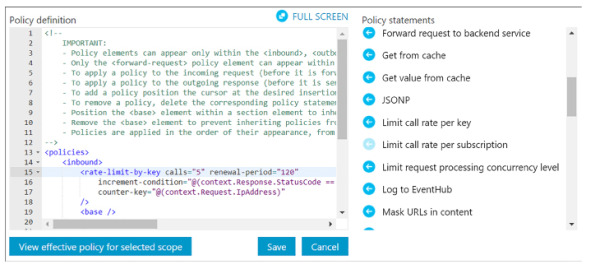
FIGURE 4-80 Editing the policy definition for an API Management service in the Publisher portal
When you are finished, click Save. Your changes will be immediately applied to the API Management gateway.
)
)
)
Protect APIs with rate limits
Protecting your published APIs by throttling incoming requests is one of the most attractive offerings of API Management. When you open up your API for others to use, it is difficult to guarantee a promised level of service if you cannot control the demand on your resources. Or, you may be interested in controlling your resource costs by limiting requests, preventing you from unnecessarily scaling up your services to meet unexpected demand. Rate limiting, or throttling, is common practice when providing APIs. Oftentimes, API publishers offer varying levels of access to their APIs. For instance, you may choose to offer a free tier with very restrictive rate limits, and various paid tiers offering higher request rates. This is where API Management’s products come into play. Define products for your varying service levels, and apply rate limiting policies to each product, accordingly.
Create a product to scope rate limits to a group of APIs
The following steps show how to create a free trial, adding APIs that developers can use on a rate-limited free trial basis:
Navigate to your API Management service on the portal.
Select Publisher Portal on the top of the Overview blade.
Create a new product named Free Trial.
Set the description to Subscribers Will Be Able To Run 10 Calls/Minute Up To A Maximum Of 200 Calls/Week.
Set the visibility to Developers.
Add your APIs to the product and publish it.
Go to Policies and set the policy scope to the free trial product.
Click + Add Policy.
Position the cursor within the inbound element.
Scroll through the list of policy statements and select Limit Call Rate Per Subscription. Modify the XML to set calls to 10 and renewal-period to 60. You can delete the API and operation elements because they are not needed in this scenario.
Position your cursor immediately below the rate-limit element you added. Select Set Usage Quota Per Subscription in the list of policy statements. Modify the XML to set calls to 200 and renewal-period to 604800. You can delete the API and operation elements because they are not needed in this scenario.
Save your changes. In the end, your inbound policy should look as follows (Figure 4-81):
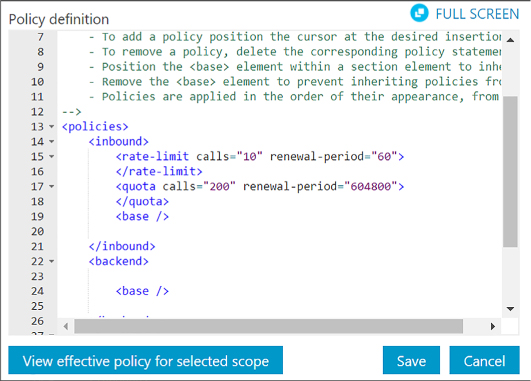
FIGURE 4-81 Editing the policy definition to set rate limits on a product
)
Advanced rate limiting
In its simplest implementation, you can control the rate of requests or the total requests/data transferred. These constraints do not help when individual end-users of your API consume exponentially more of the quota than other users. If you want to avoid having high-usage consumers limit access to occasional users, by using up the pool of available resources, consider using the new rate-limit-by-key and quota-by-key policies. These are more flexible rate limit ing policies that allow you to define expressions to track traffic usage by user-level information, such as IP address and user identity.
Here is an example of rate and quota limiting by IP address:
<rate-limit-by-key calls="10"
          renewal-period="60"
          counter-key="@(context.Request.IpAddress)" />

<quota-by-key calls="1000000"
          bandwidth="10000"
          renewal-period="2629800"
          counter-key="@(context.Request.IpAddress)" />
Add caching to improve performance
Caching is a great way to limit your resource consumption, like bandwidth, as well as reduce latency for infrequently changing data. API Management allows you to configure response caching on operations.
Follow these steps to add response caching for your API (Figure 4-82), and review caching policies:
)
Navigate to your API Management service on the portal.
Select Publisher portal on the top of the overview blade.
Select APIs on the left-hand menu.
Select the ECHO API, which is automatically added to new API Management services.
Select the Operations tab, and then select GET Retrieve Resource (Cached) from the list.
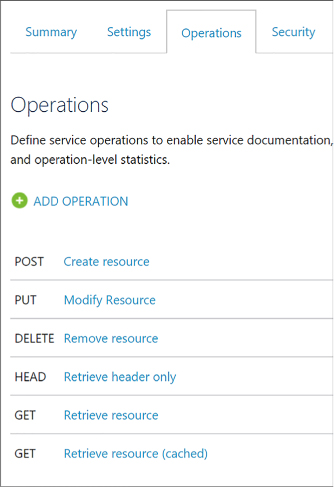
FIGURE 4-82 The API operations tab
Select the Caching tab (Figure 4-83) to view the caching settings. To enable caching on an operation, select the Enable check box. You can modify the keyed operation responses by setting values in the Vary By Query String Parameters and Vary By Headers fields. In this case, cache keys are being computed on two different headers: Accept and Accept-Charset. Duration sets the cache duration in seconds. Here it is set to 3600 seconds.
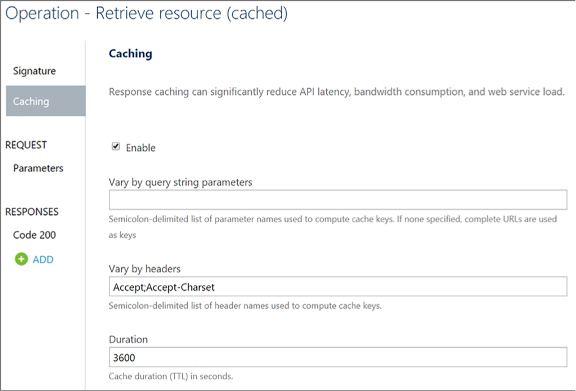
FIGURE 4-83 Caching settings for the GET operation of the Echo API
Select Policies from the left-hand menu of the publisher portal.
Select Echo API from the API select list, and then Retrieve Resource (Cached) from the Operation select list.
Here you see that the caching policies in the policy editor reflect the values in the Caching tab of the operation. Any changes here are reflected on the Caching tab, and vice-versa.
)
Monitor APIs
API Management provides a few methods by which you can monitor resource usage, service health, activities, and analytics. If you want real-time monitoring, as well as richer debugging, you can enable diagnostics on your logic app and send events to OMS with Log Analytics, or to other services, such as Azure Storage, and Event Hubs. Select Diagnostics Logs from the left-hand menu of your API Management service, and then select Turn On Diagnostics to archive your gateway logs and metrics to a storage account, stream to an event hub, or send to Log Analytics on OMS.
Activity logs provide insight into the operations that were performed on your API Management services, so you can determine the “what, who, and when” for any write operations taken on your API Management services. Select Activity Log from the left-hand menu to filter and view these logs. From here, you can select Export to archive these logs in a storage account or send them to an event hub. You can also select Log Analytics to send the logs to OMS.
Select Metrics under Monitoring in the left-hand menu of your API Management service to view the state and health of your APIs in near real-time. These metrics are emitted every minute. You can monitor gateway requests, determine which of those were successful or failed, and also view unauthorized gateway requests. It displays an interactive chart based on the selected metrics.
Select Alert rules under Monitoring to create alerts based on metrics (such as any time failed gateway requests occur over a one-hour period), activity logs (with categories such as security, service health, autoscale, etc.), and near real time metrics, based on the data captured by your API Management service’s metrics, in time periods spanning from one minute to 24 hours. Alerts can be emailed to one or more recipients, route alerts to a webhook, or run a logic app.
Open the publisher portal to view Analytics. This shows an overview of usage by developers, top products, top subscriptions, top APIs, and top operations. Each of these categories show the number of successful calls versus blocked or failed calls, as well as bandwidth used and average response time, when applicable. The usage tab shows number of calls and bandwidth by region, highlighting countries on a map, corresponding with the origin of the requests. You can select any continent or country to drill down further into the selected region. The health tab shows statistics about status codes, caching, API response time, and Service response time. Finally, the activity tab shows more detailed information about requests by developers, on products, by subscriptions, for APIs, and on which operations.
Customize the developer portal
The API Management developer portal is built on top of a content management system (CMS), which gives you flexibility on ways you can customize its layout, content, and styles. Because this is the portal through which developers discover, subscribe to, and learn more about your APIs, you may wish to alter the look and feel to more closely match your company’s website, or craft the experience for your end users in general.
There are three different methods by which you can customize the developer portal.
Edit static page content and layout elements
The layout of every page of the developer portal is based on small page elements called widgets (Figure 4-84).
)
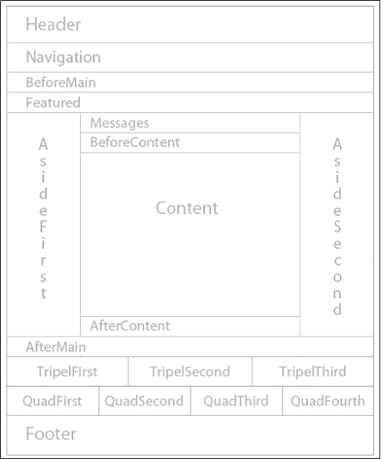
FIGURE 4-84 The widget layout of the developer portal
The content area on the page is specific to an individual page’s contents. Any Contents widget can be edited to modify that page’s content. The page layout elements are comprised of the remaining widgets. Any edits made to these layout widgets are applied to all pages within the portal.
To edit the contents of a layout widget, perform the following steps:
Navigate to your API Management service on the portal.
Select Publisher portal on the top of the overview blade.
Select Widgets on the left-hand menu, underneath the DEVELOPER PORTAL section.
Select the widget you wish to edit, such as Banner.
The Edit Widget form allows you to select the zone for the widget, layer, position, title, name (used for CSS), and its HTML.
Make changes as desired, and then click Save. You immediately see your changes on the developer portal.
To edit the contents of a page, perform the following steps:
Navigate to your API Management service on the portal.
Select Publisher portal on the top of the overview blade.
Select Content on the left-hand menu, underneath the DEVELOPER PORTAL section.
Select the page you wish to edit, such as Welcome.
The Edit Page form allows you change the page title, select whether you wish to display the title on the front-end, and its HTML.
Make changes as desired, and then click Save. When you are satisfied with your changes, click Publish Now to make those changes visible to everyone. You immediately see your changes on the developer portal.
Using these tools, you can add new layout widgets, as well as new pages. Use the Navigation area to create custom menu links or rearrange their order.
Customize the styling
Change the colors, fonts, spacing, and other styles by altering the style rules in the developer portal. For instance, change the colors and fonts to match your company’s website. To change these style rules, you need to be logged in to the developer portal as an administrator. This requires opening the developer portal from the publisher portal.
Navigate to your API Management service on the portal.
Select Publisher portal on the top of the overview blade.
Select Developer portal from the top-right of the page.
On the developer portal, hover your mouse over the customization icon to display the customization toolbar (Figure 4-85), and then select Styles from the toolbar.

FIGURE 4-85 The customization toolbar in the developer portal
In the list of editable styles that appear, you can either look through the list and change style values as you see fit, or click the Select An Element On The Page button, and then select any element on the page to view only its styles.
When you are finished making edits, click the Publish button at the bottom of the customization toolbar. This will show a preview of your changes. When satisfied, click the Publish Customizations button to make your changes publicly available.
)
Customize using templates
Use templates to customize the system-generated developer pages, such as API docs, user authentication, products, etc. Template markup uses the DotLiquid syntax, based on Ruby’s Liquid markup, to alter the appearance and behavior of the corresponding page. Dynamic content in the template is controlled through tokenized strings. When you select a template to edit, there are three panes that are displayed. The top pane is a preview of the corresponding page. On the bottom left is the template editing pane where you edit the markup, and on the bottom right is the template data pane. This pane serves as a guide to the data model for the entities available in the selected template. You can reference the template data when adding tokenized strings to the template beside it.
To edit templates, follow these steps:
Navigate to your API Management service on the portal.
Select Publisher portal on the top of the overview blade.
Select Developer portal from the top-right of the page.
On the developer portal, hover your mouse over the customization icon to display the customization toolbar, and then select Templates from the toolbar.
Select the template you wish to edit from the list.
Alter the template markup, using the bottom-left template editing pane. Here you can use a mix of HTML and tokenized strings. Reference the template data to the right to view tokenized strings you can add to the template, and the values they will display if you reference them. All changes will update the preview pane on top in real time.
When finished editing, click the save icon in the template editing pane.
Saved templates can be published either individually, or all together. To publish an individual template, click Publish in the template editor.
Click Yes to confirm and make your changes to the template live on the developer portal.