Design and implement Azure PaaS compute and web and mobile services
- By Michele Leroux Bustamante, Ike Ellis, Zoiner Tejada
- 4/7/2018
- Skill 4.1: Design Azure App Service Web Apps
- Skill 4.2: Design Azure App Service API Apps
- Skill 4.3: Develop Azure App Service Logic Apps
- Skill 4.4: Develop Azure App Service Mobile Apps
- Skill 4.5: Implement API Management
- Skill 4.6: Implement Azure Functions and WebJobs
- Skill 4.7: Design and Implement Azure Service Fabric apps
- Skill 4.8: Design and implement third-party Platform as a Service (PaaS)
- Skill 4.9: Design and implement DevOps
- Thought experiment
- Thought experiment answers
- Chapter summary
Skill 4.3: Develop Azure App Service Logic Apps
Azure Logic Apps is a fully managed iPaaS (integration Platform as a Service) that helps you simplify and implement scalable integrations and workflows in the cloud. As such, you don’t have to worry about infrastructure, management, scalability, and availability because all of that is taken care of for you. Its Logic App Designer gives you a nice way to model and automate your process visually, as a series of steps known as a workflow. At its core, it allows you to quickly integrate with many services and protocols, inside of Azure, outside of Azure, as well as on-premises. When you create a Logic App, you start out with a trigger, like ‘When an email arrives at this account,’ and then you act on that trigger with many combinations of actions, condition logic, and conversions.
Create a Logic App connecting SaaS services
One of the strengths of Logic Apps is its ability to connect a large number of SaaS (Software as a Service) services to create your own custom workflows. In this example, we will connect Twitter with an Outlook.com or hosted Office 365 mailbox to email certain tweets as they arrive.
To create a new Logic App in the portal, complete the following steps:
Navigate to the portal accessed via https://portal.azure.com.
Select New on the command bar.
Select Enterprise Integration, then Logic App (Figure 4-43).
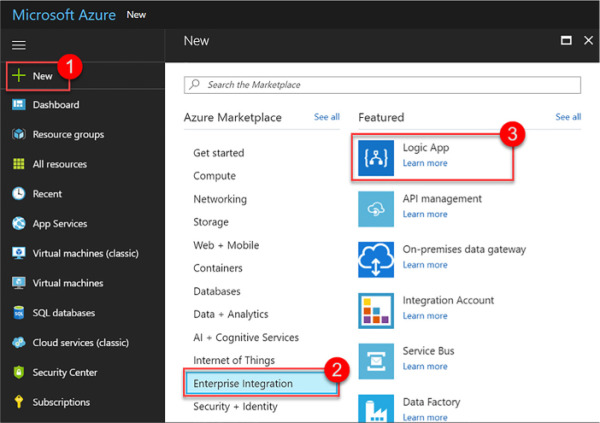
FIGURE 4-43 Creating a new Logic App from the Azure Portal
Provide a unique name, select a resource group and location, check Pin To Dashboard, and then click Create (Figure 4-44).
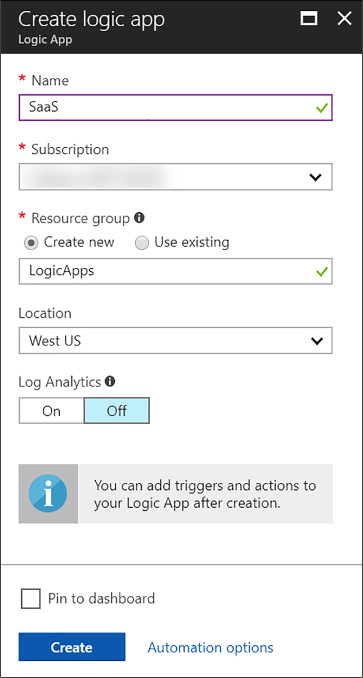
FIGURE 4-44 The Create logic app form
)
Follow the above steps to create new Logic Apps as needed in the remaining segments for this skill.
Once the Logic App has been provisioned, open it to view the Logic Apps Designer. This is where you design or modify your Logic App. You can select from a series of commonly used triggers, or from several templates you can use as a starting point. The following steps show how to create one from scratch.
Select Blank Logic App under Templates.
All Logic Apps start with a trigger. Search the list for Twitter, and then select it.
Click Sign in to create a connection to Twitter with your Twitter account. A dialog will appear where you sign in and authorize the Logic App to access your account.
In the Twitter trigger form on the designer (Figure 4-45), enter your search text to return certain tweets (such as #nasa), and select an interval and frequency, establishing how often you wish to check for items, returning all tweets during that time span.
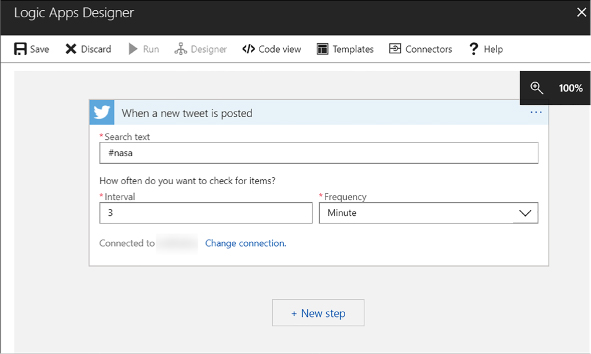
FIGURE 4-45 The Twitter trigger form in the Logic Apps Designer
Select the + New Step button, and then choose Add An Action.
Type outlook in the search box, and then select Office 365 Outlook (Send An Email) from the results. Alternately, you can select Outlook.com from the list (Figure 4-46).
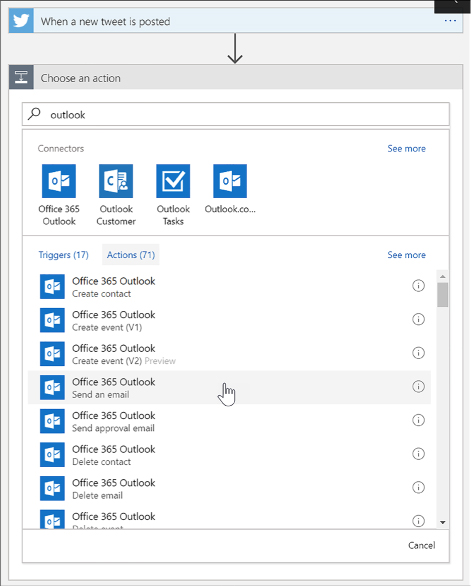
FIGURE 4-46 Adding a new Office 365 Outlook action in the Logic Apps Designer
Click Sign In to create a connection to your Office 365 Outlook account (Figure 4-47).
In the Send An Email form, provide values for the email recipient, the subject of the email, and the body. In each of these fields, you can select parameters from the Twitter Connector, such as the tweet’s text and who posted it.
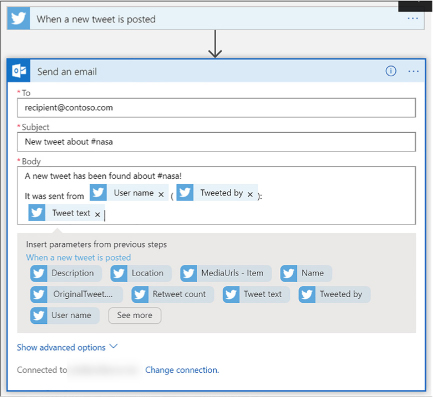
FIGURE 4-47 Adding details to a new Office 365 Outlook action in the Logic Apps Designer
Click Save in the Logic Apps Designer menu. Your Logic App is now live. If you wish to test right away and not wait for your trigger interval, click Run.
Create a Logic App with B2B capabilities
Logic Apps support business-to-business (B2B) workflows and communication through the Enterprise Integration Pack. This allows organizations to exchange messages electronically, even if they use different protocols and formats. Enterprise integration allows you to store all your artifacts in one place, within your integration account, and secure messages through encryption and digital signatures. To access these artifacts from a logic app, you must first link it to your integration account. Your integration account needs both Partner and Agreement artifacts prior to creating B2B workflows for your logic app.
Create an integration account
To get started with the Enterprise Integration Pack so you can create B2B workflows, you must first create an integration account, following these steps:
Navigate to the portal accessed via https://portal.azure.com.
Select More Services on the command bar.
In the filter box, type integration, and then select Integration Accounts in the results list (Figure 4-48).
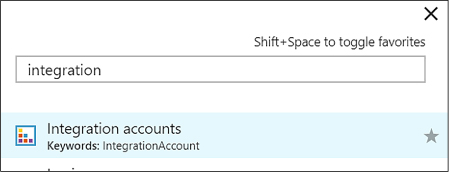
FIGURE 4-48 Navigating to the Integration accounts blade
At the top of the Integration Accounts blade, select + Add.
Provide a name for your Integration Account (Figure 4-49), select your resource group, location, and a pricing tier. Once validation has passed, click Create.
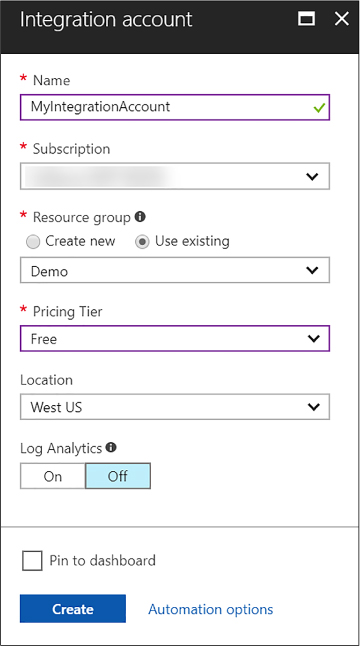
FIGURE 4-49 The create Integration account form
Add partners to your integration account
Partners are entities that participate in B2B transactions and exchange messages between each other. Before you can create partners that represent you and another organization in these transactions, you must both share information that identifies and validates messages sent by each other. After you discuss these details and are ready to start your business relationship, you can create partners in your integration account to represent you both. These message details are called agreements. You need at least two partners in your integration account to create an agreement. Your organization must be the host partner, and the other partner(s) guests. Guest partners can be outside organizations, or even a department in your own organization.
To add a partner to your integration account, follow these steps:
Navigate to the portal accessed via https://portal.azure.com.
Select More Services on the command bar.
In the filter box, type integration, then select Integration Accounts in the results list.
Select your integration account, and then select the Partners tile.
In the Partners blade, select + Add.
Provide a name for your partner (Figure 4-50), select a Qualifier, and then enter a Value to help identify documents that transfer through your apps. When finished, click OK.
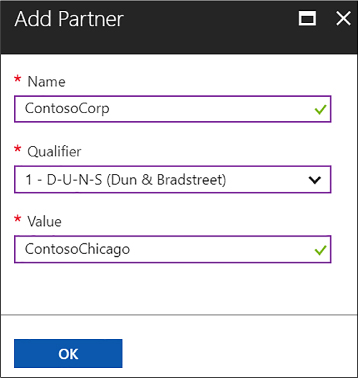
FIGURE 4-50 Adding a partner to an Integration account
After a few moments, the new partner (Figure 4-51) will appear in your list of partners.

FIGURE 4-51 Partners added to an Integration account
)
Add an agreement
Now that you have partners associated with your integration account, you can allow them to communicate seamlessly using industry standard protocols through agreements. These agreements are based on the type of information exchanged, and through which protocol or transport standards they will communicate: AS2, X12, or EDIFACT.
Follow these steps to create an AS2 agreement:
Navigate to the portal accessed via https://portal.azure.com.
Select More Services on the command bar.
In the filter box, type integration, and then select Integration Accounts in the results list (Figure 4-52).
Select your integration account, and then select the Agreements tile.
In the Agreements blade, select + Add.
Provide a name for your agreement and select AS2 for the agreement type. Now select the Host Partner, Host Identity, Guest Partner, and Guest Identity. You can override send and receive settings as desired. Click OK.
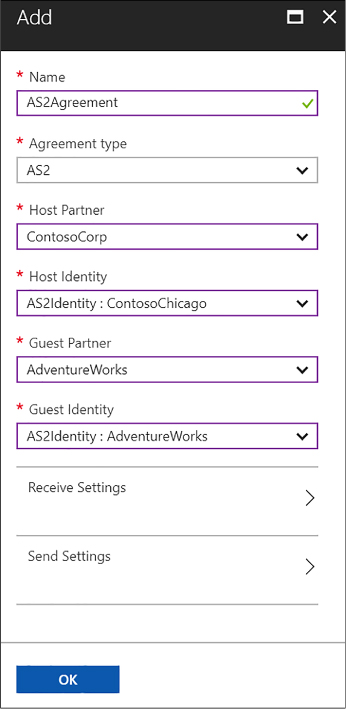
FIGURE 4-52 Adding an agreement to an Integration account
Link your Logic app to your Enterprise Integration account
You will need to link your Logic app to your integration account so you can create B2B workflows using the partners and agreements you’ve created in your integration account. You must make sure that both the integration account and Logic app are in the same Azure region before linking.
To link, follow these steps:
Navigate to the portal accessed via https://portal.azure.com.
Select More Services on the command bar.
In the filter box, type logic, and then select Logic Apps in the results list.
Select your logic app, and then select Workflow settings.
In the Workflow settings blade, select your integration account from the select list, and click Save (Figure 4-53).
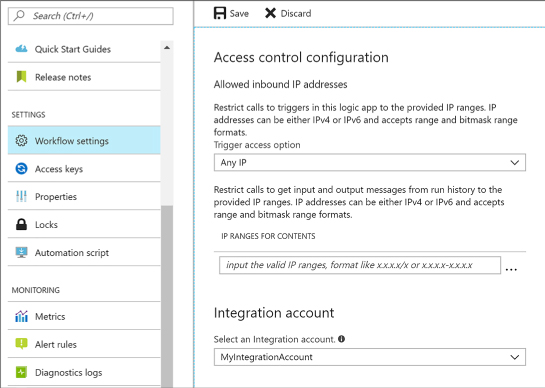
FIGURE 4-53 Linking an integration account with a logic app
Use B2B features to receive data in a Logic App
After creating an integration account, adding partners and agreements to it, and linking it to a Logic app, you can now create a B2B workflow using the Enterprise Integration Pack, following these steps:
Open the Logic App Designer on the Logic app that has a linked integration account.
Select Blank Logic App under Templates.
Search for “http request” in the trigger filter, and then select Request (When an HTTP request is received) from the list of results (Figure 4-54).
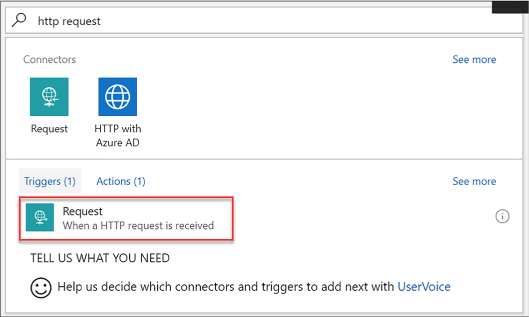
FIGURE 4-54 Selecting a Request trigger in the Logic App Designer
Select the + New Step button, and then choose Add An Action.
Type as2 in the search box, and then select AS2 (Decode AS2 Message) from the results (Figure 4-55).
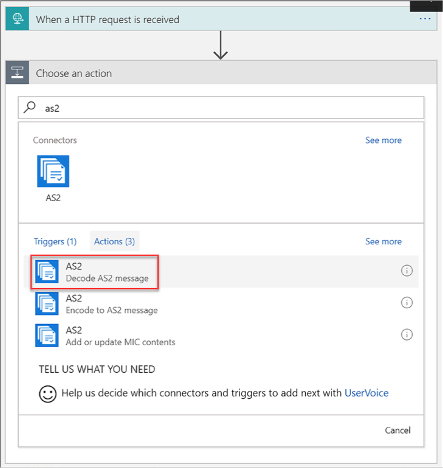
FIGURE 4-55 Selecting a Decode AS2 Message action in the Logic App Designer
In the form that follows, provide a connection name, and then select your integration account, and click Create (Figure 4-56).
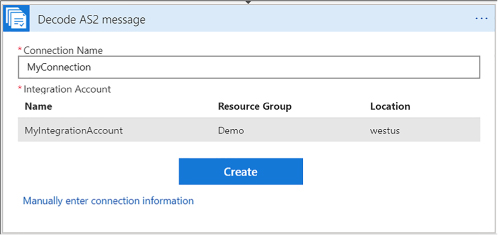
FIGURE 4-56 Setting the Decode AS2 Message connection information form in the Logic App Designer
Add the Body that you want to use as input. In this example, we selected the body of the HTTP request that triggers the Logic app. Add the required Headers for AS2. In this example, we selected the headers of the HTTP request that triggers the Logic app (Figure 4-57).
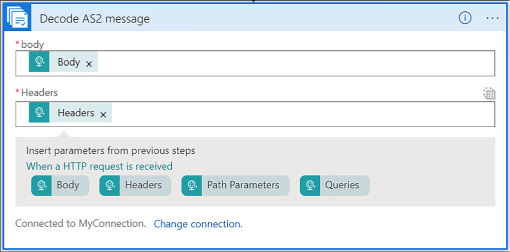
FIGURE 4-57 Setting the Decode AS2 Message body and headers information form in the Logic App Designer
Select the + New Step button, and then choose Add An Action.
Type x12 in the search box, and then select X12 (Decode X12 Message) from the results (Figure 4-58).
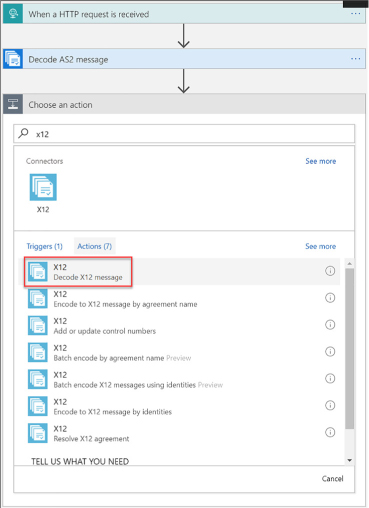
FIGURE 4-58 Selecting a Decode X12 Message action in the Logic App Designer
In the form that follows, provide a connection name, and then select your integration account as before, and click Create (Figure 4-59).
The input for this new action is the output for the previous AS2 action. Because the actual message content is JSON-formatted and base64-encoded, you must specify an expression as the input. To do this, you type the following into the X12 Flat File Message to Decode field: @base64ToString(body(‘Decode_AS2_Message’)?[‘AS2Message’]?[‘Content’])
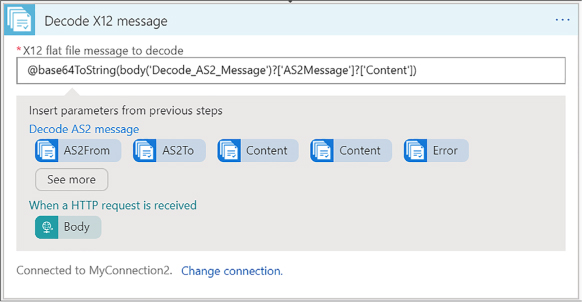
FIGURE 4-59 Setting the Decode X12 flat file message to decode the information form in the Logic App Designer
Select the + New Step button, and then choose Add An Action (Figure 4-60).
Type response in the search box, and then select Request (Response) from the results.
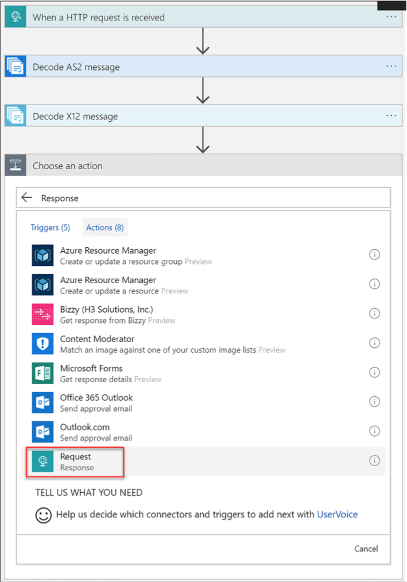
FIGURE 4-60 Selecting a Request (Response) action in the Logic App Designer
The response body should include the MDN from the output of the Decode X12 Message action (Figure 4-61). To do this, we type the following into the Body field: @base64ToString(body(‘Decode_AS2_message’)?[‘OutgoingMdn’]?[‘Content’])
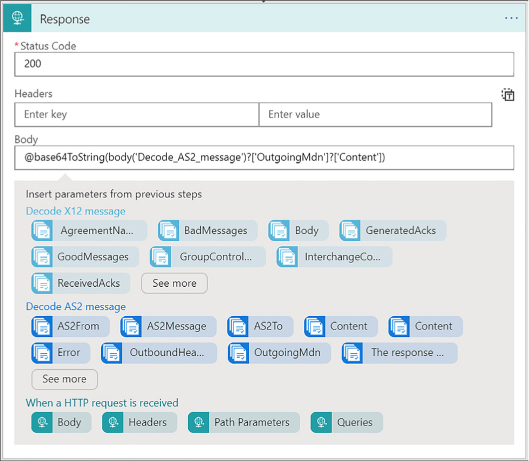
FIGURE 4-61 Setting the body in the Response form in the Logic App Designer
Click Save in the Logic Apps Designer menu.
Create a Logic App with XML capabilities
Oftentimes, businesses send and receive data between one or more organizations in XML format. Due to the dynamic nature of XML documents, schemas are used to confirm that the documents received are valid and are in the correct format. Schemas are also used to transform data from one format to another. Transforms are also known as maps, which consist of source and target XML schemas. When you link your logic app with an integration account, the schema and map artifacts within enable your Logic app to use these Enterprise Integration Pack XML capabilities.
The XML features included with the Enterprise Integration pack are:
XML validation Used to validate incoming and outgoing XML messages against a specific schema.
XML transform Used to convert data from one format to another.
Flat file encoding/decoding Used to encode XML content prior to sending, or to convert XML content to flat files.
XPath Used to extract specific properties from a message, using an xpath expression.
Add schemas to your integration account
Since schemas are used to validate and transform XML messages, you must add one or more to your integration account before working with the Enterprise Integration Pack XML features within your linked logic app. To add a new schema, follow these steps:
Navigate to the portal accessed via https://portal.azure.com.
Select More Services on the command bar.
In the filter box, type integration, and then select Integration Accounts in the results list (Figure 4-62).
Select your integration account, and then select the Schemas tile.
In the Schemas blade, select + Add.
Provide a name for your schema and select whether it is a small file (<= 2MB) or a large file (> 2MB). If it is a small file, you can upload it here. If you select Large file, then you need to provide a publicly accessible URI to the file. In this case, we’re uploading a small file. Click the Browse button underneath Schema to select a local XSD file to upload. Click OK.
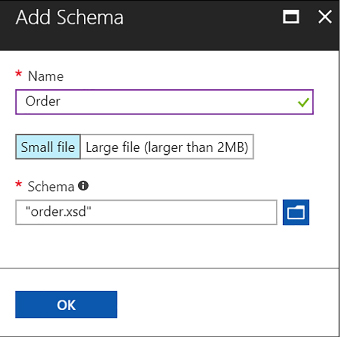
FIGURE 4-62 Adding a schema to an Integration account
Add maps to your Integration account
When you want to your Logic app to transform data from one format to another, you first add a map (schema) to your linked Integration account.
To add a new schema, follow these steps:
Navigate to the portal accessed via https://portal.azure.com.
Select More Services on the command bar.
In the filter box, type integration, then select Integration Accounts in the results list.
Select your integration account, and then select the Maps tile.
In the Maps blade, select + Add.
Provide a name for your map and click the Browse button underneath Map to select a local XSLT file to upload. Click OK (Figure 4-63).
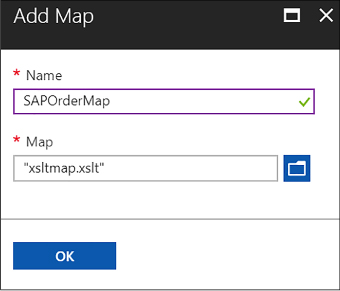
FIGURE 4-63 Adding a map to an Integration account
Add XML capabilities to the linked Logic App
After adding an XML schema and map to the Integration account, you are ready to use the Enterprise Integration Pack’s XML validation, XPath Extract, and Transform XML operations in a Logic App.
Once your LogicAapp has been linked to the Integration account with these artifacts, follow these steps to use the XML capabilities in your Logic App:
Open the Logic App Designer on the Logic pp that has a linked Integration account.
Select Blank Logic App under Templates.
Search for “http request” in the trigger filter, and then select Request (When An HTTP Request Is Received) from the list of results (Figure 4-64).
Select the + New Step button, and then choose Add An Action.
Type xml in the search box, and then select XML (XML Validation) from the results.

FIGURE 4-64 Selecting an XML Validation action in the Logic App Designer
In the form that follows, select the Body parameter from the HTTP request trigger for the Content value. Select the Order schema in the Schema Name select list, which is the schema we added to the Integration account (Figure 4-65).
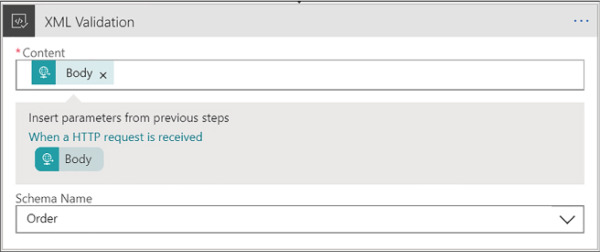
FIGURE 4-65 Selecting an XML Validation form values in the Logic App Designer
Select the + New Step button, and then choose Add An Action.
Type xml in the search box, and then select Transform XML from the results (Figure 4-66).
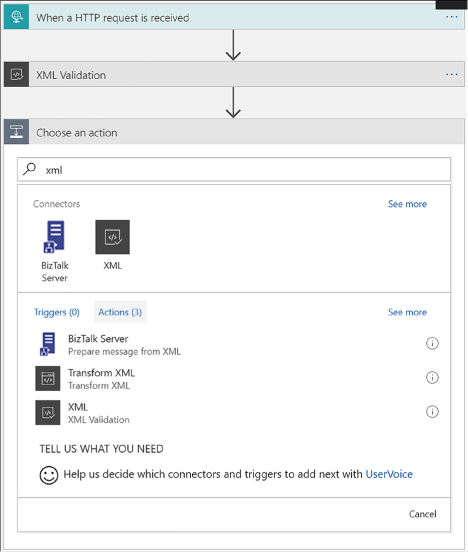
FIGURE 4-66 Selecting an Transform XML action in the Logic App Designer
In the form that follows, select the Body parameter from the HTTP request trigger for the Content value. Select the SAPOrderMap map in the Map select list, which is the map we added to the Integration account (Figure 4-67).
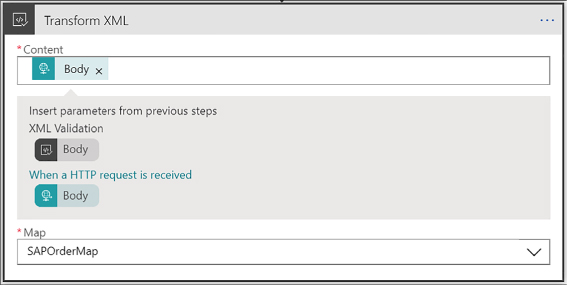
FIGURE 4-67 Setting the Transform XML form values in the Logic App Designer
In the Condition form that appears, select the Edit In Advanced Mode link, and then type in your XPath expression. In our case, we type in the following (Figure 4-68): @equals(xpath(xml(body(‘Transform_XML’)), ‘string(count(/.))’), ‘1’)
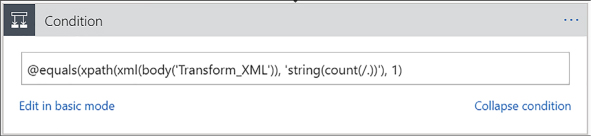
FIGURE 4-68 Setting the XPath expression for the new condition in the Logic App Designer
In the “If true” condition block beneath, select Add An Action. Search for “response,” and then select Request (Response) from the resulting list of actions (Figure 4-69).
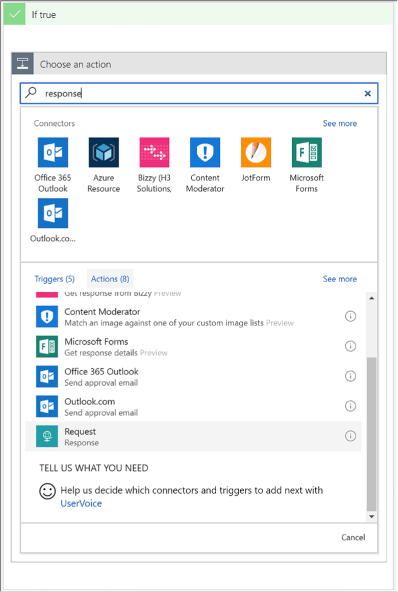
FIGURE 4-69 Selecting a Response action for the new condition’s “If true” block in the Logic App Designer
In the Response form, select the Transformed XML parameter from the previous Transform XML step. This returns a 200 HTTP response containing the transformed XML (an SAP order) within the body (Figure 4-70).
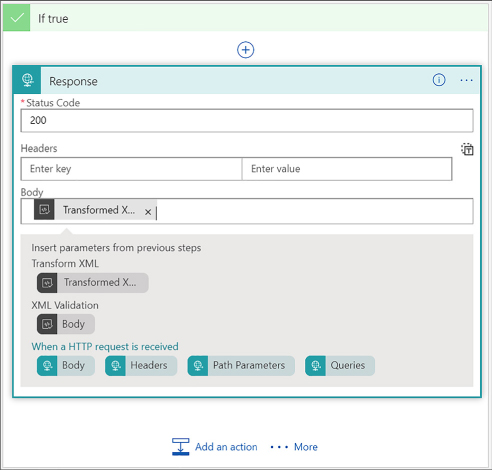
FIGURE 4-70 Completing the Response action form for the new condition’s “If true” block in the Logic App Designer
Click Save in the Logic Apps Designer menu.
)
Trigger a Logic App from another app
There are many triggers that can be added to a Logic App. Triggers are what kick off the workflow within. The most common type of triggers you can use to trigger, or call, your Logic Apps from another app, are those that create HTTP endpoints. Triggers based on HTTP endpoints tend to be more widely used due to the simplicity of making REST-based calls from practically any web-enabled development platform.
These are the triggers that create HTTP endpoints:
Request Responds to incoming HTTP requests to start the Logic App’s workflow in real time. Very versatile, in that it can be called from any web-based application, external webhook events, even from another Logic App with a request and response action.
HTTP Webhook Event-based trigger that does not rely on polling for new items. Register subscribe and unsubscribe methods with a callback URL used to trigger the logic app. Whenever your external app or service makes an HTTP POST to the callback URL, the logic app fires, and includes any data passed into the request.
API Connection Webhook The API connection trigger is similar to the HTTP trigger in its basic functionality. However, the parameters for identifying the action are slightly different.
Create an HTTP endpoint for your logic app
To create an HTTP endpoint to receive incoming requests for a Request Trigger, follow these steps:
Open the Logic App Designer on the logic app to which you will be adding an HTTP endpoint.
Select Blank Logic App under Templates.
Search for “http request” in the trigger filter, and then select Request (When An HTTP Request Is Received) from the list of results.
You can optionally enter a JSON schema for the payload, or data, that you expect to be sent to the trigger. This schema can be added to the Request Body JSON Schema field. To generate the schema, select the Use Sample Payload To Generate Schema link at the bottom of the form. This displays a dialog where you can type in or paste a sample JSON payload. This generates the schema when you click Done. The advantage to having a schema defined is that the designer will use the schema to generate tokens that your logic app can use to consume, parse, and pass data from the trigger through your workflow (Figure 4-71).
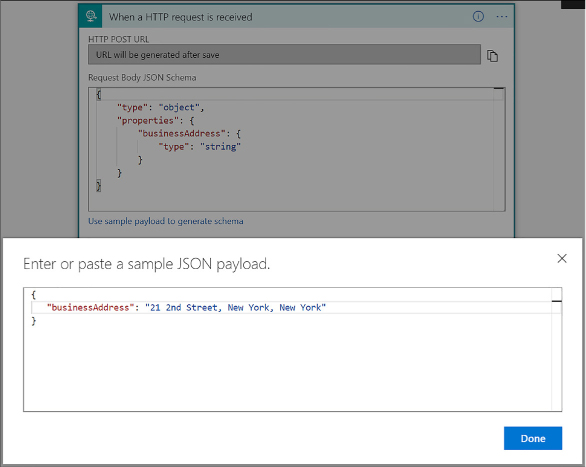
FIGURE 4-71 Adding a Request trigger with a request body JSON schema
Click Save in the Logic Apps Designer menu.
After saving, the HTTP POST URL is generated on the Receive trigger (Figure 4-72). This is the URL your app or service uses to trigger your logic app. The URL contains a Shared Access Signature (SAS) key used to authenticate the incoming requests.

FIGURE 4-72 The generated HTTP POST URL on the Request trigger
)
)
)
)
)
)
)
)
)
)
)
)
)
)
)
)
)
)
)
)
)
)
)
)
)
)
)
Create custom and long-running actions
You can create your own APIs that provide custom actions and triggers. Because these are web-based APIs that use REST HTTP endpoints, you can build them in any language framework like .NET, Node.js, or Java. You can also host your APIs on Azure App Service as either web apps or API apps. However, API apps are preferred because they will make it easier to build, host, and consume your APIs used by Logic Apps. Another recommendation is to provide an OpenAPI (previously Swagger) specification to describe your RESTful API endpoints, their operations, and parameters. This makes it much easier to reference your custom API from a logic app workflow because all of the endpoints are selectable within the designer. You can use libraries like Swashbuckle to automatically generate the OpenAPI (Swagger) file for you.
If your custom API has long-running tasks to perform, it is more than likely that your logic app will time out waiting for the operation to complete. This is because Logic Apps will only wait around two minutes before timing out a request. If your long-running task takes several minutes, or hours to complete, you need to implement a REST-based async pattern on your API. These types of patterns are already fully supported natively by the Logic Apps workflow engine, so you don’t need to worry about the implementation there.
Long-running action patterns
Your custom API operations serve as endpoints for the actions in your Logic App’s workflow. At a basic level, the endpoints accept an HTTP request and return an HTTP response within the Logic App’s request timeout limit. When your custom action executes a long-running operation that will exceed this timeout, you can follow either the asynchronous polling pattern or the asynchronous webhook pattern. These patterns allow your logic app to wait for these long-running tasks to finish.
Asynchronous polling
The way the asynchronous polling pattern works is as follows:
When your API receives the initial request to start work, it starts a new thread with the long-running task, and immediately returns an HTTP Response “202 Accepted” with a location header. This immediate response prevents the request from timing out, and causes the workflow engine to start polling for changes.
The location header points to the URL for the Logic Apps to check the status of the long-running job. By default, the engine checks every 20 seconds, but you can also add a “Retry-after” header to specify the number of seconds until the next poll.
After the allotted time (20 seconds), the engine polls the URL on the location header. If the long-running job is still going, you should return another “202 Accepted” with a location header. If the job has completed, you should return a “200 OK” along with any relevant data. This is what the Logic Apps engine will continue the workflow with.
Asynchronous Webhooks
The asynchronous webhook pattern works by creating two endpoints on your API controller:
Subscribe The Logic Apps engine calls the subscribe endpoint defined in the workflow action for your API. Included in this call is a callback URL created by the logic app that your API stores for when work is complete. When your long-running task is complete, your API calls back with an HTTP POST method to the URL, along with any returned content and headers, as input to the logic app.
Unsubscribe This endpoint is called any time the logic app run is cancelled. When your API receives a request to this endpoint, it should unregister the callback URL and stop any running processes.
Monitor Logic Apps
When you create a logic app, you can use out-of-the-box tools within Logic Apps to monitor your app and detect any issues it may have, such as failures. You can view runs and trigger history, overall status, and performance.
If you want real-time event monitoring, as well as richer debugging, you can enable diagnostics on your logic app and send events to OMS with Log Analytics, or to other services, such as Azure Storage and Event Hubs.
Select Metrics (Figure 4-73) under Monitoring in the left-hand menu of your logic app to view performance information and the overall state, such as how many actions succeeded or failed, over the specified time period. It will display an interactive chart based on the selected metrics.
)
FIGURE 4-73 Metrics for a logic app
Select Alert Rules under Monitoring to create alerts based on metrics (such as any time failures occur over a 1-hour period), activity logs (with categories such as security, service health, autoscale, etc.), and near real time metrics, based on the data captured by your Logic App’s metrics, in time periods spanning from one minute to 24 hours. Alerts can be emailed to one or more recipients, route alerts to a webhook, or run a logic app.
The overview blade of your logic app displays both Runs History and Trigger History (Figure 4-74). This view lets you see at a glance how often the app was called, and whether those operations succeeded. Select a run history to see its details, including any data it received.
)
FIGURE 4-74 The Runs history and Trigger History of a logic app