Skill 5.1: Implement Microsoft Teams
- By Orin Thomas
- 4/6/2018
In Skill 5.1 from Exam Ref 70-347 Enabling Office 365 Services, 2nd Edition, learn how to configure Office 365 connectors for Microsoft Teams and manage licenses.
This skill deals with implementing Microsoft Teams, which is a chat-based collaboration tool. In this section, you’ll learn how to configure Microsoft Teams, and how to manage licenses and teams, and how to configure Office 365 connectors for Microsoft Teams.
Teams and channels
To effectively configure Microsoft Teams, it is important to understand the difference between the concepts of Teams and Channels.
Team This is a collection of users, content, and apps associated with separate projects and tasks within an organization. Teams can be created to be private with membership only open to invited users. Teams can also be created as public. Public teams are open to anyone within the organization. By default, an Office 365 tenancy can have a maximum of 500,000 Teams, and each team can have a maximum of 2500 members. A global admin can create an unlimited number of teams. A normal Office 365 user can create up to 250 teams. By default, all users have the ability to create a team within Microsoft Teams.
Channels They are sections within a team that allow conversations to be segmented by specific topic. Team channels are for open conversations between team members. Private chats are only visible to private chat participants. It is possible to extend a channel with Apps. These Apps can include Tabs, Connectors, and Bots. The General channel is created automatically when a new team is created. The General channel cannot be removed or unfavorited. Microsoft recommends pinning information about the purpose of the team to this channel. Any member of a team can create a channel.
Setting up Teams in Office 365
Teams is enabled by default for all Office 365 organizations. To enable or disable Teams for an organization, perform the following steps:
In the Office 365 Admin Center, click on Services & Add-ins under Settings.
On the Services & add-ins page, shown in Figure 5-1, click Microsoft Teams.
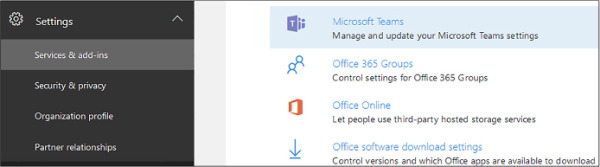
FIGURE 5-1 Services & add-ins
In the Settings By User/License type section of the Microsoft Teams page, shown in Figure 5-2, use the drop down to select each license type used in your organization, and use the slider to turn Microsoft Teams on or off.
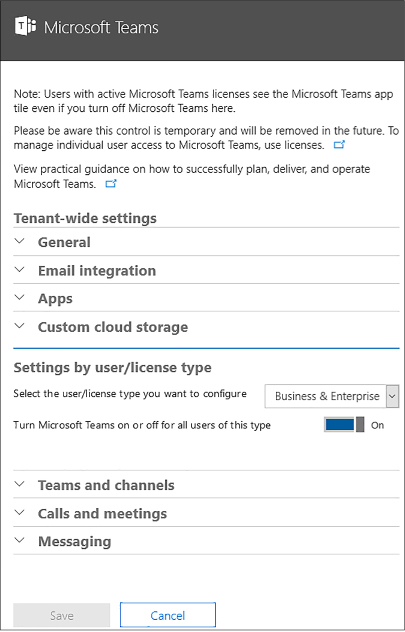
FIGURE 5-2 Settings by user/license type
)
Manage Teams licensing
Teams is available for the following Office 365 subscription types:
Office 365 Business Essentials
Office 365 Business Premium
Office 365 Enterprise F1
Office 365 Enterprise E1
Office 365 Enterprise E3
Office 365 Enterprise E5
Office 365 Education
Office 365 Education Plus
Office 365 Education E5
If a user has the appropriate Office 365 license, Teams will be enabled automatically. You can disable Teams on a per-user basis on the user’s Product Licenses page as shown in Figure 5-3.
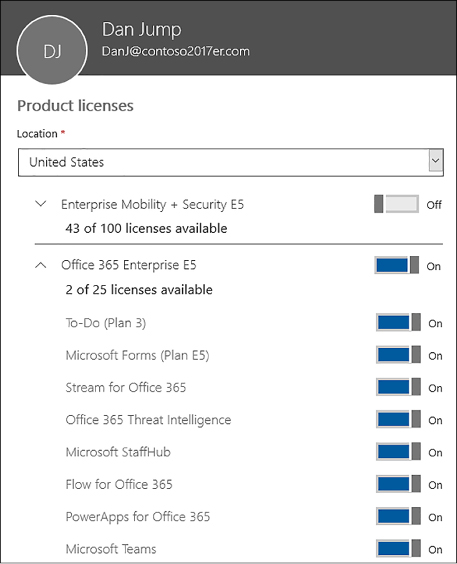
FIGURE 5-3 Microsoft Teams license
You can enable or disable Teams for specific license types through the Microsoft Teams section of the Services and add-ins area of the Office 365 Admin console as shown in Figure 5-4. If you only want to enable Teams for specific users, disable Teams at the license type level and then enable Teams for the specific users.
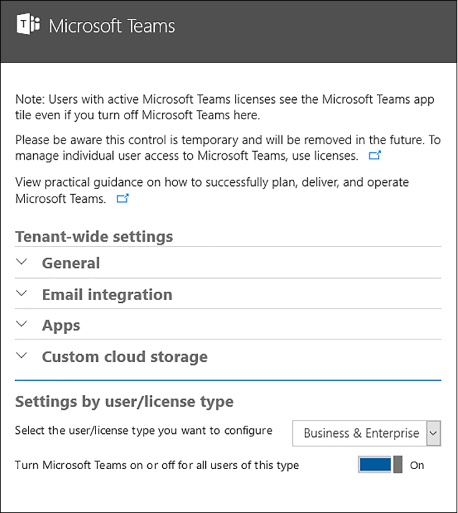
FIGURE 5-4 Microsoft Teams settings
Manage Teams functionality
Teams functionality, including functionality for channels, is enabled on a tenant wide basis, rather than on a per Team or per-channel basis. You can configure the following general tenant wide settings as shown in Figure 5-5.
Show organizational chart in personal profile When enabled, it displays an organizational chart icon in the user’s contact card. When this icon is clicked, it displays the user’s place in the organizational chart.
Use Skype for Business for recipients who don’t have Microsoft Teams It allows users of Microsoft Teams to contact other people in the organization who aren’t configured for Microsoft Teams using Skype for Business.
Allow T-bot proactive help messages T-bot, the Microsoft Teams bot, will automatically start a chat session with users to assist them with Microsoft Teams.
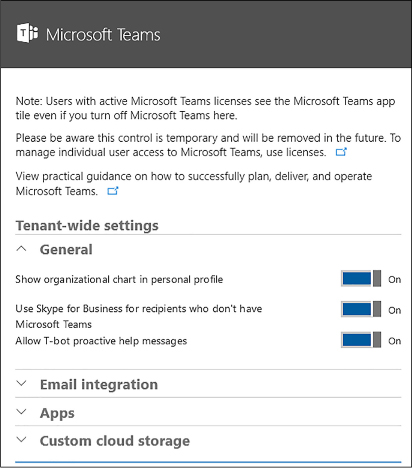
FIGURE 5-5 General Teams settings
You can allow users to send email to Microsoft Teams channels at the tenancy level as shown in Figure 5-6. You can restrict which email domains are allowed to send email to channels on the allowed senders list. To determine a channel’s email address, click More Options next to the channel name and then click Get email address.
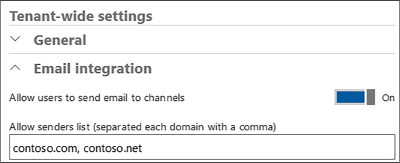
FIGURE 5-6 Teams email integration
You can configure the following Apps settings at the tenancy level as shown in Figure 5-7.
Disable default apps Allows you to disable or enable default apps. By default, default apps are disabled. The default apps are Planner, PowerApps, and Website.
Allow external apps in Microsoft Teams Allows or disallows users from adding tabs and bots that are available to the Office 365 tenant.
Allow sideloading of external apps Allows or disallows users from installing and enabling custom bots and tabs.
Allow new external apps by default Allows or disallows external apps that are added to the Office 365 tenant by default.
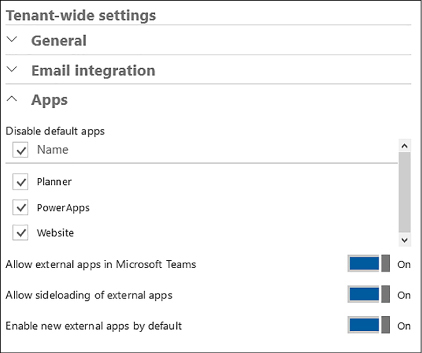
FIGURE 5-7 Apps in Teams
By default, Microsoft Teams users can upload and share files in Teams channels and chats from OneDrive and OneDrive For Business. Custom cloud storage tenancy level settings, shown in Figure 5-8, allow you to configure additional cloud storage services users that can use as a location for uploading and sharing files in Microsoft Teams channels and chats. Options include Box, Dropbox, Google Drive and ShareFile.
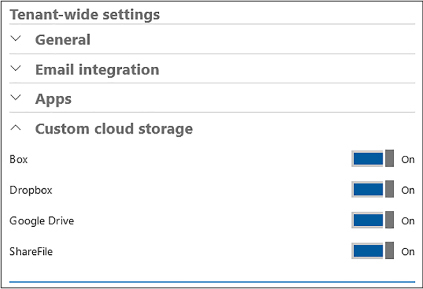
FIGURE 5-8 Custom cloud storage
The Teams and Channels settings provide links to the Groups dashboard in the Office 365 Admin Center for team management. It also provides a link to configure permissions on who on a team can add and manage channels. By default, any user in the organization can create a Team. The same creation settings configured for Office 365 Groups apply to Microsoft Teams. You will learn more about assigning roles and permissions for teams later in this chapter.
Meetings allow between two and eighty people to have an audio or video conference through Teams. The Calls and meetings settings, shown in Figure 5-9, allow you to configure the following:
Allow scheduling for private meetings If enabled, users are able to schedule private meetings. These meetings will not be listed in any channel. The maximum number of people in a private chat is 20.
Allow ad-hoc channel meetup If enabled, users can initiate ad-hoc channel meetups.
Allow scheduling for channel meetings If enabled, users are able to schedule channel meetings. All channel members can join channel meetings.
Allow videos in meetings If enabled, allows users to have video communication in a meeting.
Allow screen sharing in meetings If enabled, allows users to share desktop screen sessions within meetings.
Allow private calling If enabled, users are able to make private calls using Teams.
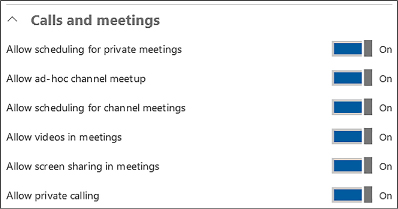
FIGURE 5-9 Calls and meetings
The messaging settings determine the types of content and control that you allow in Teams. For example, you may wish to allow the use of gifs, stickers and memes from the internet. If you do enable these settings, you may wish to pin a post describing what constitutes acceptable content for your organization, because allowing the posting of some internet memes is likely to trigger a visit from the denizens of the human resources department. You can configure the following settings, as shown in Figure 5-10.
Enable Giphy so users can add gifs to conversations Allows users to add animated images to conversations. You can set a content rating to determine how risqué the animated images allowed can be. The content rating can be set to No Restriction, Moderate, and Strict. It is enabled by default at the Moderate content rating.
Enable memes that users can edit and add to conversations Allows users to create and add memes to conversations, and is enabled by default.
Allow owners to delete all messages Allows channel owners to delete all messages in the channel, and is disabled by default.
Allow users to edit their own messages Allow users to modify their messages to channels in Teams, and is enabled by default.
Allow users to delete their own messages Users are able to delete their own messages, which is enabled by default.
Allow users to chat privately Allow users to initiate private chats, which is enabled by default.
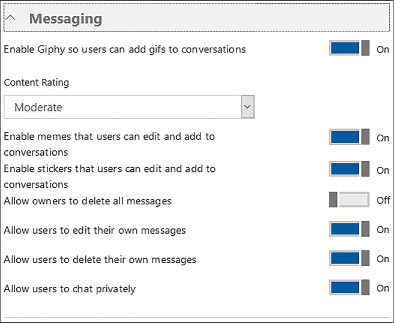
FIGURE 5-10 Messaging settings
Roles and permissions
Microsoft Teams have two administrative roles: Owner and Member. Any user that creates a new team is assigned the Owner role. Owners are able to delegate the Owner role to other members of the same Team. Table 5-1 lists the permissions that are available to holders of the Owner and Member roles.
TABLE 5-1 Teams permissions
| Owner | Member | |
| Create team | Yes | No |
| Leave team | Yes | Yes |
| Edit team name/description | Yes | No |
| Delete team | Yes | No |
| Add channel | Yes | Yes |
| Edit channel name/description | Yes | Yes |
| Delete channel | Yes | Yes |
| Add members | Yes | No |
| Add tabs | Yes | Yes |
| Add connectors | Yes | Yes |
| Add bots | Yes | Yes |
You can restrict the permission to create new Teams from all users to members of a specific security group. Doing so involves also changing the permissions of which users can create Office 365 Groups, because the permission to create Office 365 Groups is the same permission that allows the creation of Microsoft Teams. This activity can only be performed in PowerShell and involves the following steps:
Create the security group to which you want to delegate the permission to create Office 365 Groups and Microsoft Teams.
Configure Office 365 Group settings to only allow the newly created security group to create Office 365 Groups using the following PowerShell script when connected to an Azure AD session:
$Template = Get-AzureADDirectorySettingTemplate -Id 62375ab9-6b52-47ed-826b-58e47e0e304b
$Setting = $template.CreateDirectorySetting()
$setting["EnableGroupCreation"] = "false"
$setting["GroupCreationAllowedGroupId"] = "<ObjectId of Group Allowed to
 Create Groups>"
New-AzureADDirectorySetting -DirectorySetting $settings
Configure Office 365 Connectors
Connectors allow organizations to siphon content from services outside Microsoft Teams directly into Teams channels. For example, connectors allow Teams users to receive information directly into the chat stream from services including Twitter, Trello, GitHub, and Visual Studio Team Services.
Any member of a specific Team can connect that team to a cloud service using a connector. This allows all members of that Team to be notified of activities from that service. Removing a user from the Team removes any connectors added to the Team by that user.
Users can add a connector to a Team using either the Microsoft Teams Desktop or web client. To add a connector, perform the following steps:
Enter the Teams channel to which you wish to add the Connector.
Next to the channel name, click the ellipses (…) icon, and then click Connectors.
From the list of Connectors, shown in Figure 5-11, select the Connector that you wish to add and then click Configure.
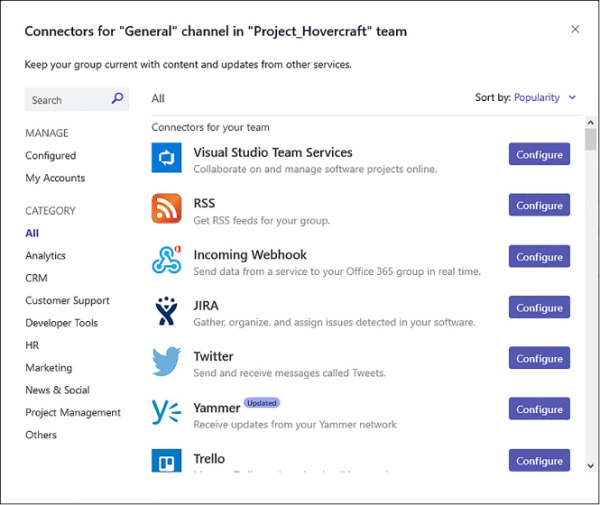
FIGURE 5-11 Available connectors
Depending on the Connector, you’ll need to provide information that allows information to be streamed from the connecting service into Teams. Figure 5-12 shows the details of the Twitter Connector, which requires a sign in to an existing Twitter account.
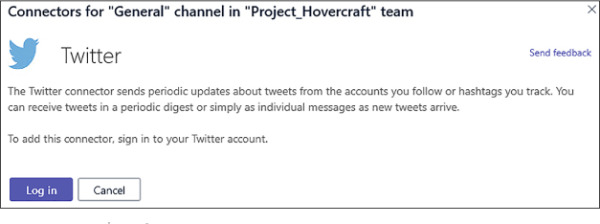
FIGURE 5-12 Twitter Connector
Once the Connector is configured, data will automatically be streamed into the channel for which the Connector is configured.
)
)
)
)
)
)
)
)
)
)
)
Organizations can develop custom Connectors to integrate with Line of Business applications using the included Incoming Webhook connector. This Connector creates an endpoint for a channel, and is able to extract data from applications using HTTP post methods.
Teams Cmdlets
You can use the following PowerShell cmdlets to manage Microsoft Teams:
Add-TeamUser Add a user or owner to a team.
Connect-MicrosoftTeams Connect an authenticated account so that it can use the Microsoft Teams cmdlets.
Disconnect-MicrosoftTeams Disconnect an account from a session where it can use Microsoft Teams cmdlets.
Get-Team View all of the Teams that a specific account belongs to.
Get-TeamChannel View all of the channels associated with a team.
Get-TeamFunSettings View the settings for posting GIFs and memes to a Team.
Get-TeamGuestSettings Views a Team’s guest settings.
Get-TeamHelp View all Teams related cmdlets.
Get-TeamMemberSettings View member settings for a Team.
Get-TeamMessagingSettings View messaging settings for a Team.
Get-TeamUser View the users of a Team.
New-Team Create a new Team.
New-TeamChannel Create a new channel within a Team
Remove-Team Remove an existing Team.
Remove-TeamChannel Remove a channel from a Team.
Remove-TeamUser Remove a user from a Team.
Set-Team Configure the properties of a Team.
Set-TeamChannel Configure the properties of a Team channel.
Set-TeamFunSettings Configure the settings for posting GIFs and memes to a Team.
Set-TeamGuestSettings Configure Team guest settings.
Set-TeamMemberSettings Configure Team member settings.
Set-TeamMessagingSettings Configure messaging settings for a Team.
Set-TeamPicture Configure the picture associated with the Team.
 EXAM TIP
Remember how to configure Teams licensing so that only a subset of the users in your organization have access. Remember the general steps required to allow only members of a specific group to create Teams.