Autoruns
- By Aaron Margosis and Mark Russinovich
- 2/17/2017
- Autoruns fundamentals
- Autostart categories
- Saving and comparing results
- AutorunsC
- Autoruns and malware
In this sample chapter from Troubleshooting with the Windows Sysinternals Tools, 2nd Edition, learn about the fundamentals of Autoruns and how you can manage system permissions.
A question I often hear is, “Why is all this stuff running on my computer?” That’s often followed with, “How do I get rid of it?” The Microsoft Windows operating system is a highly extensible platform. Not only can programmers write applications that users can choose to run, those programmers can “add value” by having their software run automatically without troubling the user to start it, by adding visible or nonvisible features to Windows Explorer and Internet Explorer, or by supplying device drivers that can interact with custom hardware or change the way existing hardware works. Sometimes the “value” to the user is doubtful at best; sometimes the value is for someone else entirely and the software acts to the detriment of the user (which is when the software is called malware).
Autostarts is the term I use to refer to software that runs automatically without being intentionally started by a user. This type of software includes drivers and services that start when the computer is booted; applications, utilities, and shell extensions that start when a user logs on; and browser extensions that load when Internet Explorer is started. Over 200 locations in the file system and registry allow autostarts to be configured on x64 versions of Windows. These locations are often referred to as Autostart Extensibility Points, or ASEPs.
ASEPs have legitimate and valuable purposes. For example, if you want your instant messaging contacts to know when you are online, having the messaging client start when you log on is a great help. Users enjoy search toolbars and PDF readers that become part of Internet Explorer. And much of Windows itself is implemented through ASEPs in the form of drivers, services, and Explorer extensions.
On the other hand, consider the plethora of “free” trial versions of programs that computer manufacturers install on new computers and that fill up the taskbar notification area. Consider also the semihidden processes that legitimate vendors run all the time so that their applications can appear to start more quickly. Do you really need all these processes constantly consuming resources? On top of that, malware almost always hooks one or more ASEPs, and virtually every ASEP in Windows has been used by malware at one point or another.
Although Windows Vista and Windows 7 offer the System Configuration Utility (msconfig.exe, shown in Figure 4-1) to let you see some of these autostarts, it shows only a small subset and is of limited use. Msconfig also requires administrative rights, even just to view settings. That means it cannot identify or disable per-user autostarts belonging to nonadministrator users.
)
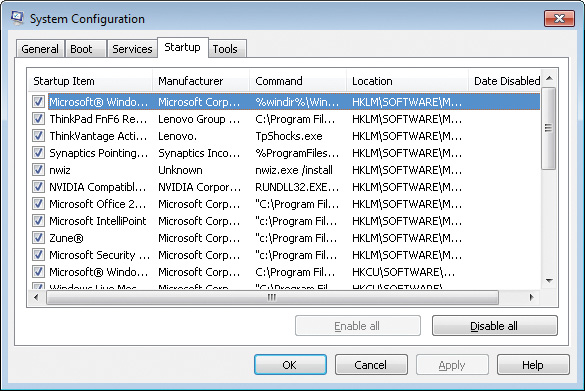
FIGURE 4-1 The MSConfig utility included in Windows Vista and Windows 7 exposes a limited set of autostarts.
Some of MSConfig’s functionality moved into Task Manager when Windows 8 introduced a Startup tab, as shown in Figure 4-2. Although it no longer requires administrative rights, it no longer shows a process’ full command line, nor where the ASEP is configured.
)
FIGURE 4-2 The Task Manager Startup tab in Windows 8 and newer is not much of an improvement.
Bryce and I created the Autoruns utility to expose as many autostarts as we could identify, and to make it easy to disable or remove those autostarts. The information that Autoruns exposes can be discovered manually if you know where to look in the registry and file system. Autoruns automates that task, scanning a large number of ASEPs in a few seconds, verifying entries, and making it easier to identify entries with suspicious characteristics, such as the lack of a digital signature, or that are flagged as suspicious by VirusTotal. We also created a command-line version, AutorunsC, to make it possible to capture the same information in a scripted fashion.
Using either Autoruns or AutorunsC, you can easily capture a baseline of the ASEPs on a system. That baseline can be compared against results captured at a later time so that changes can be identified for troubleshooting purposes. Many organizations use Autoruns as part of a robust change-management system, capturing a new baseline whenever the desktop image is updated.
Autoruns fundamentals
Launch Autoruns and it immediately begins filling its display with entries collected from known ASEPs. As shown in Figure 4-3, each shaded row represents an ASEP location, with a Regedit icon if it is a registry location or a folder icon if it is stored in the file system.1 The rows underneath a shaded row indicate entries configured in that ASEP. Each row includes the name of the autostart entry; the description, publisher and timestamp of the item; and the path to the file to run and an icon for that file. Each row also has a check box to temporarily disable the entry, and a column to display VirusTotal results. A panel at the bottom of the window displays details about the selected entry, including its full command line. The Everything tab, which is displayed when Autoruns starts, displays all ASEP entries on the system; you use the 19 other tabs to view just specific categories of autostarts. Each of these categories will be described later in this chapter.
)
FIGURE 4-3 Autoruns main window.
The Image Path column shows the full path to the target file identified by the autostart entry. In some cases, this will be the first name in the autostart’s command line. For autostarts that use a hosting process—such as Cmd.exe, Wscript.exe, Rundll32.exe, Regsvr32.exe, or Svchost.exe—the image path identifies the target script or DLL on the command line instead of the main executable. For entries that involve levels of indirection, Autoruns follows the indirection to identify the target image. For example, the Internet Explorer “Browser Helper Objects” ASEPs are recorded as GUIDs in the registry; Autoruns identifies the corresponding InProcServer entries under HKCR\CLSID and reports those DLLs. If the target file cannot be found in the expected location, the Image Path column will include the text “File not found” and the entry will be highlighted in yellow.
If the file identified in the image path is a Portable Executable (PE) file, the Timestamp column reports the date and time in the local time zone in which the image was created by the linker; otherwise—for example, for script files—the timestamp reports the last-write time of the file according to the file system. For the shaded rows that identify an ASEP location, the timestamp reports the last-modification time for the registry key or file system directory.
The Description and Publisher columns in the display are taken from the Description and Company Name version resources, respectively, for files that contain version resources, such as EXE and DLL files. If the file’s digital signature has been verified, the Publisher column displays the subject name from the corresponding code-signing certificate. (See the “Verifying code signatures” section later in this chapter for more information.)
The Description and Publisher columns are left blank if the target file cannot be found, has no Description and Company Name in its version resources, or has no version resource (which is always true of script files). The VirusTotal column is blank until you request information from the VirusTotal service, as described in the “VirusTotal analysis” section later in this chapter.
Autoruns calls attention to suspicious images by highlighting their entries in pink. Autoruns considers an image file suspicious if it has no description or publisher, or if signature verification is enabled and the image doesn’t have a valid signature.
You can quickly search for an item by pressing Ctrl+F and entering text to search for. Autoruns will select the next row that contains the search text. Pressing F3 repeats the search from the current location. Pressing Ctrl+C copies the text of the selected row to the clipboard as tab-delimited text.
On the Options menu, the Scan Options entry is disabled while Autoruns is scanning the system. To cancel the scan so that you can change those options (which are described later in this chapter), press the Esc key. A change to any selection in Scan Options takes effect during the next scan. To run a new scan with the same options, press F5 or click the Refresh button on the toolbar.
Disabling or deleting autostart entries
With Autoruns, you can disable or delete autostart entries. Deleting an entry permanently removes it, and you should do this only if you’re certain you never want the software to autostart again. Select the entry in the list, and press the Del key. Because there is no Undo, Autoruns prompts for confirmation before deleting the autostart entry.
By contrast, when you disable an entry by clearing its check box, Autoruns leaves a marker behind that Autoruns recognizes and with which it can reconstitute and re-enable the entry. For example, for most registry ASEPs, Autoruns creates an AutorunsDisabled subkey in the ASEP location and copies the registry value being disabled into that subkey before deleting the original value. Windows will not process anything in that subkey, so the items in it will not run, but Autoruns displays them as disabled autostarts. Checking the entry again puts the entry back into the actual ASEP location. For ASEPs in the file system such as in the Start menu, Autoruns creates a hidden directory named AutorunsDisabled and moves disabled entries into that directory.
Note that disabling or deleting an autostart entry prevents it from being automatically started in the future. It does not stop any existing processes, nor does it delete or uninstall the ASEP’s target file.
Also note that if you disable autostarts that are critical for system boot, initialization, or correct operation, you can put the system into a state in which recovery is not possible without booting into an alternate operating system or recovery environment.
Autoruns and administrative permissions
The vast majority of ASEPs are in locations that grant Read permission to standard users. On some versions of Windows, the registry keys containing configuration information for some services are locked down, and many scheduled tasks are not standard-user readable. But for the most part, Autoruns works perfectly fine without administrative rights for the purposes of viewing autostart entries.
Administrative rights are required to view all autostarts, and they are required if you need to change the state of entries in systemwide locations, such as HKLM or the all users’ Startup directory in the Start menu. If you select or clear a check box, or try to delete one of these entries without administrative rights, Autoruns will report Access Denied. The error message dialog box includes a Run As Administrator button that lets you restart Autoruns elevated. (See Figure 4-4.) When Autoruns has administrative rights, configuration changes should succeed. You can also restart Autoruns with User Account Control (UAC) elevation by choosing Run As Administrator from the File menu.
)

FIGURE 4-4 Access Denied and the option to restart Autoruns with UAC elevation.
To ensure that Autoruns has elevated rights when it launches, start Autoruns with the –e command-line option. This will request UAC elevation if the invoker is not already running elevated. See the “Administrative rights” section in Chapter 2, “Windows core concepts,” for more information on UAC elevation.
Verifying code signatures
Anyone can create a program and stick the name “Microsoft Corporation” in it. Therefore, seeing that text in the Publisher column gives only a low degree of assurance that the file in question was created by Microsoft and has not been modified since. Verifying a digital signature associated with that file gives a much higher degree of assurance of the file’s authenticity and integrity. The file format for some types of files allows for a digital signature to be embedded within the file. Files can also be catalog-signed, meaning that the information needed to validate a file’s content is in a separate file. Catalog signing means that even plain text files can be verified.
You can verify an entry’s digital signature by selecting the entry and choosing Verify Image from the Entry menu. If the file has been signed with a valid code-signing certificate that derived from a root certificate authority that is trusted on the computer, the text in the Publisher column changes to “(Verified)” followed by the subject name in the code-signing certificate. If the file has not been signed or the verification fails for any other reason, the text changes to “(Not verified)” followed by the company name from the file’s version resource, if present.
Instead of verifying entries one at a time, you can enable Verify Code Signatures in the Scan Options dialog box and rescan. Autoruns will then attempt to verify the signatures for all image paths as it scans autostarts. Note that the scan might take longer because it also verifies whether each signing certificate has been revoked by its issuer, which requires Internet connectivity to work reliably.
Files for which signature checks fail might be considered suspicious and therefore appear in pink. A common malware technique is to install files that on casual inspection appear to be legitimate Windows files but are not signed by Microsoft.
The Sysinternals SigCheck utility, described in Chapter 9, “Security utilities,” provides deeper detail for file signatures, including whether the file is catalog-signed and the location of the catalog.
VirusTotal analysis
VirusTotal.com is a free web service that lets users upload files to be analyzed by over 50 antivirus engines and see the results of those scans. Most users interact with VirusTotal by opening a web browser to https://www.virustotal.com and uploading one file at a time. VirusTotal also offers an API for programs such as Autoruns that makes it possible not only to scan many files at once, but also to do so much more efficiently by uploading only file hashes rather than entire files. If VirusTotal has recently received a file with the same hash, it returns the results from the most recent scan rather than performing the scan again.
You can analyze all autostart entries by enabling Check VirusTotal.com in the Scan Options dialog box and rescanning. Autoruns uploads file hashes to VirusTotal.com and writes “Hash submitted...” in the VirusTotal column. As results come back, Autoruns replaces the text in that column with the number of engines that flagged the file out of the total number of engines that returned results, rendered as a hyperlink, as shown in Figure 4-5. As an additional visual indicator, the link is colored red if any engines flagged the file as suspicious. Click the link to open the webpage where you can see details of the results. If VirusTotal has no record of the file’s hash, Autoruns reports “Unknown.”
)
FIGURE 4-5 Autoruns with VirusTotal results.
If you also enable Submit Unknown Images in the Scan Options dialog box, Autoruns automatically uploads the entire file to VirusTotal in response to an “Unknown” report. Uploading and scanning complete files can take several minutes, during which time Autoruns displays a “Scanning...” hyperlink in the VirusTotal column. Click that link to view the progress of the analysis.
You can also analyze items one at a time by right-clicking an autostart and choosing Check VirusTotal from the popup menu. Autoruns sends the file’s hash to VirusTotal and reports the engines’ results for that entry or “Unknown.” You can then upload the full file by right-clicking the entry again and choosing Submit To VirusTotal (if it was unknown) or Resubmit To VirusTotal (to force a new scan).
You have to agree to VirusTotal’s terms of service before using the Sysinternals utilities to query VirusTotal. On first use of VirusTotal, Autoruns will open your default web browser to the VirusTotal terms of service page and prompt you in a message box to agree with the terms before proceeding.
See Chapter 3, “Process Explorer,” for additional considerations regarding VirusTotal analysis, and in particular regarding uploading files to the VirusTotal service.
Hiding entries
The default list of ASEP entries is always large because, as mentioned earlier, Windows itself makes extensive use of ASEPs. Typically, Windows’ own autostart entries are not of interest when troubleshooting. Likewise, autostart entries from other Microsoft-published software such as Microsoft Office are usually not the droids you’re looking for2. And when enabling VirusTotal analysis, you’re probably more interested in inspecting the non-zero results than the entries that no antimalware engine has marked.
Autoruns offers several choices on the Options menu to show only those more-interesting entries, and a “filter” feature on the Autoruns toolbar to show only items containing the text you specify. None of these options requires rescanning the system; they manipulate the previously-collected results and can show hidden entries again instantly on demand.
You can choose to hide Windows and Microsoft autostart entries from the display by enabling the Hide Windows Entries or Hide Microsoft Entries from the Options menu. The Hide Windows Entries option is enabled by default. Enabling Hide Microsoft Entries also enables Hide Windows Entries. If the entry is a hosting process such as Cmd.exe or Rundll32.exe, the filter options’ logic is based on whether the target file is a Windows or Microsoft image and whether it is signed.
The behavior of these two options depends on whether Verify Code Signatures is also enabled. If signature verification is not enabled, Hide Windows Entries omits from the display all entries for which the target image file has the word “Microsoft” in the version resource’s Company Name field, and for which the image file resides in or below the %windir% directory. Hide Microsoft Entries checks only for “Microsoft” in the Company Name field and omits those entries. As mentioned earlier, it is easy for anyone to create a program that gets past this check, so the Verify Code Signatures option is highly recommended.
If signature verification is enabled, Hide Windows Entries omits entries that are signed with the Microsoft Windows code-signing certificate. (Windows components are signed with a different certificate from other Microsoft products.) Hide Microsoft Entries omits entries that are signed with any Microsoft code-signing certificate that chains to a trusted root certificate authority on the computer.
 Note
Note
Some files that ship with Windows, particularly drivers, are provided by third parties and have a third-party name in the Company Name field of the file’s version resource, but they are catalog signed with the Windows code-signing certificate. Consequently, these entries can be hidden when signature verification is enabled but displayed when verification is not enabled. The SigCheck utility described in Chapter 9 reports both the Company Name and the name from the signing certificate. The AutorunsC utility described later in this chapter can report both also.
If you enable Hide VirusTotal Clean Entries in the Options menu, Autoruns removes from the display all entries for which VirusTotal reports zero issues. Autoruns shows only entries that are flagged by one or more VirusTotal engines, that are unknown to VirusTotal, or that couldn’t be queried because the file couldn’t be found or was inaccessible to Autoruns. On a typical system, this option should hide most entries. Note that when a small number of the VirusTotal engines report an issue, it is usually a false positive.
Another great way to find items of interest is to type search text in the Filter text entry field in the toolbar, as shown in Figure 4-6. As you type, Autoruns limits the displayed entries to rows that contain the exact (case-insensitive) text that you type. To remove the filter, simply delete the text from the entry field.
)
FIGURE 4-6 The Filter text box limits Autoruns results to entries containing the word “onedrive.”
By default, Autoruns displays a shaded row only for ASEPs that have entries configured within them and that are not hidden. If Hide Empty Locations is disabled in the Options menu, Autoruns displays a shaded row for every ASEP that it scans, whether it has entries or not. Autoruns scans a tremendous number of ASEPs, so this increases the amount of output dramatically. Disabling this option can be useful to verify whether particular ASEPs are scanned, or to satisfy curiosity.
Scan and filter selections from the Options menu are displayed in the status bar and are saved in the registry. They’ll remain in effect the next time the same user starts Autoruns.
Getting more information about an entry
Right-clicking an entry displays the Entry submenu as a popup context menu. Five of those menu items use other programs to display more information about the selected entry than is displayed in Autoruns:
Jump To Entry Opens the location where the autostart entry is configured. For ASEPs configured in the registry, Jump To Entry starts the registry editor (Regedit.exe) and sends it simulated keystrokes to navigate to the autostart entry. (If Regedit does not navigate to the correct location the first time, try the Jump To Entry command again.) For ASEPs configured in the file system, Jump To Entry opens a new Windows Explorer folder window in that location. For Scheduled Tasks, Jump To opens the Task Scheduler user interface; however, it does not try to navigate to the selected task. Note that Autoruns’ driving of the navigation of Regedit requires that Autoruns not be running at a lower integrity level than Regedit.
Jump To Image Opens a new Windows Explorer folder window with the file identified as the target image selected.
Process Explorer If the image path is an executable (as opposed to a script or DLL file) and a process with that name is still running, Autoruns tries to get Process Explorer (Procexp) to display its Process Properties dialog box for the process. For this option to work, Procexp needs to be in the same directory with Autoruns, found in the path, or already running. If Procexp is already running, it cannot be at a higher integrity level than Autoruns. For example, if Autoruns is not elevated and Procexp is, this option will not work.
Search Online Initiates an online search for the file name using your default browser and search engine.
Properties Displays the Windows Explorer file Properties dialog box for the target image path.
Viewing the autostarts of other users
If Autoruns is running with administrative rights, it adds a User item to the menu, listing the account names that have logged on to the computer and have an accessible user profile. Selecting a user account from that menu rescans the system, searching that user’s ASEPs, including the Run keys under that user’s HKCU and the Startup directory in that user’s profile. If Show Only Per-User Locations is selected in the Scan Options dialog box, Autoruns displays only per-user ASEPs and hides all machinewide ASEPs.
One example of when this option is useful is if a standard user has installed some harmful software. With only standard user privileges, only the user’s per-user ASEPs could have been modified. Software that has only standard user privileges cannot modify systemwide settings nor touch the accounts of other users on the system. Rather than logging on and allowing that malware to run—and possibly interfering with an Autoruns scan—you can log on to the system with an administrative account, start Autoruns, select the potentially compromised account from the User menu, inspect the user’s ASEPs, and perform a cleanup if problems are identified. Enabling the Scan Only Per-User Locations option makes this task even easier by hiding all the ASEPs that the non-admin user could not have configured.
Viewing ASEPs of an offline system
Autoruns allows you to view the ASEPs of an offline instance of Windows from a different, known-good instance of Windows. This can be helpful in several scenarios:
If Windows will not start, offline analysis can identify and remove faulty or misconfigured ASEPs.
Malware, and rootkits in particular, can prevent Autoruns from accurately identifying ASEPs. For example, a rootkit that intercepts and modifies registry reads can hide the content of selected keys from Autoruns. By taking the system offline and viewing its ASEPs from an instance of Windows in which that malware is not running, those entries will not be hidden.
Malicious files on your system might appear to be signed by a trusted publisher, when in fact the root certificate might also have come from the attacker. A known-good system in which the bogus certificate is not installed will fail the signature verification for those files.
To perform offline analysis, Autoruns must run with administrative rights and must have access to the offline instance’s file system. Choose Analyze Offline System from the File menu, and then identify the target’s Windows (System Root) directory and a user’s profile directory, as shown in Figure 4-7. Autoruns then scans that instance’s directories and registry hives for its ASEPs. Note that the registry hives cannot be on read-only media.
)
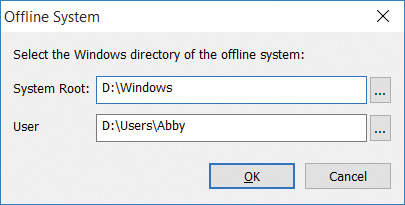
FIGURE 4-7 Picking system and user profile directories of an offline system.
Changing the font
Choose Font from the Options menu to change the font Autoruns uses to display its results. Changing the font updates the display immediately.