Manage schedules
- By Joan Lambert
- 1/30/2017
- Objective 3.1: Create and manage calendars
- Objective 3.1 practice tasks
- Objective 3.2: Create appointments, meetings, and events
- Objective 3.2 practice tasks
- Objective 3.3: Organize and manage appointments, meetings, and events
- Objective 3.3 practice tasks
- Objective 3.4: Create and manage notes and tasks
- Objective 3.4 practice tasks
Objective 3.4: Create and manage notes and tasks
Create tasks
If you use your Outlook task list to its fullest potential, you’ll frequently add tasks to it. You can create tasks in several ways:
In the Tasks module, add a task to the task list.
In other modules, add a task to the Tasks peek.
Create a new task in the task window.
Base a task on an existing Outlook item (such as a message).
Just as you can create recurring appointments, events, and meetings, you can create recurring tasks. You can set the task to occur every day, week, month, or year; or you can specify that a new task should be generated a certain amount of time after the last task is complete.
Regardless of how or where you create a task, all tasks are available in the Tasks module and in the Tasks peek. Only individual tasks are available in the Tasks List.
You will frequently need to take action based on information you receive in Outlook—for example, information in a message or meeting request. You can add information from another Outlook item to your task list, to ensure that you complete any necessary follow-up work. Depending on the method you use, you can either create a new task from an existing item or simply transfer the existing item to your task list by flagging it.
To create a task in the Tasks module
On the Home tab, in the New group, click New Task. Enter the task details in the task window that opens, and then save and close the task.
When displaying the To-Do List view of the Tasks module, enter the task description in the Type a new task box, and then press Enter to create a task with the default settings.
When displaying the Tasks List view of the Tasks module, enter the task description in the Click here to add a new Task box, press Tab to move to subsequent fields, fill in other information, and then press Enter.
To create a task in any module
On the Home tab, in the New group, in the New Items list, click Task.
Press Ctrl+Shift+K.
In the Tasks peek, enter the task description in the Type a new task box.
To create a task from an email message, contact record, or note
Drag the message, contact record, or note to the Tasks button on the Navigation Bar.
To transfer an email message to your task list without creating an individual task
In the Mail pane, click the flag icon to the right of a message.
In the Mail pane, right-click the flag icon to the right of a message, and then specify a due date: Today, Tomorrow, This Week, Next Week, No Date, or Custom (which allows you to set specific start and end dates).
Drag the message to the Tasks peek and drop it under the heading for the due date you want to assign it to. (If the desired due date doesn’t already have a heading in the Tasks peek, drop the message under another heading and then assign the due date you want.)
This method also adds the message to your task list but doesn’t create a separate task item.
This method, referred to as flagging a message for follow-up, adds the message to your task lists with the default due date specified in the Quick Click settings, and adds an information bar to the message. However, it does not create a separate task item, so to retain the task, you must retain the message—you can move the message between mail folders, but deleting the message also deletes the task.
Manage tasks
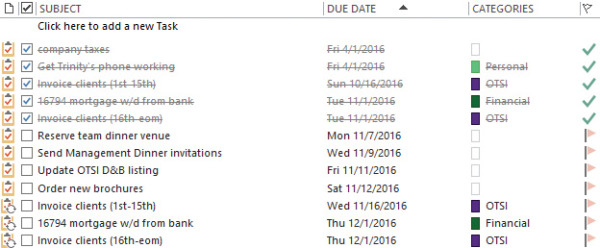
To help you organize your tasks, you can assign them to color categories in the same way that you do any other Outlook item.
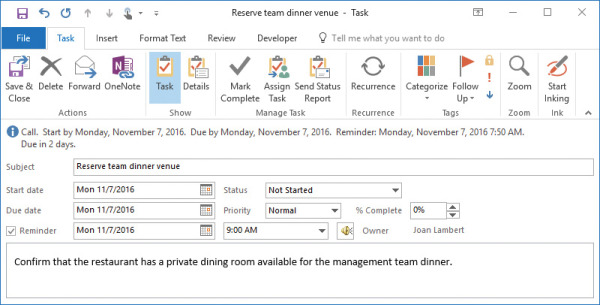
When you create a task item, the only information you must include is the subject. As with many other types of Outlook items, you can set several options for tasks to make it easier to organize and identify tasks.
Start date and due date You can display tasks on either the start date or the due date in the various Outlook task lists. The color of the task flag indicates the due date.
Status You can track the status of a task to remind yourself of your progress. Specific status options include Not Started, In Progress, Completed, Waiting On Someone Else, or Deferred. You also have the option of indicating what percentage of the task is complete. Setting the percentage complete to 25%, 50%, or 75% sets the task status to In Progress. Setting it to 100% sets the task status to Complete.
Priority Unless you indicate otherwise, a task is created with a Normal priority level. You can set the priority to add a visual indicator of a task’s importance. The Low Importance setting displays a blue downward-pointing arrow, and the High Importance setting displays a red exclamation point. You can sort and filter tasks based on their priority.
Recurrence You can set a task to recur on a regular basis; for example, you might create a Payroll task that recurs every month. Only the current instance of a recurring task appears in your task list. When you mark the current task as complete, Outlook creates the next instance of the task.
Category Tasks use the same category list as other Outlook items. You can assign a task to a category to associate it with related items such as messages and appointments.
Reminder You can set a reminder for a task in the same way you do for an appointment. The reminder appears until you dismiss it or mark the task as complete.
Privacy Marking a task as private ensures that other Outlook users to whom you delegate account access can’t see the task details.
None of the options are required, but they can be helpful when sorting, filtering, and prioritizing your tasks.
To track tasks to completion, you can update the Status and % Complete settings in the task window.
You can remove a task from your active task list by marking it as complete, or by deleting it. You can remove a flagged item from the active task list by removing the follow-up flag.
After you mark an instance of a recurring task as complete, Outlook generates a new instance of the task at whatever interval you specified when creating the task.
Removing the flag from a flagged item such as a message or contact record retains the item in its original location but removes it from your task list entirely.
To create a recurring task
On the Task tab of the task window, in the Recurrence group, click Recurrence.
In the Task Recurrence dialog box, select the Recurrence pattern and Range of recurrence options you want, and then click OK.
To assign a task to a category
In your To-Do List or Tasks peek, right-click the category icon to the right of the task subject in the task list, click Categorize, and then click the category you want.
Click the task in your Tasks List to select it. On the Home tab, in the Tags group, click Categorize, and then click the category you want.
On the Task tab of the task window, in the Tags group, click Categorize, and then click the category you want.
To assign a due date to a task
In your To-Do List or Tasks peek, right-click the flag icon, and then click the due date you want.
To mark a task as private
On the Task tab of the task window, in the Tags group, click the Private button.
To mark a task as complete
In the task window, set % Complete to 100%.
On the Task tab of the task window, in the Manage Task group, click Mark Complete.
To delete a task
In your To-Do List or Tasks peek, right-click the task subject, and then click Delete.
On the Task tab of the task window, in the Actions group, click Delete.
In the Tasks module, in the To-Do List or Tasks List, click the flagged item to select it. Then on the Home tab, in the Delete group, click Delete.
To remove a follow-up flag
Display the Tasks module, click the flagged item to select it, and then click Remove from List in the Manage Task group on the Home tab.
Click the flagged item in the Tasks peek, and then click Remove from List in the Manage Task group on the Task List tool tab.
Right-click the flagged item, click Follow Up, and then click Clear Flag.
Create and manage notes
In the Notes module, you can create and store text notes about any subject. If your organization uses Exchange Server, the notes are available to you whenever you connect to your account through Outlook, through your Internet browser, or from a mobile device.
Some functionality of the Notes feature in Outlook 2016 has been modified from that of previous versions, as follows:
The Notes folder is still available in the Folder List, and the Notes module is available from the Navigation Bar.
Notes options are not available in the Outlook Options dialog box. You can create new notes, but only with the default color and font settings. (The note color does change to reflect any color categories that you assign to it.)
Linking from a note to a contact record is no longer possible; however, you can attach a note to a contact record from within the contact record.
You can view the content of the Notes module in three standard views:
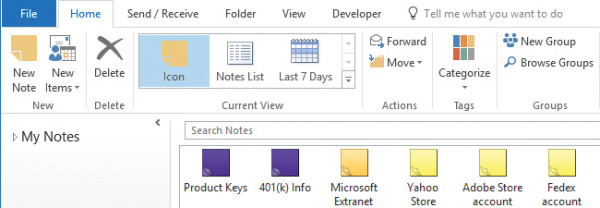
Icon view This view depicts each note as a colored square with a turned up corner, reminiscent of a pad of sticky notes.
In Icon view, you can display large icons organized in rows and columns, or small icons organized either in rows or in columns.
Notes List view This list view displays a small icon, the note subject, and up to three lines of note content.
Last 7 Days view This view is identical to Notes List view but displays only notes that have been modified within the last seven days.
In either list view, you can choose from two standard arrangements: Categories and Created Date. As with other list views, you can sort notes by a specific field by clicking the column header for that field, and you can add or remove fields from the list view.
You can organize notes by assigning them to color categories. In Icon view, uncategorized notes are depicted in the default color set in the Outlook Options window; categorized notes are depicted in the most recently assigned category color. You can also attach notes to other Outlook items, such as contact records.
To create notes
In the Notes module, do either of the following:
On the Home tab, in the New group, click New Note.
Press Ctrl+N.
In any module, press Ctrl+Shift+N.
To assign one or more notes to a color category
In the Notes pane, select the note or notes you want to assign to the same category.
On the Home tab, in the Tags group, click Categorize and then, in the list, click the category you want to assign.
To attach a note to a contact record
Open the contact record window.
On the Insert tab, in the Include group, click Outlook Item.
In the Insert Item dialog box, in the Look in list, click the Notes folder, and then, in the Items list, click the note you want to attach.
In the Insert as area, do one of the following:
To insert the note content in the Notes pane of the contact record, click Text only.
To attach the note in the Notes pane of the contact record, click Attachment.
To create a link to the note in the Notes pane of the contact record, click Shortcut.
In the Insert Item dialog box, click OK.


