Manage schedules
- By Joan Lambert
- 1/30/2017
- Objective 3.1: Create and manage calendars
- Objective 3.1 practice tasks
- Objective 3.2: Create appointments, meetings, and events
- Objective 3.2 practice tasks
- Objective 3.3: Organize and manage appointments, meetings, and events
- Objective 3.3 practice tasks
- Objective 3.4: Create and manage notes and tasks
- Objective 3.4 practice tasks
In this sample chapter from MOS 2016 Study Guide for Microsoft Outlook, learn more about exam objectives related to managing calendars, calendar items, tasks, and notes.
Objective 3.1: Create and manage calendars
Configure calendar settings
The Calendar module offers four distinct views of content. These views are:
Calendar This is the standard view in which you display your Outlook calendar. In the Day, Work Week, or Week arrangement, Calendar view displays the subject, location, and organizer (if space allows) of each appointment, meeting, or event, in addition to the availability bar and any special icons, such as Private or Recurrence.
Preview In the Day, Work Week, or Week arrangement, this view displays additional information, including information from the notes area of the appointment window, as space allows.
List This list view displays all appointments, meetings, and events on your calendar.
Active This list view displays only future appointments, meetings, and events.
In your Outlook calendar, the time that you indicate you are available for other people to schedule meetings with you is referred to as your work week. The calendar time slots within your work week are colored differently from those outside of your work week, and are the only time slots made available to people on your network when they are searching for a time to meet with you.
By default, the Outlook work week is defined as from 8:00 A.M. to 5:00 P.M. (in your local time zone), Monday through Friday. You can change this to match your individual work schedule. In Outlook 2016, you can specify a start time and end time for your standard work day, specify the days of the week that you work, and specify the day of the week that you’d like to appear first when you display only the work week in your calendar.
If you frequently travel or work with colleagues or clients outside of your usual time zone, you might want to change the time zone on your computer so that information such as the receipt time of email messages, appointment times, and the time on the clock in the Windows Taskbar notification area reflects your current location. If you have appointments in both time zones, you can display both time zones on the left side of the Calendar pane, and swap between zones when you travel. That way, you can be sure to correctly enter appointments at the time they will occur in their respective time zones.
)
To display a different calendar view
On the View tab, in the Current View group, click Change View, and then click Calendar, Preview, List, or Active.
To modify the time period shown in Calendar view or Preview view
In the Arrange group on the Home tab, or in the Arrangement group on the View tab, click Day, Work Week, Week, Month or Schedule View.
On the Home tab, in the Go To group, click Today or Next 7 Days.
To modify the time segments shown on the calendar
On the View tab, in the Arrangement group, click Time Scale, and then click 60 Minutes, 30 Minutes, 15 Minutes, 10 Minutes, 6 Minutes, or 5 Minutes.
To modify the grouping of calendar items in List view or Active view
On the View tab, in the Arrangement gallery, click Categories, Start Date, Recurrence, or Location.
Right-click any column heading, and then click Group By This Field.
To sort calendar items in List view or Active view
Click any column heading to sort by the values in that column.
Click the active sort column heading to reverse the sort order.
On the View tab, in the Arrangement group, click Reverse Sort.
To set work times on the default calendar
Open the Outlook Options dialog box and display the Calendar page.
In the Work time section, do any of the following:
Set the start time and end time of the work day you want to define.
In the Work week area, select the check boxes of the days you want to include in your work week.
In the First day of week list, click the day you want to appear first (on the left) in the Work Week view of your calendar.
In the First week of year list, click Starts on Jan 1, First 4-day week, or First full week.
In the Outlook Options dialog box, click OK to save the changes.
To change the calendar time zone
Open the Outlook Options dialog box and display the Calendar page.
In the Time zones section, do the following:
Click the Time zone list, and then click the time zone you want to display.
In the corresponding Label box, enter a description of up to 32 characters.
In the Outlook Options dialog box, click OK to save the changes.
To display multiple time zones
Open the Outlook Options dialog box and display the Calendar page.
In the Time zones section, do the following:
Select the Show a second time zone check box.
In the corresponding Time zone list, click the second time zone you want to display.
In the corresponding Label box, enter a description of up to 32 characters.
In the Outlook Options dialog box, click OK to save the changes.
To switch your calendar between the primary and secondary time zones
Open the Outlook Options dialog box and display the Calendar page.
In the Time zones section, click the Swap Time Zones button.
In the Outlook Options dialog box, click OK to save the changes.
Work with multiple calendars
The Calendar button on the Navigation Bar links to the calendar of your default email account. You can also display the following types of calendars in the Calendar module:
Calendars of your other email accounts These are available automatically when you configure Outlook to connect to an account.
Custom calendars You create a calendar in the same way that you do a folder that contains mail, contact records, or other items.
Calendars of people within your organization Within an organization that uses Microsoft Exchange Server, you can display the availability of your co-workers, individually or in a group, without special permission.
Shared calendars Other Outlook users can share their calendars with you.
SharePoint site calendars You can connect a SharePoint calendar to Outlook.
Internet calendars You can subscribe to or import calendars from the Internet.
All these types of calendars are available to you from the Folder Pane in the Calendar module or the Folder List in the Mail module.
)
You can display calendars individually, or you can display more than one calendar at a time. For example, you might have separate business and personal calendars and want to view them together. You can view multiple calendars next to each other, or you can overlay them to display a composite view of the separate calendars. When you view and scroll through multiple calendars, they all display the same date or time period.
To display or hide multiple calendars
In the Folder Pane of the Calendar module, select or clear the check box of individual calendars.
In the Folder Pane of the Mail module, expand the Folder List, and then click a calendar to display it.
To create a secondary calendar
Display the Calendar module. On the Folder tab, in the New group, click New Calendar.
In the Create New Folder dialog box, name the calendar, select its location, and then click OK.
To create a calendar group by choosing group members
Display the Calendar module in Calendar view. On the Home tab, in the Manage Calendars group, click Calendar Groups and then, in the list, click Create New Calendar Group.
In the Create New Calendar Group dialog box, enter a name for the group, and then click OK.
In the Select Name dialog box, double-click the names of the people whose calendars you want to include in the calendar group to add them to the Group Members box, and then click OK.
To create a calendar group containing the currently displayed calendars
On the Home tab, in the Manage Calendars group, click Calendar Groups and then, in the list, click Save as New Calendar Group.
In the Create New Calendar Group dialog box, enter a name for the group, and then click OK.
To delete a calendar group
In the Folder Pane, right-click the name of the calendar group, and then click Delete Group.
In the confirmation dialog box, click Yes.
To delete a calendar from the Calendar module or from a calendar group
In the Folder Pane, right-click the calendar name, and then click Delete Calendar.
To switch between Overlay Mode and Side-By-Side Mode
On the title bar tab of any secondary calendar, click the View in Overlay Mode button (the left-pointing
 arrow). In Overlay Mode, click either calendar tab to display that calendar on top of the other calendar.
On any overlaid calendar, click the View in Side-By-Side Mode button (the right-pointing
 arrow) to return to the standard display.
On the View tab, in the Arrangement group, click Overlay to turn Overlay Mode on or off for the active calendar.
Right-click any calendar tab, and then click Overlay to turn Overlay Mode on or off for that calendar.
Share calendar information
Co-workers can view your available working time when they schedule meetings with you or view your calendar through Outlook. If you want to share more information with co-workers or with people outside of your organization, you have several options for doing so.
You can allow selected co-workers to view calendar item details by sharing the calendar with them.
You can allow selected co-workers to view your entire calendar and to make appointments and respond to meeting requests on your behalf by delegating control of the calendar to them.
You can publish your calendar to the Office.com website or to a corporate web server and then share the published calendar with any person who has access to the Internet.
You can send a professional graphic representation of your appointments during a selected date range by email to any person who uses an HTML-capable email program (not only people who use Outlook), including colleagues, friends, and family members.
The options for sending, sharing, and publishing calendar information are available from the Share group on the Home tab of the Calendar module.
If your email address is part of an Exchange network, you can give permission to other people on your network to view, modify, or create items within a calendar or any other type of Outlook folder. The level of access each co-worker has is governed by the permissions you assign to him or her. Using this method, you can share your default calendar or a secondary calendar that you create, import, or subscribe to.
)
Shared calendars are available from the Folder Pane of the Calendar module
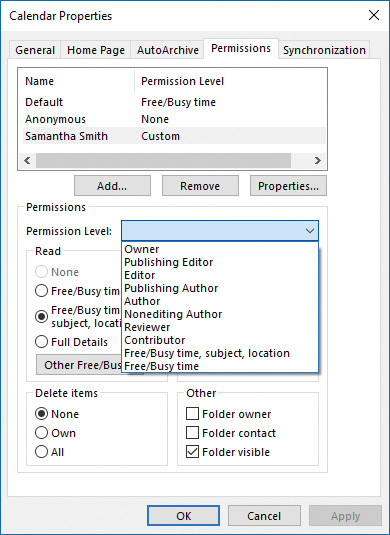
After you share a calendar, you can specify the actions each person with whom you share the calendar can take. You can select a permission level, which includes Read, Write, Delete, and other settings, or you can select individual settings in each category.
You can specify the level of detail and actions available to each person you share your calendar with
To share a calendar
In the Calendar module, display the calendar you want to share.
On the Home tab, in the Share group, click Share Calendar to create a sharing invitation.
Address the invitation to the person with whom you’d like to share your calendar. If you’d like to request that the person reciprocate by sharing his or her calendar with you, select the Request permission to view recipient’s Calendar check box.
In the Details list, click the level of detail you want to share: Availability only, Limited details, or Full details.
Add any notes you want to in the content pane, send the message, and then click Yes in the Microsoft Outlook dialog box that asks you to confirm that you want to share the calendar with the specified permissions.
To configure permissions for a shared calendar
On the Home tab, in the Share group, click Calendar Permissions.
On the Permissions tab of the Calendar Properties dialog box, do either of the following, and then click OK:
Click a preconfigured permission level in the Permission Level list.
Select individual options.