Create tables and lists
- By Joan Lambert and Steve Lambert
- 2/6/2017
In this chapter from MOS 2016 Study Guide for Microsoft Word, learn more about exam objectives related to creating and modifying tables and lists in Microsoft Word 2016.
Objective 3.1: Create tables
Data sets, particularly of numeric data, can often be presented more clearly and efficiently in a table than in a paragraph of text. Tables present large amounts of data, or complex data, in a format that is easier to read and understand by structuring it in rows and columns, which often include headers to explain the purpose or meaning of the data.
You can create a table structure and then enter information in the table cells, you can convert existing text into a table, or you can copy and paste a table structure from another Microsoft Office file, such as an Excel worksheet, a PowerPoint slide, or an Access data table.
There are two simple methods for creating blank tables:
The Insert Table menu displays a grid in which you select a range of cells—up to 10 columns wide and 8 rows high—to create a table of that size. When you create a table this way, each row is one line high and all the columns are of equal width.
The Insert Table dialog box provides an interface in which you enter or select the number of rows and columns you want to create, and you can specify a fixed or relative column width.
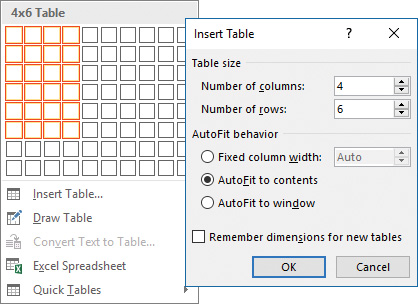
You can select AutoFit options when creating a table or any time thereafter
A table appears in the document as a set of cells, usually delineated by borders or gridlines. Each cell contains an end-of-cell marker, and each row ends with an end-ofrow marker. These markers are visible only when hidden formatting marks are shown.
When you point to a table, a move handle appears in its upper-left corner and a size handle in its lower-right corner. When the cursor is in a table, two Table Tools tabs—Design and Layout—appear on the ribbon.
)
End-of-cell and end-of-row markers are visible only when formatting marks are displayed
Create tables from scratch or from text
Converting text to a table is particularly easy when the text has a consistent structure, such as that of a tabbed list. You can convert cell entries that are separated by tabs, commas, paragraph marks, or another single character. Similarly, you can convert any table to text that is separated by the same selection of characters.
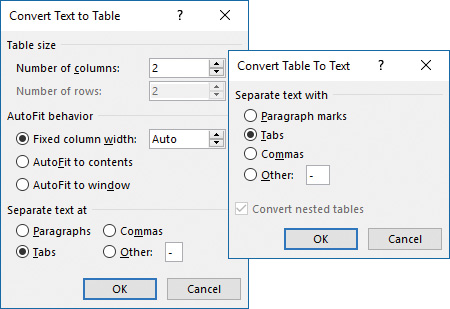
Consistent text separation is key when converting between text and tables
When converting a table to text, the text separator that you choose affects the text layout.
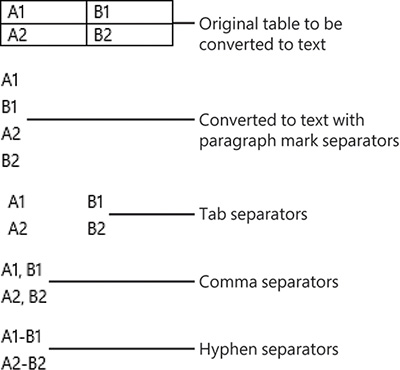
The effects of the standard text separator options
To create a blank page-width table with columns of equal width
On the Insert tab, in the Tables group, click the Table button.
In the grid, move the pointer across and down to select the number of columns and rows you want, and then click the lower-right cell in the selection.
To create a table and specify column fitting options
On the Insert tab, in the Tables group, click the Table button, and then click Insert Table.
In the Insert Table dialog box, in the Table size area, specify the number of columns and rows you want the table to include.
In the AutoFit behavior area, do one of the following, and then click OK:
To specify the width of the table columns, click Fixed column width, and then enter the width in the box.
To size the table columns to fit their contents, click AutoFit to contents. The width of the resulting table may be less than the width of the page.
To create a page-width table that is divided into columns of equal width, click AutoFit to window.
To convert text to a table
Ensure that the text you want to convert uses a consistent method of separating the content that will go into the table cells.
Select the text that you want to convert.
On the Insert tab, in the Tables group, click the Table button, and then click Convert Text to Table.
In the Convert Text to Table dialog box, in the Separate text at section, click or enter the cell text separator. Word evaluates the selected text and indicates the number of rows and columns that will fit it.
In the Table size section, review the Number of columns entry against the selected content and adjust it as necessary.
Adjust the Table size and AutoFit behavior settings, select the type of text separator, and then click OK.
To convert a table to text
Select or click anywhere in the table.
On the Layout tool tab, in the Data group, click Convert to Text.
In the Convert Table To Text dialog box, click the text separator you want to use, and then click OK:
To put each cell entry in its own paragraph, click Paragraph marks.
To put the cell entries from each row into one paragraph, do any of the following:
To create a tabbed list with the same number of columns as the table, click Tabs.
To put a comma and space between cell entries, click Commas.
To put any single character between cell entries, click Other and enter the character in the Other box.
Apply table styles
To quickly and professionally format a table, you can apply one of the built-in table styles. These include a variety of borders, shading choices, text colors, and other attributes to give the table a professional look. When formatting a table, you can choose the table elements that you want to emphasize, such as a header or total row or the first or last column, and you can format the table with banded columns or rows to make the contents more legible.
)
To apply a built-in table style
Click anywhere in the table you want to format.
On the Design tool tab, in the Table Styles gallery, click the built-in style you want to apply.
To emphasize table elements
On the Design tool tab, in the Table Style Options group, select the check boxes of the table elements you want to emphasize.
To manually format table elements
To shade cells, columns, or rows, select the element and then on the Design tool tab, in the Table Styles group, click the Shading arrow and select the color you want.
To change the color or width of borders, on the Design tool tab, in the Borders group, select the border style, line style, line weight, and pen color you want, and then do either of the following:
On the Borders menu, click the border configuration that you want to insert with the selected settings.
Click the Border Painter button, and then click individual table borders to apply the selected settings.
To remove selected cell borders, do either of the following:
Select one or more cells, rows, or columns from which you want to remove the borders. Then on the Design tool tab, in the Borders group, on the Borders menu, click No Border.
On the Layout tool tab, in the Draw group, click the Eraser button, and then click individual table borders to remove them. Click the Eraser button again, press Esc, or click away from the table to turn off the feature.
To display or hide table gridlines
On the Layout tool tab, in the Table group, click the View Gridlines button.
To format text in tables
Select the text and format it as you would regular text, by clicking buttons on the Mini Toolbar and in the Font, Paragraph, and Quick Styles groups on the Home tab.