The OWIN OpenID Connect Middleware
- By Vittorio Bertocci
- 1/22/2016
- OWIN and Katana
- OpenID Connect middleware
- TokenValidationParameters
- More on sessions
- Summary
OpenID Connect middleware
With the exception of the cookie tracking the nonce, all the considerations so far apply to the OpenID Connect middleware as well as the WS-Federation middleware. In this section I dive deeper into the features and options of the OpenID Connect middleware.
OpenIdConnectAuthenticationOptions
The options you pass in at initialization are the main way that you control the OpenID Connect middleware. The Azure AD and ASP.NET teams have taken a lot of care to ensure that only the absolute minimum amount of information is required for the scenario you want to support. The sample app you have studied so far shows the essential set of options: the ClientId (which identifies your app in your requests to the authority) and the Authority (which identifies the trusted source of identities and, indirectly, all the information necessary to validate the tokens it issues). If you want to exercise more fine-grained control, you can use the middleware initialization options class to provide the following:
- More protocol parameters that define your app and the provider you want to trust.
- What kind of token requests you want the app to put forth.
- What logic you want to execute during authentication, choosing from settings offered out of the box and from custom logic you want to inject.
- The usual array of choices controlling all Katana middleware mechanics.
In this section I describe the most notable categories. Two special properties, Notifications and TokenValidationParameters, are so important that I’ve dedicated sections to them.
For your reference, Figure 7-13 shows the default values in OpenIdConnectAuthenticationOptions for our app, right after initialization.
)
Figure 7-13 The values in OpenIdConnectAuthenticationOptions after a typical initialization sequence.
Application coordinates and request options
Besides the already-mentioned ClientId, you can supply the following application details.
NOTE

Parameters in the options class corresponding to OpenID Connect protocol parameters have the same name, with the notation adjusted to match .NET naming conventions. In early iterations, the Active Directory team tried to use the protocol names verbatim—lowercase, underscore, and all—but the community staged an uprising, and the team quickly settled on the format you see today.
RedirectUri This controls the value of redirect_uri included in the request, corresponding to the route in your app through which you want Azure AD to return the requested token. As I noted in Chapter 6, if you don’t specify any value, the parameter will be omitted and Azure AD will pick the one registered at registration time. That’s handy, but you should watch out for two possible issues. First, you might register multiple redirect_uri values for your app, in which case Azure AD will choose which one to use in a semirandom fashion (it always looks like it chooses the first one you registered, but you cannot count on that). Second, if you are connecting to providers other than Azure AD, they might require the request to comply with their spec and include a redirect_uri.
This setting is ingested at the time the app is initialized and won’t change later on. In the section about notifications, you will learn ways of overriding this and other parameters on the fly in the context of specific requests and responses.
- PostLogoutRedirectUri You have seen this in use in Chapter 5. It determines where to redirect the browser in your app once the authority concludes its sign-out operations.
- ClientSecret This represents the client_secret, which is required when redeeming an authorization code. I covered this at a high level in Chapter 2, in the context of OAuth2, but did not look at it at the trace and code level. I’ll do so later in the book.
Here are a few other parameters that control what’s going to be sent in the request.
- ResponseType Maps to the OpenID Connect parameter of the same name. Although you can assign to it any of the values discussed in Chapter 6, only “id_token” and “code id_token” (the default) lead to the automatic handling of user sign-in. If you want to support other response types, such as “code”, you need to inject custom code in the notifications described later in this chapter.
- Resource In case you are using “code id_token”, you can use this parameter to specify what resource you want an authorization code for. If you don’t specify anything, the code you get back from Azure AD will be redeemable for an access token for the Graph API. As mentioned in Chapter 6, resource is a parameter specific to Azure AD.
- Scope Maps to the OAuth2/OpenID Connect scope parameter.
Barring any custom code that modifies outgoing messages on the fly, the settings described here are the ones used in every request and response.
Authority coordinates and validation
The functional area of validation is one of the toughest to explain. It was one of the main pain points of working with WIF, where the object model expected all validation coordinates to be passed by value. Although Microsoft provided tools that generated those settings automatically from metadata, the obscurity and sheer sprawl of the resulting configuration settings came across as a bogeyman that kept the noninitiated at bay.
In the new middlewares, the default behavior is to obtain (most of) the validation coordinates by reference. You provide the authority from which you want to receive tokens, and the middleware takes care of retrieving the token validation coordinates it needs from the authority’s metadata.
In Chapter 6 you saw how that retrieval operation takes place when you pass an Azure AD authority. If you want to customize that behavior, there is a hierarchy of options you can use. From accommodating providers that expose metadata differently from how Azure AD does, to supplying each and every setting for providers that don’t expose metadata at all, these options cover the full spectrum.
Here’s how it works.
The ConfigurationManager class is tasked to retrieve, cache, and refresh the validation settings published by the discovery documents. That class is fed whatever options you provide at initialization. There is a cascade of options it looks for:
- If the options include an Authority value, it will be used as you saw in Chapter 6.
- If you are working with a provider other than Azure AD, with a different URL structure, or if you prefer to specify a reference to the actual discovery document endpoint, you can do so by using the Metadata property.
- If your provider requires special handling of the channel validation, like picking a well-known certificate instead of the usual certification authority and subject matching checks, you can override the default logic via the properties BackchannelCertificateValidator, BackchannelHttpHandler, and BackchannelTimeout.
- If you acquire the token-issuance information—such as the authorization endpoint, the issuer value, the signing keys, and the like—out of band, you can use it to populate a new instance of OpenIdConfiguration and assign it to the Configuration property.
- Finally, if you need to run dynamic logic for populating the Configuration values, you can completely take over by implementing your own IConfigurationManager and assigning it to the ConfigurationManager property in the options.
The issuer coordinates are only part of the validation story. Following is a miscellany of options that affect the validation behavior, and there will be more to say about validation in the section about TokenValidationParameters.
- SecurityTokenHandlers This property holds a collection of TokenHandlers, classes that are capable of handling token formats. By default, the collection includes a handler capable of dealing with the JSON Web Token (JWT). You can take control of the collection and substitute your own implementation if you so choose.
- RefreshOnIssuerKeyNotFound The practice of publishing in metadata documents both the currently valid and next signing key should guarantee business continuity in normal times. In case of emergency key rolls, however, the keys you have acquired in your Configuration and the ones used by the provider might end up out of sync. This flag tells the middleware to react to a token signed with an unknown key by triggering a new metadata acquisition operation so that if the mismatch is the result of stale keys, it is fixed automatically.
- CallbackPath If for some reason (typically performance) you decide that you want to receive tokens only at one specific application URL, you can assign that URL to this property. That will cause the middleware to expect tokens only in requests to that specific URL and ignore all others. Use this with care because embedding paths in your code often results in surprise 401s when you forget about them and deploy to the cloud without changing the value accordingly.
- ProtocolValidator By default, this property contains an instance of OpenIdConnectProtocolValidator, a class that performs various static verifications on the incoming message to ensure that it complies with the current OpenID Connect specification. Besides those validations, the class gives you the option of adding extra constraints, like mandating the presence of certain claim types.
Middleware mechanics
Finally, here’s a list of options that are used for driving the general behavior of the middleware in the context of the Katana pipeline:
- SignInAsAuthenticationType This value determines the value of the AuthenticationType property of the ClaimsPrincipal/ClaimsIdentity generated from the incoming token. If left unspecified, it defaults to the value passed to SetDefaultSignInAsAuthenticationType. As you have seen earlier in the section about authentication middleware, if the cookie middleware finds this in an AuthenticationResponseGrant, that’s what the cookie middleware uses to determine whether such ClaimsPrincipal/ ClaimsIdentity should be used for creating a session.
- AuthenticationType This property identifies this middleware in the pipeline and is used to refer to it for authentication operations—think of the Challenge and SignOut calls you have seen in action earlier in this chapter.
- AuthenticationMode As discussed earlier, when this parameter is set to Active, it tells the middleware to listen to outgoing 401s and transform them into sign-in requests. That’s the default behavior: if you want to change it, you can turn it off by setting AuthenticationMode to Passive.
- UseTokenLifetime This property is often overlooked, but it’s tremendously important. Defaulting to true, UseTokenLifetime tells the cookie middleware that the session it creates should have the same duration and validity window as the id_token received from the authority. If you want to decouple the session validity window from the token (which, by the way, Azure AD sets to one hour), you must set this property to false. Failing that, all the session-duration settings on the CookieMiddleware will be ignored.
- Caption This property has purely cosmetic value. Say that your app generates sign-in buttons for all your authentication middlewares. This property provides the label you can use to identify for the user the button triggering the sign-in implemented by this middleware.
Notifications
Just like WIF before them, the Katana middlewares implementing claims protocols offer you hooks designed for injecting your own custom code to be executed during key phases of the authentication pipeline. Through the years, I have seen this extensibility point used for achieving all sorts of customizations, from optimized sign-in flows, where extra information in the request is used to save the end user a few clicks, to full-blown extensions that support entirely new protocol flavors.
Whereas in old-school WIF those hooks were offered in the form of events, in Katana they are implemented as a collection of delegates gathered in the class OpenIdConnectNotifications. The OpenIdConnectAuthenticationOptions class includes a property of that type, Notifications.
OpenIdConnectNotifications can be split into two main categories: notifications firing at sign-in/sign-out message generation, and notifications firing at token/sign-in message validation. The former category counts only one member, RedirectToIdentityProvider; all the other notifications are included in the latter.
Here is some code that lists all the notifications. You can add it to the initialization of the OpenID Connect middleware in the sample application.
app.UseOpenIdConnectAuthentication(
    new OpenIdConnectAuthenticationOptions
    {
        ClientId = "c3d5b1ad-ae77-49ac-8a86-dd39a2f91081",
        Authority = "https://login.microsoftonline.com/DeveloperTenant.onmicrosoft.com"
        PostLogoutRedirectUri = "https://localhost:44300/",
        Notifications = new OpenIdConnectAuthenticationNotifications()
        {
            RedirectToIdentityProvider = (context) =>
            {
                Debug.WriteLine("*** RedirectToIdentityProvider");
                return Task.FromResult(0);
            },
            MessageReceived = (context) =>
            {
                Debug.WriteLine("*** MessageReceived");
                return Task.FromResult(0);
            },
            SecurityTokenReceived = (context) =>
            {
                Debug.WriteLine("*** SecurityTokenReceived");
                return Task.FromResult(0);
            },
            SecurityTokenValidated = (context) =>
            {
                Debug.WriteLine("*** SecurityTokenValidated");
                return Task.FromResult(0);
            },
            AuthorizationCodeReceived = (context) =>
            {
                Debug.WriteLine("*** AuthorizationCodeReceived");
                return Task.FromResult(0);
            },
            AuthenticationFailed = (context) =>
            {
                Debug.WriteLine("*** AuthenticationFailed");
                return Task.FromResult(0);
            },
        },
    }
);
I’ll discuss each notification individually in a moment, but before I do, give the app a spin so that you can see in which order the notifications fire. When you click the Sign In link, you can expect to see something like this in the output window:
1 ==>request, before cookie auth
2 ==>after cookie, before OIDC
3 ==>after OIDC, before leaving the pipeline
4 <==after entering the pipeline, before OIDC
*** RedirectToIdentityProvider
5 <==after OIDC
6 <==response, after cookie auth
This shows that RedirectToIdentityProvider runs in the context of the OpenID Connect middleware, as expected.
Once you sign in with Azure AD and are redirected to the app, you can expect to see the following sequence:
1 ==>request, before cookie auth
2 ==>after cookie, before OIDC
*** MessageReceived
*** SecurityTokenReceived
*** SecurityTokenValidated
*** AuthorizationCodeReceived
5 <==after OIDC
6 <==response, after cookie auth
1 ==>request, before cookie auth
2 ==>after cookie, before OIDC
3 ==>after OIDC, before leaving the pipeline
4 <==after entering the pipeline, before OIDC
5 <==after OIDC
6 <==response, after cookie auth
This is the same token-processing and cookie-setting sequence you encountered earlier in this chapter. This time, you can see the other notifications fire and the order in which they execute. Figure 7-14 summarizes the sequence in which the notifications fire.
)
Figure 7-14 The notifications sequence.
If you trigger a sign-out, you will see the usual sequence, but look between messages 4 and 5, and you will find that RedirectToIdentityProvider fires on sign-out as well.
Keep in mind also that notifications derive from a BaseNotification class from which they inherit a couple of methods exposing two fundamental capabilities. The first, HandleResponse, signals to the middleware pipeline that whatever logic has been executed in the notification concludes the processing of the current request, hence no other middleware should be executed. A notification calling this method has the responsibility of having everything in the context tidied up, including writing the full response. The second, SkipToNextMiddleware, signals to the middleware pipeline that whatever logic has been executed in the notification concludes the work that the current middleware should do on the request. Hence, any other request-processing code in the current middleware should not be executed, and the baton should be passed to the next middleware in the pipeline as soon as the notification concludes its work.
Now let’s look at each notification in more detail.
RedirectToIdentityProvider
This is likely the notification you’ll work with most often. It is executed right after the OpenID Connect middleware creates a protocol message, and it gives you the opportunity to override the option values the middleware uses to build the message, augment them with extra parameters, and so on. If you place a breakpoint in the notification and take a look at the context parameter, you’ll see something like what’s shown in Figure 7-15.
)
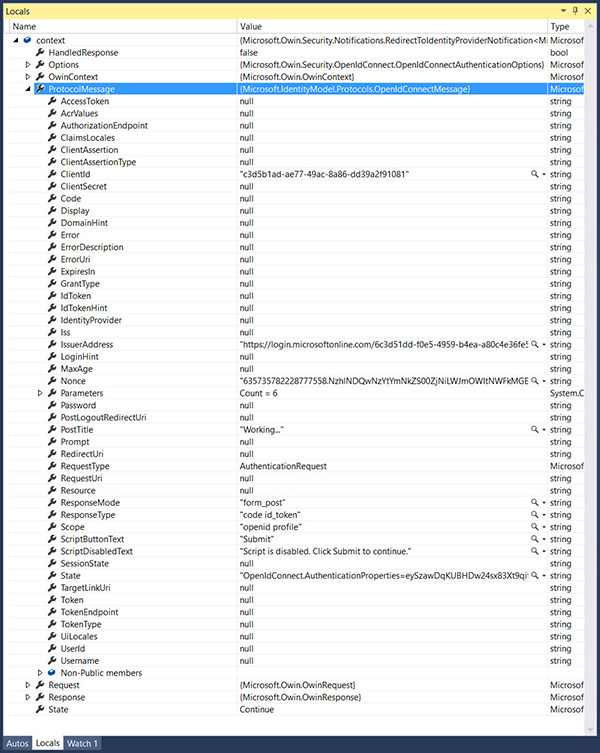
Figure 7-15 The content of the context parameter on a typical RedirectToIdentityProvider notification execution.
I expanded the ProtocolMessage in Figure 7-15 so that you can see that it already contains all the default parameters you have seen in the request on the traces in Chapter 6. There are a number of fun and useful things you can do here, so let’s examine a couple of examples.
Say that my app is registered to run both on my local dev box (hence, on a localhost address) and on an Azure website (hence, on something like myapp.azurewebsites.net). That means that depending on where my app is running at the moment, I have to remember to set the correct RedirectUri and PostLogoutRedirectUri properties in the options right before deploying. Or do I? Consider the following code:
RedirectToIdentityProvider = (context) =>
{
   string appBaseUrl = context.Request.Scheme + "://"
       + context.Request.Host + context.Request.PathBase;
    context.ProtocolMessage.RedirectUri = appBaseUrl + "/";
    context.ProtocolMessage.PostLogoutRedirectUri = appBaseUrl;
    return Task.FromResult(0);
},
Here I simply read from the Request the URL being requested, indicating at which address my app is running at the moment and using it to inject the correct values of RedirectUri and PostLogoutRedirectUri in the message. Neat!
Or consider a case in which I want to guarantee that when an authentication request is sent, the user is always forced to enter credentials no matter what session cookies might already be in place. In Chapter 6 you learned that OpenID Connect will behave that way upon receiving a prompt=login parameter in the request, but how do you do it? Check out this code:
RedirectToIdentityProvider = (context) =>
{
    context.ProtocolMessage.Prompt = "login";
    return Task.FromResult(0);
},
That’s it. From this moment on, every sign-in request will prompt the user for credentials. Easy. Now is the time to reap the benefits of having gone through all those nitty-gritty protocol details in Chapter 6; you can use this notification to control every aspect of the message to your heart’s content. Of course, this applies to sign-out flows, too.
But before moving on to the next notification, I want to highlight that you don’t have to put the code for your notifications in line. If you have notification-handling logic you want to reuse across multiple applications, you can put it in a function, package it in a class, and reuse it as you see fit. Explicitly creating a function is also indicated when the amount of code is substantial, or when you want to enhance readability. As a quick demonstration of this approach, let’s rewrite the latest sample in an explicit function at the level of the Startup class:
public static Task RedirectToIdentityProvider(RedirectToIdentityProviderNotification<OpenIdConne
ctMessage, OpenIdConnectAuthenticationOptions> notification)
{
    notification.ProtocolMessage.Prompt = "login";
    return Task.FromResult(0);
}
Assigning it back in the Notifications is straightforward:
//...
Notifications = new OpenIdConnectAuthenticationNotifications()
{
    RedirectToIdentityProvider = Startup.RedirectToIdentityProvider,
// ...
I also like the aspect of this approach that makes more visible which parameters are being passed to the notification, which in turns makes it easier to understand what the notification is suitable for. The OpenIdConnectMessage passed to RedirectToIdentityProvider is an excellent example of that.
MessageReceived
This notification is triggered when the middleware detects that the incoming message happens to be a known OpenID Connect message. You can use it for a variety of purposes; for example, for resources you want to allocate just in time (such as database connections), stuff you want to cache in memory before the message is processed further, and so on. Alternatively, you might use this notification for logging purposes. However, the main use I have seen for MessageReceived occurs when you want to completely take over the handling of the entire request (that’s where HandleResponse comes into play, by the way). For example, you might use MessageReceived for handling response_types that the middleware currently does not automatically process, like a sign-in flow based on authorization code. That’s not an easy endeavor, and as such not very common, but some advanced scenarios will sometimes require it, and this extensibility model makes doing so possible.
SecurityTokenReceived
SecurityTokenReceived triggers when the middleware finds an id_token in the request. Similar considerations as for MessageReceived apply, with finer granularity. Here, the entity being processed is the token, as opposed to the entire message.
SecurityTokenValidated
At the stage in which SecurityTokenValidated fires, the incoming id_token has been parsed, validated, and used to populate context.AuthenticationTicket with a ClaimsIdentity whose claims come from the incoming token.
This is the right place for adding any user-driven logic you want to execute before reaching the application itself. Common scenarios include user-driven access control and claims augmentation. Here are examples for each case.
Say that I run a courseware website where users can buy individual subscriptions for gaining access to training videos. I integrate with Azure AD, given that business users are very important to me, but my business model imposes on me the need to verify access at the user level. That means that the token validations you have studied so far aren’t in themselves sufficient to decide whether a caller can gain access. Consider the following implementation of SecurityTokenValidated:
SecurityTokenValidated = (context) =>
{
    string userID = context.AuthenticationTicket.Identity.FindFirst(ClaimTypes.NameIdentifier).Value;
    if (db.Users.FirstOrDefault(b => (b.UserID == userID)) == null)
        throw new System.IdentityModel.Tokens.SecurityTokenValidationException();
    return Task.FromResult(0);
},
The notification body retrieves a user identifier from the claims of the freshly created AuthenticationTicket. That done, it verifies whether that identifier is listed in a database of subscribers (whose existence I am postulating for the sake of the scenario). If the user does have an entry, everything goes on as business as usual. But if the user is not listed, the app throws an exception that creates conditions equivalent to the ones you would experience on receiving an invalid token. Simple!
Consider this other scenario. Say that your application maintains a database of attributes for its users—attributes that are not supplied in the incoming token by the identity provider. You can use SecurityTokenValidated to augment the set of incoming user claims with any arbitrary value you keep in your local database. The application code will be able to access those values just like any other IdP-issued claims, the only difference being the issuer value. Here’s an example.
SecurityTokenValidated = (context) =>
{
    string userID = context.AuthenticationTicket.Identity.FindFirst(ClaimTypes.NameIdentifier).
Value;
    Claim userHair = new Claim("http://mycustomclaims/hairlength", RetrieveHairLength(userID),
ClaimValueTypes.Double, "LocalAuthority");
    context.AuthenticationTicket.Identity.AddClaim(userHair);
    return Task.FromResult(0);
},
Here I assume that you have a method that, given the identifier of the current user, queries your database to retrieve an attribute (in this case, hair length). Once you get the value back, you can use it to create a new claim (I invented a new claim type on the spot to show you that you can choose pretty much anything that works for you) and add that claim to the AuthenticationTicket’s ClaimsIdentity. I passed “’LocalAuthority” as the issuer identifier to ensure that the locally generated claims are distinguishable from the ones received from the IdP: the two usually carry a different trust level.
Now that the new claim is part of the ticket, it’s going to follow the same journey we have studied so far for normal, nonaugmented identity information. Making use of it from the app requires the same code you already saw in action for out-of-the-box claim types.
public ActionResult Index()
{
    var userHair = ClaimsPrincipal.Current.FindFirst("http://mycustomclaims/hairlength");
    return View();
}
This is a very powerful mechanism, but it does have its costs. Besides the performance hit of doing I/O while processing a request, you have to keep in mind that whatever you add to the AuthenticationTicket will end up in the session cookie. In turn, that will add a tax for every subsequent request, and at times it might even blow past browser limits. For example, Safari is famous for allowing only 4 KB of cookies/headers in requests for a given domain. Exceed that limit and cookies will be clipped, signature checks will fail, nonces will be dropped, and all sorts of other hard-to-diagnose issues will arise.
AuthorizationCodeReceived
This notification fires only in the case in which the middleware emits a request for a hybrid flow, where the id_token is accompanied by an authorization code. I’ll go into more details in a later chapter, after fleshing out the scenario and introducing other artifacts that come in handy for dealing with that case.
AuthenticationFailed
This notification gives you a way to catch issues occurring in the notifications pipeline and react to them with your own logic. Here’s a simple example:
AuthenticationFailed = (context) =>
{
    context.OwinContext.Response.Redirect("/Home/Error");
    context.HandleResponse();
    return Task.FromResult(0);
},
In this code I simply redirect the flow to an error route. Chances are you will want to do something more sophisticated, like retrieving the culprit exception (available in the context) and then log it or pass it to the page. The interesting thing to notice here is the use of HandleResponse. There’s nothing else that can make meaningful work in the pipeline after this, hence we short-circuit the request processing and send the response back right away.