The OWIN OpenID Connect Middleware
- By Vittorio Bertocci
- 1/22/2016
- OWIN and Katana
- OpenID Connect middleware
- TokenValidationParameters
- More on sessions
- Summary
In this chapter I focus on the OpenID Connect middleware and supporting classes. These are the cornerstones of ASP.NET’s support for web sign-on.
As you saw in Chapter 5, “Getting started with web sign-on and Active Directory,” in the most common case, the OpenID Connect middleware requires very few parameters to enable web sign-on. Beneath that simple surface, however, are knobs for practically anything you want to control: protocol parameters, initialization strategies, token validation, message processing, and so on. This chapter will reveal the various layers of the object model for you, showing how you can fine-tune the authentication process to meet your needs.
OWIN and Katana
When I wrote Programming Windows Identity Foundation (Microsoft Press) in 2009, I didn’t have to spend much time explaining HttpModule, the well-established ASP.NET extensibility technology on which WIF was built. This time around, however, I cannot afford the luxury of assuming that you are already familiar with OWIN and its implementation in ASP.NET—this is the foundational technology of the new generation of authentication libraries.
OWIN is a stable standard at this point, but its implementations are still relatively new technologies. You can find plenty of information online, but the details are rapidly changing (as I write, ASP.NET vNext is in the process of renaming lots of classes and properties), and you need to have a solid understanding of the pipeline and model underlying the identity functionality.
In this section I provide a quick tour of OWIN (as implemented in Katana 3.0.1) and the features that are especially relevant for the scenarios I’ve described throughout the book. For more details, you can refer to the online documentation from the ASP.NET team.
What is OWIN?
OWIN stands for Open Web Interface for .NET. It is a community-driven specification: Microsoft is just a contributor, albeit a very important one. Here’s the official definition, straight from the specifications’ home page at http://owin.org/.
- OWIN defines a standard interface between .NET web servers and web applications. The goal of the OWIN interface is to decouple server and application, encourage the development of simple modules for .NET web development, and, by being an open standard, stimulate the open source ecosystem of .NET web development tools.
In essence, OWIN suggests a way of building software modules (called middlewares) that can process HTTP requests and responses. It also describes a way in which those modules can be concatenated in a processing pipeline and defines how that pipeline can be hosted without relying on any specific web server or host or the features of a particular development stack.
The core idea is that, at every instant, the state of an HTTP transaction and the server-side processing of it is represented by a dictionary of the following form:
IDictionary<string, object>
This is commonly known as the environment dictionary. You can expect to find in it the usual request and response data (host, headers, query string, URI scheme, and so on) alongside any data that might be required for whatever processing an app needs to perform. Where does the data come from? Some of it, like the request details, must eventually come from the web server. The rest is the result of the work of the middleware in the pipeline.
Oversimplifying, a middleware is a module that implements the following interface:
Func<IDictionary<string, object>, Task>;
I am sure you have already guessed how things might work. The middleware receives the environment dictionary as input, acts on it to perform the middleware’s function, and then hands it over to the next middleware in the pipeline. For example, logging middleware might read the dictionary and pass it along unmodified, but an authentication middleware might find a 401 code in the dictionary and decide to transform it into a 302, modifying the response to include an authentication request. By using the dictionary as the way of communicating and sharing context, as opposed to calling each other directly, middlewares achieve a level of decoupling that was not possible in older approaches.
How do you bootstrap all this? At startup, the middleware pipeline needs to be constructed and initialized: you need to decide what middlewares should be included and in which order and ensure that requests and responses will be routed through the pipeline accordingly. The OWIN specification has a section that defines a generic mechanism for this, but given that you will be working mostly with the ASP.NET-specific implementation, I won’t go into much detail on that.
I skipped an awful lot of what the formulaic descriptions of OWIN normally include (like the formal definitions of application, middleware, server, and host), but I believe that this brief description should provide you enough scaffolding for understanding Katana, ASP.NET’s implementation of OWIN.
Katana
Katana is the code name for a set of Microsoft’s .NET 4.5–based components that utilize the OWIN specification to implement various functionalities in ASP.NET 4.6. It’s what you used in Chapter 1 and Chapter 5 and includes base middleware classes, a framework for initializing the pipeline, pipeline hosts for ASP.NET, and a large collection of middlewares for all sorts of tasks.
In Chapter 5 you encountered most of the Katana NuGet packages and assemblies that appear in common scenarios. You also successfully used them by entering the code I suggested. Here I’ll reexamine all that, explaining what really happens.
Startup and IAppBuilder
In Chapter 5, in the section “Host the OWIN pipeline,” you created a Startup class and decorated its source file with the assembly:OwinStartup attribute. The function of Startup is to initialize the OWIN pipeline by having its Configure method automatically invoked at initialization. To follow current practices, I instructed you to make Startup partial and to put the actual pipeline-building code in another file—but you could have just as well added the code in line in Startup.
Using the attribute is only one of several ways of telling Katana which class should act as Startup. You can also do the following:
- Have one class named Startup in the assembly or the global namespace.
- Use the OwinStartup attribute. The attribute wins against the naming convention (using Startup): if both techniques are used, the attribute will be the one driving the behavior.
Add an entry under <appSettings> in the app config file, of the form
<add key="owin:appStartup" value=" WebAppChapter5.Startup" />.
This entry wins over both the naming convention and the attribute.
Fun times! I’ve listed these alternatives so that you know where to look if your app appears to magically pick up code without an obvious reason. I used to feel like that all the time when I first started with Katana.
Let’s now turn our attention to Startup.Configure. Observe the method’s signature:
public void Configure(IAppBuilder app)
IAppBuilder is an interface designed to support the initialization of the application. It looks like this:
public interface IAppBuilder
{
    IDictionary<string, object> Properties { get; }

    object Build(Type returnType);
    IAppBuilder New();
    IAppBuilder Use(object middleware, params object[] args);
}
The Properties dictionary is used in turn by the server and host to record their capabilities and initialize data, making it available to the application’s initialization code—that is to say, whatever you put in Configure. In the case of our sample app, the server is IIS Express and the host is the SystemWeb host we referenced when adding the NuGet package with the same name.
NOTE

That host is actually an HttpModule designed to host the OWIN pipeline. That’s the trick Katana uses to integrate with the traditional System.Web pipeline.
The Build method is rarely called in your own code, so I’ll ignore it here. The Use method enables you to add middleware to the pipeline, and I’ll get to that in a moment.
To prove to you that the host does indeed populate app at startup, let’s take a peek at the app parameter when Configure is first invoked. Open Visual Studio, open the solution from Chapter 5, place a breakpoint on the first line of Configure, and hit F5. Once the breakpoint is reached, navigate to the Locals tab and look at the content of app. You should see something similar to Figure 7-1.
)
Figure 7-1 The content of the app parameter at Configure time.
Wow, we didn’t even start, and look at how much stuff is there already!
Katana provides a concrete type for IAppBuilder, named AppBuilder. As expected, the Properties dictionary arrives already populated with server, host, and environment properties. Feel free to ignore the actual values at this point. Just as an example, in Figure 7-1 I highlighted the host.AppName property holding the IIS metabase path for the app.
The nonpublic members hold a very interesting entry: _middleware. If you keep an eye on that entry as you go through the pipeline-initialization code in the next section, you will see the value of Count grow at every invocation of Use*.
Middlewares, pipeline, and context
Stop the debugger and head to Startup.Auth.cs, where you will find the implementation of ConfigureAuth. This is where you actually add middleware to the pipeline, through the calls to UseCookieAuthentication and UseOpenIdConnectAuthentication. Those are convenience extension methods. UseCookieAuthentication is equivalent to this:
app.Use(typeof(CookieAuthenticationMiddleware), app, options);
The effect of Use is to add the corresponding middleware to the pipeline in AppBuilder—as you can observe by watching the aforementioned _middleware. Although technically a middleware might simply satisfy the Func interface mentioned at the beginning, Katana offers patterns that are a bit more structured. One easy example can be found by examining OwinMiddleware, a base class for middlewares. It’s super simple:
public abstract class OwinMiddleware
{
    protected OwinMiddleware(OwinMiddleware next)
    {
        Next = next;
    }
    protected OwinMiddleware Next { get; set; }
    public abstract Task Invoke(IOwinContext context);
}
Every middleware provides an Invoke method, accepting an IOwinContext, which is a convenience wrapper of the environment dictionary from the OWIN specs. In addition, every middleware can hold a pointer to the next entry in the pipeline. The idea is that when you call a middleware’s Invoke method, the middleware can do its work on the context (typically, the request part of it), await the Invoke call of the next middleware in the pipeline, and do more work (this time on the response) once the Invoke method of the next middleware returns. As mentioned earlier, middlewares communicate via shared context: each middleware can examine the IOwinContext instance to find out what the preceding middleware did. You can see a diagram of this flow in Figure 7-2. The diagram is specific to the sample application scenario—hence IIS and the System.Web model—to make things as concrete as possible. However, I want to stress that the middleware activation sequence would remain the same even if it were hosted elsewhere.
)
Figure 7-2 The OWIN pipeline as implemented by Katana in the sample application scenario: an HttpModule, hosting a cascade of middlewares.
Note that one middleware can always decide that no further processing should happen. In that case the middleware will not call the Invoke method of the next middleware in the sequence, effectively short-circuiting the pipeline.
NOTE
OwinMiddleware is great for explaining the base functionality of the middleware, but in practice it raises interop issues. If you plan to build your own middleware (which is far outside the scope of this book), you should consider achieving the same behaviors without using it.
There’s a neat trick you can use for observing firsthand how the middleware pipeline unfolds. You can interleave the Use* sequence with your own debug middlewares, and then place strategic breakpoints or debug messages. Here’s the pattern for a minimal middleware-like debug implementation:
app.Use(async (Context, next) =>
{
    // request processing - do something here
    await next.Invoke();
    // response processing - do something here
});
That’s pretty easy. Here’s the sequence from the sample app, modified accordingly:
app.SetDefaultSignInAsAuthenticationType(CookieAuthenticationDefaults.AuthenticationType);
app.Use(async (Context, next) =>
{
    Debug.WriteLine("1 ==>request, before cookie auth");
    await next.Invoke();
    Debug.WriteLine("6 <==response, after cookie auth");
});

app.UseCookieAuthentication(new CookieAuthenticationOptions());

app.Use(async (Context, next) =>
{
    Debug.WriteLine("2 ==>after cookie, before OIDC");
    await next.Invoke();
    Debug.WriteLine("5 <==after OIDC");
});

app.UseOpenIdConnectAuthentication(
    new OpenIdConnectAuthenticationOptions
    {
        ClientId = "c3d5b1ad-ae77-49ac-8a86-dd39a2f91081",
        Authority = "https://login.microsoftonline.com/DeveloperTenant.onmicrosoft.com",
        PostLogoutRedirectUri = https://localhost:44300/
    }
);

app.Use(async (Context, next) =>
{
    Debug.WriteLine("3 ==>after OIDC, before leaving the pipeline");
    await next.Invoke();
    Debug.WriteLine("4 <==after entering the pipeline, before OIDC");
});
The numbers in front of every debug message express the sequence you should see when all the middlewares have a chance to fire. Any discontinuity in the sequence will tell you that some middleware decided to short-circuit the pipeline by not invoking its next middleware buddy.
Run the sample app and see whether everything works as expected. But before you do, you need to disable one Visual Studio feature that interferes with our experiment: it’s the Browser Link. The Browser Link helps Visual Studio communicate with the browser running the app that’s being debugged and allows it to respond to events. The unfortunate side effect for our scenario is that Browser Link produces extra traffic. In Chapter 6, “OpenID Connect and Azure AD web sign-on,” we solved the issue by hiding the extra requests via Fiddler filters, but that’s not an option here. Luckily, it’s easy to opt out of the feature. Just add the following line to the <appSettings> section in the web.config file for the app:
<add key="vs:EnableBrowserLink" value="false"></add>
That done, hit F5. As the home page loads, the output window will show something like the following:
1 ==>request, before cookie auth
2 ==>after cookie, before OIDC
3 ==>after OIDC, before leaving the pipeline
'iisexpress.exe' (CLR v4.0.30319: /LM/W3SVC/2/ROOT-1-130799278910142565): Loaded 'C:\windowsassembly\GAC_MSIL\Microsoft.VisualStudio.Debugger.Runtime\14.0.0.0__b03f5f7f11d50a3a\Microsoft.
VisualStudio.Debugger.Runtime.dll'. Skipped loading symbols. Module is optimized and the
debugger option 'Just My Code' is enabled.
4 <==after entering the pipeline, before OIDC
5 <==after OIDC
6 <==response, after cookie auth
You can see that all the middlewares executed, and all in the order that was predicted when you assigned sequence numbers. Never mind that this doesn’t appear to do anything! You’ll find out more about that in the next section.
Click Contact or Sign In on the home page. Assuming that you are not already signed in, you should see pretty much the same sequence you’ve seen earlier (so I won’t repeat the output window content here), but at the end of it your browser will redirect to Azure AD for authentication. Authenticate, and then take a look at the output window to see what happens as the browser returns to the app. You should see something like this:
1 ==>request, before cookie auth
2 ==>after cookie, before OIDC
5 <==after OIDC
6 <==response, after cookie auth
1 ==>request, before cookie auth
2 ==>after cookie, before OIDC
3 ==>after OIDC, before leaving the pipeline
4 <==after entering the pipeline, before OIDC
5 <==after OIDC
6 <==response, after cookie auth
This time you see a gap. As the request comes back with the token, notice that the first part of the sequence stops at the OpenID Connect middleware—the jump from 2 to 5 indicates that the last debug middleware was not executed, and presumably the same can be said for the rest of the following stages.
What happened? Recall what you studied in the section “Response” in Chapter 6: when the OpenID Connect middleware first receives the token, it does not grant access to the app right away. Rather, it sends back a 302 for honoring any internal redirect and performs a set-cookie operation for placing the session cookie in the browser. That’s exactly what happens in the steps 1, 2, 5, and 6: the OpenID Connect middleware decides that no further processing should take place and initiates the response sequence. The full 1–6 sequence that follows is what happens when the browser executes the 302 and comes back with a session cookie.
That’s it. At this point, you should have a good sense of how middlewares come together to form a single, coherent pipeline. The last generic building block you need to examine is the context that all middlewares use to communicate.
Sign out of the app and stop the debugger so that the next exploration will start from a clean slate.
Context Before getting to the specifics of authentication, let’s invest a few moments to get to know the OWIN context better.
Place a breakpoint in the first diagnostic middleware, on the line that writes the message marked with 1. Hit F5, and once the execution reaches your breakpoint, head to the Locals tab and take a look at the content of the Context parameter. You should see what’s depicted in Figure 7-3.
)
Figure 7-3 The structure of the Katana context.
Let’s cover each of the entries here.
Authentication The Authentication property is used for exposing authentication capabilities of the current pipeline. You saw this in action when you implemented the sign-in and sign-out features in Chapter 5, via the Challenge and SignOut methods, respectively.
Authentication is also used by authentication middlewares for communicating with one another, as you will see in the next section. As Figure 7-4 shows, when the request first enters the pipeline, Authentication is empty. You will learn about this property in detail when we focus on the authentication middleware.

Figure 7-4 The Context.Authentication property content upon receiving the first unauthenticated request.
Environment As the OWIN specification states, the core status of an OWIN pipeline is captured by the environment dictionary. Figure 7-5 shows how the Katana implementation features all the values prescribed by the OWIN specification, plus a few more.
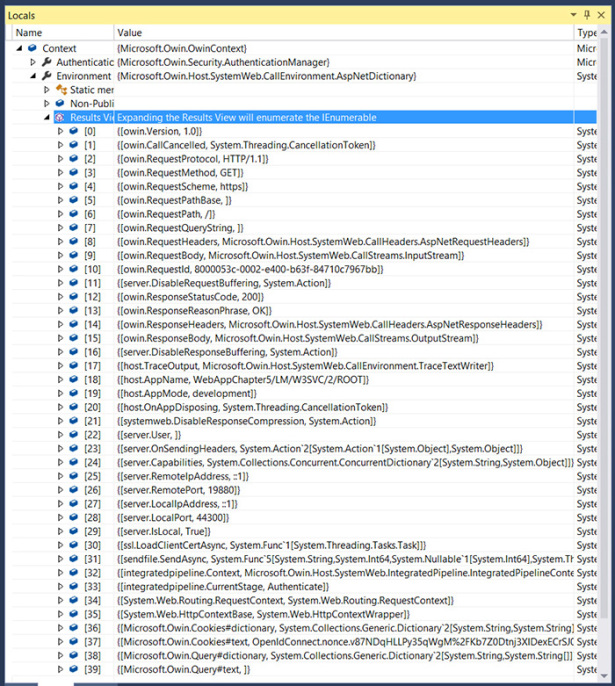
Figure 7-5 The content of the OWIN environment dictionary on first request.
Request and Response If you are familiar with HTTP request and response manipulation in traditional ASP.NET, you should be quite comfortable with their similarly named Context properties in Katana. Figure 7-6 shows an example.
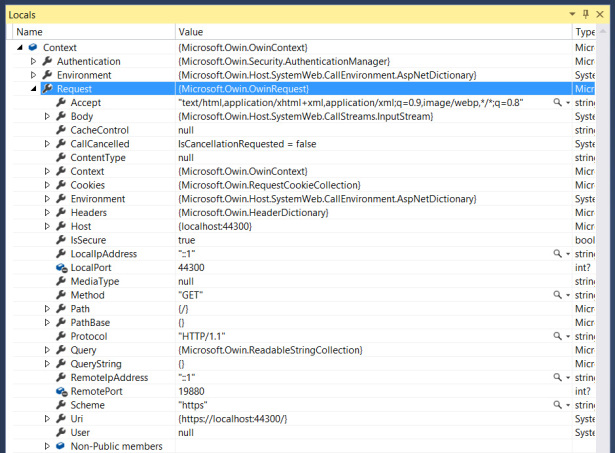
Figure 7-6 The first request, represented by the Context.Request property.
- TraceOutput This property is mainly a clever way of exposing a standard trace at the OWIN level, regardless of the specific host used to run the pipeline.
)
)
)
Add more breakpoints for the other debug middlewares and see how Context changes as the execution sweeps through the pipeline. After you have experimented with this, head to the next section, where I review the authentication flow through the OWIN pipeline in detail.
Authentication middleware
The authentication functionality emerges from the collaboration of a protocol middleware (like those for OpenID Connect or WS-Federation) and the cookie middleware. The protocol middleware reacts to requests and responses by generating and processing protocol messages, with all that entails (token validation and so on). The cookie middleware persists sessions in the form of cookies at sign-in and enforces the presence and validity of such cookies from the instant of authentication onward. All communication between the two middlewares takes place via the AuthenticationManager instance in the Context. Let’s break down the sign-in flow we captured earlier into three phases: generation of the sign-in challenge, response processing and session generation, and access in the context of a session.
Sign-in redirect message Assume that you triggered the sign-in flow by clicking Contact. As you observed, this action results in all the middlewares firing in the expected order, and it concludes with the redirection of the browser toward Azure AD with an authorization request message.
If you go through the flow while keeping an eye on Context.Response, you will notice that after the request leaves the OWIN pipeline (after the debug message marked 3), something changes the Response’s StatusCode to 401. In this case, that was the good old [Authorize], which does its job to enforce authenticated access regardless of the presence of the OWIN pipeline.
If you go beyond the breakpoint on debug message 4 and let the OpenID Connect middleware execute, you will observe that Response.StatusCode changes again, this time to 302. If you dig into the Response.Headers collection, you will notice a new entry, Location, containing the OpenID Connect authorization request. Moreover, you will find a new Set-Cookie entry for saving the OpenID Connect nonce.
Walking through the rest of the breakpoint, you will see the response message go unmodified through the remainder of the pipeline and back to the browser.
In Katana parlance, the OpenID Connect middleware is Active by default. That means that its options class’s AuthenticationMode property is set to Active, which makes it react to 401 responses by generating its sign-in challenge message. That is not always what you want: for example, if you have multiple protocol middlewares configured to talk to different IdPs, you will want explicit control (via calls to Authentication.Challenge) over what middleware should be in charge to generate the sign-in message at a given moment.
Figure 7-7 displays the steps in the sequence of the sign-in message generation phase.
)
Figure 7-7 The sequence through which an unauthenticated request elicits the generation of a sign-in message.
Token validation and establishment of a session The sequence that processes the Azure AD response carrying the token (characterized by the debug sequence 1, 2, 5, 6 earlier) is the one requiring the most sophisticated logic.
The request goes through the cookie middleware (breakpoints on messages 1 and 2) unmodified. However, as soon as you step over the Invoke call in the diagnostic middleware that calls the OpenID Connect middleware, you’ll observe that the execution goes straight to the breakpoint on debug message 5, skipping the rest of the pipeline and the app itself and initiating the response.
Once again, the Response object carries a 302. If you recall the explanations in the earlier section, you know that this 302 means that the middleware successfully validated the token received and is now using a redirect operation to perform any local redirect and persist the session cookie in the client browser. If you take a look at the Response.Header collection, you will find a Location entry redirecting to “https://localhost:44300/Home/Contact”, which is the route originally requested. You will also find a Set-Cookie entry meant to delete the nonce, which is no longer necessary at this point. However, you will not find any Set-Cookie for the session cookie. Where is it?
Saving the session is the job of the cookie middleware, which at this point has not yet had a chance to process the response. In fact, saving a session might be a far more complicated matter than simply sending back a Set-Cookie header. For example, you might want to save the bulk of the session on a server-side store: the cookie middleware provides that ability as a service so that any protocol middleware can leverage it without having to reinvent the process every time.
The OpenID Connect middleware uses Context.Authentication to communicate to the cookie middleware the content of the validated token to be persisted as well as other session-related details, such as duration. Right after the OpenID Connect middleware processes the request, you’ll see the Authentication properties AuthenticationResponseGrant, SignInEntry, and User populated.
The cookie middleware is mostly interested in AuthenticationReponseGrant. When its turn comes to process the response, the cookie middleware will find the AuthenticationReponseGrant and use its content to generate a session. In Figure 7-8 you can see an example of AuthenticationResponseGrant content.
)
Figure 7-8 The AuthenticationResponseGrant content right after the OpenID Connect middleware successfully validates a sign-in response from Azure AD.
Properties refers to generic session properties, such as the validity window (derived from the validity window of the token itself, as declared by Azure AD). Identity, as you guessed, is the ClaimsIdentity representing the authenticated user. The most important thing to notice at this point is the AuthenticationType value that’s shown: that’s a hint left by the OpenID Connect middleware for the cookie middleware, indicating that the ClaimsIdentity instance should be persisted in the session. Recall that when the pipeline is initialized in Startup.Auth.cs, you started the method with the following line:
app.SetDefaultSignInAsAuthenticationType(CookieAuthenticationDefaults.AuthenticationType);
That told the protocol middlewares in the pipeline that in the absence of local overrides, the identifier to use for electing an identity to be persisted in a session is CookieAuthenticationDefaults.AuthenticationType, which happens to be the string “Cookies”. When the OpenID Connect middleware validates the incoming token and generates the corresponding ClaimsPrincipal and nested ClaimsIdentity, it uses that value for the AuthenticationType property. When the cookie middleware starts processing the response and finds that ClaimsIdentity, it verifies that the AuthenticationType it finds there corresponds to the AuthenticationType value it has in its options. Given that here we used the defaults everywhere, it’s a match; hence, the cookie middleware proceeds to save the corresponding ClaimsPrincipal in the session.
If you examine the Response.Headers collection after the cookie middleware has a chance to execute, you will see that the Set-Cookie value now includes a new entry for an .Asp.Net.Cookies, which contains the ClaimsPrincipal information. Figure 7-9 summarizes the sequence.
)
Figure 7-9 The token-validation and session-creation sequence. The OpenID Connect middleware processes the incoming token, passing the user identity information it carries to the cookie middleware. In turn, the cookie middleware saves the user identity information in a session cookie.
Authenticated access as part of a session Once the session has been established, all requests within its validity window are handled in the same way: as soon as the request is processed by the cookie middleware (between debug messages marked with 1 and 2), the incoming cookie is retrieved, validated, and parsed. The ClaimsPrincipal it carries is rehydrated, as shown by the value of Authentication.User being populated with a ClaimsPrincipal; the rest of the pipeline just lets the message through without further processing.
Figure 7-10 shows how this all plays out through the middleware pipeline.
)
Figure 7-10 During a session, every request carries the session token, which is validated, decrypted, and parsed by the cookie middleware. The user claims are made available to the application.
Explicit use of Challenge and SignOut The explicit sign-in and sign-out operations you implemented in the AccountController of the sample app also use the Authentication property of Context to communicate with the middleware in the pipeline.
If you want to see how Challenge works, repeat the sign-in flow as described earlier, but this time trigger it by clicking Sign In. Stop at the breakpoint on debug message 4. You will see that the response code is a 401, just like the case we examined earlier. However, here you will also see populated entries in Authentication, in particular AuthenticationResponseChallenge. If you peek into it, you’ll see that AuthenticationResponseChallenge holds the AuthenticationType of the middleware you want to use for signing in (“OpenIdConnect”) and the local redirect you want to perform after sign-in (in this case, the root of the app). If the OpenID Connect middleware is set to Passive for AuthenticationMode, the presence of the 401 response code alone is not enough to provoke the sign-in message generation, but the presence of AuthenticationResponseChallenge guarantees that it will kick in. Other than that, the rest of the flow goes precisely as described.
The sign-out flow is very similar. Hit the Sign Out link. Stopping at the usual breakpoint 4, you’ll observe that Authentication now holds a populated AuthenticationResponseRevoke property, which in turn contains a collection of AuthenticationTypes, including “OpenIdConnect” and “Cookies”. When it’s their turn to process the response, the middlewares in the pipeline check whether there is a nonnull AuthenticationResponseRevoke entry containing their AuthenticationTypes. If they find one, they have to execute their sign-out logic. As you advance through the breakpoints in the response flow, you can see that behavior unfolding. The OpenID Connect middleware reacts by changing the return code to 302 and placing the sign-out message for Azure AD in the Location header. The cookie middleware simply adds a Set-Cookie entry that sets the session cookie expiration date to January 1, 1970, invalidating the session. Figure 7-11 provides a visual summary of the operation.
)
Figure 7-11 The contributions to the sign-out sequence from each middleware in the pipeline.
Diagnostic middleware
When something goes wrong in the OWIN pipeline, finding the culprit is often tricky. Adding breakpoints to an “in line” middleware, as I have done in this chapter to highlight how the pipeline works, is definitely an option. Alternatively, Katana offers a specialized diagnostic middleware that can render useful debugging information directly in the browser when an unhandled exception occurs in the pipeline. Setting it up is super easy.
Add a reference to the NuGet package Microsoft.Owin.Diagnostics. In your Startup.Auth.cs, add the associated using directive. Right on top of your main configuration routine (in our sample, ConfigureAuth), add something along the lines of the following:
app.UseErrorPage(new ErrorPageOptions()
{
    ShowCookies = true,
    ShowEnvironment = true,
    ShowQuery = true,
    ShowExceptionDetails = true,
    ShowHeaders = true,
    ShowSourceCode = true,
    SourceCodeLineCount = 10
});
The extension method UseErrorPage injects into the pipeline some logic for dumping diagnostic information on the current page in case an exception is raised in the pipeline. For that reason, it’s important to place this method at the beginning of the pipeline (otherwise, any exceptions occurring before it has a chance to fire would not be captured). All the options you see in the call control what diagnostic information you want to display; the property names are self-explanatory.
If you want to test the contraption, you can artificially raise an exception in any of our debugging middlewares, and then hit F5 to see what happens. Figure 7-12 shows a typical diagnostic page.
)
Figure 7-12 The page displayed by the diagnostic middleware from Microsoft.Owin.Diagnostics.
Important

You should never use this middleware in production applications, as it might reveal information you don’t want an attacker to obtain. Please use this only for debugging. Moreover, this middleware will not help in the case of exceptions raised in the application itself. It is really specialized for handling issues occurring in the OWIN pipeline.