Administering Windows Server 2012 R2: Monitoring and Auditing
- By Orin Thomas
- 6/2/2014
Practice exercises
The goal of this section is to provide you with hands-on practice with the following:
- Configure data collector sets
- Configure alerts
- Manage event subscriptions
- Perform network monitoring
- Configure removable device auditing
- Configure logon auditing
- Configure expression-based audit policies
- Enable folder auditing
To perform the exercises in this section, you need access to an evaluation version of Windows Server 2012 R2. You should also have access to virtual machines SYD-DC, MEL-DC, CBR-DC, and ADL-DC, the setup instructions for which are described in the Introduction. You should ensure that you have a checkpoint of these virtual machines that you can revert to at the end of the practice exercises. You should revert the Virtual Machines (VMs) to this initial state prior to beginning these exercises.
Exercise 1: Configure data collector sets
In this exercise, you configure data collector sets. To complete this exercise, perform the following steps:
- Start SYD-DC, and sign on as CONTOSO\Don_Funk.
- On SYD-DC, click Performance Monitor in the Tools menu of Server Manager.
In the Performance Monitor console, expand the Performance\Data Collector Sets\User Defined, as shown in Figure 10-26.
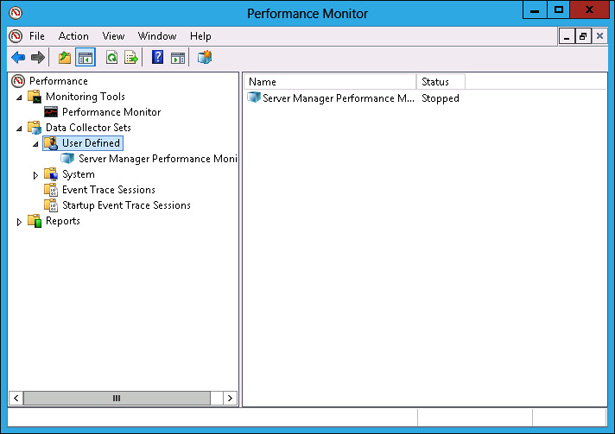
FIGURE 10-26 Accessing data collector sets
- On the Action menu, click New, and click Data Collector Set.
In the Create New Data Collector Set dialog box, type the name SYD-DC-Performance-Measurement and click Create Manually (Advanced), as shown in Figure 10-27. Click Next.

FIGURE 10-27 Entering the data collector set name
On the What Type Of Date Do You Want To Include? page, click Performance Counter, as shown in Figure 10-28, and click Finish.

FIGURE 10-28 Selecting Performance Counter
- In the Performance Monitor console, click SYD-DC-Performance-Measurement.
- In the details pane, click DataCollector01.
- On the Action menu, click Properties.
In the DataCollector01 Properties dialog box, shown in Figure 10-29, click Add.
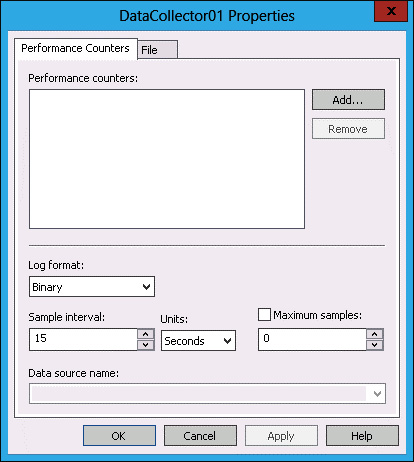
FIGURE 10-29 Performance counters
- In the Available Counters dialog box, click Logical Disk, and click Add.
- Click Memory, click the arrow, click Available Mbytes, and click Add.
- Click Network Interface, and click Add.
- Click Processor, and click Add.
Verify that the list of added counters matches Figure 10-30, and click OK.
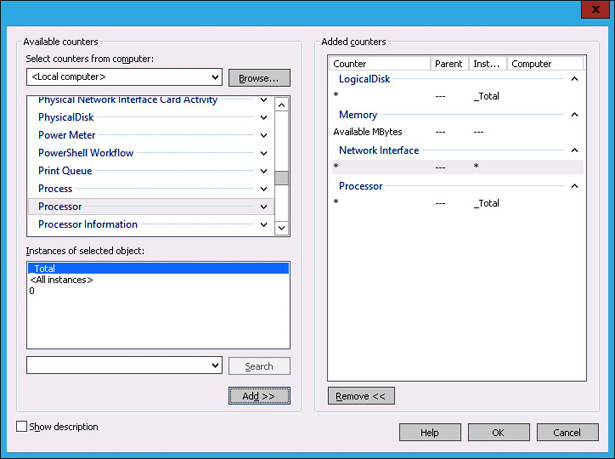
FIGURE 10-30 Matching added counters
In the DataCollector01 Properties dialog box, set the Sample Interval to 15 seconds (see Figure 10-31), and click OK.
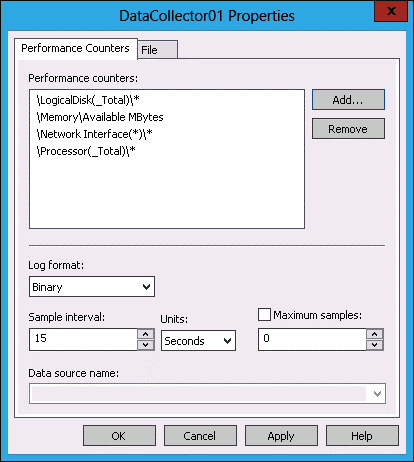
FIGURE 10-31 Setting the interval
- In Performance Monitor, click Data Collector Sets\User Defined\SYD-DC-Performance-Measurement.
- On the Action menu, click Properties.
- On the Schedule tab of the SYD-DC-Performance-Measurement Properties dialog box, click Add.
- On the Folder Action dialog box, set a time of 3:00:00 AM, and click OK.
Verify that the Schedule tab appear similar to Figure 10-32, and click OK
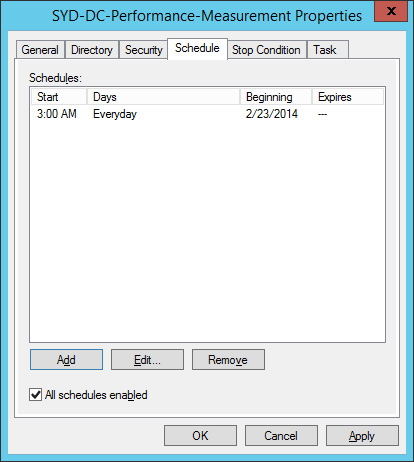
FIGURE 10-32 Configure data collector set schedule
)
)
Exercise 2: Collect data
In this exercise, you collect data from the data collector set. To complete this exercise, perform the following steps:
- In Performance Monitor, click Data Collector Sets\User Defined\SYD-DC-Performance-Measurement.
- On the Action menu, click Start.
- After 2 minutes, on the Action menu, click Stop.
- Expand Reports, expand User Defined, and click SYD-DC-Performance-Measurement.
Double-click the report listed in the details pane, as shown in Figure 10-33.
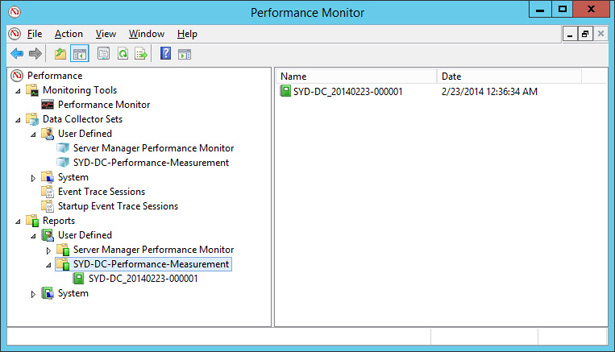
FIGURE 10-33 Selecting a report
- Click Change Graph Type, and click Report.
View the report, as shown in Figure 10-34.
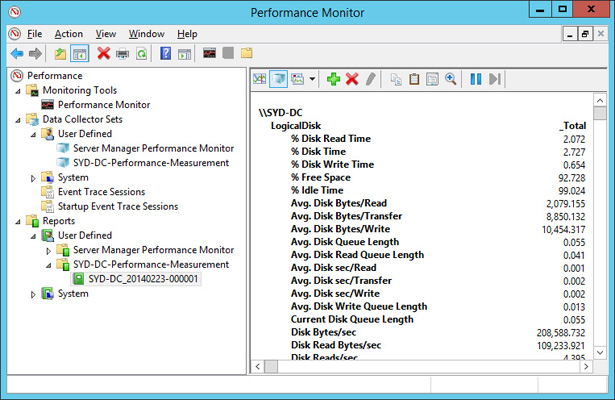
FIGURE 10-34 Viewing the report
)
)
Exercise 3: Configure alerts
In this exercise, you configure a free disk space alert. To complete this exercise, perform the following steps:
- In Performance Monitor, click User Defined under Data Collector Sets.
- On the Action menu, click New, and click Data Collector Set.
- On the Create New Data Collector Set page, type Disk Space Alert, click Create Manually (Advanced), and click Next.
On the Create New Data Collector Set page, click Performance Counter Alert, as shown in Figure 10-35, and click Next.
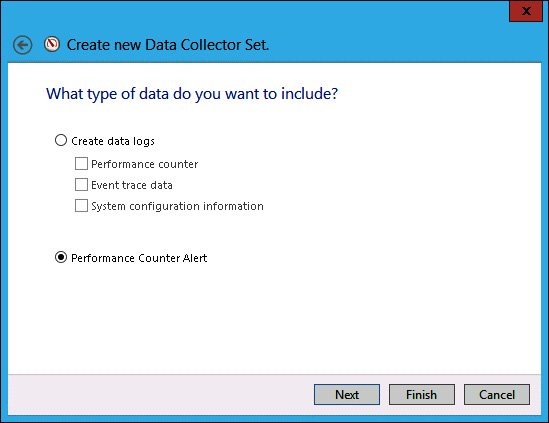
FIGURE 10-35 Choosing Performance Counter Alert
- On the Which Performance Counters Would You Like To Monitor? page, click Add.
In the Available Counters dialog box, click LogicalDisk, click %Free Space, click C:, and click Add, as shown in Figure 10-36. Click OK.
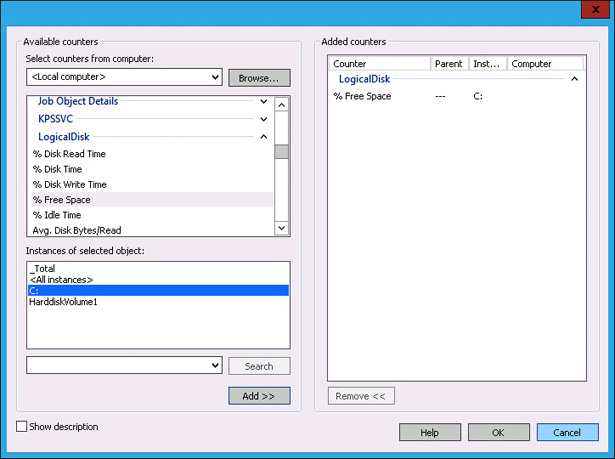
FIGURE 10-36 Selecting LogicalDisk
- Set the Alert When menu to Below.
Set the Limit value to 5, as shown in Figure 10-37, and click Next.
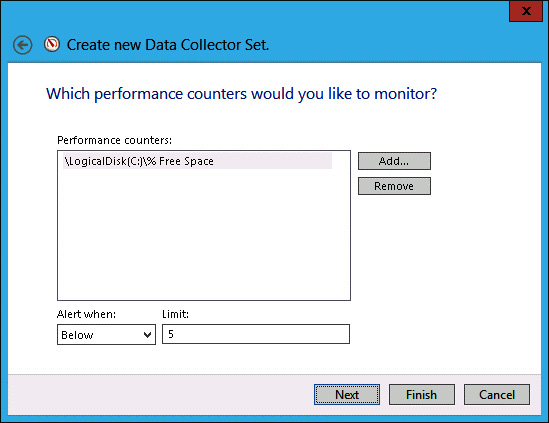
FIGURE 10-37 Setting the limit value
- Click Finish.
)
Exercise 4: Prepare computers for event subscriptions
In this exercise, you configure computers to support event log subscriptions. To complete this exercise, perform the following steps:
- On SYD-DC, right-click Windows PowerShell on the task bar, and click Run As Administrator.
Enter the following command and press Enter.
Wecutil qc
- When prompted, press Y, and press Enter.
- Close the Windows PowerShell prompt.
- Sign on to MEL-DC as Administrator.
Open the Windows PowerShell prompt and type the following commands.
Add-Computer -DomainName contoso.com
- In the Windows PowerShell Credentials dialog box, type don_funk@contoso.com and Pa$$w0rd, and click OK.
Type the following command at the Windows PowerShell prompt to restart the computer.
Restart-Computer
- Sign on to MEL-DC as Contoso\don_funk.
- On the Tools menu on Server Manager, click Computer Management.
In the Computer Management console, expand Local Users And Groups, click Groups, and then click Administrators, as shown in Figure 10-38.
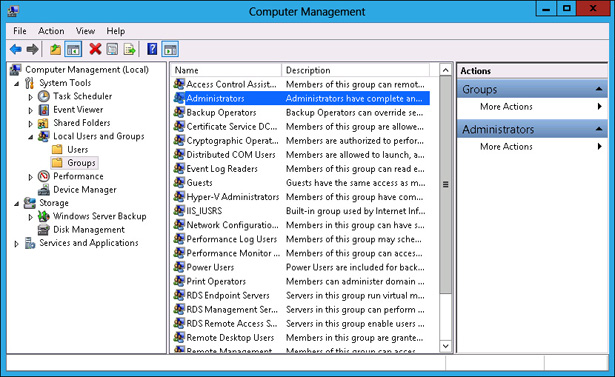
FIGURE 10-38 Accessing Administrators
- On the Actions pane, click More Actions, and click Properties under Administrator.
- In the Administrators Properties dialog box, click Add.
- In the Select Users, Computers, Service Accounts, Or Groups dialog box, click Object Types.
In the Object Types dialog box, enable the Computers check box, as shown in Figure 10-39, and click OK.
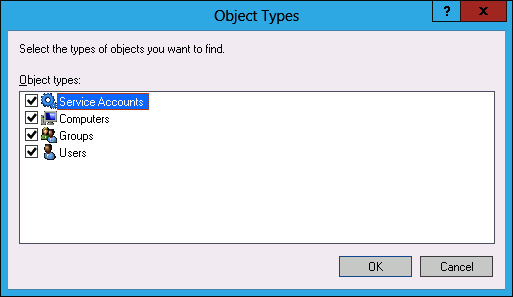
FIGURE 10-39 Selecting Computers
- In the Select Users, Computers, Service Accounts, Or Groups dialog box, type SYD-DC, click Check Names, and click OK.
Verify that the Administrators Properties dialog box matches Figure 10-40 and click OK.
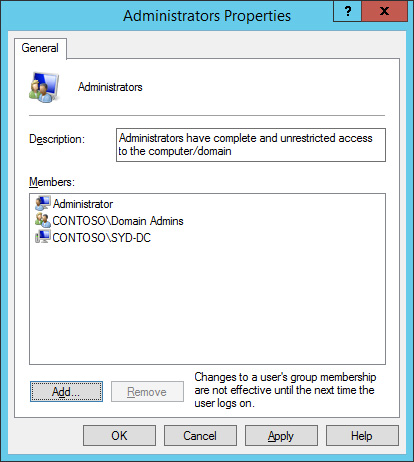
FIGURE 10-40 Administrators Properties dialog box
- Restart MEL-DC.
)
Exercise 5: Configure event subscriptions
In this exercise, you configure event subscriptions. To complete this exercise, perform the following steps:
- In the Server Manager console on SYD-DC, open the Tools menu, and click Event Viewer.
In Event Viewer, click the Subscriptions node, as shown in Figure 10-41.
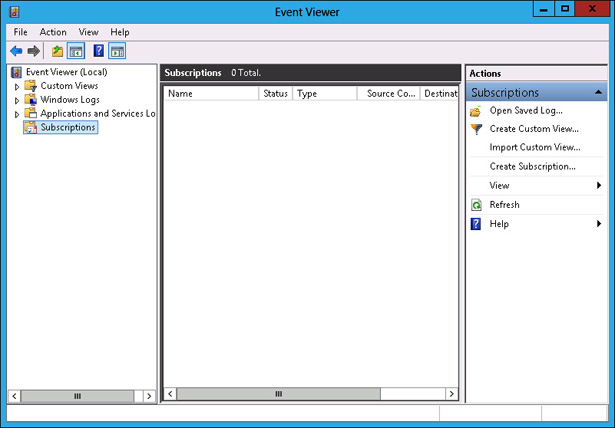
FIGURE 10-41 Clicking the Subscriptions node
- On the Actions pane, click Create Subscription.
- In the Subscription Properties dialog box, type the name as Subscription-Alpha, click Collector Initiated, and click Select Computers.
- In the Computers dialog box, click Add Domain Computers.
- In the Select Computer dialog box, type MEL-DC, click Check Names, and click OK.
Verify that the Computers dialog box matches Figure 10-42, and click Test.
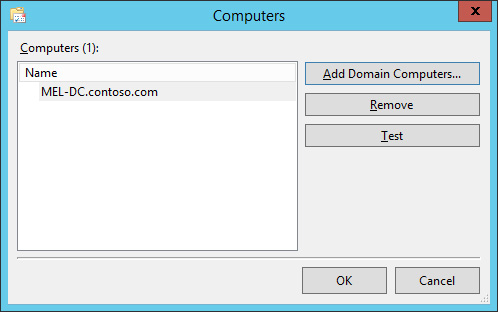
FIGURE 10-42 Computers dialog box
- In the Event Viewer dialog box, click OK.
- In the Computers dialog box, click OK.
- Click Select Events.
- In the Query Filter dialog box, select Critical, Error, Warning, and Information.
- Click the Event Logs menu, and click Windows Logs.
Verify that the Query Filter appears the same as Figure 10-43, and click OK.
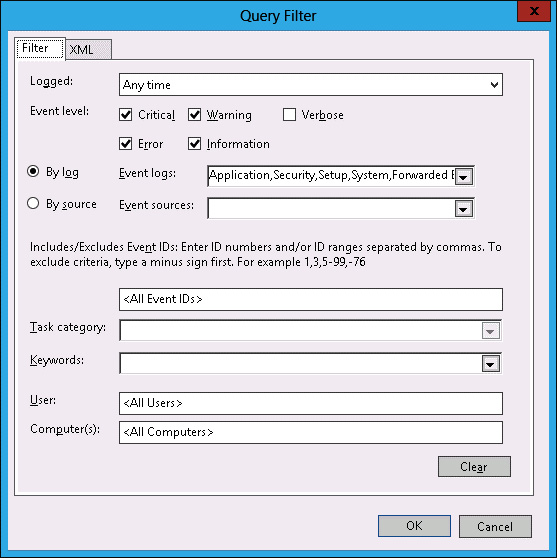
FIGURE 10-43 The Query Filter dialog box
- In the Subscription Properties dialog box, click Advanced.
In the Advanced Subscription Settings dialog box, click Minimize Latency, as shown in Figure 10-44, and click OK.
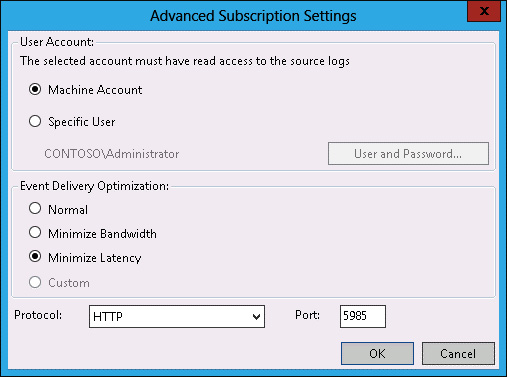
FIGURE 10-44 Advanced Subscription Settings dialog box
Verify that the Subscription Properties – Subscription-Alpha dialog box matches Figure 10-45, and then click OK.
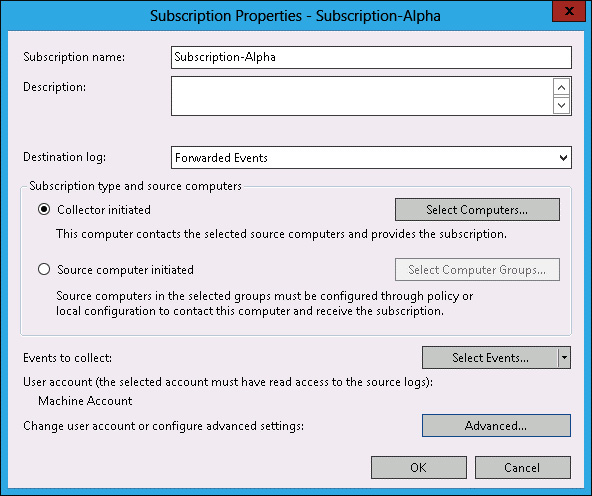
FIGURE 10-45 Subscription Properties dialog box
- Restart server MEL-DC.
- Expand the Windows Logs node, and click Forwarded Events.
Verify the presence of items in the event log, as shown in Figure 10-46.
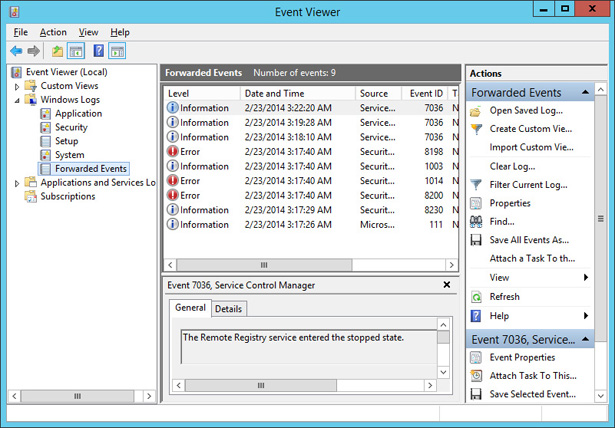
FIGURE 10-46 Event log
- Close Event Viewer.
)
)
Exercise 6: Configure network monitoring
In this exercise, you monitor the processes and services that use network interfaces. To complete this exercise, perform the following steps:
- On the Tools menu of the Server Manager console on SYD-DC, click Resource Monitor.
On the Network tab, click the arrow next to TCP Connections, as shown in Figure 10-47.
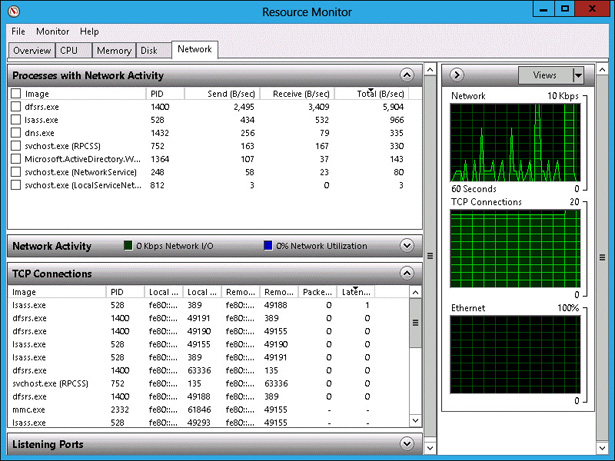
FIGURE 10-47 Network tab of the Resource Monitor
Click the arrow next to Listening Ports to list the ports on which different services are listening (see Figure 10-48).
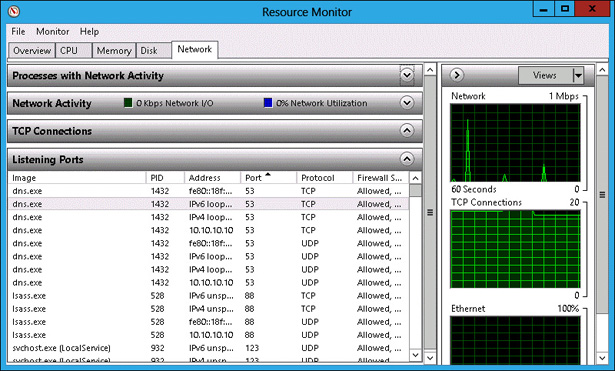
FIGURE 10-48 Listing the different ports.
)
)
Exercise 7: Using Message Analyzer
In this exercise, you use Message Analyzer to perform network monitoring. To perform this exercise, you need to download Message Analyzer from the following website: http://www.microsoft.com/en-au/download/details.aspx?id=40308 (or just use a search engine to locate the installer) and then install it on MEL-DC. Ensure that you do not run the program and that you sign off after installation. To complete this exercise, perform the following steps:
- Ensure that you are signed on to MEL-DC as contoso\don_funk.
- In the Server Manager on MEL-DC, click Local Server, and then select IE Enhanced Security Configuration.
In the Internet Explorer Enhanced Security Configuration dialog box, set the Administrators setting to Off, as shown in Figure 10-49, and click OK.
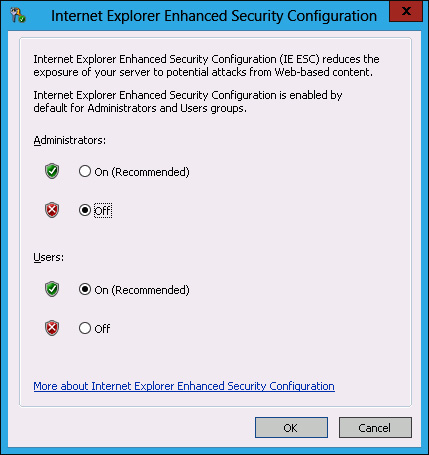
FIGURE 10-49 Internet Explorer security
- In the Search charm on MEL-DC, type Microsoft Message Analyzer.
- Click Microsoft Message Analyzer in the results list.
- On the Welcome To The Microsoft Message Analyzer dialog box, click Do Not Update Items, and click OK.
On the File menu, click Capture Trace, and click SMB2 Server Full PDU (Windows 8/Windows Server 2012 or later) as shown in Figure 10-50, and click Start With.
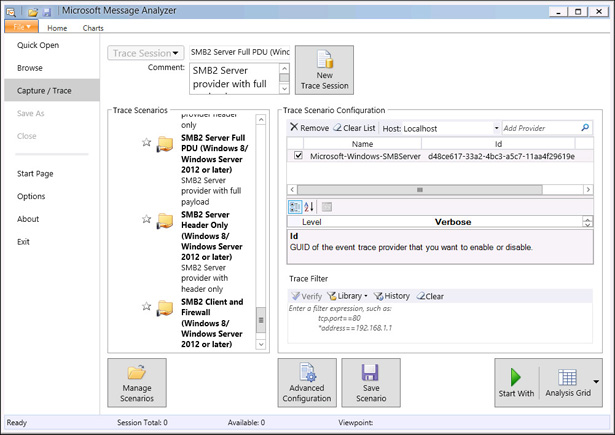
FIGURE 10-50 SMB Server Full PDU
- On the taskbar, click File Explorer.
- In File Explorer, click Computer, and then double-click Local Disk (C:).
- On the title bar, click New Folder. Name the new folder TEST.
- Right-click the TEST folder, click Share With, and click Specific People.
- In the File Sharing dialog box, click Share, and then click Done.
In Microsoft Message Analyzer, click Analysis Grid, and verify that messages have been recorded, and click the final message, as shown in Figure 10-51.
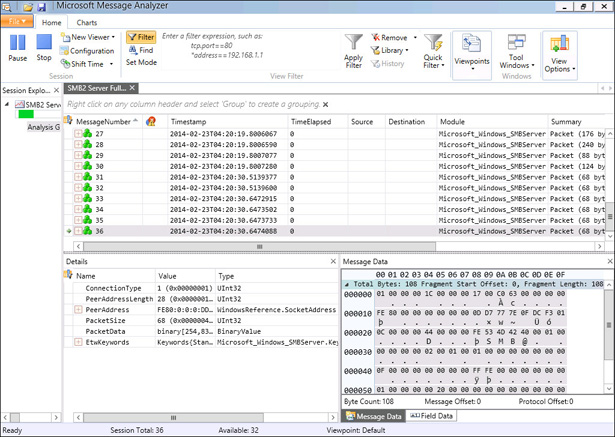
FIGURE 10-51 Verifying that messages have been recorded
- Use File Explorer to navigate to C:\TEST.
- Create a text file in C:\TEST named secretfile.txt. The content of the file should be the words “secret secret.” Switch to SYD-DC.
- On SYD-DC, in the Search charm, type \\MEL-DC\TEST\secretfile.txt and click Secretfile.txt in the Results pane.
- Switch to MEL-DC.
- Verify that additional traffic has been recorded.
Examine the message data for network addresses, such as server MEL-DC (see Figure 10-52).
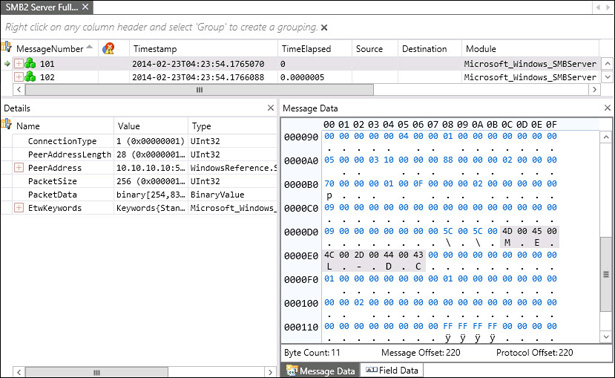
FIGURE 10-52 Examining message data
- Close Microsoft Message Analyzer.
- When prompted to save the captured trace, click No.
)
)
)
Exercise 8: Configure removable device auditing
In this exercise, you configure a GPO so that removable device usage is audited. To complete this exercise, perform the following steps:
- On SYD-DC, click Group Policy Management on the Tools menu of Server Manager.
Expand Forest: Contoso.com\Domains\contoso.com\Group Policy Objects, and click Default Domain Policy, as shown in Figure 10-53.
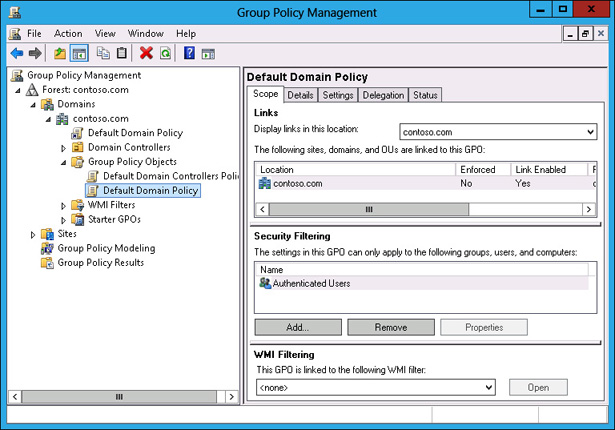
FIGURE 10-53 Clicking Default Domain Policy
- On the Action menu, click Edit.
In the Group Policy Management Editor, navigate to the Computer Configuration\Policies\Windows Settings\Security Settings\Advanced Audit Policy Configuration\Audit Policies\Object Access node and click Audit Removable Storage, as shown in Figure 10-54.
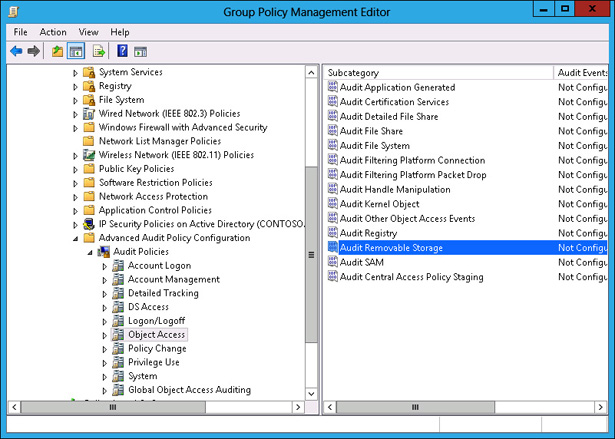
FIGURE 10-54 Clicking Audit Removable Storage
- Double-click Audit Removable Storage.
In the Audit Removable Storage Properties dialog box, select Configure The Following Audit Events, Success, and Failure; then click OK (see Figure 10-55).
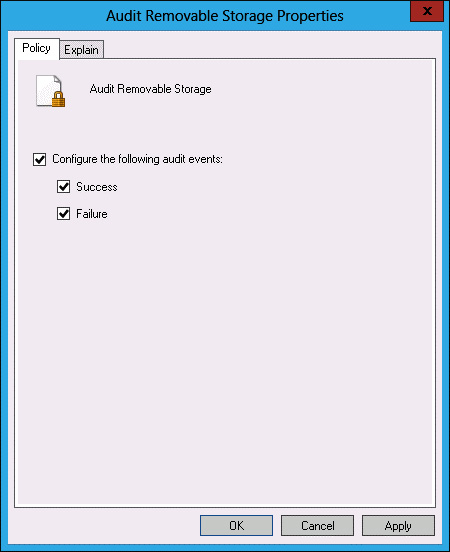
FIGURE 10-55 Auditing properties
- Close the Group Policy Management Editor.
- On the taskbar, right-click Windows PowerShell, and click Run As Administrator.
In the Windows PowerShell window, type the following command and press Enter.
Gpupdate /force
In the Windows PowerShell window, type the following command and press Enter.
Auditpol /get /category:"Object Access"
Verify that Removable Storage is configured for Success And Failure auditing, as shown in Figure 10-56.
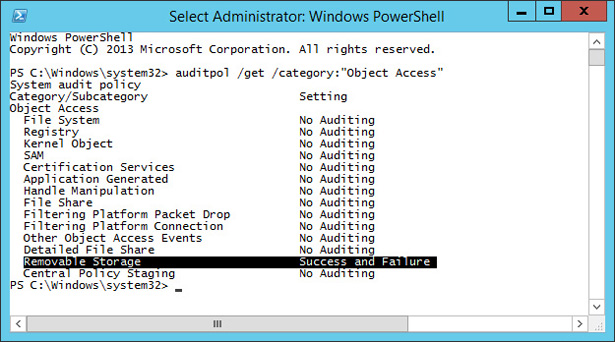
FIGURE 10-56 Configuring Removable Storage
)
)
)
Exercise 9: Configure logon auditing
In this exercise, you configure logon auditing. To complete this exercise, perform the following steps:
- In the Group Policy Management Console (GPMC) on SYD-DC, right-click the Default Domain Policy, and click Edit.
In the Group Policy Management Editor, navigate to the Computer Configuration\Policies\Windows Settings\Security Settings\Advanced Audit Policy Configuration\Audit Policies\Logon/Logoff, and click Audit Logon, as shown in Figure 10-57.
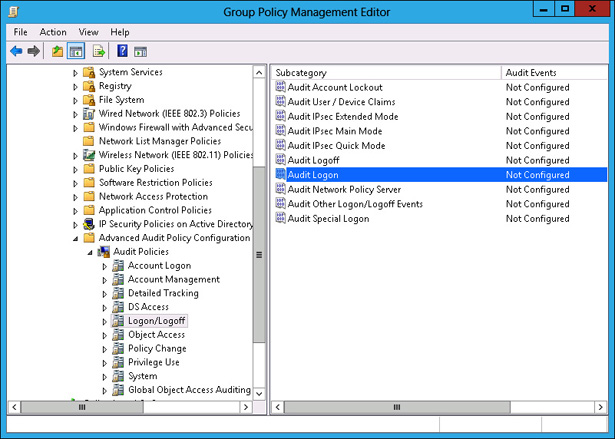
FIGURE 10-57 Selecting Audit Logon
- On the Action menu, click Properties.
In the Audit Logon Properties dialog box, select Configure The Following Audit Events, Success, and Failure (see Figure 10-58). Click OK.
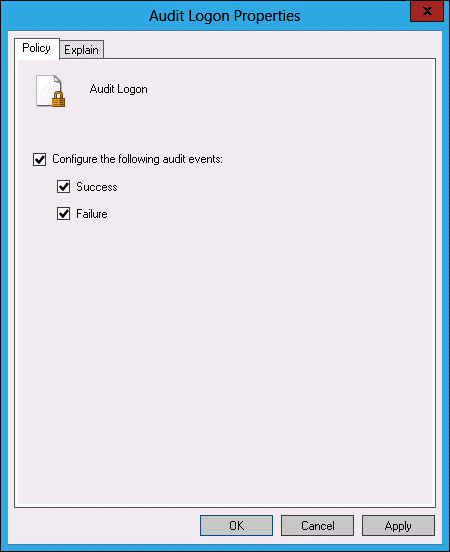
FIGURE 10-58 Setting audit properties
- Close the Group Policy Management Editor.
- On the Tools menu of the Server Manager console, click Active Directory Users And Computers.
- In Active Directory Users And Computers, select Users, and then click Administrator.
- On the Action menu, click Copy.
In the Copy Object – User dialog box, configure the following information, as shown in Figure 10-59, and click Next.
- First Name: Gabe
- Last Name: Frost
- User Logon Name: Gabe_Frost
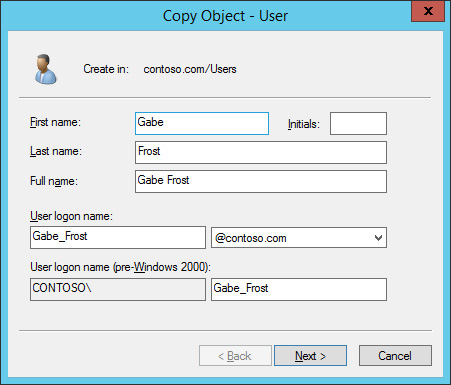
FIGURE 10-59 Setting copy object data
- Type Pa$$w0rd in the Password and Confirm Password text boxes, ensure User Must Change Password At Next Logon is not selected, click Next, and click Finish.
- Close Active Directory Users And Computers.
In Windows PowerShell, type the following command and press Enter.
Gpupdate /force
In Windows PowerShell, type the following command and press Enter.
Auditpol /get /category:"Logon/Logoff"
Verify that Logon is configured for Success And Failure auditing, as shown in Figure 10-60.
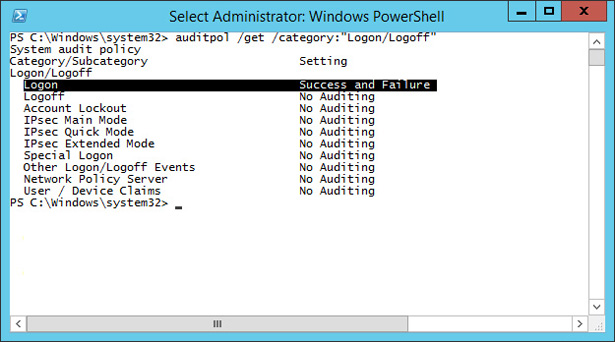
FIGURE 10-60 Logon for Success And Failure auditing
- Switch to MEL-DC.
- Sign out and sign on as contoso\gabe_frost with the password Pa$$w0rd.
- Switch to SYD-DC.
- On the Tools menu of the Server Manager console, click Event Viewer.
- Expand Windows Logs\Security Logs and click the most recent event with Event ID 4624.
Click the Details pane and verify that the TargetUserName Gabe_Frost is listed, as shown in Figure 10-61. You may need to scroll through several events to find this TargetUserName.
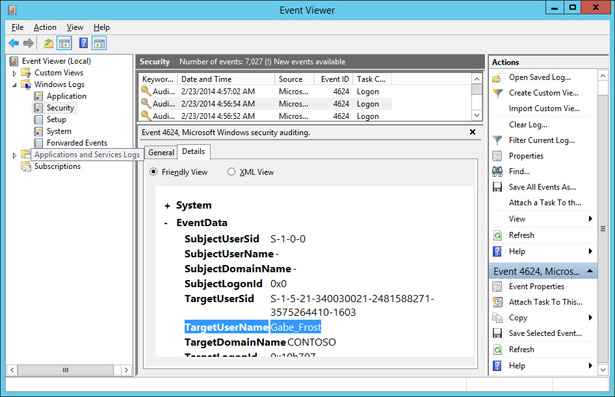
FIGURE 10-61 TargetUserName Gabe Frost
)
)
)
Exercise 10: Configure expression-based audit policies
In this exercise, you configure expression-based audit policies in Group Policy. To complete this exercise, perform the following steps:
- On SYD-DC, open Active Directory Users And Computers from the Tools menu of the Server Manager console.
- Right-click the Users container, click New, and click Group.
In the New Object – Group dialog box, type the name Jupiter, as shown in Figure 10-62, and click OK.
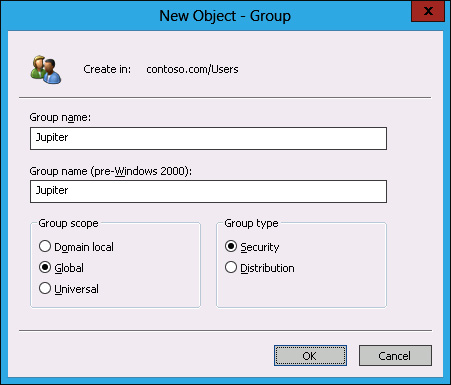
FIGURE 10-62 Typing the group name
- Right-click the Users container, click New, and click Group.
- In the New Object – Group dialog box, type the name Saturn and click OK.
- Right-click the Users container, click New, and click Group.
- In the New Object – Group dialog box, type the name Neptune and click OK.
- Right-click the Users container, click New, and click Group.
- In the New Object – Group dialog box, type the name Mars and click OK.
- Close Active Directory Users And Computers.
- In the GPMC, right-click Default Domain Policy, and click Edit.
In the Group Policy Management Editor, navigate to the Computer Configuration\Policies\Windows Settings\Security Settings\Advanced Audit Policy Configuration\Audit Policies\Global Object Access Auditing and click File System, as shown in Figure 10-63.
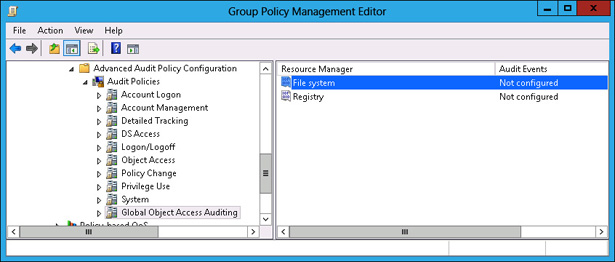
FIGURE 10-63 Selecting File System
- On the Action menu, click Properties.
- In the File System Properties dialog box, click Define This Policy Setting, and click Configure.
- In the Advanced Security Settings For Global File SACL dialog box, click Add.
- In the Auditing Entry For Global File SACL dialog box, click Select A Principal Link.
- In the Select User, Computer, Service Account, Or Group dialog box, type Jupiter, click Check Names, and click OK.
- On the Type drop-down menu, click All.
- Click the Add A Condition link.
- Click the Add Items button.
- In the Select User, Computer, Service Account, Or Group dialog box, type Saturn, click Check Names, and click OK.
Verify that the Auditing Entry For Global File SACL dialog box matches Figure 10-64 and click OK.
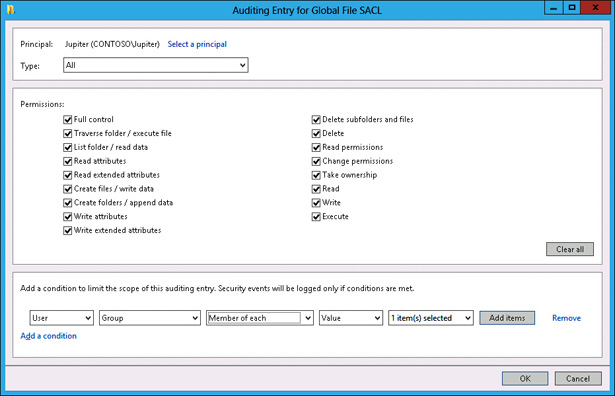
FIGURE 10-64 Auditing the Entry For Global File SACL dialog box
- In the Advanced Security Settings For Global File SACL dialog box, click Add.
- In the Auditing Entry For Global File SACL dialog box, click Select A Principal link.
- In the Select User, Computer, Service Account, Or Group dialog box, type Mars, click Check Names, and click OK.
- Set the Type drop-down menu to Fail.
- Click the Add A Condition link.
- Click the Member Of Each drop-down menu, and select Not Member Of Any.
- Click the Add Items button.
- In the Select User, Computer, Service Account, Or Group dialog box, type Neptune, click Check Names, and click OK twice.
Verify that the Advanced Security Settings For Global File SACL dialog box matches Figure 10-65, and click OK.
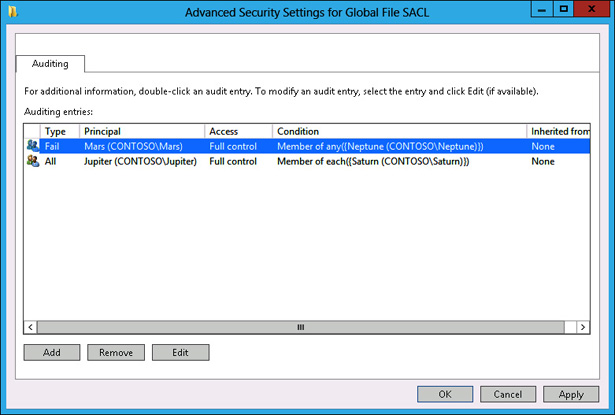
FIGURE 10-65 Advanced Security Settings For Global File SACL dialog box
- Click OK to close the File System Properties dialog box and close the Group Policy Management Editor.
)
)
)
Exercise 11: Configure folder auditing
In this exercise, you configure expression-based audit policies at the folder level. To complete this exercise, perform the following steps:
- Click File Explorer on the taskbar.
- Click Computer and double-click Local Disk (C:).
- On the title bar, click the New Folder icon.
- Name the new folder Audited_Files.
- Right-click the Audited_Files folder, and click Properties.
- On the Security tab, click Advanced.
On the Auditing tab of the Advanced Security Settings For Audited_Files dialog box, shown in Figure 10-66, click Add.
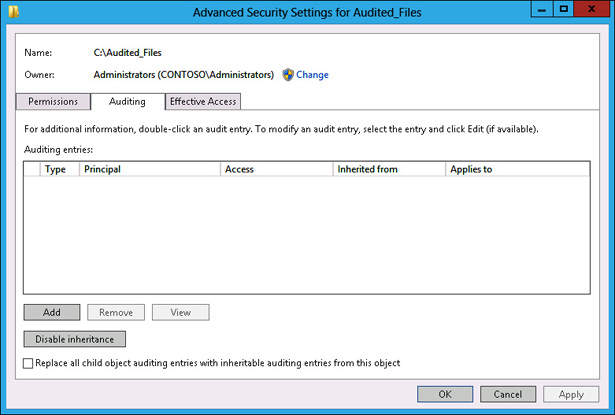
FIGURE 10-66 Auditing tab of the Advanced Security Settings For Audited_Files dialog box
- In the Auditing Entry For Audited_Files dialog box, click Select A Principal link.
- In the Select User, Computer, Service Account, Or Group dialog box, type Neptune, click Check Names, and click OK.
- Change the type from Success to Fail.
- Click the Add A Condition link.
- Click the Add Items button.
- In the Select User, Computer, Service Account, Or Group dialog box, type Saturn, click Check Names, and click OK.
Verify that the Auditing Entry For Audited Files dialog box matches Figure 10-67, and click OK.
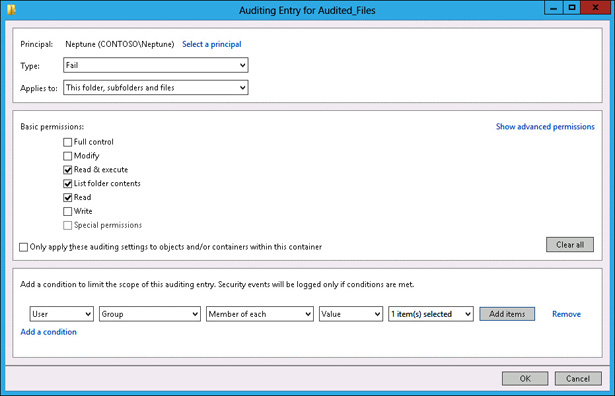
FIGURE 10-67 Auditing Entry For Audited Files dialog box
- Click OK twice to close all dialog boxes.
)
)
)
)
)
)
)
)
)
)
)
)
)
)
)
)
)
)
)
)