Manage identity and compliance
- By Andrew Warren and Andrew Bettany
- 12/24/2023
In this sample chapter from Exam Ref MD-102 Microsoft Endpoint Administrator, you will learn identity and device compliance, two important elements of your IT infrastructure that can improve your organization’s overall security and help protect your organizational data. This chapter covers Skills 2.1 and 2.1 from the MD-102 exam.
Two of the most important elements of your IT infrastructure are identity and device compliance. Identity provides knowledge of who somebody or something is, while compliance enables you to determine the overall health of a device. By implementing these two technologies, you can improve your organization’s overall security and help protect your organizational data. Compliance policies, especially when implemented with conditional access, are an important part of the MD-102 exam.
Skills covered in this chapter:
Skill 2.1: Manage identity
Skill 2.2: Implement compliance policies for all supported device platforms by using Intune
Skill 2.1: Manage identity
Identity services provide authentication and authorization to help protect your organizational resources and data. Over the years, Microsoft has implemented several such identity services: Active Directory Domain Services (AD DS), Azure Active Directory (Azure AD), and Azure AD Domain Services. The MD-102 exam primarily covers content that relates to Azure AD.
Overview of identity solutions
Before we get into the specific content covered in the exam, it’s perhaps worth reviewing these identity providers. There are two identity providers you must be familiar with in the Endpoint Administrator role:
AD DS Windows Server role used to support identity in on-premises environments
Azure AD Cloud-based identity solution used to provide single sign-on (SSO) for cloud apps such as Microsoft 365 and Azure
A third identity provider, Azure AD Domain Services, is a managed Azure service that provides an identity solution that closely resembles the behavior of AD DS but runs in the cloud without needing Windows server computers configured as domain controllers. This identity solution is out of this course’s scope.
Active Directory Domain Services
Detailed knowledge of Windows Server and AD DS is outside the scope of the MD-102 exam. However, it’s probably worth at least discussing the fundamentals of AD DS to help put Azure AD into context.
AD DS, commonly referred to as either Windows Active Directory or just Active Directory, is a role of associated services installed on Windows Servers. Windows Server installed with the AD DS role is a complex environment that has benefitted organizations for more than 20 years and has many legacy components necessary to support AD feature backward compatibility. AD DS has the following features:
Hierarchical and granular and based on the X.500 standard.
Implements Lightweight Directory Access Protocol (LDAP) for managing directory objects.
Administrative ability is defined by group membership.
Objects are stored in containers called organizational units (OUs) that represent the structure of your organization, as shown in Figure 2-1.
Group Policy manages the administration of objects, as indicated in Figure 2-1.
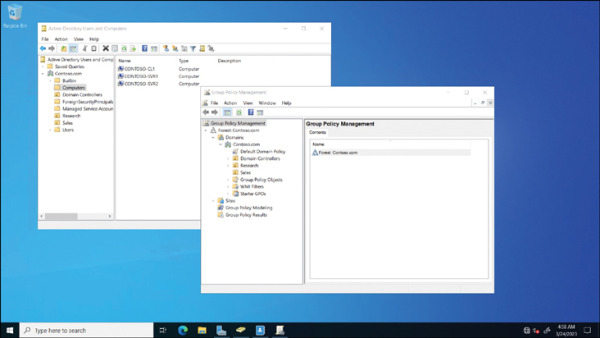
FIGURE 2.1 Management tools on an Active Directory domain controller
Kerberos protocol is primarily used for AD DS authentication.
Computer objects represent computers that join an Active Directory domain.
)
Azure Active Directory
Microsoft provides each cloud-based services subscriber, such as Microsoft 365, an instance of Azure AD (a tenant). Organizations can choose to add additional subscriptions, such as Microsoft Azure, and use the same Azure AD tenant for authentication and authorization. Alternatively, organizations can implement a separate Azure AD tenant for each subscribed service or app.
When you subscribe to a cloud service, like Microsoft 365, you can select a specific edition of Azure AD. The free version of Azure AD provides capabilities useful to most organizations; however, paid Azure AD Premium editions are also available, adding capabilities more relevant to large organizations.
It’s important not to think of Azure AD as Active Directory in the cloud; instead, it’s an entirely different authentication and authorization solution designed to support the cloud environment, unlike AD DS. Azure AD has the following features:
Is flat, with no container hierarchy
Provides for less fine-grained administrative control
Uses role-based access control (RBAC)
Supports administration management with profiles and group assignments
Relies on Security Assertion Markup Language (SAML) and Open Authorization (OAuth)
When working with devices, you can add devices to Azure AD that are running a variety of operating systems, including
Android
iOS
Linux
macOS
Windows 10 and newer
)
FIGURE 2.2 The Microsoft Entra admin center displaying the Azure Active Directory | All devices folder.
Implement user authentication on Windows devices, including Windows Hello for Business, passwordless, and tokens
You can sign in to your Windows 11 computer by using a variety of user accounts, depending on the configuration of your computer. The following list describes these account types:
Microsoft account A consumer Microsoft account, often with an Outlook.com or Hotmail.com suffix.
Microsoft 365 account An Azure AD account, usually called a Work or School account. Typically has an organizational suffix, such as Contoso.com. When a user adds a Work or School account to their device, they sign in using those account details, all services and apps accessed by the user automatically use the account to authenticate; this provides for cloud-based SSO.
 EXAM TIP
By default, all Azure AD accounts are configured with a default tenant domain suffix. This default suffix is created when you obtain your Microsoft 365 subscription and always ends with .onmicrosoft.com. When configuring your Azure AD tenant, you typically add a custom domain name, such as Contoso.com, that your organization owns. Users can then sign in using either the custom domain suffix or the default domain suffix, although users find it easier and more logical to use the custom domain suffix.
Domain account An AD DS account. If a computer is AD DS domain-joined, then a user can sign in at their computer using a domain account. When a user signs in using a domain account, all services and apps accessed by the user automatically use the account to authenticate; this provides for AD DS forest-wide SSO.
Local account A computer user account. Typically, Windows 11 computers have local user and group accounts. A user might sign in using a local account when the computer belongs to them rather than the organization they work for. When users sign in using local accounts, they must configure the organizational account for each app or service they want to connect to. For example, they must add a Work or School account as part of a Microsoft Outlook profile to connect to Exchange Online.
Most users are probably familiar with signing in using a username and password. While that’s acceptable and fairly common, Microsoft has added support for different authentication methods in Windows 11. These methods are designed to improve the sign-in experience and help make it more secure.
Understand multifactor authentication
Traditional computer authentication is based on users providing a name and password. This enables an authentication authority to validate the exchange and grant access. Although password-based authentication is acceptable in many circumstances, Windows 11 provides a number of additional more secure methods for users to authenticate with their devices, including multifactor authentication (sometimes referred to as two-factor authentication).
Multifactor authentication is based on the principle that users who want to authenticate must have two (or more) things to identify themselves:
Know something (such as a password)
Have something (such as a security token)
Be something (such as fingerprints or biometrics)
For example, a user might know a password, have a security token (in the form of a digital certificate), and be able to prove who they are with biometrics, such as fingerprints or facial recognition.
Explore Biometrics
Biometrics, such as a fingerprint, provides more secure and often more convenient methods for identifying and verifying users and administrators. Windows 11 includes native support for biometrics through the Windows Biometric Framework (WBF), and when used as part of a multifactor authentication plan, biometrics is increasingly replacing passwords in modern workplaces.
Biometric information is obtained from the individual and stored as a biometric sample which is then securely saved in a template and mapped to a specific user. You can use a fingerprint reader to capture a person’s fingerprint. (You “enroll” the user when configuring this.) Also, you can use a person’s face, retina, or even voice. The Windows Biometric service can also be extended to include behavioral traits, such as body gait and typing rhythm.
Windows includes several Group Policy settings related to biometrics, as shown in Figure 2-3, that you can use to allow or block biometrics from your devices. You can find Group Policy Objects here: Computer Configuration\Administrative Templates\Windows Components\Biometrics.
)
FIGURE 2.3 Biometrics Group Policy settings
Configure Windows Hello and Windows Hello for Business
Windows Hello is a two-factor biometric authentication mechanism built into Windows 11, and it is unique to the device on which it is set up. Windows Hello enables users to unlock their devices using facial recognition, fingerprint scanning, or a PIN.
Windows Hello for Business is the enterprise implementation of Windows Hello and enables users to authenticate to an AD DS or Azure AD account, and it allows them to access network resources. Administrators can configure Windows Hello for Business using Group Policy or mobile device management (MDM) policy and use asymmetric (public/private key) or certificate-based authentication.
Windows Hello provides the following benefits:
Strong passwords can be difficult to remember, and users often reuse them on multiple sites, reducing security. Windows Hello enables them to authenticate using their biometric data.
Passwords are vulnerable to replay attacks, and server breaches can expose password-based credentials.
Passwords offer less security because users can inadvertently expose their passwords because of phishing attacks.
Windows Hello helps protect against credential theft. Because a malicious person must have both the device and the biometric information or PIN, it becomes more difficult to hack the authentication process.
Windows Hello can be used both in cloud-only and hybrid deployment scenarios.
Windows Hello signs you into your devices much faster than when using a password.
To implement Windows Hello, your devices must have the appropriate hardware. For example, facial recognition requires using special cameras that see infrared (IR) light. These can be external cameras or cameras incorporated into the device. The cameras can reliably distinguish between a photograph and a living person. For fingerprint recognition, your devices must be equipped with fingerprint readers, which can be external or integrated into laptops or USB keyboards.
After you have installed the necessary hardware devices, you can set up Windows Hello by opening Settings, selecting Accounts, and then, on the Sign-In Options page, under the Ways to sign in heading, reviewing the options for facial or fingerprint recognition. You can still configure a PIN or use a Security key if you do not have Windows Hello–supported hardware.
To configure Windows Hello for facial recognition, follow these steps:
Open Settings and select Accounts.
On the Accounts page, select Sign-In Options.
Under the Ways to sign in heading, select Facial recognition (Windows Hello).
Click Set up, and when prompted, click Get started.
Enter your PIN or password to verify your identity.
Allow Windows Hello to capture your facial features, as shown in Figure 2-4.
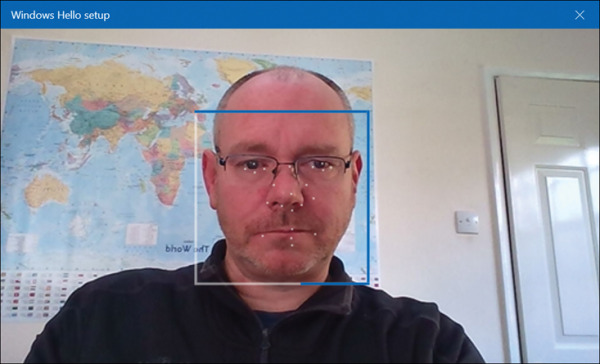
FIGURE 2.4 Configuring Windows Hello
After completion, you are presented with an All Set! Message, indicating that you can close the dialog.
)
Users can use Windows Hello for a convenient and secure sign-in method tied to the device on which it is set up.
For Enterprises that want to enable Windows Hello, they can configure and manage Windows Hello for Business. Windows Hello for Business uses key-based or certificate-based authentication for users by using Group Policy or mobile device management (MDM) policy or a mixture of both methods.
Configure PIN
To avoid authentication with passwords, Microsoft provides an authentication method that uses a PIN. When you set up Windows Hello, you’re asked to create a PIN first. This PIN enables you to sign in using the PIN as an alternative when you can’t use your preferred biometric because of an injury or because the sensor is unavailable or not working properly. The PIN provides the same level of protection as Windows Hello.
Windows Hello PIN provides secure authentication without sending a password to an authenticating authority, such as Azure AD or an AD DS domain controller. Windows Hello for Business provides enterprises with compliance with the new FIDO 2.0 (Fast ID Online) framework for end-to-end multifactor authentication.
A user cannot use a PIN alone (known as a convenience PIN) within a domain environment. Figure 2-5 shows that the PIN settings are known as the Windows Hello PIN. A user must first configure Windows Hello and already be signed in using a local account, a domain account, a Microsoft account, or an Azure AD account. The user can then set up PIN authentication associated with the credential for the account.
)
FIGURE 2.5 Configuring Windows Hello PIN
After a user has completed the registration process, Windows Hello for Business generates a new public-private key pair on the device known as a protector key. If installed in the device, the Trusted Platform Module (TPM) generates and stores this protector key; if the device does not have a TPM, Windows encrypts the protector key and stores it on the file system. Windows Hello for Business also generates an administrative key to reset credentials if necessary.
The user now has a PIN gesture defined on the device and an associated protector key for that PIN gesture. The user can now securely sign in to his device using the PIN and then add support for a biometric gesture as an alternative to the PIN. The gesture can be facial recognition, iris scanning, or fingerprint recognition, depending on the available device hardware. When a user adds a biometric gesture, it follows the same basic sequence mentioned in the previous section. The user authenticates to the system using the PIN and then registers the new biometric. Windows generates a unique key pair and stores it securely. The user can then sign in using the PIN or a biometric gesture.
You can use MDM policies or GPOs to configure your organization’s Windows Hello for Business settings. For example, you can configure a policy that enables or disables the use of biometrics on devices affected by the policy.
Using Group Policy to Configure Windows Hello for Business
To configure Windows Hello for Business in your on-premises organization, you use the appropriate GPOs within the following location:
Computer Configuration\Policies\Administrative Templates\Windows Components\Windows Hello for Business
To configure PIN complexity with Windows 11 (with and without Windows Hello for Business), you can use the eight PIN Complexity Group Policy settings, which allow you to control PIN creation and management.
You can deploy these policy settings to computers or users. If you deploy settings to both, then the user policy settings have precedence over computer policy settings, and GPO conflict resolution is based on the last applied policy. The policy settings included are:
Require digits
Require lowercase letters
Maximum PIN length
Minimum PIN length
Expiration
History
Require special characters
Require uppercase letters
In Windows 11, the PIN complexity Group Policy settings are located at: Administrative Templates\System\PIN Complexity (under both the Computer and User Configuration nodes).
If your organization is not using Windows Hello for Business, you can still use the option to set a Convenience PIN. A Convenience PIN is very different from a Windows Hello for Business PIN because it is merely a wrapper for the user’s domain password. This means that the user’s password is cached and substituted by Windows when signing in with a Convenience PIN.
The option to allow a Convenience PIN is disabled by default for domain-joined clients. To enable this feature, enable the Turn On Convenience PIN Sign-In GPO value located at Computer Configuration\Administrative Templates\System\Logon.
Using Intune to Configure Windows Hello for Business
To configure the required Windows Hello for Business settings using Intune, open the Microsoft Intune admin center and then create a device configuration profile with the Identity protection type. Use the following procedure:
In the Microsoft Intune admin center, select Devices > Windows and click Configuration Profiles.
Click Create profile, select Windows 10 and later, and then select Identity protection from the list of templates.
Click Create, and then on the Basics tab, provide a name and description. Click Next.
On the Configuration settings tab, enable the Configure Windows Hello for Business setting.
As shown in Figure 2-6, you can configure the required settings described earlier. Click Next.
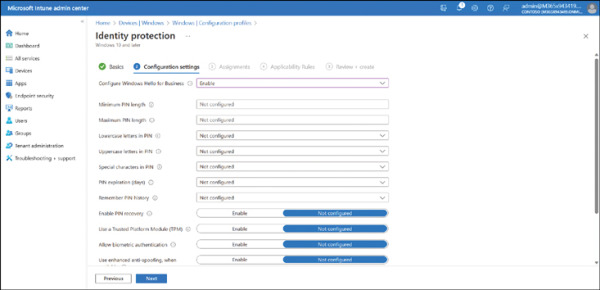
FIGURE 2.6 Enabling Windows Hello for Business with Intune
On the Assignments tab, assign the policy to the desired group, click Next, and then complete the wizard to complete the profile configuration.
)
You can also achieve the same result by using an Account protection policy in Endpoint security. Account protection policies support the configuration of the following:
Local user group membership
Local admin password solution (LAPS)
Account protection
Choose Account protection. You can then follow a similar wizard-driven procedure to configure Windows Hello for Business settings.
Manage RBAC for Intune
In Windows Server and Windows 11, users are assigned administrative ability through group membership. Typically, built-in groups are used to support this process. For example, to enable a user to perform server management tasks, you can add their user account to the Server Operators local group. Because the Server Operators local group has been automatically assigned numerous management abilities, a user added to that group inherits the abilities of that group. This process is referred to as group-based security.
In Intune, a different process is used; this process is called role-based access control. Although you can use RBAC to assign management and administrative permissions in Intune, RBAC is usually managed in Azure AD. Although your job function might not entail configuring RBAC in Azure AD, it’s probably worth reviewing some of the available settings.
Configuring RBAC in Azure AD
There are numerous built-in roles in Azure AD. You can rely solely on these roles and, for many situations, they’ll provide you with the necessary management delegation you likely need. However, you can also create custom roles; these are roles for which you define the management permissions to suit your specific organizational requirements.
You use the Microsoft Entra admin center or the Azure Active Directory admin center to manage and assign roles.
In Microsoft Entra, expand Azure Active Directory in the navigation pane, then expand Roles & admins. Select the Roles & admins node, as displayed in Figure 2-7.
)
FIGURE 2.7 Reviewing RBAC roles in Microsoft Entra
You can search for a specific role and then review who has that role assigned. For example, in the search box, enter Intune and then select the Intune Administrator role from the returned list.
On the Assignments tab, you can review and modify role-holders. To add an assignment, use the following procedure:
Click Add assignments.
Click the No member selected link.
In the Select a member pane, select a user or group to which you want to assign the role. Click Next.
You can now choose between the following options:
Eligible Means that the user can exercise the permissions of the assigned role. You can then make the assignment permanently eligible or define a time range. When a user is eligible for a role, a designated administrator must confirm their use of that role when the user attempts to exercise their administrative permissions.
Active Means the user can immediately exercise the administrative permissions associated with the assigned role.
Click Assign.
When you assign a role, you can assign it to the entire directory (which means everything in your Azure AD tenant), or you can use Admin units. These are similar to organizational units (OUs) in an on-premises AD DS infrastructure, allowing for a more targeted delegation of admin permissions.
You define the scope of the role when you add a user or group to the role. That’s to say, you select the Scope type option on the Add assignments page, as displayed in Figure 2-8. You can then select either Directory (the default) or Administrative unit. You must then choose the appropriate admin unit.
)
FIGURE 2.8 Scoping the application of a role
As an Endpoint Administrator, your job role entails performing device management and related tasks. In Azure AD, there are a number of relevant RBAC roles for administrative tasks in Microsoft Intune. These are:
Intune Administrator Role holders can manage all aspects of Microsoft Intune.
Azure AD Joined Local Administrator Users assigned to this role are added to the local administrators group on Azure AD-joined devices.
Cloud Device Administrator Users with this role have limited device management capabilities, including enabling, disabling, and deleting devices.
Configuring RBAC in Intune
Although you’ll typically manage roles and role assignments in Microsoft Entra, you can also manage these roles directly in Intune. Or, more accurately, you can manage role assignments in Intune. To review or change role assignments using the Microsoft Intune admin center, use the following procedure:
Select the appropriate user account.
On the user details page, select Assigned roles in the navigation pane.
Review or update the assigned roles as shown in Figure 2-9.
)
FIGURE 2.9 Updating role assignments in Intune
Register devices in and join devices to Azure AD
Microsoft designed Windows 11 to be remotely managed using cloud-based tools, such as Microsoft Intune. As more organizations migrate to the cloud, you must understand how to configure your users’ devices to register them in Azure AD.
In this section, you’ll learn how to register a device so a workplace or school with cloud-based services can manage it. You’ll learn how to enable device registration and join devices to Azure AD.
Understand device management
When joining devices to an on-premises domain environment, the types of devices you can join to the domain are quite restrictive; devices, for example, must be running a supported operating system. This means that any users that have devices running Windows 11 Home editions cannot join the company’s on-premises domain.
However, Azure AD is less restrictive in this respect; you can add to Azure AD almost any tablet, laptop, smartphone, and desktop computer running various operating systems. When you enable users to add their devices to Azure AD, you will manage their enrolled devices using an MDM solution, such as Microsoft Intune, which enables you to manage and provision your users’ devices.
You can connect your devices to Azure AD in one of two ways. These are:
Registering a device to Azure AD
Joining a device to Azure AD
To understand these options, it’s worth considering an on-premises scenario. Suppose you want to connect a computer to a workplace file server. Let’s assume your computer is configured in a workgroup—a standalone configuration. You’ll perform the following procedure:
Sign in to your computer using a local user account.
Connect your computer to the corporate network infrastructure.
Open File Explorer and map a network drive to a target file server shared folder.
Provide credentials to authenticate with the server. These credentials are in AD DS and stored in a domain controller.
Access your mailbox in your organization’s Exchange Server by creating an Outlook profile that enables connectivity to the Exchange environment, including the credentials required to access the mailbox.
The process is decentralized and requires manual configuration to access resources in your corporate environment. Contrast that to a domain-joined workstation:
You sign in to the domain-joined workstation using a domain account.
You map a network drive to a file server. The server uses your existing credentials to authenticate you.
You open Outlook. Your Exchange Server mailbox server uses your existing credentials to authenticate you.
Using domain-joined devices has enabled SSO, ensuring all apps can be accessed using the signed-in credentials. This is very convenient for the user.
In some ways, you can consider an Azure AD–registered Windows 11 computer to be functionally equivalent to an on-premises, workgroup-configured computer. The user signs in using a local account and then uses a work or school account to access cloud apps and services, having to provide the credentials each time they connect to a new app or service.
Similarly, an Azure AD-joined device behaves much like a computer joined to an AD DS domain. The user signs in with their work or school account, and then all apps and services use these credentials thereafter, providing a better user experience.
Let’s examine these two options more closely.
Azure AD–Registered Devices
Windows devices can be registered with Azure AD or joined to Azure AD. Other operating systems, such as iOS, Linux, macOS, and Android, can only be registered.
Generally, corporately owned devices running Windows should be Azure AD-joined, whereas users’ own devices running Windows should be registered with Azure AD.
EXAM TIP
Remember, ONLY Windows devices can be joined to Azure AD.
After a user registers or joins their device with Azure AD, it is “known” to Azure AD, and information about the device is stored in Azure AD. Effectively, the device is given an identity with Azure AD. You can then create conditional access policies to determine whether access to resources from your users’ devices will be granted.
Azure AD–registered devices enable users to use personally owned devices to access your organization’s resources in a controlled manner. Azure AD supports Bring Your Own Device (BYOD) scenarios for multiple devices, including Windows 11, iOS, Android, and macOS.
With an Azure AD–registered device, the user gains access to resources using a work or school Azure AD account at the time they access the resources. All corporate data and apps are kept completely separate from the personal data and apps on the device. If the personal computer, tablet, or phone that is registered with Azure AD doesn’t meet your corporate standards for security and compliance—for example, if a device is not running a supported version of the operating system or has been rooted— the access to the resource is denied.
The main reasons for implementing device registration are
Enabling access to corporate resources from nondomain–joined or personally owned devices.
Enabling SSO for specific apps and/or resources managed by Azure AD.
After you enable device registration, users can register and enroll their devices in your organizational tenant. After they have enrolled their devices
Enrolled devices are associated with a specific user account in Azure AD.
A device object is created in Azure AD to represent the physical device and its associated user account.
A user certificate is installed on the user’s device.
Azure AD–Joined Device
Joining a Windows 11 device to Azure AD is similar to registering a device with Azure AD, but it enables enhanced management capabilities. After a device has been joined to Azure AD, the local state of a device changes to enable your users to sign into the device using the work or school account instead of a local account.
An enterprise typically joins its owned devices to the Azure AD to allow for cloud-based management of the devices and to grant access to corporate apps and resources.
Organizations of any size can deploy Azure AD Join. Azure AD Join works well in a cloud-only (no on-premises infrastructure) environment. When Azure AD Join is implemented in a hybrid environment, users can access both cloud and on-premises apps and resources.
Azure AD–joined devices enable your users to access the following benefits:
SSO Enables users simplified access to Azure-managed SaaS apps, services, and work resources.
Enterprise-compliant roaming User settings can be roamed across joined devices using their Azure AD–joined devices (without the need to sign in using a Microsoft account).
Windows Hello Devices can be secured using the enterprise features of Windows Hello.
Restriction of access Devices can only access apps that meet the organizational compliance policy.
Seamless access to on-premises resources Hybrid Azure AD–joined devices can access on-premises resources when connected to the domain network.
Organizations that already have Microsoft 365 or other SaaS apps integrated with Azure AD have the necessary components in place to have devices managed in Azure AD instead of being managed in Active Directory.
Enable device management
Device management requires configuration to ensure that when your users attempt device registration (register or join), the process doesn’t fail. By default, the setting is enabled, allowing all Windows 11 devices with valid credentials to be managed by your Azure AD.
Typically, you’ll use Microsoft Entra to configure the required settings. Use the following procedure to verify and, where necessary, update the settings:
Open the Microsoft Entra admin center.
Under Azure Active Directory in the navigation pane, select Devices, and then click Overview.
On the Devices | Overview page, click Device settings.
As shown in Figure 2-10, enable the Users may join devices to Azure AD setting. You can choose All to allow all users to perform this task, or you can choose Selected and choose which users can perform this task.
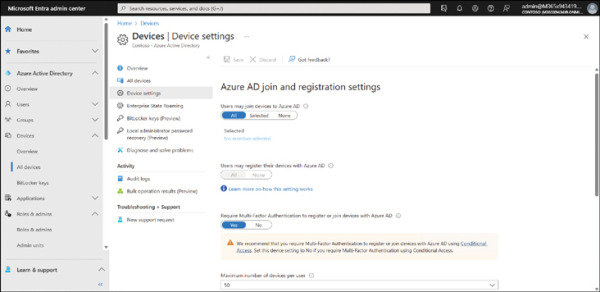
FIGURE 2.10 Configuring the settings for Azure AD registration or join
If necessary, also enable Users may register their devices with Azure AD.
Enable the Require Multi-Factor Authentication to register or join devices with Azure AD setting for additional security. However, you must ensure that users’ accounts are configured with the necessary settings for MFA.
Finally, click the Manage Additional local administrators on all Azure AD joined devices link to add specified users as local administrators on joined devices. Any users you add are assigned to the Azure AD Joined Device Local Administrator role. This setting ensures that a cloud user is always added as a local admin on all your organization’s devices.
You can also enable the Azure AD Local Administrator Password Solution (LAPS) setting for any new devices.
)
On the Device settings page, you can fine-tune the process of registering and joining devices by configuring the device settings, as shown in Table 2-1.
TABLE 2-1 Azure AD device configuration settings
Device setting |
Description |
|---|---|
Users May Join Devices To Azure AD |
Allows you to select users that can join Windows 11 devices to Azure AD. The default is All. |
Users May Register Their Devices With Azure AD |
Allows devices to be registered with Azure AD by users. Options include:
|
Require Multi-Factor Authentication To Register Or Join Devices With Azure AD |
Determines whether users are required to use multifactor authentication factor to join their devices to Azure AD. This setting only applies to Azure AD Join on Windows 11 and BYOD registration for Windows 11, iOS, and Android. This setting does not apply to hybrid Azure AD–joined devices, Azure AD–joined VMs in Azure, and Azure AD–joined devices using Windows Autopilot self-deployment mode. The default setting is No. |
Maximum Number Of Devices Per User |
Restricts the number of devices per user. Once this quota is reached, they cannot add devices until one or more existing devices are removed. The device quota is across both Azure AD–joined and Azure AD–registered devices. By default, all users can have a maximum of 50 devices in Azure AD. |
Manage Additional Local Administrators On All Azure AD Joined Devices |
Enables you to assign the users that are granted local administrator rights on a device and added to the Device Administrators role in Azure AD. By default, global administrators in Azure AD and device owners are granted local administrator rights. Requires an Azure AD Premium license. |
Enable Azure AD Local Administrator Password Solution (LAPS) |
Helps you securely manage the passwords of local accounts on joined devices. Defaults to No. This is discussed in more detail later in this chapter. |
Restrict Users From Recovering The BitLocker Key(s) For Their Owned Devices |
Determines if users can recover their BitLocker key(s). If enabled, the setting restricts non-admins from being able to access the BitLocker key(s) for their own devices. Selecting No enables users to recover their BitLocker key(s). Defaults to No. |
Connect devices to Azure AD
Once the prerequisites have been configured to allow device registration service to take place, you can connect devices to Azure AD.
There are three ways to connect a Windows 11 device to Azure AD as follows:
Join a new Windows 11 device to Azure AD
Join an existing Windows 11 device to Azure AD
Register devices to Azure AD
In this section, you’ll learn the steps required to connect Windows 11 to Azure AD.
Join a new Windows 11 Device to Azure AD
In this method, you take a new Windows 11 device and join the device to Azure AD during the first-run experience.
The device could have been previously prepared using an enterprise deployment method, or it could have been distributed by the original equipment manufacturer (OEM) directly to your employees.
If the device is running either Windows 11 Professional or Windows 11 Enterprise, OOBE presents the setup process for company-owned devices.
To join a new Windows 11 device to Azure AD during OOBE, use the following steps:
Start the new device and allow the setup process to begin.
When prompted, on the Is this the right country or region? page, select your country or region, and click Yes.
On the Is this the right keyboard layout or input method? page, select the appropriate keyboard layout, and click Yes.
When prompted, if you want to add an additional keyboard layout, follow the steps to do so. Otherwise, click Skip.
Your computer checks for updates.
If prompted, review and Accept the License Agreement.
On the Let’s set things up for your work or school page, as shown in Figure 2-11, in the Sign in box, enter your organizational user account and click Next.
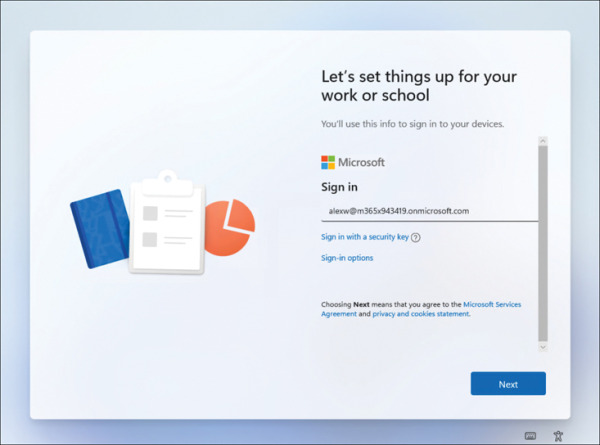
FIGURE 2.11 Joining a device to Azure AD during OOBE
When prompted, enter your password and click Sign in.
If your account requires it, you are prompted to identify yourself with MFA. This is configured at the organizational level but requires your user account to be configured.
The Enrollment Status Page, if configured, displays, as shown in Figure 2-12, guiding users during the device enrollment process.
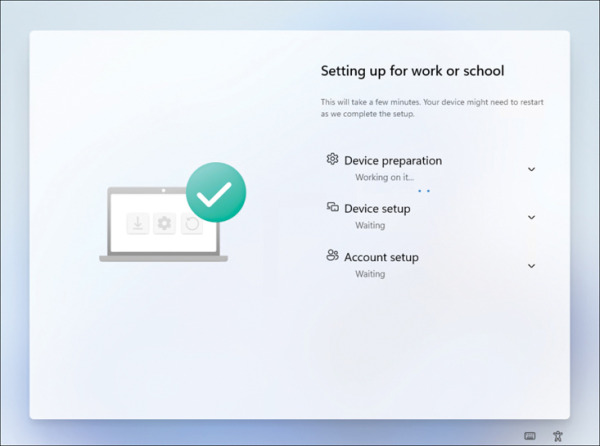
FIGURE 2.12 The device Enrollment Status Page displays
On the Choose privacy settings for your device page, click Next and then click Accept.
Your device checks for updates and might now return to Device preparation. You can, if prompted, click Continue anyway to allow this process to complete in the background.
If your organization requires it, you are now prompted to complete the Windows Hello setup. At the Use Windows Hello with your account page, click OK.
On the Set up a PIN page, in the New PIN and Confirm PIN boxes, enter a PIN that conforms to your organizational requirements and then click OK.
Click OK, and then you should be automatically signed in to the device, joined to your organization or school Azure AD tenant, and presented with the desktop.
)
)