Managing M365 users, groups, and identity synchronization
- By Orin Thomas
- 12/23/2023
In this sample chapter from Exam Ref MS-102 Microsoft 365 Administrator, you will learn how to configure user identity properly, from designing an identity strategy and planning identity synchronization with Microsoft Entra Connect and Microsoft Entra Cloud Sync, to managing and troubleshooting identity synchronization. This chapter covers skills 2.1-2.4 in the MS-102 exam.
A key aspect of deploying Microsoft 365 is configuring user identity properly, so users can seamlessly access resources in the on-premises and Microsoft 365 environments. If it is not done correctly, users must juggle different accounts, depending on whether the accessible resources are hosted locally or in the cloud. In this chapter, you will learn about designing an identity strategy, managing Microsoft Entra ID identities, planning identity synchronization with Microsoft Entra Connect and Microsoft Entra Cloud Sync, and managing and troubleshooting identity synchronization.
Skills in this chapter:
Skill 2.1: Manage Microsoft 365 identities
Skill 2.2: Prepare for identity synchronization
Skill 2.3: Synchronize identities using Microsoft Entra Connect
Skill 2.4: Synchronize identities using Microsoft Entra Cloud Sync
The actual functionality of these products has not been changed, and it is also likely that it will be some time before UI elements in various administrative portals and Microsoft’s official documentation are also completely updated to use the new brand guidelines. Practice tests and study materials that use the original names will still provide you with relevant information on functionality. However, for the foreseeable future, multiple names will be used to label the same product or service.
Skill 2.1: Manage Microsoft 365 identities
Planning Microsoft 365 identities involves managing internal and external users who need to access Microsoft 365 resources and applications. When managing these identities, you must ensure that users are appropriately licensed for the necessary tools. External identities are users not part of your organization who might need access to internal resources and applications.
Plan Microsoft 365 and Microsoft Entra ID identities
Microsoft 365 uses Microsoft Entra ID (previously Azure Active Directory) as its identity store. In hybrid environments, you’ll manage identities primarily using on-premises management tools such as Active Directory Users and Computers. In environments where Microsoft Entra ID is the primary authority source, you can use the Microsoft 365 admin center to manage user identities. You can also use the Microsoft Entra admin center to perform these tasks.
When planning the use of Azure identities, you’ll need to consider the following questions:
What UPN will be used with the identity for login to Microsoft 365 resources? You can change the UPN suffix to any domain configured and authorized for use with the directory.
What authentication and authorization options will be required to access Microsoft 365 resources? Will users need to change their passwords regularly? Will users be required to perform multifactor authentication?
What roles will be assigned to users? Will you need to assign Microsoft Entra ID roles to specific users? What method will you use to perform this task?
Will Microsoft Entra ID groups be used? What strategy will you use to manage collections of users into groups? Will your organization use a group naming convention?
You’ll learn more about how to perform user-management tasks later in this chapter.
Manage users
You can use the Microsoft 365 admin center or the Entra ID admin center available at https://entra.microsoft.com to manage Microsoft Entra ID user accounts. The Entra ID admin center gives you a larger set of options for managing the properties of user accounts than the Microsoft 365 admin center because you can edit extended user properties.
To create a new Microsoft Entra ID user, perform the following steps:
In the Microsoft Entra admin center, select Users > All Users > New User.
On the New User blade, provide the following information:
Name The user’s actual name.
User Name The user’s sign-in name in UPN format.
Profile The user’s first name, last name, job title, and department.
Properties The user’s source of authority. By default, if you are creating the user using the Entra ID admin center or the Microsoft 365 admin center, this will be Entra ID.
Groups The groups the user should be a member of.
Directory Role Whether the account has a User, Global Administrator, or a limited administrator role.
Password The automatically generated password. With the Show Password option, you can transmit the password to the user through a secure channel.
You can also use the Microsoft Entra admin center to perform the following user administrator tasks:
Update profile information
Assign directory roles
Manage group membership
Manage licenses
Manage devices
Manage access to Azure resources
Manage authentication methods
Another option is to use the Active Users section of the Microsoft 365 admin center shown in Figure 2-1. From this console, you can add users using the Add A User item, which will require the user’s first name, last name, display name, and username in UPN format and will provide the option of an automatically generated password that must be changed and the ability to assign a role and add profile details.
)
FIGURE 2.1 Active Users
User templates allow you to create users with specific configurations, including assigning a specific set of licenses, app access, roles, and profile information. Figure 2-2 shows the Assign Licenses page of the Add User Template dialog.
)
FIGURE 2.2 Creating a new user template in the Microsoft 365 admin center
Manage groups
Groups enable you to collect users and assign them privileges and access to workloads or services. Rather than assign privileges and access to workloads or services directly to users, you can assign these rights to a group and then indirectly assign them to users by adding the user accounts to the appropriate group. Using groups in this way is a long-standing administrative practice because it allows you to determine a user’s level of access and rights by looking at the user’s group memberships rather than checking each workload and service to determine if the user account has been assigned rights to that service. You can manage groups in the Active Teams And Groups area of the Microsoft 365 admin center, as shown in Figure 2-3.
)
FIGURE 2.3 The Active Teams And Groups page in the Microsoft 365 admin center
Microsoft 365 supports the following group types:
Microsoft 365 groups Used for collaboration between users. These users can be inside or external to the organization. Each Microsoft 365 group has an associated email address, shared workspace for conversations, shared location for files, calendar events, and a planner.
Security groups Used to grant access to specific Microsoft 365 resources, such as SharePoint sites. Security groups can contain user accounts as well as device accounts. Device-related groups are most often used with services such as Intune.
Mail-enabled security groups Can be used to grant access to specific Microsoft 365 resources. Cannot be dynamically managed and cannot contain devices.
Distribution groups Used for sending notifications to groups of people.
Group membership for Microsoft 365 groups and security group types can be configured as Assigned or Dynamic. When the Assigned option is selected, membership is managed manually. When the Dynamic option is selected, group membership is determined based on the results of a query against user or device attributes. For example, suppose you have a user located in a specific department or city and managed by a specific person. That user could automatically be put in a specific group.
Source of authority is important when modifying users and groups. Modifications occurring in the on-premises Active Directory overwrite the current state of the objects within the Microsoft Entra ID instance that supports the Microsoft 365 tenancy. The only exception to this rule is the assignment of licenses, which only occurs using the Microsoft 365 admin center or PowerShell tools.
Modifications made to on-premises user and group objects will be present only in the Microsoft Entra ID instance that supports the Microsoft 365 tenancy after synchronization has occurred. By default, synchronization occurs every 30 minutes. You can force synchronization to occur by using the Synchronization Service Manager tool.
With deletion, the source of authority concept is very important. When you want to delete a user or group account created in the on-premises Active Directory instance, you should use tools such as Active Directory Users and Computers or the Active Directory admin center. When you delete a user or group using this method, the user will be deleted from the on-premises Active Directory instance and then, when synchronization occurs, from the Microsoft Entra ID instance that supports the linked Microsoft 365 tenancy.
Deleting a user from Microsoft 365 keeps their account in the Microsoft Entra ID Recycle Bin for 30 days. This means you can recover the account online if necessary. If you delete a user from your on-premises Active Directory environment but have enabled the on-premises Active Directory Recycle Bin, recovering the user from the on-premises Active Directory Recycle Bin will recover the user account in the Entra ID instance associated with Microsoft 365. You must create another account with a new GUID if your Active Directory Recycle Bin is enabled in your on-premises Active Directory instance.
Manage external identities by using Microsoft Entra External ID
Sometimes you want to enable people in a partner organization or external users such as temporary contractors to interact with resources hosted in Microsoft 365. For example, you might want to allow someone to collaborate with content hosted in SharePoint Online.
When planning external access to Microsoft 365 resources, you should understand that Microsoft 365 external sharing and Microsoft Entra External ID collaboration are almost the same thing. Except for OneDrive and SharePoint Online, all external sharing uses the Microsoft Entra External ID collaboration invitation APIs. Although Microsoft Entra External ID is not a direct replacement for Azure AD B2B and Azure AD B2C, the functionality of these products addresses the same use cases.
You manage external sharing for SharePoint Online by using the Sharing page of the SharePoint admin center. To configure SharePoint so that only Microsoft Entra External ID sharing is enabled, select Allow Sharing Only With The External Users That Already Exist In Your Organization’s Directory, as shown in Figure 2-4.
)
FIGURE 2.4 SharePoint Online Sharing options
You can use the External Collaboration Settings page, accessible from the Entra ID External Identities blade, to configure the following collaboration settings:
Guest Users Permissions Are Limited Enabled by default, this option enables you to configure guest users to have the same permissions as standard users.
Admins And Users In The Guest Inviter Role Can Invite Invitations can be sent from users who hold the administrator and guest inviter roles.
Members Can Invite Invitations can be sent by users who are not administrators and who have not been assigned the Guests Can Invite role.
Guests Can Invite Users with Guests Can Invite status can invite other users as B2B users or guests.
Enable Email One-Time Passcode For Guests This is a one-time passcode for guests who do not have an Azure AD or Microsoft account and for which Google Federation has not been configured. Guests who use one-time passcodes remain authenticated for 24 hours.
Allow Invitations To Be Sent To Any Domain This is the default setting, which enables guest and B2B invitations to be sent to any domain.
Deny Invitations To Specified Domains This enables you to create a block list of domains to which guest and B2B invitations cannot be sent.
Allow Invitations Only To The Specified Domains Use this option to allow guest and B2B invitations only to specific domains. Invitations to domains not on the allowed list are blocked.
Microsoft Entra External ID accounts
Microsoft Entra External ID accounts are a special type of guest user account that resides within the Microsoft Entra ID instance to which you can assign privileges. Microsoft Entra External ID accounts are generally used when you want to allow one or more users from a partner organization to access resources hosted within your organization’s Microsoft 365 tenancy. For example, if users in Contoso’s partner organization, Tailwind Traders, need to interact with and publish content to a Contoso SharePoint Online site, one method of providing the necessary access is to create a set of Microsoft Entra External ID accounts.
Microsoft Entra External ID accounts have the following properties:
They are stored in a separate Microsoft Entra ID tenancy from your organization but are represented as a guest user in your organization’s tenancy. The Microsoft Entra External ID user signs in using their organization’s Microsoft Entra ID account to access resources in your organization’s tenancy.
They are stored in your organization’s on-premises Active Directory and then synced using Microsoft Entra Connect (previously Azure AD Connect) and a guest user type. This is different from the usual type of synchronization, where user accounts are synced from an on-premises directory, but the Microsoft Entra ID accounts are traditional Microsoft Entra ID accounts and are not assigned the guest user type.
Microsoft Entra ID accounts use the user type to display information about the account’s relationship to the organization’s tenancy. The two following values are supported:
Member If the user type is Member, the user is considered to belong to the host organization. This is appropriate for full-time employees, some types of contractors, or anyone else on the organizational payroll or within the organizational structure.
Guest The Guest user type indicates that the user is not directly associated with the organization. The Guest user type applies to Microsoft Entra External ID and, more generally, to guest accounts. It is used when the account is based in another organization’s directory or associated with another identity provider, such as a social network identity.
The account’s user type does not determine how the user signs in; it merely indicates the user’s relationship to the organization that controls the Microsoft Entra ID tenancy. It can also be used to implement policies that depend on the value of this attribute. It is the source attribute property that indicates how the user authenticates. This property can have the following values:
Invited User A guest or Microsoft Entra External ID user who has been invited but has not accepted yet.
External Active Directory An account that resides in a directory managed by a partner organization. When the user authenticates, they do so against the partner organization’s Microsoft Entra ID instance. This field will eventually be updated to represent the Microsoft Entra ID branding.
Microsoft Account A guest account that authenticates using a Microsoft account, such as an Outlook.com or Hotmail.com account.
Windows Server Active Directory A user signed in from an on-premises instance of Active Directory managed by the same organization that controls the tenancy. This usually involves the deployment of Microsoft Entra Connect. In the case of a Microsoft Entra External ID user, though, the user type attribute is set to Guest.
Azure Active Directory A user signed in using a Microsoft Entra ID account that your organization manages. The user type attribute is set to Guest for a Microsoft Entra External ID user. This field will eventually be updated to represent the Microsoft Entra ID branding.
When you create the first type of Microsoft Entra External ID account, an invitation is sent to the user to whom you want to grant Microsoft Entra External ID access. The process of creating and sending this invitation also creates an account within your organization’s Microsoft Entra ID instance. This account will not have any credentials associated with it because authentication will be performed by the Microsoft Entra External ID user’s identity provider.
Until the invitation is accepted, the Source property of an invited guest user account will be set to Invited User. You can also resend the invitation if the target user does not receive or respond to the first invitation. When the user accepts the invitation, the Source attribute will be updated to External Entra ID. If the user’s account is synchronized from an on-premises Active Directory instance, but the User Type is set to Guest, the Source property will be listed as Windows Server Active Directory.
Guest accounts
A Guest account might be considered a type of account where the account is a Microsoft account or a social account rather than one associated with an Entra ID tenancy. For example, a Guest account might have an @outlook.com email address or a social media account (such as Facebook). The main difference between the two is that, in general, an Entra External ID account implies a business-to-business relationship, whereas a Guest account implies a business-to-individual relationship.
You create a Guest account in exactly the same way as an External ID account, as outlined in the preceding section. You send an invitation, an account is created, the user accepts the invitation, and then the individual uses the account to access Microsoft 365 resources to which they have been granted permissions.
Guest users are blocked from performing certain tasks, including enumerating users, groups, and other Entra ID resources. You can remove the guest user default limitations by performing the following steps:
On the Microsoft Entra ID blade, under Manage, select User Settings.
On the User Settings blade, select Manage External Collaboration Settings.
On the External Collaboration Settings page, select No under Guest Users Permissions Are Limited.
Manage Microsoft 365 contacts
Contacts are people not part of your organization that you want to be present within address books. For example, there might be specific partners or vendors you want people in your organization to find quickly; in that case, you can add them as contacts. When people type a contact’s name into Outlook or Microsoft Teams, their details will be prepopulated as though they were typical members of your organization. You can provide a contact’s email address, phone number, fax number, website, street address, city, state, zip, and country and configure a MailTip for them.
You can add contacts from the Microsoft 365 admin center by going to Contacts under Users, as shown in Figure 2-5.
)
FIGURE 2.5 Contacts
You can add contacts individually or import up to 40 contacts at a time by using a specially formatted CSV file. You can also add and manage contacts using the New-MailContact, Get-MailContact, Enable-MailContact, Remove-MailContact, Disable-MailContact, and Set-MailContact Exchange PowerShell cmdlets.
 EXAM TIP
You can configure an allow list of specific domains to which invitations can be sent, and you can configure a block list where you only block invitations to specific domains.
Manage product licenses
Microsoft 365 users require licenses to use Outlook, SharePoint Online, Office 365, and other services. Users assigned the Global Administrator or User Management Administrator roles can assign licenses when creating new Microsoft 365 user accounts. They can also assign licenses to accounts created through directory synchronization or federation.
When a license is assigned to a user, the following occurs:
An Exchange Online mailbox is created for the user.
Edit permissions for the default SharePoint Online team site are assigned to the user.
For Microsoft 365 Apps for enterprise, the user can download and install Microsoft Office on up to five Windows or macOS computers.
You can view the number of valid licenses and the number of those licenses that have been assigned on the Licenses page. You access this page by selecting Billing in the left pane of the Microsoft 365 admin center and then selecting Licenses, as shown in Figure 2-6.
)
FIGURE 2.6 The Licenses page
To assign a license to a user, perform the following steps:
In the Microsoft 365 admin center, select the Active Users node under Users, as shown in Figure 2-7.
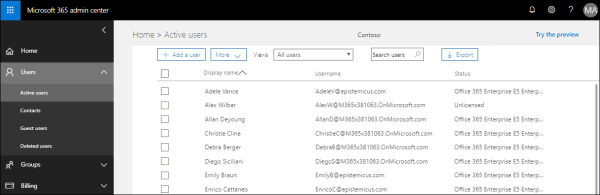
FIGURE 2.7 The Active Users node
Select the checkbox next to the user to whom you want to assign a license. This will open the user’s properties page, as shown in Figure 2-8.
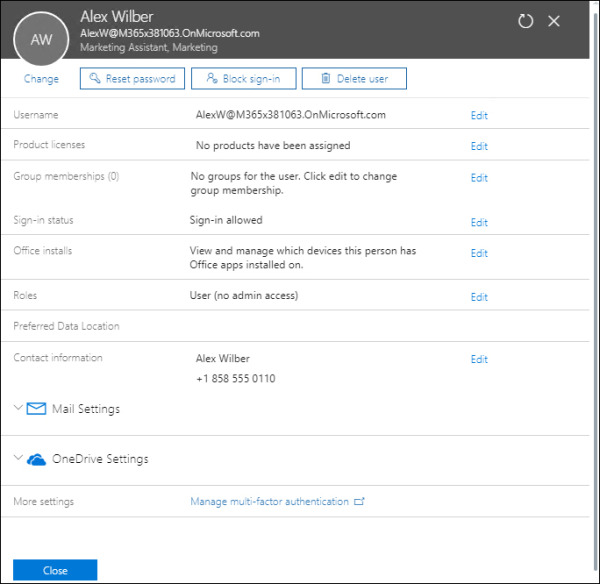
FIGURE 2.8 User properties page
On the user’s properties page, select Edit next to Product Licenses.
Use the Location dropdown to choose your location. Then, assign licenses as needed: Enterprise Mobility And Security, Office 365 Enterprise, and Windows 10/11 Enterprise, as shown in Figure 2-9.
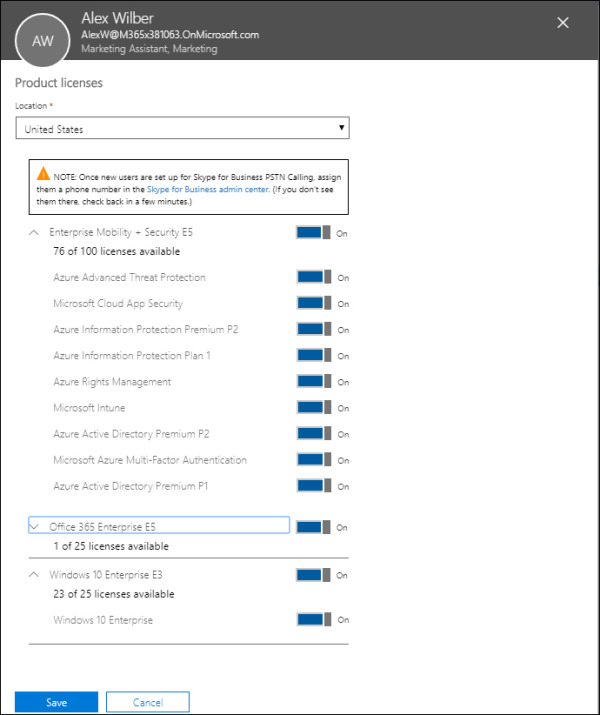
FIGURE 2.9 The Product Licenses page
Select Save to assign the licenses to the user.
)
)
)
User accounts created in Microsoft 365 by the synchronization process will not automatically be assigned Microsoft 365 licenses. This means that when creating new user accounts in the on-premises environment after initially configuring Microsoft Entra Connect, you’ll also need to use Microsoft 365 admin center or PowerShell to provision those accounts with Microsoft 365 licenses.