Azure Site Recovery
- By Avinash Valiramani
- 6/26/2023
- Overview
- Azure-to-Azure disaster recovery
- Hyper-V-to-Azure disaster recovery
- Replication policy
Azure–to–Azure disaster recovery
ASR enables you to set up the replication of an Azure IaaS VM to another Azure region. After you enable replication, ASR installs the Site Recovery agent extension on the Azure VM that is used to register the VM to the ASR service. Once this is done, existing disk data and changes to the disk are transferred to the target storage account or managed disk based on your selection. Data is transferred using Microsoft’s private network rather than the public internet, regardless of the Azure region selected, ensuring your data is transferred in a secure manner. Replication is continuous and crash-consistent, and app-consistent recovery points are created based on the replication policy that you set up for a VM.
Replication policy
The replication policy created and associated by default during the DR setup process defines the following:
Recovery-point retention This defines how far back in time ASR allows for recovery. The service retains recovery points based on retention timelines you define. At this time, the maximum supported recovery-point retention duration is 15 days for managed disks and 3 days for unmanaged disks; the default is 24 hours.
Crash-consistent recovery points These are snapshots of the state of the VM disk taken and sent to the target region. These recovery points do not capture the data in memory and can therefore result in applications being brought online in an inconsistent state when recovered. Although most applications these days support crash-consistent recovery points, it is best to use app-consistent recovery points for recovery, if possible. By default, these are created every 5 minutes.
App-consistent recovery points These are snapshots of the on-disk data along with all processes, data, and transactions running in memory. These are captured using the Volume Shadow Copy Service on Windows Servers. App-consistent snapshots take longer than crash-consistent snapshots and can add load to the server depending on the available resources and frequency defined. You should test to make sure these snapshots are not causing significant overhead or resize your VM workload to accommodate the additional load. The minimum frequency supported for this snapshot is 1 hour; the default setting is 4 hours.
You can define a replication policy based on your application, workload, or recovery point objective (RPO) requirements and set up your replication configuration to use that policy when setting up replication.
Data security
ASR does not intercept, scan, or analyze data transferred between source and target regions. This makes the entire process transparent to the service and eliminates the risk of the replicated data being used for malicious purposes. Data is encrypted in transit as well as encrypted while at rest when stored in the target region.
Multi-VM consistency
Multiple interdependent VMs can be set up in a replication group during replication setup so they are replicated to the target region with shared crash-consistent and app-consistent recovery points. This might be necessary when multiple application, interface, and database servers require that level of data consistency across each to ensure a supported failover. All VMs in a replication group must be failed over at the same time and cannot be failed over individually.
A replication group can contain a maximum of 16 VMs. VMs can be added to a replication group only when they are being set up for replication. To add a VM that is already replicating to a replication group, you must re-create the replication for that VM. Multi-VM consistency is quite resource intensive. It is therefore recommended that you enable it only in scenarios in which it is important for VMs to have such shared snapshots.
Target environment configuration
You can define different configuration items for the target environment, even after setting up replication. However, there are a few configuration items that can be defined only during the initial setup. Following is a brief list of some of the key items that are supported at this time:
Target VM SKU You can define this during replication setup, leave it set to automatic, or modify it after replication setup. When set to automatic, ASR will select a VM SKU that is the same or similar based on resource availability in the target region.
Target resource group You can define the target resource group during replication setup or leave it set to automatic, in which case the service will create a new resource group or modify an existing one after replication setup.
Target virtual network You can define the target virtual network during replication setup or leave it set to automatic, in which case the service will create a new one or modify an existing one after replication setup.
Target subnet The service automatically assigns the VM to a subnet based on the source VM subnet setup. You can modify the target subnet after replication setup.
Target name The service automatically assigns a target name based on the source VM name. You can modify the target name after replication setup.
Target disk type You can define the target disk type during replication setup. The service automatically selects the disk type based on the source disk setup, but you can change it if required during replication setup.
Target subscription The service automatically selects the subscription based on the source VM subscription, but if there is another subscription associated with the same Azure AD tenant, you can select it instead during replication setup.
Target proximity group The service automatically sets the target proximity group to None, but you can change this during replication setup.
Target VM availability configuration The service automatically sets the target VM availability configuration based on the source VM, but you can change this at replication setup.
Failover and failback
In the event of a disaster in the primary region, you can failover the Azure VM to the target region using the ASR service. You will be asked to select the recovery point to use for the restoration. The target VM will then be created based on the settings you’ve defined and the replicated data.
The target VM is created in an unprotected state. Once the primary region is back online, you can set up failback replication for the VM. At this time, the site recovery service checks whether the source disk is still available. If one exists, it will check it for consistency and determine the missing changes to replicate over. If no disk exists, it will start the replication of the entire disk.
You can perform a failback in the same manner as the failover and perform it whenever you have the appropriate downtime.
Test and planned failovers
ASR supports test and planned failover options. Each option is useful in different scenarios.
In a test failover, ASR creates a VM in a test network defined by you, with the replicated data. It is recommended that you set up an isolated test network without connectivity to the primary network to avoid accidental writes from test applications to the primary database or other unexpected issues. The test VM does not commit write operations to the replication data. This enables you to make changes to the test VM—for example, application or database upgrades—without affecting the primary server or the replication in any way. You can perform test failovers to validate your VM and its workload failover as needed in the secondary region to perform application or database upgrade testing or for compliance auditory reasons. When you are finished testing, you can simply clean up the test environment; the test VM and associated disks will be deleted from the secondary Azure region, while the original replication continues unimpeded.
During a planned failover, ASR brings the VM online in the secondary region and allows changes to the VM to be committed to disk. While the changes are not replicated to the primary region, replication from the primary site is stopped. Use this option in scenarios where your primary VM is down or you are migrating to the secondary region.
Network security
You can control outbound replication traffic using network security groups (NSGs) in the source Azure region. ASR requires that any NSG rules set up enable outbound replication traffic. You can use service tags that Microsoft provides to define such outbound traffic rules. This ensures that any IP changes in the Microsoft services are automatically applied to your environment, as the service tags are updated by Microsoft when such changes occur, supporting uninterrupted replication for your workloads.
Azure–to–Azure disaster recovery walkthrough
The following section walks you through the process of setting up and testing Azure–to–Azure replication for a VM using the Azure Portal.
Using Azure Portal
Setup Azure Replication
To set up Azure–to–Azure VM replication using the Azure Portal, follow these steps:
Log in to the Azure Portal, browse to the VM you want to replicate, and click it to select it.
In the left pane of the selected VM’s configuration blade (see Figure 2-1), click Disaster Recovery to start the Azure Site Recovery wizard.
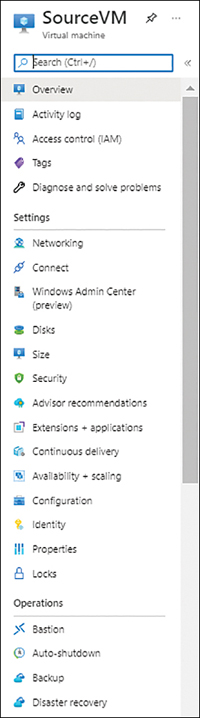
FIGURE 2-1 Options in the SourceVM configuration blade.
In the Basics tab of the Azure Site Recovery wizard, open the Target Region drop-down list and choose the region in which you would like to replicate the VM. (See Figure 2-2.) Then click Next: Advanced Settings.
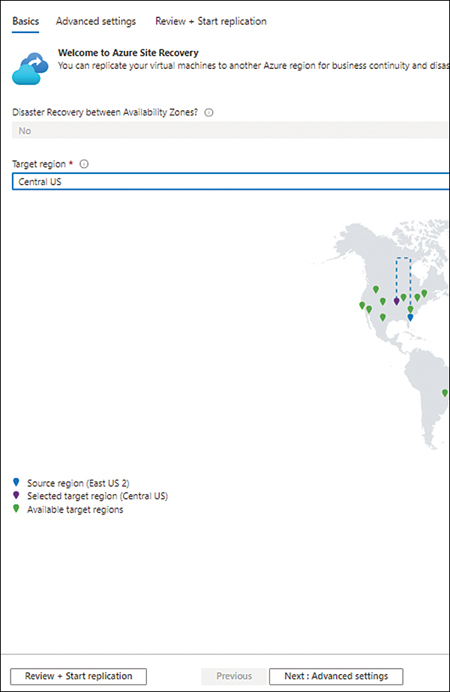
FIGURE 2-2 Basics tab.
In the Advanced Settings tab (see Figure 2-3), enter the following information and click Next: Review + Start Replication:
Subscription Select the subscription in which you want to create the replica VM.
VM Resource Group Select the resource group in which to create the replica VM. Alternatively, the wizard will create one automatically.
Virtual Network Select the virtual network to use for the replica VM. Alternatively, the wizard will create one automatically.
Availability Specify whether the replica VM should be set up with availability enabled or leave it set to the default (Single Instance).
Proximity Placement Group Specify whether the replica VM should be placed in a proximity placement group.
Cache Storage Account Select an existing Azure storage account to use as the replication cache. Alternatively, the wizard will create one automatically.
Vault Subscription Select the subscription in which to set up the Recovery Services vault.
Recovery Services Vault Select an existing Recovery Services vault. Alternatively, the wizard will create one automatically.
Vault Resource Group Select an existing resource group in the target location. Alternatively, the wizard will create one automatically.
Replication Policy Select an existing replication policy from the drop-down list. Alternatively, the wizard will create one automatically.
Update Settings Specify whether ASR should manage all update settings or if you will do so manually.
Automation Account Select an existing automation account to use for the site recovery configuration. Alternatively, the wizard will create one automatically.
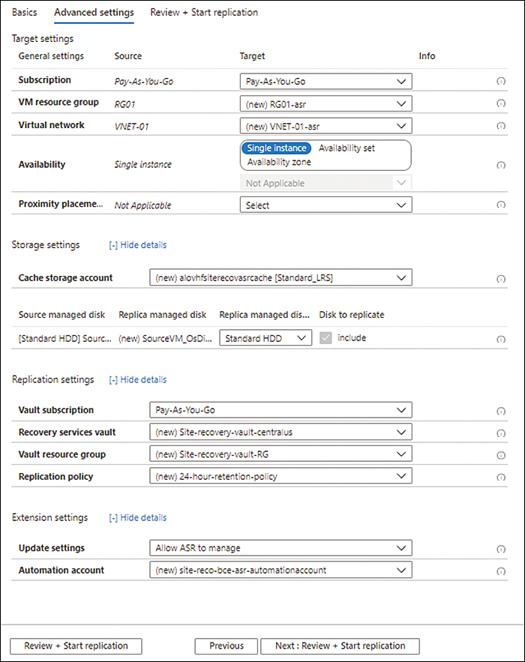
FIGURE 2-3 Advanced Setting tab.
On the Review + Start Replication tab, check your settings and click Start Replication. (See Figure 2-4.)
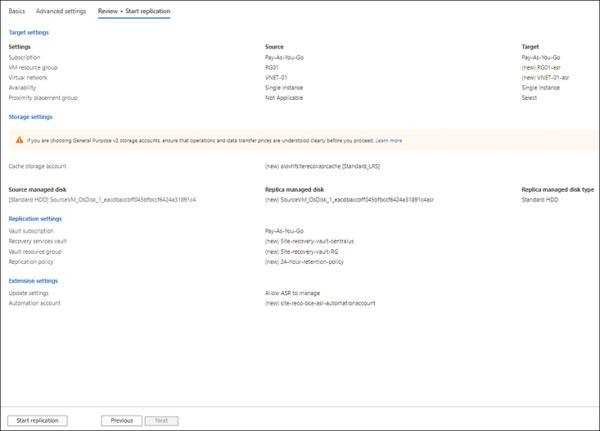
FIGURE 2-4 Review + Start Replication tab.
ASR creates the resources you requested, starting a number of jobs one after another to create all the different components.
Monitor the jobs to ensure they all complete successfully. (See Figure 2-5.)
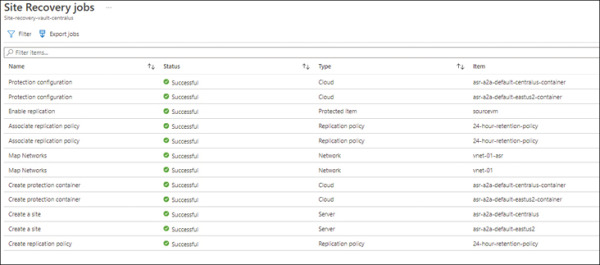
FIGURE 2-5 Site Recovery Jobs page.
)
)
Monitor Replication
When all the jobs are complete, in the Site Recovery service, under Replicated Items, you will see the SourceVM you just replicated.
Click SourceVM under Replicated Items.
A SourceVM Overview page displays the status of the replication, or sync. Notice in Figure 2-6 that Replication Health is Healthy, but Status is 0% Synchronized.
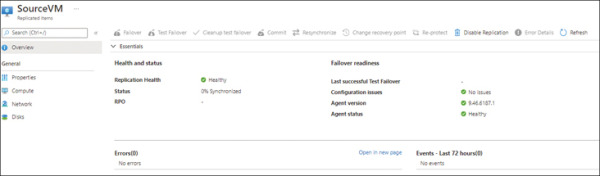
FIGURE 2-6 The SourceVM Overview page with Replication Health and Status data.
Refresh and monitor this page until synchronization is complete.
When synchronization is complete, Status will change to Protected. (See Figure 2-7.) At this point, you can make changes to the replica VM configuration.
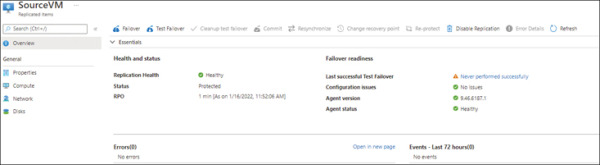
FIGURE 2-7 The SourceVM overview page with the updated Replication Health and Status data.
)
)
Customize Replica Configurations
In the left pane of the SourceVM’s Replicated Items configuration blade, click Compute.
On the Compute Properties page (see Figure 2-8), enter the following information and click Save:
Name Type the VM name in the Name row of the Target Settings column.
Resource Group Enter the resource group in the Resource Group row of the Target Settings column.
Size Enter the size in the Size row of the Target Settings column.

FIGURE 2-8 Compute settings.
In the left pane of the SourceVM’s Replicated Items configuration blade, click Network.
Click Edit to make changes to the following settings, if desired. (See Figure 2-9.) Then click Save:
Target Network
Test Failover Network
Accelerated Networking
Subnet
Network Security Group
Private IP Address
Public IP
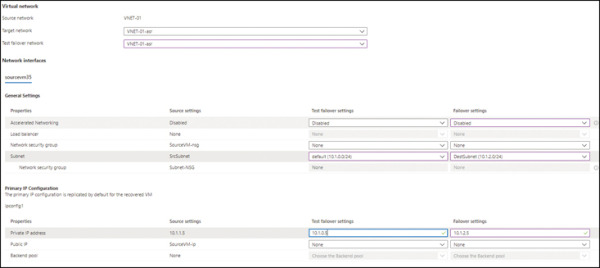
FIGURE 2-9 Network settings.
In the left pane of the SourceVM’s Replicated Items configuration blade, click Disks to monitor pending changes to the source VM to assess how the sync is progressing. (See Figure 2-10.)

FIGURE 2-10 Disks replication status.
Next, you’ll perform a test failover to test the replica VM.
)
)
)
Test Failover
Back in the Overview page in the SourceVM’s Replicated Items configuration blade, click the Test Failover button. (See Figure 2-11.) A Test Failover page opens.

FIGURE 2-11 Click the Test Failover button.
In the Test Failover page (see Figure 2-12), set the following options as shown and click OK:
From This automatically lists the Azure region where your source VM is running.
To This automatically lists the Azure region where your replica VM is set to be created.
Choose a Recovery Point Choose the recovery point to restore to and create the replica VM. You will generally want to select Latest Processes (Low RTO) for the least data loss possible.
Azure Virtual Network This automatically lists the Azure virtual network where your replica VM is set to be created.
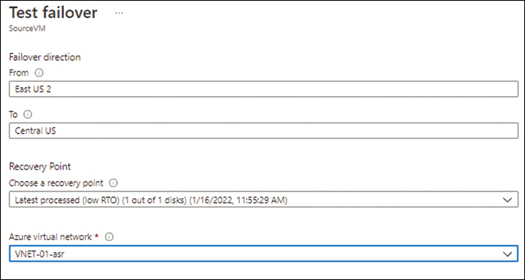
FIGURE 2-12 Test Failover page.
ASR stores the recovery point in the target region and creates a new VM with a name similar to the source VM. For example, if the source VM were named DC01, the new VM would be named DC01-test. Figure 2-13 shows the result.
)
)
FIGURE 2-13 SourceVM-test Overview page.
Log in to the new VM and verify that all the data, apps, and services reflect correctly.
Now that you have finished testing, you’re ready to clean up the test environment.
Cleanup Test Failover
Back in the Overview page in the SourceVM’s Replicated Items configuration blade (see Figure 2-14), click the Cleanup Test Failover button.
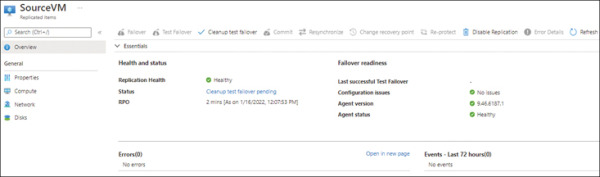
FIGURE 2-14 Click the Clean Test Failover button.
In the Test Failover Cleanup dialog box (see Figure 2-15), type any notes from the test that you would like to record in the Notes box. These could include the test participants, test outcomes, issues encountered, or changes to incorporate in future tests or after testing the replication configuration.
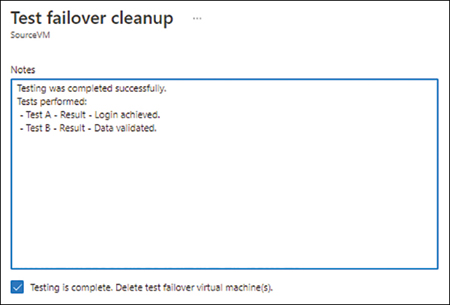
FIGURE 2-15 The Test Failover Cleanup dialog box.
Select the Testing Is Complete. Delete Test Failover Virtual Machine(s) check box and click OK to initiate the cleanup job.
From the Test Failover Cleanup page (see Figure 2-16), monitor the cleanup job to ensure it completes successfully.
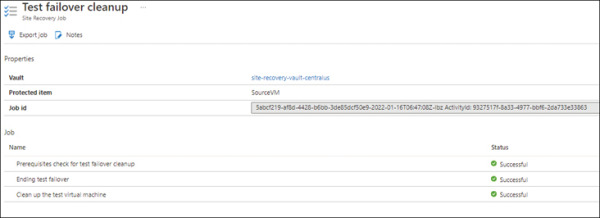
FIGURE 2-16 Test Failover Cleanup page, showing the progress of the cleanup job.
If all your tests have completed successfully, you’re ready to perform a full failover of the VM to the Azure region to which you are replicating.
)
)
Perform Failover
Back in the Overview page in the SourceVM’s Replicated Items configuration blade (see Figure 2-17), click the Failover button.
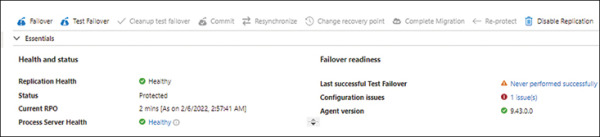
FIGURE 2-17 Click the Failover button.
In the Failover dialog box (see Figure 2-18), verify your settings, select the Shut Down Machine Before Beginning Failover check box if desired, and click OK to launch the ASR failover job.
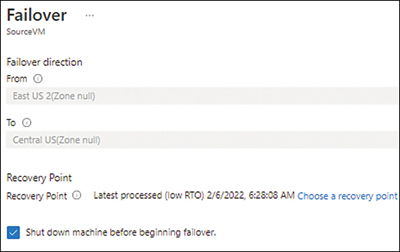
FIGURE 2-18 Failover dialog box.
On the Failover page (see Figure 2-19), monitor the progress of the replication job to ensure all the steps complete successfully. If any errors occur, they will appear highlighted on the page, and you will need to analyze and fix them before re-running the failover job.
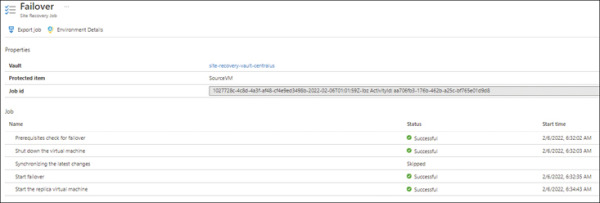
FIGURE 2-19 Failover job summary page.
When the failover is complete, browse to the failed-over VM in the target region, log in to the VM, and validate that your application, database, or required services are online and working as intended.
Now it’s time to commit the VM. When you commit the VM, you will no longer be able to change the recovery point. Committing the VM will allow you to set up re-protect to enable the sync of the failed-over VM back to the source location, if required.
Back in the Overview page in the SourceVM replica’s configuration blade (see Figure 2-20), click the Commit button. Then, when prompted, click the Confirm button.
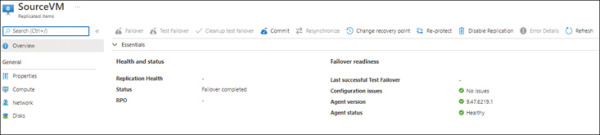
FIGURE 2-20 Click the Commit button.
Now you can set up re-protection for the failed-over VM with the source VM. This provides redundancy for the failed-over VM in case of a disaster in the new site.
To set up re-protection, in the Overview page in the SourceVM’s Replicated Items configuration blade, click the Re-protect button.
In the Re-protect page (see Figure 2-21), validate or customize the settings as needed and click OK to start the re-protection job.
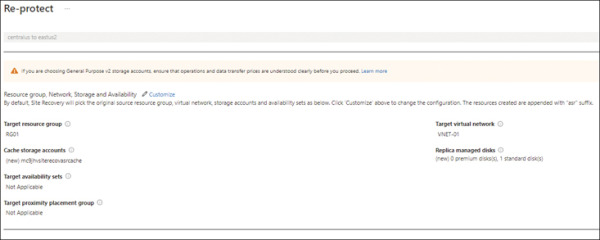
FIGURE 2-21 Re-protect page.
Monitor the progress of the re-protection job to confirm that all the steps finish successfully. (See Figure 2-22.)
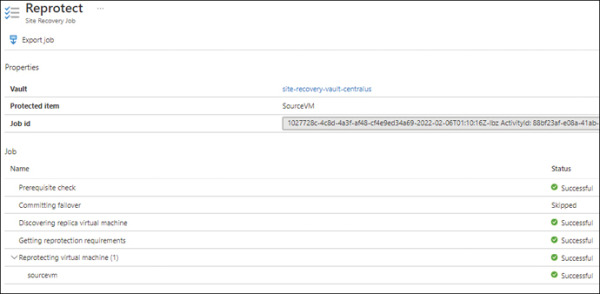
FIGURE 2-22 Reprotect page for the Site Recovery job.
When the re-protection job is complete, return to the Overview page in the SourceVM’s configuration blade to monitor the replication status. (See Figure 2-23.) When Status is at 100% or Healthy, you can test failover or failover the VM if you want to switch back to your primary site.
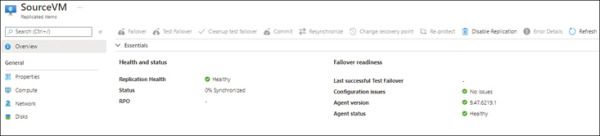
FIGURE 2-23 Overview page of the SourceVM replica showing the replication status.
)
)
)
)
)
)
)
)
)
)
)
)