Hypertext Markup Language (HTML)
- By Rob Miles
- 9/10/2021
What is HTML?
This is not a guide to HTML. You can buy whole books that do a very thorough job of describing the language and how it is used. But you should finish this section with a good understanding of the fundamentals. HTML is a markup language. Markup is what the “M” in HTML stands for. The word “markup” comes from the printing profession. Printers would be given text that had been “marked up” with instructions such as “print this part in large font” and “print this part in italic.”
Figure 2-2 shows what happens if you don’t use a markup language properly. In this case, the customer wanted a cake with no writing on it. The customer said, “Please Leave Blank” when asked what she wanted written on the cake. Unfortunately, the baker took this instruction literally.
)
FIGURE 2-2 Markup taken literally
This kind of misunderstanding is impossible with HTML. The language has a rigid separation between the text that is to be displayed and the formatting instructions. In HTML, if I want something to be emphasized, I will use an HTML markup command to request this:
<em>This text is emphasized.</em> This text is not.
The sequence <em> is recognized by the browser as meaning “make the text that follows this instruction look slightly different from the other text” and is called a tag. The browser will display emphasized text until it sees the sequence </em>, which marks the end of the emphasized text. Most browsers emphasize text by displaying it as italic. If we viewed the above HTML in a Microsoft Edge, we would see something that looks like this:
This text is emphasized. This text is not.
Once you understand the fundamentals of HTML, you can use it to format text. The HTML below shows a few more tags.
This is <em>emphasized</em><br>
This is <i>italic</i><br>
This is <strong>strong</strong><br>
This is <b>bold</b><br>
This is <small>small</small><br>
This is <del>deleted</del><br>
This is <ins>inserted</ins><br>
This is <u>underlined</u><br>
This is <mark>marked</mark><br>
The example HTML above uses a tag, <br>, that means “start on a new line.” The <br> tag does not need to be matched by a </br> element to “close it off.” This is because it has an immediate effect on the layout; it is not “applied” to any specific items on the page. When I pass this text into a browser, I get the output shown in Figure 2-3.
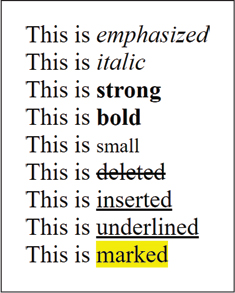
FIGURE 2-3 The <br> tag creates a new line of text.
If you look closely at the text in Figure 2-3, you will notice that some of the requests have similar results. For example, the emphasized (<em>) and italic (<i>) formats both produced italic output. The bold (<b>), italic (<i>), and underline (<u>) tags are regarded as slightly less useful than the more general ones, such as emphasized (<em>) or strong (<strong>). The reasoning behind this is that if a display has no way of producing italic characters a request to display something in italic is not going to work.
However, if the display is asked to “emphasize” something, it might be able to do this in a different way, perhaps by changing the color of the text. Output produced by HTML is intended to be displayed in a useful way on a huge range of output devices. When you use a markup language, you should be thinking about the effect you want to add to a piece of text. You should think “I need to make this stand out, so I’ll use the <strong> format,” rather than just making the text bold.
You can write the commands using uppercase or lowercase or any combination of the two. In other words, the tags <em>, <EM>, and <Em> are all regarded as the same thing by the browser.
Display symbols
By now, you should have a good idea how HTML works. A tag <blah> marks the start of something. The sequence </blah> marks the end. The tags can be nested (placed inside each other).
<em>This is emphasized <strong>This is strong and emphasized</strong></em>
This HTML would generate:
This is emphsized This is strong and emphasized
For every start tag (<blah>) that marks a formatted area of text, there should be a matching end tag (</blah>). Most browsers are quite tolerant if you get this wrong, but the display that you get might not be what you want.
The question you are probably asking now is, “How I can ever get to display the < (less than) and > (greater than) symbols in my web pages?” The answer is that HTML uses another character to mark the start of a symbol entity. The & character marks the start of a symbol. Symbols can be identified by their names:
This is a less than: < symbol and this is a greater than > symbol
The name of the less than character (<) is lt, and the name of the greater than (>) symbol is gt. Note that the end of a symbol name is marked by a semicolon (;). If you are now wondering how we display an ampersand (&), the answer is that it has the symbol name amp.
This is an ampersand: &
You can find a handy list of symbols and their names here: https://dev.w3.org/html5/html-author/charref. Note that when you give a symbol a name, the case of the names is significant.
É<br> é<br>
The HTML above would display the uppercase (É) and lowercase (é) versions of eacute. If you like emojis (and who doesn’t?), you can add these to your web pages by using a symbol that includes the number of the emoji that you want to use.
Happy face: 😜<br>
This will display a happy face, as shown in Figure 2-4.
FIGURE 2-4 Happy face emoji
If you want to discover all the numbers that you can use to put emojis in your web pages, take a look here: https://emojiguide.org/.
Lay out text in paragraphs
We now know how to format text. Next, we must consider how we can lay this text out on the page. When HTML text is displayed, the original layout of the text input is ignored. In other words, consider this text:
Hello
 world

    from   Rob
The layout of this text is a bit of a mess. However, when this text is displayed by a browser, you see the following:
Hello world from Rob
The browser takes in the original text, splits it into words, and then displays the words with single spaces between them. Any layout information in the source text is discarded. This is a good idea because the designer of a web page can’t make any assumptions about the display that will be used. The same page needs to work on large and small displays—from smartphones to large LCD panels.
We’ve seen that the <br> sequence asks the browser to create a new line during the display of text. Now we are going to consider some more commands that control how text is laid out when it is displayed. The <p> and </p> commands enclose text that should appear in a paragraph:
<p>This is the first paragraph</p>
<p>This is the second paragraph</p>
This HTML will display two paragraphs:
This is the first paragraph
This is the second paragraph
The <br> command is not the same as the <p> command; it does not space the lines out like a paragraph would.
Create headings
We can use other tags to markup text as headings at different levels:
<h1>Heading 1</h1>
<h2>Heading 2</h2>
<h3>Heading 3</h3>
<h4>Heading 4</h4>
<p>A normal paragraph</p>
We can use these in documents to create headings, as shown in Figure 2-5.
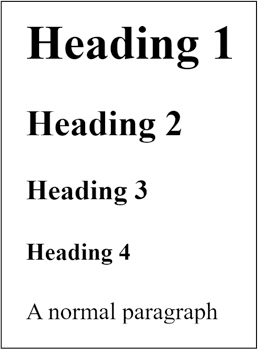
FIGURE 2-5 Headings
You can use headings to create structure in a document.
Use preformatted text
But sometimes, you might have something that you have already formatted. In this case, you can use the <pre> tag to tell the browser not to perform any layout:
<pre>
This text
  is rendered
    exactly how I wrote it.
</pre>
The text enclosed by the <pre> tags is displayed by the browser without any changes to the formatting.
This text
  is rendered
    exactly how I wrote it.
The browser uses a monospaced font when displaying preformatted text. In a monospaced font all the characters have the same width. Many fonts, including the one used to print this paragraph, are proportional. This means that each character has a particular width; for example, the “I” character is much smaller than the “m” character. However, for text such as ASCII art, it is important that all the characters line up. The code for the logo shown in Figure 2-6 would not look correct if it were not displayed with a monospaced font.
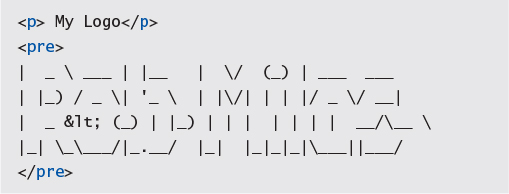
FIGURE 2-6 A preformatted logo
Note that the ASCII art above contains a < character, which I had to convert to a symbol (<) so that it is displayed correctly. This is important. Remember that the browser will not format preformatted text, but it still observes the character conventions that you must use to display characters and symbols. You can add tags to the preformatted text to make parts of it emphasized; <p> tags inside preformatted blocks of text might work, but this is not advised because it makes your html badly formed. The logo appears as shown in Figure 2-7.
FIGURE 2-7 My logo
PROGRAMMER’S POINT: DON’T ABUSE THE BROWSER
Browsers are generally very tolerant of badly formatted HTML. The browser will try to display something even if the HTML it receives is badly formatted. This means you can get away with HTML like this:
<em>Emphasized <strong>strongly emphazised</em> just strong </strong>
The browser will display what you would expect:

However, it is malformed HTML. You might be wondering why. Let’s take a look at the sequence of tags in the text.
)
This is an example of what is called bad nesting. This is because the <em> tag “ends” inside the <strong> tag. In properly formed HTML, a tag that is created inside another tag will end before the enclosing tag ends. The complete sequence of a start tag, text, and end tag is called an element. While one element can completely contain another, it is not correct for elements to overlap like the ones in the above figure. The correct version of this HTML is shown below. Note that each element is complete.
)
The above figure shows what correct nesting looks like. Each element ends before its enclosing one. The reason why I’m stressing this is that most browsers can work out the meaning of the badly nested HTML and display it correctly, but some might not. This could lead to your web pages looking wrong to some people. I’m sure you’ve had the experience of having to switch browsers because a particular website doesn’t look right. Now you know how this can happen.
You can identify incorrectly nested HTML when you see an end tag that doesn’t match the most recent start tag. If you want to use a program to make sure that your HTML is correct, you can use the official validator site at https://validator.w3.org/. You can point the validator at a site you have created or paste HTML text into it for checking.
Add comments to documents
You can add comments to an HTML document by enclosing the comment text in the sequences <!-- and --> as follows:
<!-- Document Version 1.0 created by Rob Miles -->
The author credit would not be displayed by the browser, but you could view it in the source code by pressing the F12 key to open the developer view. As we go through this text, I’ll be telling you regularly how useful it is to add comments to your work, so I think it is a good idea to start doing this now.
Add images to web pages
For the first few years of its life, the World Wide Web didn’t have any pictures at all. The image tag was added by Marc Andreessen, one of the authors of Mosaic, the most popular browser in the early days of the web. The image tag contains the name of a file that contains an image:
<img src="seaside.JPG">
The image tag uses an attribute to specify the file that contains the image to be displayed. An attribute is given inside the tag as a name and value pair, separated by the equals character. When the browser finds an img tag, it looks for the src attribute and then looks for an image file with that name. In the case of the above HTML, the browser would look for an image called seaside.JPG. It would look in the same place on the server from which it loaded the web page. We must make sure that file exists on the server; otherwise, the image will not be displayed.
The image will be displayed in line with the text on the page. We can use the HTML layout tags to lay an image out sensibly with the surrounding text:
<h1>Seaside Picture</h1>
<p><img src="seaside.JPG" alt="Waves crashing on an empty beach"></p>
<p>This picture was taken at Hornsea in the UK.</p>
The image shown in Figure 2-8 is 600 pixels wide. A pixel (short for picture cell) is one of the dots that make up the picture. The more pixels that you have, the better looking the picture is.
)
FIGURE 2-8 An image that is 600 pixels wide
However, this can cause problems if the picture is too large to fit on the device being used to display the image. The img tag supports width and height attributes that can be used to set the displayed size of an image. So, if I want to display the image as 400 pixels wide I can do this:
<p><img src="seaside.JPG" alt="Waves crashing on an empty beach" width="400">
Note that I didn’t specify the height, which means the browser will automatically calculate the height that matches a width of 400 pixels. You can specify both height and width if you like, but you need to be careful not to make the pictures distorted. Setting the absolute width of an image using height and width attributes looks like a good idea at first, but it can be restricting. Remember that an underlying principle of the World Wide Web is that a page should display in a useful way on any device. An image size of 400 pixels might be fine for a small device, but it will appear very small if viewed on a large TV display. In the next chapter, we will discover how we can use style sheets to allow items on a web page to be automatically scaled for the target device.
The HTML document
We now know that we can use tags to mark regions of text as needing to be formatted in a particular way, such as using <em> for emphasized text. We can also mark regions of text as being in paragraphs or levels of headings. We can apply several tags to a given piece of text to allow formatting instructions to be layered on top of each other, but we need to make sure that these instructions are properly “nested” inside each other. Now we can consider how to create a properly formatted HTML document. This comprises several sections:
)
)
)
)
)
)
The browser looks for the sequence <!DOCTYPE HTML> at the start to make sure that it is reading an HTML file. All the HTML that describes the page is given between <html> and </html> tags. The </html> tag contains a lang attribute that specifies the language of the page. The language "en" is English. The <head> and </head> tags mark the start and end of the heading of the document. The heading contains information about the content of the page including styling information (which is discussed further in the next chapter). The text between the <body> and </body> tags is what is to be displayed. In other words, everything we have learned up to now goes into the body part of the web page file.
Linking HTML documents
An HTML document can contain elements that link to another document. The other document can be on the same server, or it can be on a different server entirely. A link is created by using an <a> tag, which has an href attribute that contains the URL of the destination page:
Click on <a href="otherpage.html">this link</a>to open another page.
The text in the body of the <a> tag is the text that the browser will highlight as the link. In the example HTML above the words “this link” will be the linkable text. This will result in text on the page that looks like this:
Click on this link to open another page.
If the reader clicks the link, the browser will open a local file—in this case, a file named “otherpage.html”—which will be displayed. The destination of the link can refer to a page on a completely different site:
<p>Click on <a href="https://www.robmiles.com"> this link</a> to go to my blog.</p>