Design identity and security
- By Ashish Agrawal, Avinash Bhavsar, MJ Parker, Gurvinder Singh
- 8/6/2021
- Skill 2.1: Design authentication
- Skill 2.2: Design authorization
The challenge of migrating to a cloud-centered architecture forces us to think of new ways to protect data, resources, and services. In this sample chapter from Exam Ref AZ-304 Microsoft Azure Architect Design, you will learn how to design authentication, authorization, and security for applications.
The challenge of migrating to a cloud-centered architecture forces us to think of new ways to protect data, resources, and services. Companies have become comfortable protecting legacy, on-premises environments against threats from the outside world, but now it is expected that those same resources must be equally protected, even though they are moving to the cloud. In this chapter, we will cover the core concepts of how to protect all resources, so that all data and services can safely be accessed from anywhere, by all users.
Skills covered in this chapter:
Skill 2.1: Design authentication
Skill 2.2: Design authorization
Skill 2.3: Design security for applications
Skill 2.1: Design authentication
Designing a cloud-based solution for authentication is not an easy task. It must include assurance that users and applications are properly verified before they can access data, services, and resources in the cloud, and on-premises. While offering the most stellar verification, user requests for data and services must remain seamless and high-performing, even when there are many simultaneous requests, working over both on-premises and in the cloud. Azure provides all that you need for the purposes of Authentication.
Single sign-on solutions (SSO)
Traditionally, IT staff individually created and updated user accounts in each application, which meant that users had to remember a password for each such application. Single sign-on means being able to access all the applications and resources that a user needs to do business by signing in only once using a single user account. Once signed in, the user can access all needed applications without being required to authenticate (type a password) a second time.
Single sign-on, which is depicted in Figure 2-1, offers several benefits:
Enabling single sign-on across applications and Office 365 provides a superior log in experience for existing users, which reduces or eliminates multiple log in prompts.
Coupling Azure AD SSO with conditional access policies can offer significantly improved security experiences.
Auditing access requests and approvals for the application, as well as understanding overall application usage, becomes easier with Azure Active Directory. Azure AD supports native audit logs for every application access request performed.
Replacing current access management and provisioning process and migration to Azure Active Directory to manage self-service access to the application (as well as other SaaS applications in the future) will allow for significant cost reductions related to running, managing, and maintaining the current infrastructure.
Eliminating application specific passwords eliminates costs related to password reset for that application and lost productivity while retrieving passwords.
Single sign-on across Azure, Microsoft 365, and many SaaS applications is available in the Azure AD free tier.
)
FIGURE 2.1 Single sign-on flow
Figure 2.1 illustrates all the components and steps involved when a user tries to sign in to an application secured by Azure AD and if password hash sync used. This is a cloud-based authentication flow. As depicted in the figure, when a user tries to sign in to an application secured by Azure AD (and if the user is authenticating directly with Azure AD), the following steps occur:
The user tries to access an application such as the Outlook web app or Box.
If the user is not already signed in, the user is redirected to the Azure AD User Sign-In page.
The user enters their username and password into the Azure AD sign-in page and then clicks the Sign In button.
Azure AD evaluates the response and responds to the user as appropriate. For example, Azure AD either signs the user in immediately or makes an Azure multifactor authentication request.
If the user sign-in is successful, the user can access the application.
Figure 2-2 shows the point-and-click Azure portal options for setting up single sign-on. In this case, using Enterprise Applications, the Google Docs app is being set up for single sign-on.
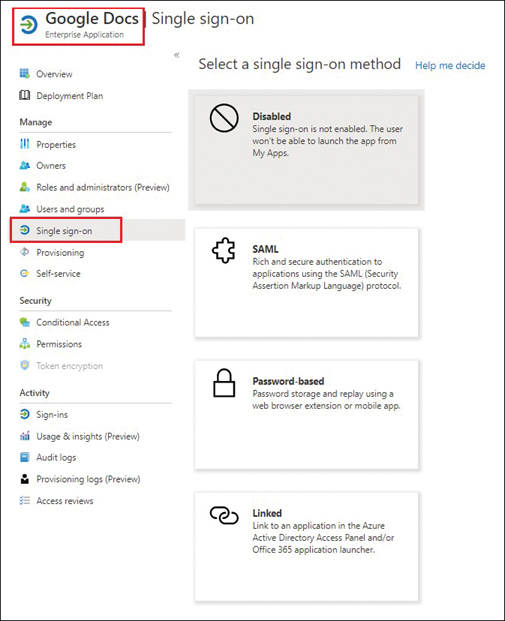
FIGURE 2.2 Single sign-on options in Azure Active Directory Enterprise Applications
Also, if external users are allowed in your organization, it is not a requirement that they implement Azure Active Directory in their own environments. Log in screens can be customized to include company logos and text that will extend a comfort level to all users because the log in screen is intuitive, and users will know that the only requirements are a username and password.
Azure AD provides the following topologies for SSO solutions. You should choose the one that most closely matches your specific scenario:
Azure AD Single Sign-On with Password Hash Sync or cloud-based user authentication.
Azure AD Single Sign-On with AD FS or other federation as the IDP (identity provider). This solution is a combination of hybrid identity sync that uses Azure AD Connect and maintains a trust with an on-premises federation service as the identity provider for Azure Active Directory. Azure Active Directory acts as the IDP for the application, while acting as the SP (service principal) for the on-premises federation service.
Azure AD Single Sign-on with Pass-through Authentication, which allows your users to sign in to both on-premises and cloud-based applications using the same passwords.
In addition to authentication being managed with the Azure portal, it can be managed with command-line tools, PowerShell, Microsoft Graph API, and .Net Languages, such as C# and VB.Net, using libraries, such as ADAL.
Authentication
Once a user has populated a log-in screen, authentication is the next step in the process. Authentication can take place as a result of a variety of scenarios and various types of applications, such as web apps, mobile apps, desktop apps, and web APIs.
The Microsoft Authentication Library (MSAL) can be used to acquire security tokens, so that web APIs can be protected and acquire security tokens from APIs or web apps.
Although most authentication methods include users who are signed in with previously mentioned app types, some apps known as daemon apps can acquire tokens without a user. Apps and services can be automated so that the flow is triggered in a flow of tasks and activities. These apps use the OAuth 2.0 standard. Examples of a daemon app include web applications that are used to perform batch or background processing.
As companies are migrating to the cloud, there is a focus on empowering users to be productive anywhere and at any time. Conditional access, which is an AAD service, is a great way to apply the proper access controls without a heavy-handed obstruction process. Conditional access policies can be put into place that will check signals (users, groups, locations, devices, applications, and real-time risks). Signals will verify every access attempt and determine if access should be allowed, blocked, or will require more information to make that determination.
Conditional access policies address concerns that are common to most companies. Some examples of the most common policies include:
Requiring multifactor authentication for users with administrative roles
Requiring multifactor authentication for Azure management tasks
Blocking sign-ins for users attempting to use legacy authentication protocols
Requiring trusted locations for Azure AD multifactor authentication registration
Blocking or granting access from specific locations
Blocking risky sign-in behaviors
Requiring organization-managed devices for specific applications
In the past, both users and IT professionals struggled with repetitive authentication procedures to get users and/or applications authenticated. With the innovation of Microsoft’s Identity Platform, users and applications can prove who they are with various protocols through Azure Active Directory’s “store” of user and application data. Delegating Azure Active Directory as the single point of authentication alleviates a high administration burden for IT professionals by using the Microsoft Identity Platform.
Microsoft Identity Platform provides Identity as a Service (IaaS), which supports industry-standard protocols, including:
OAuth (for authorization)
OpenID Connect (open standard for authentication access)
SAML (Security Assertion Markup Language) for exchanging authentication and authorization between identity and service providers.
Azure Active Directory uses Conditional Access policies to make decisions about which users and devices can access Azure resources. Conditional Access uses policies that work with signals, decisions, and enforcement. To better understand these components, see Table 2-1.
TABLE 2-1 Conditional Access components
Common Signals |
Common Decisions |
Common Enforcements |
|---|---|---|
User or group membership |
Block access |
Requiring multifactor authentication for administrators |
IP location Information |
Grant access |
Requiring multifactor authentication for Azure management tasks |
Devices |
Blocking sign-ins for legacy authentication (using legacy authentication protocols) |
|
Applications |
Requiring trusted locations for Azure multifactor authentication registration |
|
Risk detection (real-time and calculated) |
Blocking or granting access from specific locations |
|
Microsoft Cloud App Security (MCAS) |
Requiring organization-managed devices for specific applications |
Multifactor authentication
Azure multifactor authentication (see Figure 2-3) can be enabled so that users are required to provide additional verification methods to sign in. Examples of additional access methods are a call to a phone, a text message to a phone, or to send a mobile app verification code. Multifactor authentication can be managed through the Azure portal, command-line tools, scripts, or code.
)
FIGURE 2.3 Conditional access using MFA
Users must register their own selected methods for MFA. The most efficient approach is to use Azure Directory Identity Protection. This service will prompt users to register for MFA on their next log in.
An alternative approach is to enforce MFA registration through Conditional Access Policies for an “All Users” group in your company. This method is not as efficient, as it requires some manual setup and periodic review.
Assigning multifactor authentication (MFA) to an existing user
Follow these steps to assign multifactor authentication to an existing user:
From the Azure portal, go to Azure Active Directory.
Click All Users.
Click the ellipsis (…;) at the top right.
Choose Multi-Factor Authentication, as shown in Figure 2-4.
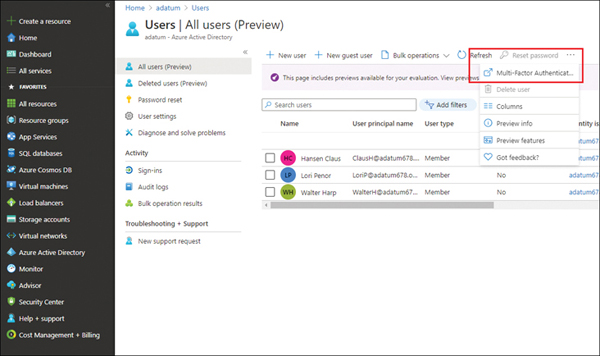
FIGURE 2.4 Multifactor authentication assignment
Choose a user by clicking the user’s name and then choose Enable > Service Settings, as shown in Figure 2-5.
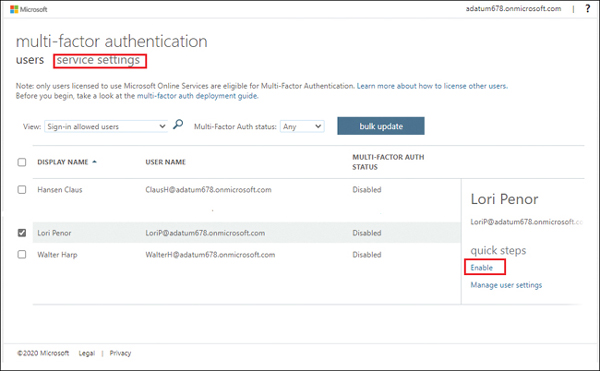
FIGURE 2.5 Choosing a user for whom to enable MFA
From the Service Settings blade, observe the MFA Options available to validate users, as shown in Figure 2-6.
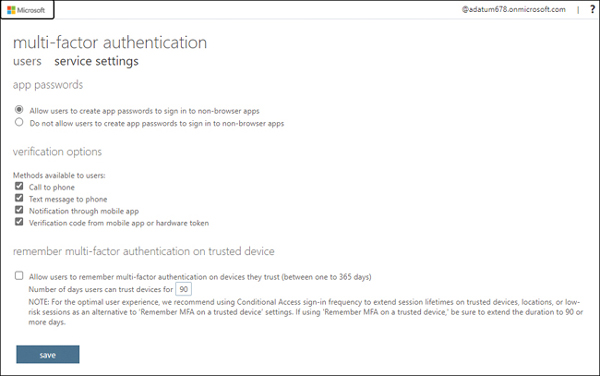
FIGURE 2.6 MFA Service Settings
)
)
)
)
Network access authentication
When the need arises in Azure to control or limit connectivity to and from networks (Example: devices or subnets), Azure supports isolation techniques for the purpose of allowing only intended connections to the network.
Similar to Azure Policy, Azure uses Network Security Groups to assist with filtering network traffic to and from Azure resources, as well as services in an Azure virtual network. Like Conditional Access policies, Network Security Groups (NSGs) contain security rules to allow or deny inbound and/or outbound traffic to and from Azure resource in the virtual network.
NSGs are assigned to either network interfaces or subnets. Any rules that have been created will apply to all network interfaces in a subnet. Using a subnet as an NSG target can reduce management and administration. Network Security Groups support:
TCP (Transmission Control Protocol/Internet Protocol) TCP establishes and maintains the network conversation.
UDP (User Datagram Protocol) UDP is a communication protocol used across the Internet for especially time-sensitive transmissions, such as video playback or DNS lookups.
ICMP (Internet Control Message Protocol) ICMP protocol is most commonly used by network devices to send error and operational messages. It is also used for troubleshooting network connectivity issues.
Security rules
Network Security Groups (NSGs) contain one or more security rules that are defined to allow or deny traffic to and from the network. All NSG rules start by identifying properties, including priority, which is used to evaluate NSG rules.
Azure also creates several default rules that cannot be deleted as listed in Table 2-2. While you cannot remove these default rules, you can override them by creating higher priority rules.
TABLE 2-2 Inbound and outbound default traffic rules when NSGs are created in Azure
Inbound traffic default rules |
||
|---|---|---|
Priority |
Rule name |
Description |
65000 |
AllowVnetInbound |
Allow inbound traffic from all VMs in VNET VNet. |
65001 |
AllowAzureLoadBalancerInbound |
Allow inbound traffic from Azure Load Balancer. |
65500 |
DenyAllInBound |
Deny all inbound traffic. |
Outbound traffic default rules |
||
Priority |
Rule name |
Description |
65000 |
AllowVnetOutbound |
Allow outbound traffic from all VMs to all VMs in a VNET. |
65001 |
AllowInternetOutBound |
Allow outbound traffic from all VMs to the Internet. |
65500 |
DenyAllOutBound |
Deny all outbound traffic. |
Service tags
Service tags allow access restriction by resources or services. Service tags represent a group of IP addresses and simplify rule configuration. When using tags, you do not need to know the IP address or port details. Microsoft creates and manages service tags. Listed below are the most-used service tags:
VirtualNetwork
AzureLoadBalancer
Internet
AzureTrafficManager
Storage
SQL
AppService
Create a virtual network and a network security group
Although both VNets and NSGs can be created and managed with the Azure portal, a common way to create and manage NSGs is with Azure CLI, using the Azure Cloud Shell.
Listing 2-1 shows the command-line snippets that can be used to create a VNet and an NSG:
LISTING 2-1 Create a virtual network and an NSG
//Sample of Azure CLI command line code
//Create Resource Group
$rg = "lucernerg"
az group create --name $rg --location
 'East US'

//Create Virtual Network/Servers
az network vnet create --resource-group $rg --name Lucerne-servers --address-prefix
10.0.0.0/16 --subnet-name LucerneApps --subnet-prefix 10.0.0.0/24

//Create Lucerne Servers NSG Group
az network nsg create --resource-group $rg --name Lucerne-SERVERS-NSG
The following steps show the quick creation method for creating a virtual network. If you have custom IP addresses and subnet addresses, you can use the detailed creation method, which is explained separately after this set of steps.
In the Azure portal’s left menu, click Virtual Networks.
Click +Create.
For a quick create, choose Add Resource Group > Name > Region, and click Review And Create. (Azure will create default properties for the remaining entries.)
Click Review + Create. Azure will run a final validation. If everything has been filled out correctly, the portal will display Validation Passed and a green check mark, and the Create button will appear.
Click the Create button to create the new Azure virtual server.
Detailed creation method:
In the Azure portal’s left menu, click Virtual Networks.
Click +Create.
Across the top, you will see tabs for each set of items. Click each tab and fill the information as shown here:
Basics Subscription Name, Resource Group (new or existing), Name, and Region.
IP Addresses IPv4 or IPv6 Address Space (choose either), Subnet Names (if using), and optional Default IP Address.
Security You are offered both Disable or Enable options for Bastion Host, DDoS Protection Standard, and Firewall.
Tags Tags act like custom labels and are designed to help users find tagged items at any time by using the search bar located at the top of the Azure portal.
Review + Create Submits the above details for validation.
Once Review + Create has been selected, Azure will run a final validation. If everything has been filled out correctly, the portal will display Validation Passed and a green check mark, and the Create button will appear.
Click the Create button to create the new Azure Virtual Server.
As is always true in Azure, there are alternative ways to accomplish the same goal:
The +Create A Resource option in the left hub menu will take you to the Azure Marketplace. Typing Network Security Group in the Azure Marketplace search bar will show a choice of NSGs. Use the Create button to launch a wizard that will allow you to create an NSG.
The All Services option in the left hub menu will take you to the most commonly used, or featured items. In the filter box, enter Network Security Group. The choices will be filtered, and Network Security Group will appear first in the list. When using the All Services option, you will see the +Add option, which begins the process of creating an NSG.
Follow these steps to create an NSG:
From the Azure portal choose All Services or open the Azure Marketplace and type Network Security Group.
Click +Add.
Fill in the Resource Group Name, Instance Name, and Region.
Click Review + Create.
Once the green validation check appears, your choices have been validated and are ready for submission.
Click Create.
Follow these steps to associate an NSG to a subnet:
From the Azure portal, click Virtual Networks.
Click the network to which you want to associate the NSG.
Click the Subnets option from the Settings section.
Click on the desired subnet. The screen will show all subnets available, including the default subnets.
The pop-up menu will contain an option to choose an NSG. This drop-down menu contains all NSGs that have been created in this subscription. Choose the desired NSG that will be associated with the subnet chosen above.
Click Save.
Azure AD Connect and Azure AD Connect Health
Active Directory Domain Services and Azure Active Directory are identity services that can be effective when identities are consistent in both on-premises and cloud environments in a hybrid cloud scenario.
Azure AD Connect addresses this need by creating and managing the synchronization of identities across on-premises and cloud environments. Installation is quick, and a wizard allows verification of both cloud and on-premises administrative accounts. Once AD Connect verifies the administrator, it walks the administrator through a series of screens that will perform initial setup of AD Connect. Subsequent walk-throughs allow the administrator to adjust the settings. Azure AD Connect provides following features:
Password hash synchronization Password hash synchronization acts like an extension to the directory synchronization feature that is implemented by Azure AD Connect Sync. Password hashes allow you to sign in to an Azure service using the same password that you use to sign in to your on-premises Active Directory instance. This option reduces the number of passwords that users will need to maintain and improve productivity. Behind the scenes, these passwords are synced when Azure AD Connect syncs on-premises and cloud directories. Therefore, the passwords will remain the same, but you cannot enforce user-level Active Directory security policies during sign-in.
Pass-through authentication (PTA) This feature is an alternative to password hash synchronization even though it will seem the same to end users. Pass-through authentication also allows users to sign in to both on-premises and cloud-based applications using the same passwords. Like password hash synchronization, users only have to remember one password, which will improve productivity. The main difference with pass-through authentication is that organizations want to enforce on-premises Active Directory security and policies, which cannot be accomplished with password hash synchronization.
Synchronization The process of synchronization is completed using AD Connect too, which is installed in minutes and has a tiny footprint (which makes it very efficient). Administrators are required to sign in with two sets of credentials:
On-premises administrative credentials
Cloud-based administrative credentials
Once the administrator is signed in, a walk-through wizard gives the administrator choices such as pass-through authentication versus federated authentication. It also allows the administrator to choose which OUs (organization units) they wish to sync. Although Azure Active Directory does not implement OUs, the wizard knows how to pull items from OUs and sync them to Azure Active Directory. The Administrator can also choose to sync up the entire Active Directory implementation (all OUs). However, if a company is very large and has an extremely large number of objects/entries in Active Directory, it might behoove the Administrator to sync OUs in chunks. Doing so will reduce the amount of time it takes for objects to sync, and will allow testing in chunks, rather than finding errors after syncing the entire enterprise at once. AD Connect also offers schedulers that will help to automate the sync process at desired points in time, as well as filtered/grouping options to make your syncs more efficient.
AD Connect Health AD Connect Health is a tool that can be installed with the AD Connect software suite and is used to monitor and collect insights into on-premises identity infrastructure. In other words, it will ensure reliability of syncing objects from on premises to the cloud. This monitoring feature has no extra charge, but it requires a minimum of a P1 license. AD Connect Health will make administrators aware of any issues and/or errors that will take place during sync, therefore allowing administrators to proactively troubleshoot issues before they become a bigger problem.
Azure AD Connect allows organizations to:
Enable users to use a single identity to access both cloud and on-premises applications and services (Microsoft 365 being one of the most common applications).
Use one tool to deploy and manage the synchronization of identities.
Use the most sought-after identity management capabilities.
Identity management is the backbone of a company’s user community. To be certain that your identity management is always up to date and without error, Azure provides Azure AD Connect Health, which is a portal to view usage analytics, alerts, performance, and other pertinent on-premises, identity infrastructure–related information.
AD Connect Health allows organizations to
Use enhanced security to view trends regarding lockouts and failed sign-in attempts.
Use one tool to receive alerts on all critical identity management performance and connectivity issues.
Use one tool to monitor per-server metrics such as top application usage, network locations, and connectivity.
Figure 2-7 depicts the placement of AD Connect and AD Connect Health.
)
FIGURE 2.7 Placement of Azure Active Directory, Azure AD Connect, and Connect Health
User Self Service solutions
Azure provides some ways that users can help themselves, thereby reducing calls to company administrators or help desk employees. Administrators can also perform access reviews to ensure security standards. Self-service options include:
Self-Service Reset for Azure multifactor authentication verification options
Azure Active Directory self-service password reset
Self-service group and application access
Self-service sign-up user flow
Azure AD access review
Self-Service Reset for Azure multifactor authentication verification options
Self-service password reset (SSPR) allows users to self-serve multifactor authentication options without the intervention of an IT professional. This service also allows users to reset verification options such as:
Call To Phone Users can reset their phone numbers.
Text Message To Phone Users can reset their mobile phone numbers.
Notification Through Mobile App Users can reset some mobile app notification settings.
Verification On Code From Mobile App Or Hardware Token Users can reset some app notifications.
Azure Active Directory self-service password reset
SSPR or self-service password reset empowers users to self-serve with password resets in Azure Active Directory. This includes password locking and resets. Azure provides detailed reporting that tracks user password locking and resets, including alert notifications to users on password reset and to all admins when other admins reset their passwords.
Self-service group and application access
Azure Active Directory provides non-administrators the ability to manage access to resources such as groups, application roles, Microsoft 365 groups, security groups, and access package catalogs. These users are not required to hold an administrative role. For example, in Microsoft 365, a user may create a SharePoint site that would automatically give him or her the Owner role. While this is not a Global Administrator role—or even a specialized Administrator role—it would allow the owner to perform any changes, additions, or deletions of that SharePoint site. In addition, this owner could delegate rights for this site to users of their choosing. The same applies to other Microsoft 365 services, such as Teams and OneDrive using for Business.
Azure AD access review
Azure administrators can maintain security standards by using Azure AD access reviews. This service allows administrators to efficiently review and manage group memberships, access enterprise applications, and make role assignments, and it allows administrators to be certain the users do not retain access for extended periods of time (if they no longer need it).
 Exam Tip
To protect your users, you can configure risk-based policies in Azure Active Directory that automatically respond to risky behaviors. Azure AD Identity Protection policies can automatically block a sign-in attempt or require additional action, such as require a password change or prompt for Azure AD Multi-Factor Authentication. These policies work with existing Azure AD Conditional Access policies as an extra layer of protection for your organization.
Azure Active Directory B2B
With Azure Active Directory B2B, administrators can now provide access to your company’s Azure resources to external users and partners using a simple invitation/redemption process.
External users do not need to remember or learn anything new when it comes to logging in to company Azure resources. Azure AD B2B provides the following features:
Allows partners to use their existing identities and credentials.
Allows partners to take advantage of Azure AD, without requiring them to use it in their own environments.
Allows administrators to manage resources for the partners, without having to manage any external accounts or passwords, or lifecycles (syncing accounts).
Allows administrators to protect company resources with Conditional Access policies.
To invite a guest/partner user, click Azure Active Directory in the Azure portal and click Users > New Guest User (see Figure 2-8).
)
FIGURE 2.8 Inviting guest users to Azure resources
In Figure 2-8, Armando Pinto was added as a guest user. Once the Invite button is clicked, Armando will receive an email containing an invitation link. When Armando accepts the invitation, he will be listed as Guest in Azure Active Directory and will have access to Azure resources that the administrator or self-serve user gives him. Keep in mind that Conditional Access policies (including the requirement for MFA) can be used further as per your security needs.
Exam Tip
With Azure AD B2B, the partner uses their own identity management solution, so there is no external administrative overhead for your organization. Guest users sign in to your apps and services with their own work, school, or social identities such as Facebook, Microsoft accounts, or Google. When you set up federation with identity providers, your external users can sign in with their existing social or enterprise accounts, instead of creating a new account just for your application.