Introduction to Azure Security Center
- By Yuri Diogenes and Tom Janetscheck
- 5/30/2021
- Deployment scenarios
- Understanding Security Center
- Planning adoption
- Onboarding resources
- Inventory
Onboarding resources
To fully utilize all features available in Security Center, you need to first upgrade the subscription from Free to Azure Defender. You can see the current state of your subscription by clicking the Subscription option in the Overview blade. From there, you can see which subscription: Not Covered (using free tier), Partially Covered (at least one workload is upgraded to use Azure Defender), or Fully Covered (all workloads were upgraded to Azure Defender), as shown in Figure 2-8.
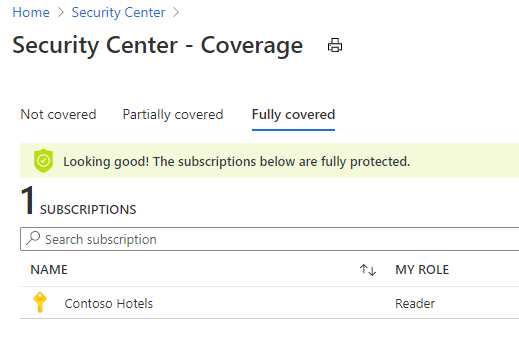
FIGURE 2-8 Subscription coverage shows the three possible states of your Azure subscription in Security Center.
If your subscription is using the Free Tier option, you can click Getting Started in the left navigation pane to upgrade to Azure Defender. If this is the first time you are upgrading this subscription from Free to Azure Defender, you will be able to test all capabilities for free in the first 30 days. Keep in mind that if you do not downgrade before the trial finishes, it will automatically start charging after the 30-day trial period ends. To upgrade, click the Upgrade button, as shown in Figure 2-9.
)
FIGURE 2-9 When you first upgrade from Free to Azure Defender, you have a 30-day free trial.
After you click this button, a notification will pop up indicating that you have started the trial, and you will be redirected to the Install Agents blade, as shown in Figure 2-10.
)
FIGURE 2-10 Options to install the agents in the selected subscriptions
To finish this step, click the Install Agents button, and you will be redirected back to the Overview page. To review pricing selection, click the Price & Settings option in the left navigation pane. Under Management, click the subscription that you just upgraded, and the Azure Defender plans appear, as shown in Figure 2-11.
)
FIGURE 2-11 Azure Defender plans for different workloads
Auto provisioning
Because you selected the option to install the agents, you enabled the capability to automatically install the Log Analytics Agent on all VMs that are provisioned on this subscription. This capability is called auto provisioning, and it is the preferred method to configure Security Center.
However, there are some very specific scenarios in which customers may want to disable auto provisioning and control the onboarding process manually. To change these settings, follow the steps below:
Open the Azure portal and sign in as a user who has Security Admin privileges.
In the left navigation, click Security Center.
In the Security Center left navigation under Management, click the Pricing & Settings option.
Click the subscription for which you want to review the auto provisioning settings.
Under the Settings section on the left, click Auto Provisioning, and the Auto Provisioning settings appear, as shown in Figure 2-12.
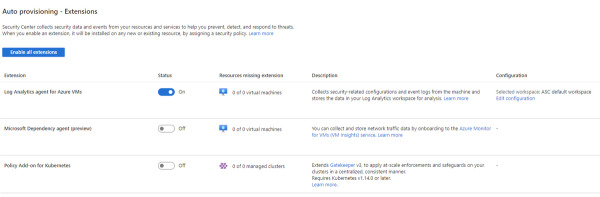
FIGURE 2-12 Auto provisioning settings in Security Center
In the Configuration column for the Log Analytics Agent For Azure VMs, click Edit Configuration.
In the Extension Deployment Configuration blade shown in Figure 2-13, you will have the options to allow Security Center to manage the workspace (default) or select another workspace to be used by Security Center, which is the preferred option when you have multiple subscriptions and you want to centralize the workspace.
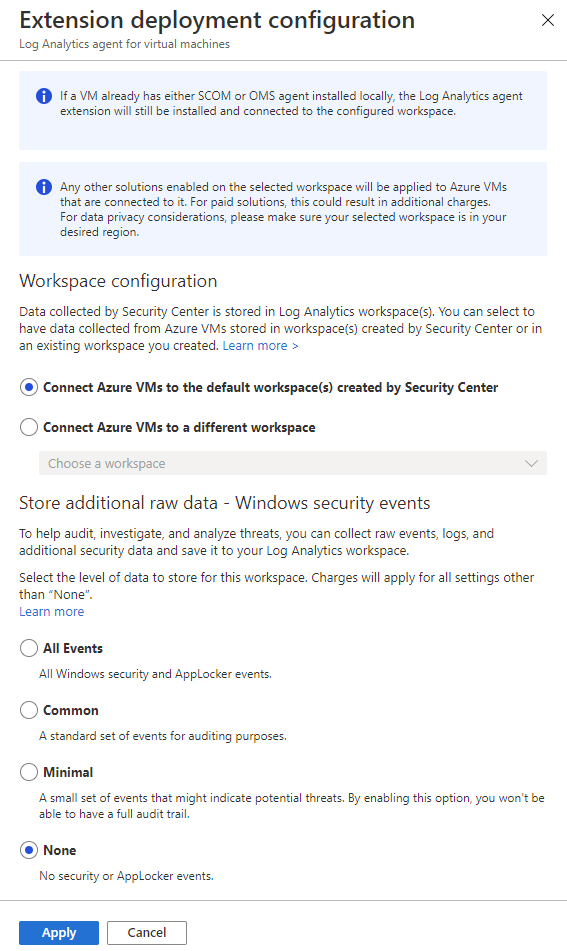
FIGURE 2-13 Options to control the workspace and data collection
)
In the Store Additional Raw Data section, you can configure the level of data collection granularity for Windows systems. Each setting will determine the type of events that will be collected. If you are using Group Policy Object (GPO) to configure your servers where the agent will be installed, we recommend that you enable the audit policies Process Creation Event 4688 and the CommandLine fields inside event 4688. Audit Process Creation determines whether the operating system generates audit events when a process is created (starts). This information includes the name of the program or the user who created the process. Below you have a summary of what each option collects:
All Events If you select this option, all security events will be stored in your workspace.
Common When you select this option, only a subset of events will be stored in your workspace. Microsoft considers these events—including login and logout events— to provide sufficient detail to represent a reasonable audit trail. Other events, such as Kerberos operations, security group changes, and more, are included based on industry consensus as to what constitutes a full audit trail.
Minimal Choosing this setting results in the storage of fewer events than the Common setting, although we aren’t sure how many fewer or what types of events are omitted. Microsoft worked with customers to ensure that this configuration surfaces enough events that successful breaches are detected and that important low-volume events are recorded, but logout events aren’t recorded, so it doesn’t support a full user audit trail.
None This option disables security event storage.
To enable data collection for Adaptive Application Controls, Security Center configures a local AppLocker policy in Audit mode to allow all applications. This will cause AppLocker to generate events that are then collected and stored in your workspace. It is important to note that this policy will not be configured on any machines on which there is already a configured AppLocker policy. To collect Windows Filtering Platform Event ID 5156, you need to enable Audit Filtering Platform Connection (Auditpol /set /subcategory:"Filtering Platform Connection" /Success:Enable).
Onboard virtual machines located on-premises
As explained previously, VMs that are located in Azure will be provisioned automatically, which means that the monitoring agent will be automatically installed. If you need to onboard Computers located on-premises, you need to install the agent manually. Follow the steps below to onboard non-Azure computers or VMs:
Open the Azure portal and sign in as a user who has Security Admin privileges.
In the left navigation, click Security Center.
In the Security Center left navigation under General, click the Getting Started option and click the Get Started tab.
Under Add Non-Azure Computers, click the Configure button, as shown in Figure 2-14.
FIGURE 2-14 Option to onboard non-Azure computers
In the Add New Non-Azure Computers blade, select the workspace in which you want to store the data from these computers, and before onboarding any computers, make sure to click Upgrade to upgrade the Workspace to Azure Defender, as shown in Figure 2-15.
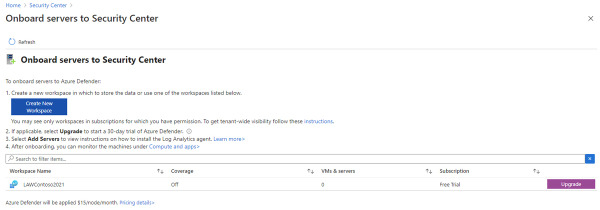
FIGURE 2-15 Upgrading the workspace to Azure Defender
If you don’t see that the Upgrade button has changed to Add Servers, click the Refresh button and you should see the Add Servers button, as shown in Figure 2-16. Click it to proceed.

FIGURE 2-16 Adding servers to the workspace
Once you click this button, the Agents Management page appears, as shown in Figure 2-17.
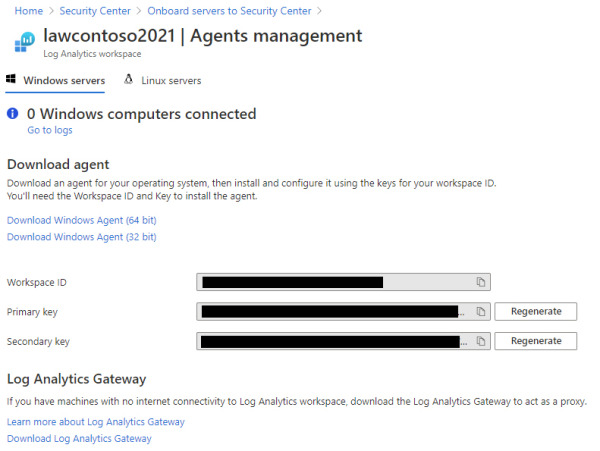
FIGURE 2-17 Agent selection
On this page, you should click the appropriate Windows agent (64- or 32-bit version), and if you are installing this in a Linux operating system, click the Linux Servers tab and follow the instructions from there. Make sure to copy the Workspace ID and Primary Key values to the clipboard. You will need those values when installing the agent in the target system.
When you finish downloading it, you can close the Security Center dashboard (close your browser) and copy the agent installation file to a shared network location where the client can access it.
)
)
)
)
For this example, the agent installation will be done in a Windows Server 2016 computer located on-premises. However, the same set of procedures apply to a non-Azure VM located in the cloud. Log in in the target system and follow the steps below to perform the installation:
Double-click the MMASetup-AMD64.exe file, and if the Open File–Security Warning dialog appears, click Run.
If the User Access Control dialog appears, click Yes.
On the Welcome To The Microsoft Monitoring Agent Setup Wizard page, click Next.
Read the Microsoft License Terms, and click I Agree.
On the Destination Folder page, leave the default selection and click Next. The Agent Setup Options page appears, as shown in Figure 2-18.
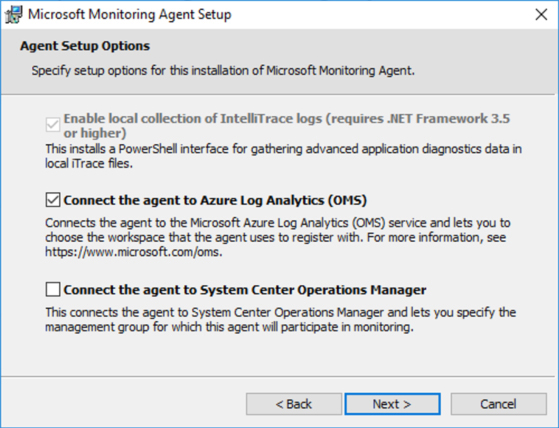
FIGURE 2-18 Selecting the target service
Select Connect The Agent To Azure Log Analytics (OMS), as shown in Figure 2-18, and click Next. The Azure Log Analytics page appears, as shown in Figure 2-19.
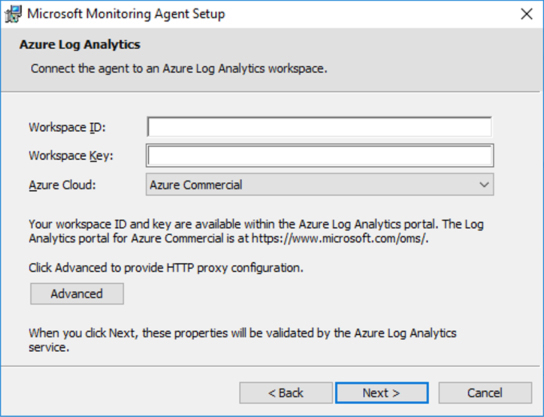
FIGURE 2-19 Providing the workspace ID and primary key
On this page, you need to write the Workspace ID and the Primary Key that were obtained in step 8 of the previous procedure. Notice that the Primary Key should be entered in the Workspace Key field. If this computer is behind a Proxy Server, you need to click the Advanced button and provide the Proxy URL and authentication if needed. Once you finish filling these options, click Next.
On the Microsoft Update page, select Use Microsoft Update For Updates (Recommended) and click Next.
On the Ready To Install page, review the Summary field and click Install.
The Installing The Microsoft Monitoring Agent page appears, and the installation proceeds.
Once the installation is finished, the Microsoft Monitoring Agent Configuration Completed Successfully page appears. Click Finish.
You can also perform this installation using the command line interface (CLI) using the following code:
MMASetup-AMD64.exe /Q:A /R:N /C:"setup.exe /qn ADD_OPINSIGHTS_WORKSPACE=1 OPINSIGHTS_
WORKSPACE_AZURE_CLOUD_TYPE=0 OPINSIGHTS_WORKSPACE_ID=<yourworkspaceID> OPINSIGHTS_
WORKSPACE_KEY=<yourworkspaceprimarykey> AcceptEndUserLicenseAgreement=1"
Most of the parameters that you saw in the agent installation are self-explanatory; the only one that might not be readily apparent is OPINSIGHTS_WORKSPACE_AZURE_CLOUD_TYPE, which is the cloud environment specification. The default is 0, which represents Azure commercial cloud. Only use 1 if you are installing the agent in an Azure government cloud.
It can take some time for this new non-Azure computer to appear in Security Center, but if you want to validate the connectivity between this computer and the workspace, you can use the TestCloudConnection tool. On the target computer, open the command prompt and navigate to the folder \Program Files\Microsoft Monitoring Agent\Agent. From there, execute the command TestCloudConnection.exe, and if the connectivity is working properly, you should see all tests followed by this message: Connectivity test passed for all hosts for workspace id <workspace id>.
Onboard resources from other cloud providers
After upgrading to Azure Defender, you will be able to use cloud connectors to connect to AWS or GCP. When connecting Security Center with AWS, you are integrating with AWS Security Hub, and the insights that are gathered from Security Hub will appear on the Security Center recommendations page. With GCP, Security Center integrates with the GCP Security Command, and you will also be able to see the insights in the Security Center recommendations.
For this example, you will connect AWS with Security Center. You will need to complete the following work on the AWS side before you start configuring Security Center:
Enable AWS Config
Enable AWS Security Hub
Verify that there is data flowing to the Security Hub
Configure AWS authentication, which can be done by creating the following:
An IAM role for Security Center
An AWS user for Security Center
Regardless of the authentication method you selected previously, make sure that this role/user has the following permissions policies:
SecurityAudit
AmazonSSMAutomationRole
AWSSecurityHubReadOnlyAccess
When configuring the Account ID in AWS, make sure to use the Microsoft Account ID 158177204117.
With those steps in place, you are ready to configure the cloud connector, but if you also want to onboard servers that are in AWS, you will need to ensure that the following tasks are done prior to configuring the cloud connector in Azure Security Center:
Install the AWS Systems Manager on your servers (EC2 instances) that reside in AWS. For instructions, see http://aka.ms/ascbookaws.
Configure this Server (EC2 Instance) to use Azure Arc. For instructions, see http://aka.ms/ascbookarc.
In Azure, make sure to create a service principal that will be used for Azure Arc. Follow the steps found in this article to configure it: http://aka.ms/ascbookspn.
Now that all pre-requisites are fulfilled, you can follow the steps below to start the configuration of the AWS connector in Security Center:
Open Azure portal and sign in as a user who has ownership privileges in the subscription.
In the left navigation, click Security Center.
In the Security Center left navigation, under Management, click the Cloud Connectors option, and click the Add AWS Account button. The Connect AWS Account page appears, as shown in Figure 2-20.
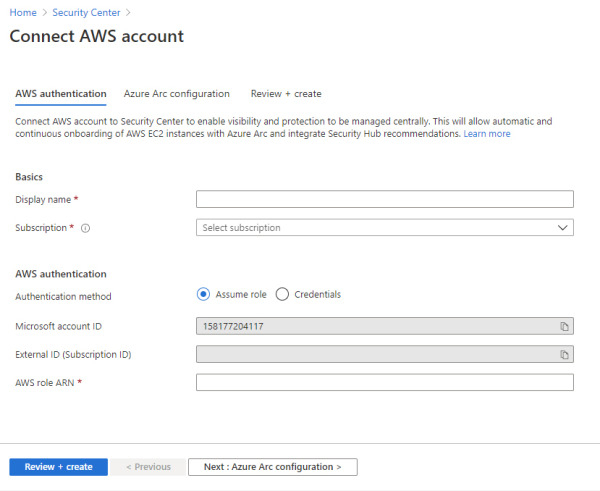
FIGURE 2-20 Connecting to AWS
In the Basics section, type a name for the connector and select the appropriate subscription from the drop-down menu.
In the AWS Authentication section, use the appropriate method (Assume Role if you created a role or Credentials if you created a user). Assuming that you used a role, the AWS role ARN number must be provided. This number is located in the summary of the role you created in AWS. Click the Next Azure Arc Configuration button, and the settings shown in Figure 2-21 appear.
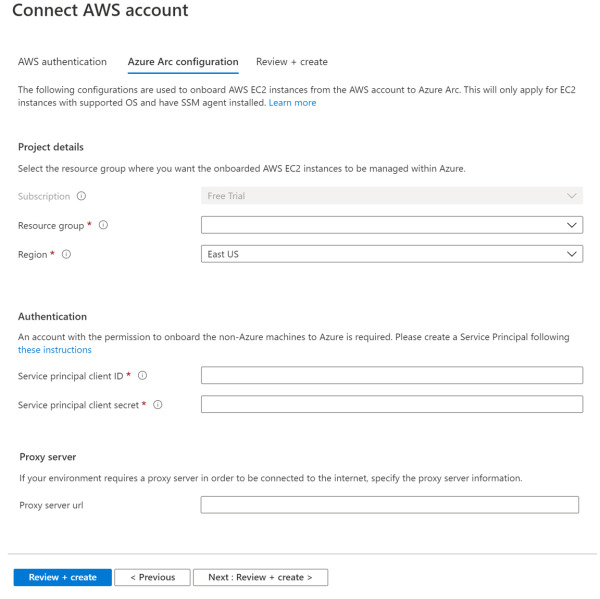
FIGURE 2-21 Configuring Azure Arc settings
Select the Resource Group and Region.
In the Authentication section, you need to provide the Service Principal Client ID and the Client Secret.
Click the Review + Create button and complete this operation.
Once you finish, you will see the connector, as shown in Figure 2-22.
)
)
)
)
)
)
)
FIGURE 2-22 Configured AWS connector
After some time, you will be able to see recommendations for your AWS account. These recommendations will appear with the AWS tag, as shown in Figure 2-23.
)
FIGURE 2-23 Recommendations appear with the AWS tag.
At this point, your Azure Arc machines will be discovered, but you still need to install the Log Analytics agent on those machines, and there is a specific recommendation for that, as shown in Figure 2-24.
)
FIGURE 2-24 Recommendations to install the Log Analytics agent on the Azure Arc machine
You can leverage the Quick Fix feature to quickly deploy the agent to this Azure Arc machine. You just need to select the server and click the Remediate button. In Figure 2-24, the Freshness Interval indicates that it might take 24 hours for this remediation to take effect.
Onboard resources using PowerShell
In large deployments, you might consider using Security Center PowerShell modules to help you quickly performing onboarding operations. To prepare the environment you must first install the Az.Security module using the commands below:
Set-ExecutionPolicy -ExecutionPolicy AllSigned
Install-Module -Name Az.Security -Force
When finished, use the Connect-AzAccount PowerShell command to log in to your Azure account. Next, register your subscriptions to the Security Center Resource Provider. Run the commands below, and make sure to replace the <subscription ID> field for your subscription number, which can be obtained using the command Get-AzSubscription.
Set-AzContext -Subscription "<subscription ID>"
Register-AzResourceProvider -ProviderNamespace ‘Microsoft.Security’
At this point, you can start performing all operations that you need to onboard Security Center in your subscription. Usually, the first one is to upgrade from Free to Standard tier. First, you will set the context for the subscription that you want to upgrade, and then you perform the upgrade using the commands below:
Set-AzContext -Subscription "<subscription ID>"
Set-AzSecurityPricing -Name "default" -PricingTier "Standard"
You can use Get-AzSecurityPricing to verify if your subscription was correctly upgraded to the Standard version. If you already have a workspace and you want to connect Security Center to it, use the Set-AzSecurityWorkspaceSetting command. You will need the Workspace ID to perform this operation, which you can retrieve using the Get-AzSecurityWorkspaceSetting command. Another common operation to perform at this stage is to enable auto provisioning. For that, use the command below:
Set-AzSecurityAutoProvisioningSetting -Name "default" -EnableAutoProvision
To verify if the auto provisioning was correctly enabled, use the Get-AzSecurityAuto ProvisioningSetting command. One last operation we recommend is to configure the security contact information for email notifications. To configure this option, use the command below:
Set-AzSecurityContact -Name "YourName" -Email "youremailaddress" -Phone "yourphone"
-AlertAdmin -NotifyOnAlert
You can use the Get-AzSecurityContact command to verify your settings were configured properly. Make sure to visit the Azure Security Center community page to take advantage of many PowerShell samples: https://github.com/Azure/Azure-Security-Center/tree/master/Powershell%20scripts.