Using Windows 10
- By Ed Bott and Craig Stinson
- 3/6/2021
- An overview of the Windows 10 user experience
- Using and customizing the Windows 10 Start menu
- Using and customizing the taskbar
- Using and customizing Action Center
- Switching tasks
- Reviewing, revisiting, resuming with Timeline
- Switching between virtual desktops
- Managing and arranging windows
- Using a keyboard and mouse in Windows 10
- Using Windows 10 on a touchscreen device
- Using the Windows Ink workspace
- Working with fonts
Using Windows 10 on a touchscreen device
Tablet Mode was specifically designed for sustained use with a touchscreen-equipped device such as a tablet or hybrid PC. We already discussed the Windows user experience with a conventional PC. Tablet Mode introduces a series of significant changes—automatically if it detects you’re using a touchscreen device without a keyboard attached, or manually if you want to treat a touchscreen-equipped laptop as if it were a tablet.
Working in Tablet Mode
Windows 10 makes some assumptions about your preferences based on your hardware. On conventional PCs with a keyboard and mouse, Tablet Mode is off. On dedicated tablets, this mode is on by default. You can adjust these preferences at Settings > System > Tablet Mode. On a hybrid device with a relatively small touchscreen, you might prefer to have Tablet Mode on full time, for example.
To turn on Tablet Mode, press Windows key + A, click the icon at the right end of the taskbar, or swipe from the right edge to open Action Center, then click or tap Tablet Mode.
Turning on Tablet Mode makes the following changes in the Windows 10 user experience:
It reconfigures the taskbar, bumping up button sizes, adding a back button, replacing the search box with a search button, and hiding all taskbar buttons. The following comparison shows the normal taskbar on top and the same area in Tablet Mode below it:
)
All apps run in full screen. It’s possible to snap two apps side by side, but they have a thick sizing bar between them, similar to the one introduced in Windows 8.
Start opens in full screen, with the app list hidden by default and accessible only by tapping the hamburger menu icon in the upper-left corner of the display.
Using the Touch Keyboard
The other essential feature of a touchscreen-equipped device, especially one without a keyboard, is the presence of the extremely versatile Windows 10 Touch Keyboard. It allows text entry into dialog boxes, web forms, your browser’s address bar, documents, the search box—anywhere you would normally need a physical keyboard to provide input.
Figure 3-14 shows the standard Touch Keyboard.
)
Figure 3-14 This is the default layout of the Touch Keyboard; use the control in the upper-left corner to change the keyboard display mode, dock or float the keyboard, or jump to language or typing settings.
In tablet mode, the Touch Keyboard should appear automatically when you tap to position the insertion point in a place that accepts text entry. You can also make the Touch Keyboard appear by tapping its button, which appears in the notification area on the right of the taskbar. (If this button is hidden, right-click or do a long press on the taskbar and then select the Show Touch Keyboard Button option.) Note that by clicking the Touch Keyboard button, you can also display the Touch Keyboard on a computer that is not touch-enabled.
The limited screen space available for the Touch Keyboard means you have to switch layouts to enter symbols and numbers. Tap the &123 key in the lower-left corner to switch between the standard QWERTY layout and the first of two symbol layouts, as shown in Figure 3-15. Note that the layout includes a dedicated number pad, which is extremely handy for working with spreadsheets and performing other data-entry tasks.
)
Figure 3-15 Tap the &123 key in the lower-left corner to switch between the standard QWERTY keys and this alternate view of symbols and numbers.
In some respects, the Touch Keyboard is more versatile than its physical counterparts. Entering a typographic symbol like the interrobang (a character consisting of an exclamation point superimposed on a question mark) or an emoji doesn’t require the use of ANSI codes. Instead, you can enter characters directly. To enter an interrobang, for example, click (or press) and hold either the question mark or the exclamation point. Relevant special-character options will appear in a panel above the character you clicked. Use the same technique to enter, for example, an accented vowel.
To see the vast array of available emojis and kaomojis, click the “happy face” button on the bottom row. The Touch Keyboard also offers a large array of symbols. To see what’s there, click &123, and then click Ω.
With the emoji keyboard layout visible, the bottom row displays keys you can use to switch between different categories. All the categories offer more symbols than can be displayed at one time in the Touch Keyboard. To explore a category fully, swipe left and right. If you don’t have a touch display, you can scroll by clicking the minuscule arrows in the lower-right and -left corners of the emoji layout. Figure 3-16 shows an example of the people category. Note that by clicking and holding the people category icon, you can change the skin tone of the people emojis.
)
Figure 3-16 Windows 10 supports hundreds of emoji characters. Pick a category from the bottom row and use the arrow keys to scroll through different character sets, 36 at a time.
Dictating text with the Touch Keyboard
By clicking the microphone button near the upper-left corner of the Touch Keyboard, you can dictate text instead of typing. In addition to words, you can dictate punctuation symbols and such editing instructions as “delete last ten words.”
To enable dictation, you must open Settings > Privacy > Speech and turn on Online Speech Recognition.
Typing with shapes
If you find hunting and pecking is onerous and slow, draw your words instead. Using either the compact or the wide (default) layout of the Touch Keyboard, you can create words by drawing a line from one letter to the next. Windows does an excellent job of recognizing your intentions, and where it cannot it proposes alternative possibilities (just as it would if you misspelled using conventional typing methods). Mobile phones have had this “swipe to type” capability for some time, and if you’ve texted this way on a hand-held platform, you’ll find it much the same on your Windows tablet.
Changing keyboard styles and docking
Tapping the button in the upper-left corner of the Touch Keyboard reveals a unified settings menu for the keyboard:
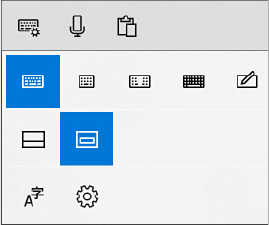
The two options in the middle row of this menu control whether the keyboard floats or is docked against the lower edge of your screen. The bottom row includes buttons to display language settings, typing settings, and tips.
The buttons on the top row of the menu change the layout of the keyboard itself. With the button on the left, you get the default layout shown earlier. The button in the fourth position displays the “full” layout, which, like a typical laptop keyboard, includes Alt and Ctrl keys, a Tab key, and an Fn key. If you’re handy with thumbs, you’ll like the second button from the left, which compresses the keyboard into a one-handed miniature that takes up a minimum of screen space and functions just like your cell phone. The third layout from the left splits the keyboard into left and right sections, each of which you can operate with one-handed dexterity.
With all these layouts, you can take advantage of Microsoft’s superb text-prediction engine. As soon as you finish a word (and sometimes before), likely continuations appear in a row at the top of the keyboard. So, for example, to write “Give me a few minutes to get the money,” all you need to type is the first two letters. You can click your way through the rest of the sentence. If you’re sending input to a modern (UWP) app, the engine will suggest appropriate emojis as well as text continuations.
Typing suggestions are an opt-in feature. To enable them, go to Settings > Devices > Typing. Under the Typing heading on the Typing page, turn on Show Text Suggestions As I Type On The Software Keyboard.
Meanwhile, the rightmost button in the menu’s top row replaces the keyboard with a handwriting input panel, shown in Figure 3-17. Text that you enter in the input box is automatically translated into characters for entry at the current insertion point.
)
Figure 3-17 The handwriting panel does a remarkable job at translating even sloppy penmanship into readable results.
Even if your handwriting is so bad that no one but you (and perhaps not even you) can read it, you might be in for a surprise. In the unlikely event that the panel misreads your intent, you can still select from a row of alternatives that appears at the top of the window.
Although the handwriting panel is most useful with devices that support pen input, if you find yourself without a stylus, you can still use it with your fingertip. To do this, visit Settings > Devices > Pen & Windows Ink and turn on Write In The Handwriting Panel With Your Fingertip.