Deployment and configuration
- By Orin Thomas
- 5/26/2020
- Bare metal versus virtualized
- Windows images
- Answer files
- Windows Deployment Services
- Virtual Machine Manager
Windows Deployment Services
Windows Deployment Services (WDS) is a server role that you can deploy on computers running Windows Server. WDS enables you to deploy operating systems, including Windows 8.1, Windows 10, Windows Server 2012, Windows Server 2012 R2, Windows Server 2016, and Windows Server 2019, to computers over the network. WDS can send these operating systems across the network using multicast transmissions, which means that multiple computers receive the same operating system image while minimizing the use of network bandwidth. When you use multicast transmissions, the same amount of traffic crosses the network independently of whether you are deploying an operating system to 1 computer or to 50. WDS also can use unicast transmissions.
Deploying Windows Server through WDS involves performing the following steps:
An operating system deployment transmission is prepared on the WDS server.
The media access control (MAC) addresses of Pre-boot Execution Environment (PXE)–compliant network adapters are made available to the WDS server.
The computers that are targets of the transmission boot using their PXE-compliant network adapters.
These computers locate the WDS server and begin the operating system setup process. If the WDS server has been provisioned with an answer file, the setup completes automatically. If the WDS server has not been provisioned with an answer file, an administrator must enter setup configuration information.
Each WDS server can have only one unattended installation file for each processor architecture. Because unattended installation files differ between server and client, you either need to swap unattended files when you are switching between client and server or have multiple WDS servers. WDS can be used in conjunction with other technologies such as Desired State Configuration where an answer file only performs basic configuration tasks, with the substantial tasks completed by an advanced configuration technology.
WDS requirements
WDS clients need a PXE-compliant network adapter, which is rarely a problem because almost all modern network adapters are PXE-compliant. You can also use WDS to deploy Windows Server 2012 and later to virtual machines running under Hyper-V. The trick to doing this is to use a legacy rather than a synthetic network adapter when creating the virtual machine as a Generation 1 virtual machine. This isn't necessary when using Generation 2 virtual machines because the Generation 2 virtual machine network adapters support PXE booting.
If you have a computer that does not have a PXE-compliant network adapter, you can configure a special type of boot image known as a discover image. A discover image boots an environment, loading special drivers to enable the network adapter to interact with the WDS server. You create the boot image by adding the appropriate network adapter drivers associated with the computer that can’t PXE boot to the Boot.wim file from the Windows Server installation media.
WDS has the following requirements:
A Windows Server DNS server must be present on the local area network (LAN).
Prior to Windows Server 1810, an authorized Dynamic Host Configuration Protocol (DHCP) server must be present on the network. You can host WDS and DHCP on the same computer as long as you configure the options shown in Figure 3-10. Versions of Windows Server after 1810—including Windows Server 2019—can be used with third-party DHCP servers. Because this limits your ability to use IP address tracking through IPAM, using a third-party DHCP server if you are using WDS is not a recommended strategy.
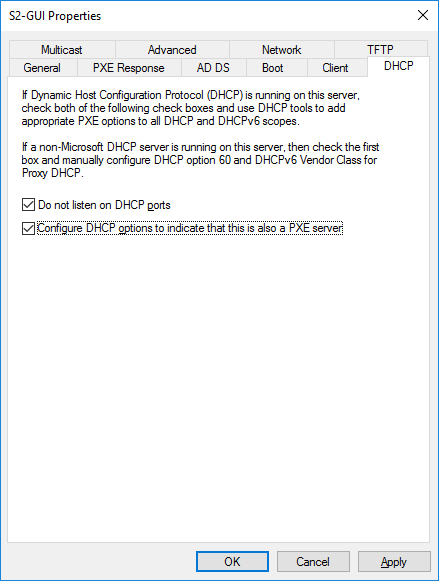
Figure 3-10 WDS DHCP settings
)
If you install WDS from the Add Roles And Features Wizard, you can configure these settings automatically. Although the WDS server does not require a static IP address, it is good practice to ensure that infrastructure roles such as WDS always use a consistent network address. You can install WDS on computers running the Server Core version of Windows Server.
When installing WDS on Server Core, you have to specify the location of the source files or ensure that the server has a connection to the Internet, which enables them to be downloaded automatically. Although it is possible to manage WDS from Windows PowerShell, most administrators use the graphicsal WDS Remote Server Administration Tools (RSAT) from a computer running Windows 10, Windows Server 2016, or Windows Server 2019 with Desktop Experience.
Managing images
Images contain either entire operating systems or a version of a special stripped-down operating system known as Windows PE. Windows PE functions as a type of boot disk, enabling a basic environment to be loaded from which more complex maintenance and installation tasks can be performed. WDS uses four image types: boot image, install image, discover image, and capture image.
Boot Image. A special image that enables the computer to boot and begin installing the operating system using the install image. A default boot image, named Boot.wim, is located in the sources folder of the Windows Server installation media.
Install Image. The main type of image discussed in this chapter. Contains the operating system as well as any other included components, such as software updates and additional applications. A default install image, named Install.wim, is present in the sources folder of the Windows Server installation media. Install images can be in .vhd or .vhdx format, though you can only manage install images using the WDS console in Windows Server 2012 R2, Windows Server 2016, or Windows Server 2019.
Discover Image. This special image is for computers that cannot PXE boot to load appropriate network drivers to begin a session with a WDS server.
Capture Image. A special image type that enables a prepared computer to be booted so that its operating system state can be captured as an install image. You add capture images as boot images in WDS.
To import an image into WDS, perform the following steps:
Open the Windows Deployment Services console.
Click Install Images. From the Action menu, click Add Install Image.
Choose whether to create a new image group or to use an existing image group.
Specify the location of the image file.
In the Available Images page of the Add Image Wizard, select the operating system images that you want to add. When the image or images are added, click Next, Finish.
Configuring WDS
The installation defaults for WDS are suitable when you deploy the role in small environments. If you are deploying WDS in larger environments and do not choose to implement System Center Virtual Machine Manager for server operating system deployments, you might want to configure the options discussed in the following sections, which are available by editing the properties of the WDS server in the Windows Deployment Services console.
PXE response settings
With PXE response settings, you can configure how the WDS server responds to computers. As Figure 3-11 shows, you can configure WDS not to respond to any client computers (this effectively disables WDS), to respond to known client computers, or to respond to all computers but require an administrator to manually approve an unknown computer. Known computers are those that have prestaged accounts in Active Directory. You can prestage computers if you know the MAC address of the network interface card (NIC) that the computer uses. Vendors often supply a list of MAC addresses associated with computers when you purchase those computers, and you can use this list to prestage computer accounts.
)
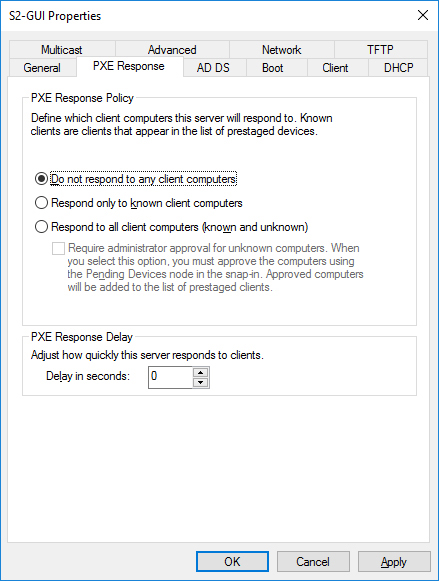
Figure 3-11 PXE Response settings
You use the PXE Response Delay setting when you have more than one WDS server in an environment. You can use this setting to ensure that clients receive transmissions from one WDS server over another, with the server configured with the lowest PXE response delay having priority over other WDS servers with higher delay settings.
Client Naming Policy
The Client Naming Policy enables you to configure how computers installed from WDS are named if you aren’t using deployment options that perform the action. You can also use the settings on the AD DS tab, shown in Figure 3-12, to configure domain membership and organizational unit (OU) options for the computer account.
)
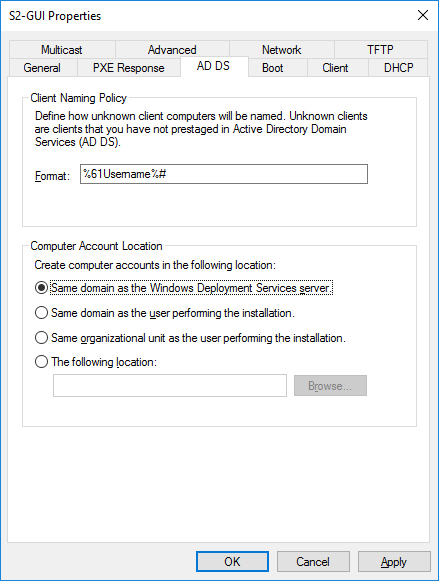
Figure 3-12 Client Naming Policy
WDS boot options
In the Boot options tab of the WDS server’s Properties dialog box, shown in Figure 3-13, you can configure how clients that PXE boot interact with the WDS server. You can also configure a default boot image for each architecture supported by WDS. By default, once a client has connected to a WDS server, someone must press the F12 key to continue deploying the operating system. In environments in which you are performing a large number of simultaneous deployments, requiring this level of manual intervention might substantially delay the deployment.
)
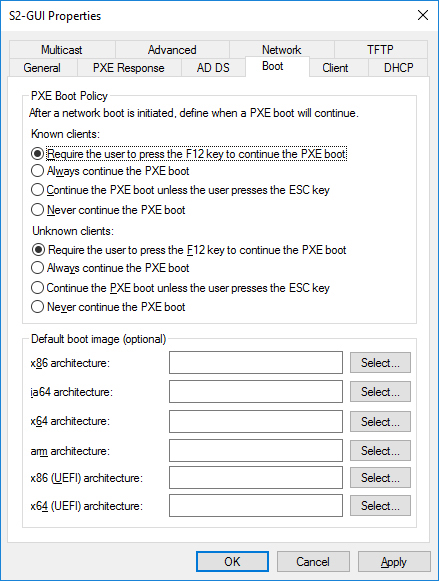
Figure 3-13 Boot options
Multicast options
The default settings of WDS have all computers that join the multicast transmission receiving the installation image at the same speed. If you frequently deploy operating systems, you are aware that sometimes there are one or two computers that have network adapters that slow transmission; transmissions that should take only 15 minutes now take half a day. You can configure the transfer settings on the Multicast tab, shown in Figure 3-14, so that clients are partitioned into separate sessions depending on how fast they can consume the multicast transmission. You still have those slow computers taking a long time to receive the image, but the other computers connected to the transmission can complete the deployment quicker.
)
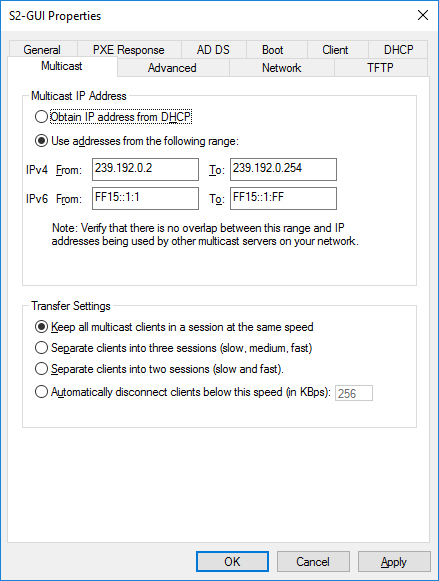
Figure 3-14 WDS Multicast tab
Other options
Although you are less likely to need them, you can configure other options on the following tabs:
Advanced tab. You can configure WDS to use a specific domain controller and global catalog (GC) server. You can also configure whether WDS is authorized in DHCP. DHCP authorization occurs automatically when you install the WDS role.
Network tab. You can specify a User Datagram Protocol (UDP) port policy to limit when UDP ports are used with transmissions. You can also configure a network profile to specify the speed of the network, minimizing the chance that WDS transmissions slow the network down.
TFTP tab. You can specify maximum block size and Trivial File Transfer Protocol (TFTP) window size.
Configuring transmissions
You use WDS transmissions to set WDS to transfer the operating system image to PXE clients. When configuring a WDS transmission, you need to decide what type of multicast transmission you are going to perform in the Multicast Type page of the Create Multicast Transmission Wizard, as shown in Figure 3-15.
)
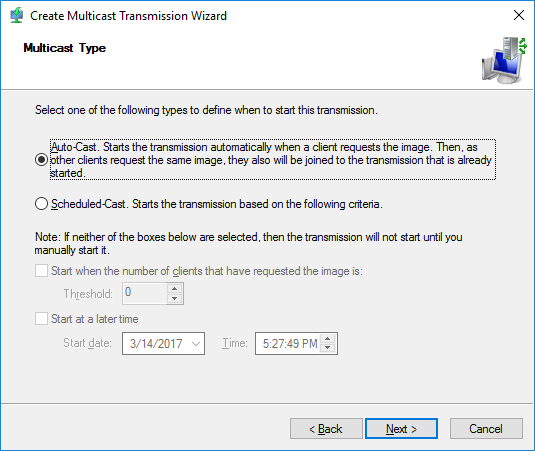
Figure 3-15 Multicast type
The difference between these options is as follows:
Auto-Cast. A transmission starts when a client requests the image. If another client requests the same image, the client joins the existing transmission, caching data from the current transfer and then retrieving data that was transmitted before the client joined the transmission. This is the best option to use when you are performing one-off deployments.
Scheduled-Cast. You choose either to start the transmission when a specified number of clients have joined, or you start the transmission at a particular date and time. Scheduled-Cast is the best option to use when you are deploying the same operating system image to a large number of computers.
To configure a WDS transmission, perform the following steps:
Open the Windows Deployment Services console, expand the WDS server from which you want to perform the deployment, and click Multicast Transmissions. In the Action menu, click Create Multicast Transmission.
Provide a name for the multicast transmission.
On the Image Selection page, specify which operating system image you want to deploy using the transmission.
On the Multicast Type page, specify whether you use Auto-Cast or Scheduled-Cast. If you choose Scheduled-Cast, select the number of clients or the transmission start time.
Driver groups and packages
You can stage device drivers on a WDS server by importing the device driver as a package. A driver package contains the extracted driver files. You can import the driver package into WDS by locating the driver's .inf file. When using the WDS console, you can either import individual driver packages or all the drivers in a set of folders.
In the WDS console, you can organize drivers into driver groups. A driver package can be a member of more than one group, and deleting a driver group does not delete the associated driver packages. You can use driver groups with filters to limit which driver packages are available to WDS clients.