Deployment and configuration
- By Orin Thomas
- 5/26/2020
Answer files
Answer files present a traditional method of performing operating system deployment and configuration. While not as comprehensive as newer technologies such as Desired State Configuration (DSC) that assist not only in deployment but in ongoing configuration, answer files allow you to automate the process of deploying Windows Server.
Instead of having to manually select specific installation options and perform post–installation configuration actions such as joining a newly deployed server to an AD DS domain, you can automate the process with answer files. During setup, the Windows Server looks for a file on local and attached media named Autounattend.xml. If this file is present, Windows Server automatically uses the settings contained in the file to configure the new server deployment.
As its name suggests, Autounattend.xml uses the XML file format. Although it is certainly possible for you to manually edit this XML file using a text editor such as Notepad, this process is complicated, and you are likely to make errors that cause the file to not work. The Windows System Image Manager (known as Windows SIM) is a GUI-based tool that you can use to create an answer file. When using the tool, you must specify the image for which you want to create an answer file. Windows SIM then creates a catalog file for all the options that you can configure. After you configure all the settings that you want automated during installation and post-installation configuration, you can have the tool output an answer file using correct XML syntax. Windows SIM is included with the Windows Assessment and Deployment Kit (Windows ADK), which you can download from the Microsoft website.
To create an answer file using Windows SIM, perform the following steps:
Download and install Windows ADK from the Microsoft website using the installation defaults. You can do this with Chocolatey, covered later in this chapter, by running the following command:
Choco install -y windows-adk-all
Copy the \Sources\install.wim file from the Windows Server installation media to a temporary directory on the computer on which you have installed Windows ADK.
Open Windows SIM from the Start screen.
In the Windows SIM interface, click File, and then choose Select Windows Image. Open the Install.wim file.
Select an operating system image in the install image for which you wish to create an answer file. For example, Figure 3-8 shows the selection of the Standard edition with Desktop Experience operating system.
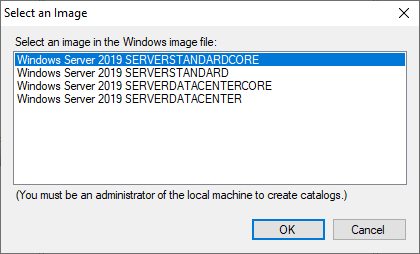
Figure 3-8 Select an image
When prompted to create a catalog file, click Yes.
Click File, New Answer File.
Use Windows SIM to select each component that you want to configure. Figure 3-9 shows how you can configure installation to join the adatum.com domain.
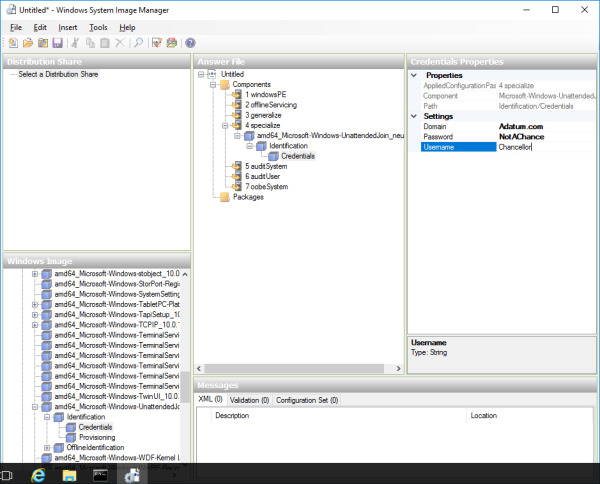
Figure 3-9 Windows System Image Manager
)
)