Deployment and configuration
- By Orin Thomas
- 5/26/2020
Windows images
With Windows images, the entire operating system, as well as associated drivers, updates, and applications, is stored within a single file known as an image file. During installation, this image is applied to the target volume. Windows images use the Windows Imaging (WIM) file format, which has the following benefits:
Multiple deployment methods. You can use a variety of ways to deploy Windows images. While unusual these days, you can deploy .wim files using a traditional DVD-ROM, from a bootable USB drive, from a network share, or through specialized deployment technologies such as Windows Deployment Services (WDS) or System Center Virtual Machine Manager. While it is possible to use System Center Configuration Manager to deploy Windows Server, Configuration Manager is primarily used with client operating systems rather than server operating systems.
Editable. You can mount an image and edit it, enabling, disabling, or removing operating system roles and features as necessary.
Updatable. You can update an image without having to perform an operating system image capture.
The Windows Server 2019 installation media contain two .wim files in the Sources folder: Boot.wim and Install.wim. The installation media uses Boot.wim to load the preinstallation environment that you use to deploy Windows Server 2019. Install.wim stores one or more operating system images. For example, as Figure 3-1 shows, the Install.wim file available with the evaluation version of Windows Server 2019 contains four different editions of Windows Server 2019. Depending on the specifics of the hardware on which you are attempting to install Windows Server, you might need to add extra drivers to the boot.wim file. For example, you will need to add extra drivers if the Windows Server installation routine cannot access the storage device on which you want to install Windows Server because that device’s driver is included in the default boot image.
)
FIGURE 3-1 Windows Server 2019 editions
Modifying Windows images
The Deployment Image Servicing and Management (DISM) tool is a command-line tool that you can use to manage images in an offline state. You can use Dism.exe to perform the following tasks:
Enable or disable roles and features
List roles and features
Add, remove, and list software updates
Add, remove, and list software drivers
Add, remove, and list software packages in .appx format to a Windows image
For example, you can take the Install.wim file from the Windows Server installation media and use Dism.exe to mount that image, add new drivers and recent software updates to that image, and save those changes to an image all without having to perform an actual deployment. The advantage is that when you do use this updated image for deployment, the drivers and updates that you added are already applied to the image and you won’t have to install them as part of your post-installation configuration routine.
You can use the Microsoft Update Catalog (https://catalog.update.microsoft.com) to search for drivers for images that you use with physically deployed servers. This site stores all the certified hardware drivers, software updates, and hotfixes published by Microsoft. Once you download drivers and software updates, you can add them to your existing installation images by using Dism.exe or the appropriate PowerShell cmdlets in the DISM PowerShell module.
Servicing Windows images
As an IT professional responsible for deploying Windows Server, you need to ensure that your deployment images are kept up to date. The latest software updates should be applied to the image, and any new device drivers for commonly used server hardware should be included.
The main goals of an image servicing strategy are the following:
Ensure that the latest software updates and hotfixes are applied to the image before the image is deployed to new servers.
Ensure that the latest drivers are applied to the image before the image is deployed to new servers.
If you don’t take these steps, you’ll have to wait until after you’ve deployed the operating system before you can apply updates and drivers. While Windows Server updates are cumulative now, and you won’t need to spend hours updating an image from RTM, it’s quicker to have the most recent update already applied to the image than it is to wait for the server to deploy, retrieve the latest update, and then wait for it to download and then install. Having updates apply after deployment has occurred consumes a significant amount of time and also substantively increases network traffic. One of your aims when performing a deployment should be to get the server operational and hosting workloads as quickly as possible.
You can use the DISM (Deployment Image Servicing and Management) utility or the associated PowerShell cmdlets in the DISM PowerShell module to service the current operating system in an online state or perform offline servicing of a Windows image.
Servicing images involves performing the following general steps:
Mount the image so that it can be modified.
Service the image.
Commit or discard the changes made to the image.
Mounting images
By mounting an image, you can make changes to that image. When you mount an image, you link it to a folder. You can use File Explorer, Windows PowerShell, or Cmd.exe to navigate the structure of this folder and interact with it as you would any other folder located on the file system. Once the image is mounted, you can also use Dism.exe or PowerShell to perform servicing tasks, such as adding and removing drivers and updates.
A single WIM file can contain multiple operating system images. Each operating system image is assigned an index number, which you need to know before you can mount the image. You can determine the index number using Dism.exe with the /Get-wiminfo switch. For example, if you have an image named Install.wim located in the C:\Images folder, you can use the following command to get a list of the operating system images it contains.
Dism.exe /get-wiminfo /wimfile:c:\images\install.wim
Figure 3-2 shows the result of this command and lists the images contained in Windows Server 2019. The Standard Evaluation Edition of Windows Server 2019 with the Server Core installation option is assigned index identity 1, the Standard Evaluation with Desktop Experience is assigned index identity 2, the Datacenter Evaluation with the Server Core installation option is assigned index identity 3, and the Datacenter Evaluation with Desktop Experience is assigned index identity 4.
)
Figure 3-2 Details of an operating system image
You can accomplish the same task using the Get-WindowsImage PowerShell cmdlet. For example, to view the contents of the image Install.wim in the C:\Images folder, run the following command, as shown in Figure 3-3.
Get-WindowsImage -ImagePath c:\images\install.wim
)
Figure 3-3 Windows image details
Once you have determined which operating system image you want to service, you can use the /Mount-image switch with the Dism.exe command to mount that image. For example, to mount the Standard Edition of Windows Server 2019 from the Install.wim file that is available with the Evaluation Edition in the C:\Mount folder, issue this command:
Dism.exe /mount-image /imagefile:c:\images\install.wim /index:2 /mountdir:c:\mount
Alternatively, you can accomplish the same goal using the following Mount-WindowsImage command:
Mount-WindowsImage -ImagePath c:\images\install.wim -index 2 -path c:\mount
Adding drivers and updates to images
Once you have mounted an image, you can start to service that image. When servicing images used to deploy Windows Server, the most common tasks are adding device drivers and software updates to the image. You can use the /Add-Driver switch with the Dism.exe command to add a driver to a mounted image. When using the switch by itself, you need to specify the location the driver’s .inf file. Rather than adding a driver at a time, you can use the /Recurse option to have all drivers located in a folder and its subfolders added to an image. For example, to add all of the drivers located in and under the C: Drivers folder to the image mounted in the C:\Mount folder, use the following command.
Dism.exe /image:c:\mount /Add-Driver /driver:c:\drivers\ /recurse
Similarly, you could use the Add-WindowsDriver cmdlet to accomplish the same objective by issuing the command:
Add-WindowsDriver -Path c:\mount -Driver c:\drivers -Recurse
You can use the /Get-Driver option to list all drivers that have been added to the image and the /Remove-Driver option to remove a driver from an image. In PowerShell, you use the Get-WindowsDriver cmdlet and the Remove-WindowsDriver cmdlets. You can remove only the drivers that you or someone else has added to an image. You can’t remove any of the drivers that were present in the image when Microsoft published it. You might choose to remove an existing driver if the driver you added in the past has since been updated.
You can use Dism.exe with the /Add-Package switch to add packages that contain updates or packages in .cab or .msu format. Software updates are available from the Microsoft Update Catalog website in .msu format. For example, you can download an update from the Microsoft Update Catalog website named Cumulative Update For Windows Server 2019 for x64-based Systems (KB4505056) to the C:\Updates folder on a computer, as shown in Figure 3-4.
)
Figure 3-4 Downloading a cumulative update
If you mounted a WIM image of the Windows Server 2019 operating system in the C:\Mount folder, you could apply the update to the image by using the command:
Dism.exe /image:c:\mount /Add-Package /PackagePath:"c:\updates\windows10.0-kb4505056-x64_09c6216e684ce667fc0c07cc30e84ef21f04c6f1.msu"
You can accomplish the same thing with the following Add-WindowsPackage command:
Add-WindowsPackage -path c:\mount -packagepath "c:\updates\AMD64-all-windows10.0-kb4505056-x64_09c6216e684ce667fc0c07cc30e84ef21f04c6f1.msu"
Adding roles and features
You can determine which features are available in a mounted operating system image by using the /Get-Features switch. Features include both Windows Server 2019 roles and features. For example, to learn which features are available in the image mounted in the C:\Mount folder, use this command, as shown in Figure 3-5:
Dism.exe /image:c:\mount /Get-Features
)
Figure 3-5 View features
You can enable or disable a specific feature using the /Enable-Feature switch. For example, to enable the NetFx3ServerFeatures feature, which enables the .NET Framework 3.5 server features in an image, use this command.
Dism.exe /image:c:\mount /Enable-Feature /all /FeatureName:NetFx3ServerFeatures
Some features in the Windows Server image are in a state in which they are listed as having their payload removed, which means that the installation files for that feature are not included in the image. If you install a feature that had its payload removed when the operating system was deployed, the operating system can download the files from the Microsoft update servers on the Internet. You can also specify the location of the installation files. The installation files for the features that have had their payload removed in Windows Server are located in the \Sources\sxs folder of the volume in which the installation media is located.
You can add these payload-removed features to an image by using Dism.exe and specifying the source directory. For example, to modify an image mounted in the C:\Mount folder so that the Microsoft .NET Framework 3.5 features are installed and available, issue this command when the installation media is located on volume D, as shown in Figure 3-6:
Dism.exe /image:c:\mount /Enable-Feature /all /FeatureName:NetFx3 /Source:d:\sources\sxs
)
Figure 3-6 Enabling a feature
Committing an image
When you finish servicing an image, you can save your changes using the /Unmount-Wim switch with the /Commit option. You can discard changes using the /Discard option. For example, to make changes and then commit the image mounted in the C:\Mount folder, use this command.
Dism.exe /Unmount-Wim /MountDir:c:\mount /commit
You can use the Save-WindowsImage PowerShell cmdlet to save changes to an image without dismounting the image. You use the Dismount-WimImage cmdlet with the Save parameter to save the modifications that you’ve made to an image and then dismount it. For example, to dismount and save the image mounted in the C:\Mount folder, run the command:
Dismount-WimImage -Path c:\mount -Save
Once you have committed the changes, the .wim file that you originally mounted is updated with these modifications. You can then import this .wim file into WDS, use it to build a virtual hard disk, or use it with bootable USB installation media to deploy Windows Server 2019 with these updates and modifications already applied.
Build and capture
When you perform a build and capture, you deploy an operating system; provision that operating system with updates, applications, and drivers; and then capture that operating system for deployment. Build and capture is used less often with server operating systems because they rarely require the same sort of application deployment that is required for client operating systems. If you can just pull a container with an updated application down onto an operating system after deployment, there is little reason to include it in the image. Additionally, with tools such as Desired State Configuration, Chef, and Puppet, many post-installation and configuration tasks can be completely automated, reducing the hassle of post-installation configuration.
If your deployment strategy does involve the deployment and capture of Windows Server 2019, you need to remember that you’ll need to generalize the image prior to capture, removing any configuration information that is specific to the installation. You can perform this task using the Sysprep.exe utility. Sysprep.exe is included with Windows Server 2019 and is located in the C:\Windows\System32\Sysprep folder. When you use Sysprep.exe to prepare the image, you can configure the image to return to the system Out-of-Box Experience (OOBE), as shown in Figure 3-7. This is the same experience you get when Windows Server boots for the first time, though in this case all the updates, applications, and drivers included in the captured image are included in the newly deployed image.
)
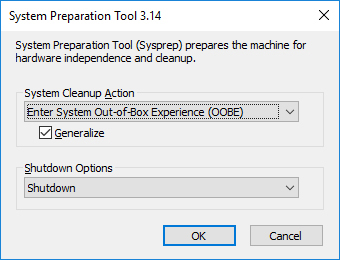
Figure 3-7 Sysprep
You can use Dism.exe with the /Capture-Image switch or the New-WindowsImage PowerShell cmdlet to capture an image.