Objective group 2. Insert and format text, paragraphs, and sections
- By Joan Lambert
- 5/26/2020
- Objective 2.1: Insert text and paragraphs
- Objective 2.2: Format text and paragraphs
- Objective 2.3: Create and configure document sections
Objective 2.3: Create and configure document sections
The skills being tested by this objective are those related to controlling the layout of document content on pages by inserting custom page breaks, creating document sections that display content differently from the main document, and laying out the content of a document or section in columns.
You can format text in multiple columns, and manually divide a document into pages or sections. When you define sections, you can set up the pages of each section differently from other sections of the document.
)
Display content in columns
By default, Word 2019 displays the content of a document in one column that spans the width of the page between the left and right margins. You can choose to display content in two or more columns to create layouts like those used in newspapers and magazines.
You can format an entire document or a section of a document in columns. When you select part of a document and format it in columns, Word inserts section breaks at the beginning and end of the selection to delineate the area in which the columnar formatting is applied. Content fills the first column on each page and then moves to the top of the next column. When all the columns on one page are full, the content moves to the next page. You can insert column breaks to specify where you want to end one column and start another. Section breaks and column breaks are visible when you display formatting marks in the document.
)
When dividing text into columns, you can choose one, two, or three columns of equal width or two columns of unequal width. If the standard options don’t suit your needs, you can specify the number and width of columns. The number of columns is limited by the width and margins of the page. Each column must be at least a half inch (or 1.27 centimeter) wide.
When you format selected content to display columns, Word automatically inserts section breaks before and after the selected content. (If you format an entire document in columns, no section breaks are inserted.)
To format selected text into simple columns
 On the Layout tab, in the Page Setup group, click the Columns button, and then click the standard column configuration you want.
To manually break column content
 Position the cursor where you want to insert the column break, and then do either of the following:
On the Layout tab, in the Page Setup group, click the Breaks button, and then in the Page Breaks section, click Column.
Press Ctrl+Shift+Enter.
To format all or part of a document in built-in column configurations
Do either of the following:
To format all of the document content in columns, position the cursor anywhere in the document, but do not select content.
To format part of the document content in columns, select the contiguous content.
On the Layout tab, in the Page Setup group, click the Columns button, and then do either of the following:
To format the content in columns of equal width, click Two or Three (specifying the number of columns).
To format the content into one narrow and one wide column, click Left or Right (specifying the location of the narrow column).
To format content in a preset column configuration
Select the contiguous content you want to format in columns, or to format the entire document, position the cursor in the document without selecting content.
On the Layout tab, in the Page Setup group, click the Columns button, and then click More Columns.
In the Columns dialog box, do the following, and then click OK:
In the Number of columns box, enter or select the number of columns (up to 16) that you want to configure.
Clear the Equal column width check box.
In the Width and spacing area, set the width of each nonstandard column and the space between it and the next column. Word automatically updates the width and spacing of other columns to equal the total available space.
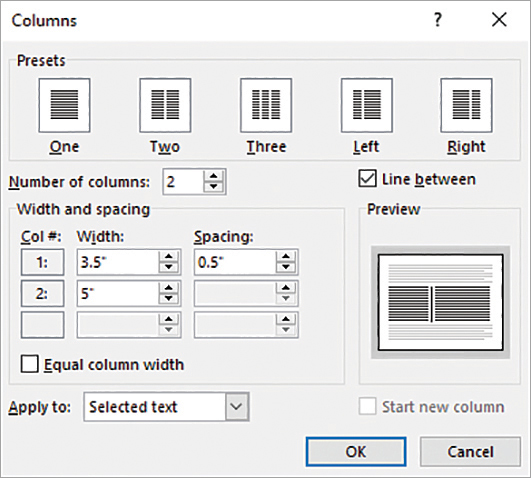
Configure content in up to 16 columns
To display lines between columns
- In the Columns dialog box, select the Line between check box.
To insert a manual column break
- Position the cursor to the left of the text that you want to start the next column, and then do either of the following:
On the Layout tab, in the Page Setup group, click the Breaks button, and then click Column.
Press Ctrl+Shift+Enter.
To revert content to a single column
- Position the cursor in the columnar section, and then do any of the following:
On the Layout tab, in the Page Setup group, click the Columns button, and then click One.
Open the Columns dialog box. In the Presets area, click One. Then click OK.
Delete the section break that defines the columnar section.
Define document pages and sections
When the content of a document exceeds the amount that will fit within the margins of a single page, Word creates a new page by inserting a soft page break (a page break that moves if the preceding content changes). If you want to break a page in a place other than where Word would normally break it, you can insert a manual page break. The content after the page break moves to the top of the next page.
If you want to control the page layout more specifically, you can insert a section break. Section breaks have two purposes:
They can act as a “smart” page break and move the following content to the next page, the next even page, or the next odd page.
They can fence off a portion of document content that you want to format differently from other content.
You divide a document into sections by inserting a section break at the beginning of each new section. (It is not necessary to have a section break at the beginning or end of a document.) You can choose from three types of section breaks:
Continuous starts the new section on the same page.
Next Page breaks the page before beginning the new section.
Even Page begins the new section at the top of the next even-numbered page.
Odd Page begins the new section at the top of the next odd-numbered page.
For each section, you can configure independent page setup options, including:
Margins
Pages to print per sheet
Line numbers
Orientation
Headers and footers
Borders
Paper size
Vertical alignment
Shading
You can also format the content within a section into columns, as discussed in the previous topic of this section.
A common use of section breaks is to set off content that you want to orient vertically on a page from content that you want to orient horizontally so that a single document can include both portrait and landscape pages.
Page and section breaks are visible in a document when paragraph and other formatting marks are shown. When working in a document that includes breaks, display the formatting marks for two reasons: so you don’t accidentally move or delete page, column, or section breaks, and so you can locate the breaks if you want to move or delete them.
When displaying formatting marks, all types of manually placed breaks are shown. Page breaks are represented by dotted lines, section breaks by double-dotted lines, and column breaks by double-spaced dotted lines. Each type of break also has a text label.
)
If you want a paragraph of text to start a new page regardless of other changes in the document content, you can configure the paragraph formatting to include a page break. When you use this method, the page break is not shown with the formatting marks.
To divide a document into sections
Position the cursor at the beginning of the content with which you want to start the new section.
On the Layout tab, in the Page Setup group, click the Breaks button.
On the Breaks menu, in the Section Breaks section, click Next Page, Continuous, Even Page, or Odd Page to define the starting page of the new section.
To insert a manual page break
Position the cursor to the left of the content that you want to start the new page.
Do any of the following:
On the Insert tab, in the Pages group, click the Page Break button.
On the Layout tab, in the Page Setup group, click the Breaks button, and then in the list, click Page.
Press Ctrl+Enter.
To open the Paragraph dialog box
- On the Home tab, in the Paragraph group, click the dialog box launcher.
To force a page break before a specific paragraph
Position the cursor anywhere in the paragraph.
Open the Paragraph dialog box, and display the Line and Page Breaks tab.
In the Pagination area, select the Page break before check box. Then click OK.
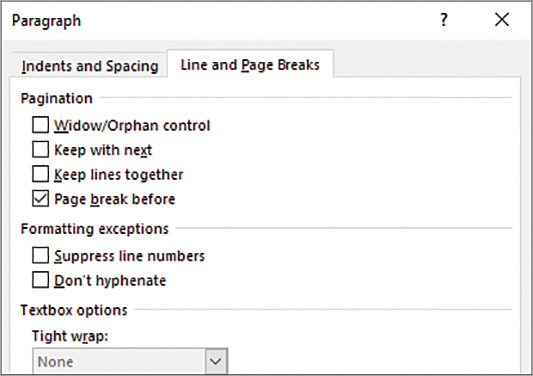
You can configure a page break as part of the paragraph formatting
To insert a section break
- On the Layout tab, in the Page Setup group, click the Breaks button, and then in the Section Breaks section, click one of the following:
To create a section that does not affect page breaks, click Continuous.
To create a section that starts content on the next page, click Next Page.
To create a section that starts content on the next even-numbered page, click Even Page.
To create a section that starts content on the next odd-numbered page, click Odd Page.
To specify different settings for a document section
- Position the cursor anywhere in the section you want to format, and then do either of the following:
On the Layout tab, in the Page Setup group, change the Margins, Orientation, Size, Columns, Line Numbers, or Hyphenation setting. The change will apply to the current section only.
Open the Page Setup dialog box. On the Margins, Paper, and Layout tabs, configure the settings that you want to change for the current section. In the Apply to list, click This section. Then click OK.

This Section appears in the Apply To list only when the document contains multiple sections
To display formatting marks (including page, section, and column breaks)
- On the Home tab, in the Paragraph group, click the Show/Hide ¶ button.
- Press Ctrl+Shift+8 (Ctrl+*).
To remove a manual page break or section break
Display formatting marks.
Do any of the following:
Click in the left margin to select the page break or section break paragraph.
Drag to select the page break or section break marker.
Position the cursor to the left of the page break or section break marker.
Press Delete.
OBJECTIVE 2.3 PRACTICE TASKS
The practice file for these tasks is in the MOSWord2019\Objective2 practice file folder. The folder also contains a result file that you can use to check your work.
- Open the Word_2-3 document, and do the following:
 Near the beginning of the document, insert a page break before the Process heading.
- Select the Questions for Team Leaders and Questions for Department Reps headings and the lists that follow them. Format the selection in two columns of equal width. Set the space between the columns to 0.3" and place a vertical line between the columns.
- If necessary, insert a column break before the Questions for Department Reps heading so that each list is in its own column.
- In the Pre-Plan Project section, select the heading, the paragraph, and the list items. Format each of the selected paragraphs to stay on the same page as the paragraph that follows it, and to keep all the lines of each paragraph together.
- Near the end of the document, locate the Carry out project section. Create a separate document section that contains only the content of the Carry out project section, on its own page. For only this section, set the orientation to Landscape and all four margins to 2".
- Preview the document on the Print page of the Backstage view to verify the changes.
- Save the Word_2-3 document. Open the Word_2-3_results document and compare the two documents to check your work. Then close the open documents.