Create and modify tables
- By Paul McFedries
- 6/13/2020
In this sample chapter from MOS Study Guide for Microsoft Access Expert Exam MO-500, you will review methods for importing data into tables, managing tables and records in tables, and creating and modifying fields.
Objective 2.1: Create tables
If the data you want to work with resides in an external data source—usually a local file, a remote file (on a network or on the Internet), or data on a server—you need to import it into Access. Depending on the type of data source you are using, Access gives you one or more of the following choices for importing the data:
Import the source data into a new table in the current database. Access either creates a new table to hold the data or replaces any data in an existing table. No link is maintained with the original data.
Append a copy of the records to an existing table. Access adds the source data to the existing table. If the table does not exist, Access creates it. No link is maintained with the original data.
Link to the data source by creating a linked table. Access adds the source data to the new table. A link is maintained with the original data, so if that data changes, the changes are reflected in the Access version of the data.
)
Access 365 and Access 2019 support a number of external data sources, including the following: Excel workbooks, HTML documents, XML files, text files, Access databases, and Outlook folders.
Import data into a new table
When you import data from Excel into a new table, the Import Spreadsheet Wizard prompts you for information to complete the operation. The wizard first prompts you for the worksheet or the named range you want to import. You can view the sample data that the wizard displays from the worksheet, but you cannot modify it. Access can use the column headings in the worksheet as field names in the database. You can also specify each field’s data type and whether Access should index the field. The wizard’s fourth page provides options for setting the table’s primary key. Access can create an ID field in the table to use as the primary key, or you can select a primary key field or use no primary key in the new table.
)
You can import data from a text file that uses the .txt, .csv, .tab, or .asc file name extension. When you import data from a text file, you work with the Import Text Wizard. In the wizard, you first need to specify whether a character separates the fields of data in the text file (a delimited text file) or whether the data is arranged in fixed-width columns. For delimited text files, you must specify which character is used as the delimiter; for fixed-width files, you indicate where column breaks should occur.
The later pages of the Import Text Wizard are similar to those you work with in the Import Spreadsheet Wizard. You can name fields, specify a data type, indicate whether the field should be indexed, and skip a specific field. The wizard also prompts you to set up a primary key for the table.
Three of the other formats you can import are as follows:
HTML documents Data is often available in documents created using HTML (Hypertext Markup Language), which is the language used to build web pages. Although this data is usually text, some HTML data comes either as a table (a rectangular array of rows and columns) or as preformatted text (text that has been structured with a predefined spacing used to organize data into columns with fixed widths). Both types are suitable for import into Access so that you can perform more extensive data analysis. To import HTML document data, the file must reside on your computer or on your network.
XML files Access uses the structure of the XML file to determine table names and fields. Import options include Structure Only, Structure And Data, and Append Data To Existing Table(s).
Outlook folders Importing a contacts or tasks folder from Outlook is an effective way to add this information to a database. Access runs the Import Exchange/Outlook Wizard when you import data from Outlook. The wizard prompts you to provide field names, specify data types, and set up indexes. You can skip fields if you don’t want to import them.
To import Excel data into a table
On the External Data tab, in the Import & Link group, click New Data Source, click From File, and then click Excel.
In the Get External Data – Excel Spreadsheet dialog box, click Import The Source Data Into A New Table In The Current Database, click Browse to locate the source file, and then click OK.
In the Import Spreadsheet Wizard, select the data you want to import, then click Next:
To import the data from a worksheet, select Show Worksheets, then click the worksheet name.
To import the data from a named range, select Show Named Ranges, then click the range name.
If the first row of the Excel data contains headings and you want Access to use those headings as the field names for the new table, select the First Row Contains Column Headings check box, then click Next.
On the next Import Spreadsheet Wizard page, click the field you want to work with, then edit the field name, select the data type, and specify whether you want the field indexed. Alternatively, you can select the Do Not Import (Skip) check box to tell Access to skip the field when importing the data.
Repeat step 5 for each field, then click Next.
On the next Import Spreadsheet Wizard page, select a primary key option, then click Next:
Let Access Add Primary Key Select this option to have Access create a new field named ID that acts as the primary key by using the AutoNumber data type.
Choose My Own Primary Key Select this option, then use the associated list to select the field you want to use as the primary key. Note that the field you choose must contain unique entries.
No Primary Key Select this option to skip adding a primary key to the new table.
On the final Import Spreadsheet Wizard page, type a name for your new table, then click Finish to return to the Get External Data – Excel Spreadsheet dialog box.
If you want to save the steps in this operation, select Save Import Steps, then click Save Import; otherwise, click Close.
To import HTML document data into a table
On the External Data tab, in the Import & Link group, click New Data Source, click From File, and then click HTML Document.
In the Get External Data – HTML Document dialog box, click Import The Source Data Into A New Table In The Current Database, click Browse to locate the source file, and then click OK.
In the Import HTML Wizard, if the first row of the HTML data contains headings and you want Access to use those headings as the field names for the new table, select the First Row Contains Column Headings check box, then click Next.
On the next Import HTML Wizard page, click the field you want to work with, then edit the field name, select the data type, and specify whether you want the field indexed. Alternatively, you can select the Do Not Import (Skip) check box to tell Access to skip the field when importing the data.
Repeat step 4 for each field, then click Next.
On the next Import HTML Wizard page, select a primary key option, then click Next:
Let Access Add Primary Key Select this option to have Access create a new field named ID that acts as the primary key by using the AutoNumber data type.
Choose My Own Primary Key Select this option and then use the associated list to select the field you want to use as the primary key. Note that the field you choose must contain unique entries.
No Primary Key Select this option to skip adding a primary key to the new table.
On the final Import HTML Wizard page, type a name for your new table, then click Finish to return to the Get External Data – HTML Document dialog box.
If you want to save the steps in this operation, select Save Import Steps, then click Save Import; otherwise, click Close.
To import XML data into a table
On the External Data tab, in the Import & Link group, click New Data Source, click From File, and then click XML File.
In the Get External Data – XML File dialog box, click Browse to locate the source file, then click OK.
In the Import XML dialog box, in the Import Options group, select how you want the XML data imported, then click OK:
Structure Only Select this option to import just the field names.
Structure and Data Select this option to import both the field name and the data.
Append Data to Existing Table(s) Select this option to add the data to an existing table (or tables, if the XML file contains multiple tables).
If you want to save the steps in this operation, select Save Import Steps, then click Save Import; otherwise, click Close.
To import text data into a table
On the External Data tab, in the Import & Link group, click New Data Source, click From File, and then click Text File.
In the Get External Data – Text File dialog box, click Import The Source Data Into A New Table In The Current Database, click Browse to locate the source file, and then click OK. The Import Text Wizard appears.
Select the type of text file you’re importing:
Delimited Select this option if your text file uses a character (such as a comma) to separate each field, then click Next. Select the option that represents the character used in the source data to separate the fields (or select Other and then type the character in the text box). If the first row of the text data contains headings and you want Access to use those headings as the field names for the new table, select the First Row Contains Column Headings check box. Click Next.
Fixed Width Select this option if your text file uses a set width for each column of data, then click Next. Use the next Import Text Wizard page to adjust the column breaks as needed, then click Next.
On the next Import Text Wizard page, click the field you want to work with, then edit the field name, select the data type, and specify whether you want the field indexed. Alternatively, you can select the Do Not Import (Skip) check box to tell Access to skip the field when importing the data.
Repeat step 4 for each field, then click Next.
On the next Import Text Wizard page, select a primary key option, then click Next:
Let Access Add Primary Key Select this option to have Access create a new field named ID that acts as the primary key by using the AutoNumber data type.
Choose My Own Primary Key Select this option and then use the associated list to select the field you want to use as the primary key. Note that the field you choose must contain unique entries.
No Primary Key Select this option to skip adding a primary key to the new table.
On the final Import Text Wizard page, type a name for your new table, then click Finish to return to the Get External Data – Text File dialog box.
If you want to save the steps in this operation, select Save Import Steps, then click Save Import; otherwise, click Close.
To import Outlook folder data into a table
On the External Data tab, in the Import & Link group, click New Data Source, click From Other Sources, and then click Outlook Folder.
In the Get External Data – Outlook Folder dialog box, click Import The Source Data Into A New Table In The Current Database, then click OK.
In the Import Exchange/Outlook Wizard, select the data you want to import, then click Next.
On the next Import Exchange/Outlook Wizard page, click the field you want to work with, then edit the field name, select the data type, and specify whether you want the field indexed. Alternatively, you can select the Do Not Import (Skip) check box to tell Access to skip the field when importing the data.
Repeat step 4 for each field, then click Next.
On the next Import Exchange/Outlook Wizard page, select a primary key option, then click Next:
Let Access Add Primary Key Select this option to have Access create a new field named ID that acts as the primary key by using the AutoNumber data type.
Choose My Own Primary Key Select this option and then use the associated list to select the field you want to use as the primary key. Note that the field you choose must contain unique entries.
No Primary Key Select this option to skip adding a primary key to the new table.
On the final Import Exchange/Outlook Wizard page, type a name for your new table, then click Finish to return to the Get External Data – Outlook Folder dialog box.
If you want to save the steps in this operation, select Save Import Steps, then click Save Import; otherwise, click Close.
Append records from external data
When you import data from an Excel spreadsheet, an HTML document, a text file, or an Outlook folder, you can choose an option to append records to an existing table. Access adds the records in the source data to the table you specify. The steps for importing the data are then essentially the same as when you import data into a new table.
To avoid errors when you append data, make sure that the external data source organization matches the structure of the table you are appending records to. For example, in an Excel worksheet that does not include column headings, the position and the type of data need to match the field order and data types in the destination table. When column headings are present, the name and data type for each column must match the corresponding fields (although the order of the columns and fields do not have to match). Also, check whether the source data contains any fields not included in the table. If the source data does contain other fields, you should add these fields to the destination table or specify to skip them for the import process. The destination table can include fields that are not defined in the source data, provided those fields have their Required property set to No and the fields do not contain any validation rules that prohibit null values.
The source data must include data that is compatible with the table’s primary key, and the data in that column must be unique. You receive an import error message if a primary key value in the source data matches one already defined in the destination table. Also, if the Indexed property of any field in the destination table is set to Yes (No Duplicates), the source data must include unique values for that field.
To append records to a table in the current database
On the External Data tab, in the Import & Link group, click New Data Source, then click one of the following data sources:
From File, and then Excel
From File, and then HTML Document
From File, and then Text File
From Other Sources, and then Outlook Folder
In the Get External Data dialog box, do the following:
Click Browse to open the File Open dialog box. Locate and select the source file, then click Open.
Click Append ACopy Of The Records To The Table, and then in the adjacent list, select the table you want to append records to.
Click OK.
Follow the steps in the import wizard (if Access provides one) to import and append the data.
In the Get External Data dialog box, do the following:
If you want to save the steps of the operation for reuse, select the Save Import Steps check box and provide a name and optional description for the steps.
Click Close.
)
Create linked tables from external sources
With linked tables, you can include in your database information that’s stored in an external data source. You can create a linked table that’s based on an Excel worksheet, a text file, or one of the other external data formats that Access supports. Linking to an Excel worksheet or a text file, for example, creates a one-way link. You can read the data in Access, but you cannot insert or update records—the data is maintained only in the external data source. However, you can link to tables in another Access database and work with those tables in many of the same ways you work with tables in your database. You can add and update records in a table linked to another Access database, but you can’t change the table’s design. To modify the design, open the table in the source database.
Access adds an entry for a linked table to the Navigation Pane, displaying an icon that identifies the type of data source. The icon includes a small arrow to indicate that the table is a linked table.
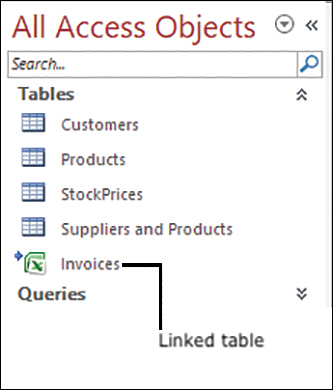
Linked tables are identified in the Navigation Pane.
When you link to an Excel worksheet or a text file to create a table, Access provides a wizard (the Link Text Wizard, for example) that functions much like the wizards you follow to import data into a new table.
If you link to an Access database or to another external data source that is protected with a password, you must provide the password to link successfully. Access can save the password so that you don’t need to provide it each time you open the external table. Because Access saves this information, you might want to encrypt your database.
If a source file you have linked to is moved to a different location, you can update the link by using the Linked Table Manager dialog box, which lists each table linked to in the current database.
To link to a table in another Access database
On the External Data tab, in the Import & Link group, click New Data Source, click From Database, and then click Access.
In the Get External Data – Access Database dialog box, do the following:
Click Browse to open the File Open dialog box. Locate and select the source database, then click Open.
Click Link To The Data Source By Creating ALinked Table.
Click OK to open the Link Tables dialog box.
In the Link Tables dialog box, select the table or tables you want to link to, then click OK.
To link to a text file
On the External Data tab, in the Import & Link group, click New Data Source, click From File, and then click Text File.
In the Get External Data – Text File dialog box, do the following:
Click Browse to open the File Open dialog box. Locate and select the source file, then click Open.
Click Link To The Data Source By Creating ALinked Table.
Click OK to start the Link Text Wizard.
In the Link Text Wizard, do the following:
On the wizard’s first page, specify the format of the text file (Delimited or Fixed Width), then click Next.
Choose the delimiting character or specify column breaks (depending on the format).
Select First Row Contains Field Names if this option applies.
Click Next to work through the remaining pages to set field options.
Enter a name for the linked table, then click Finish.
In the Link Text Wizard message box that confirms the table was linked, click OK.
To link to an Excel worksheet or named range
On the External Data tab, in the Import & Link group, click New Data Source, click From File, and then click Excel.
In the Get External Data – Excel Spreadsheet dialog box, do the following:
Click Browse to open the File Open dialog box. Locate and select the source workbook, then click Open.
Click Link To The Data Source By Creating ALinked Table.
Click OK to start the Link Spreadsheet Wizard.
In the Link Spreadsheet Wizard, do the following:
On the wizard’s first page, select the worksheet or named range that contains the data you want to link to, then click Next.
Specify whether the first row of the data includes column headings, then click Next.
Enter a name for the linked table, then click Finish.
In the Link Spreadsheet Wizard message box that confirms the table was linked, click OK.
To manage linked tables
On the External Data tab, in the Import & Link group, click Linked Table Manager.
In the Linked Table Manager dialog box, select the check box for the table or tables whose links you want to update, then click OK.
If the source file is not in the original location, Access opens the Select New Location dialog box. In this dialog box, navigate to the new location for the file, select the file, and then click Open.
In the Linked Table Manager message box, click OK.
Import tables from other databases
You can import tables from other database files or database management systems. In this section, you learn how to import one or more tables from three common types of databases:
SQL Server This robust and powerful server-based database management system is designed to handle massive amounts of data. To access a SQL Server instance, you need to know the login ID and password to connect to the SQL Server data source.
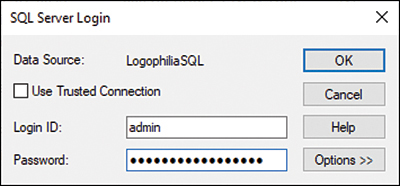
You must log in to access an SQL Server database.
Azure Database This online database management system runs inside an Azure instance in Microsoft’s cloud.
dBASE This is a DBF file that you import from a local or network location.
To import one or more tables from an SQL Server database
On the External Data tab, in the Import & Link group, click New Data Source, click From Database, and then click From SQL Server.
In the Get External Data – ODBC Database dialog box, click Import The Source Data Into A New Table In The Current Database, then click OK. Access opens the Select Data Source dialog box.
On the Machine Data Source tab, click the SQL Server data source, then click OK. The SQL Server Login dialog box appears.
Type the login ID and password required to log in to the SQL Server, then click OK. Access displays the Import Objects dialog box.

Use the Import Objects dialog box to select the table or tables you want to import.
In the Tables list, click each table you want to import, and click OK. Access imports the data and returns you to the Get External Data – ODBC Database dialog box.
If you want to save the steps in this operation, select Save Import Steps, then click Save Import; otherwise, click Close.
To import one or more tables from an Azure database
On the External Data tab, in the Import & Link group, click New Data Source, click From Database, and then click From Azure Database.
In the Get External Data – ODBC Database dialog box, click Import The Source Data Into A New Table In The Current Database, then click OK. Access opens the Select Data Source dialog box.
On the Machine Data Source tab, click the Azure database data source, then click OK. Access prompts you to log in to the database.
Type the login ID and password required to log in to the Azure database, then click OK. Access displays the Import Objects dialog box.
In the Tables list, click each table you want to import, then click OK. Access imports the data and returns you to the Get External Data – ODBC Database dialog box.
If you want to save the steps in this operation, select Save Import Steps, then click Save Import; otherwise, click Close.
To import a table from a dBASE file
On the External Data tab, in the Import & Link group, click New Data Source, click From Database, and then click dBASE File.
In the Get External Data – dBASE File dialog box, click Browse to display the File Open dialog box, click the dBASE file you want to import, and then click Open.
Click Import The Source Data Into A New Table In The Current Database, then click OK. Access imports the data.
If you want to save the steps in this operation, select Save Import Steps, then click Save Import; otherwise, click Close.
OBJECTIVE 2.1 PRACTICE TASKS
The practice files for these tasks are located in the MOSAccessExpert2019\Objective2 practice file folder. The folder also contains a result file that you can use to check your work.
 In the AccessExpert_2-1 database, do the following:
 If the Info bar appears, click the Enable Content button.
- Import the Customers Table worksheet from the AccessExpert_2-1 workbook (.xlsx) located in the practice file folder to create a new table in the database, using the worksheet’s column headings. Skip importing the Fax field. Use the CustomerID field as the primary key. Name the table Customers.
- Import the table from the AccessExpert_2-1 HTML document (.html) located in the practice file folder to create a new table in the database, using the table’s column headings. Let Access create the primary key. Name the table Products.
- Import the structure and data of the Suppliers table from the AccessExpert_2-1 XML document (.xml) located in the practice file folder to create a new table in the database.
- Import the AccessExpert_2-1 text file (.csv) located in the practice file folder and append the data to the existing Orders table in the database. Import the text as a comma-delimited file using the text file’s column headings. Use the OrderID field as the primary key.
- Import the AccessExpert_2-1 text file (.txt) located in the practice file folder to create a linked table in the database. Import the text as a fixed-width file using the text file’s column headings. Name the first field Currency, the second field Per $US, and the third field To $US. Name the table Exchange Rates.
- Open the AccessExpert_2-1 text file (.txt) located in the practice file folder. In the second column of the Argentine Peso record, change the value 8.77 to 8.57. Save and close the text file, then update the Exchange Rates table to incorporate the changed value.
- Open the AccessExpert_2-1_results database. Compare the two databases to check your work. Then close the open databases.