Manage and Format Data in Excel
- By Paul McFedries
- 3/10/2020
- Objective 2.1: Fill cells based on existing data
- Objective 2.2: Format and validate data
The skills tested in this section of the Microsoft Office Specialist Expert exam for Microsoft Excel 2019 relate to filling cells with data, creating custom number formats, performing data validation, grouping data, inserting subtotals, removing duplicate records, and applying and managing conditional formatting rules. Specifically, the following objectives are associated with this set of skills:
2.1 Fill cells based on existing data
2.2 Format and validate data
2.3 Apply advanced conditional formatting and filtering
Many worksheets are drab, lifeless conglomerations of numbers, formulas, and text. If you’ll be sharing your worksheets with other people, your numbers will have much more impact and will be more easily understood if they’re pleasingly formatted and presented in a way that aids comprehension.
This chapter guides you in studying methods for using Flash Fill and advanced Fill Series options; creating custom number formats; configuring data validation; grouping and ungrouping data; inserting totals and subtotals; removing duplicate records from a table; and creating and managing conditional formatting rules.
Objective 2.1: Fill cells based on existing data
Fill cells by using Flash Fill
If you have inherited workbooks from someone else or if you have imported data from external data sources, you have probably come across data that was either structured or formatted (or both) in such a way that it was either difficult to read or difficult to work with. It could be mainframe data that arrives as all-uppercase letters, dates that appear in non-date formats, phone numbers that don’t have dashes or parentheses, or fields that combine multiple pieces of data (such as first names and last names).
One way to tackle such data is to reenter it by hand in the structure or format you prefer or require. That works for a few records, but it gets tedious and time-consuming for dozens of records, and it becomes unworkable for hundreds or thousands of records.
Fortunately, creating your preferred data from existing data can often be done with only minimal work thanks to an Excel feature called Flash Fill. Given a column of original data, if you use the first cell in the next column to enter the corrected data (which could be data extracted from the original cell or the same data formatted in a different way), select the second cell, then run the Flash Fill command, Excel “recognizes” what you’re doing and automatically fills in the rest of the column with the corrected data.
Let’s look at a few examples:
Column A contains a list of all-uppercase company names. In column B, I use cell B2 to type the title-case version of the text in cell A2 and then select cell B3. After I run the Flash Fill command, Excel recognizes the pattern and fills in the rest of the column with title-case versions of all the other cells in column A.
Column A contains a list of full names, where each cell contains the first name, middle initial, and last name. In cells B2, C2, and D2, I typed the first name, middle initial, and last name, respectively, from cell A2. When I select cell B3 and run Flash Fill, Excel recognizes the pattern and fills in the rest of the first names; similarly, selecting C3 and running Flash Fill adds the middle initials, and selecting D3 and running Flash Fill adds the last names.
Column A contains a list of phone numbers without any parentheses or dashes. In cell B2, I typed the phone number from cell A2 and added the parentheses and dash. When I select cell B3 and run Flash Fill, Excel recognizes the pattern and fills the rest of the column with the formatted phone numbers.
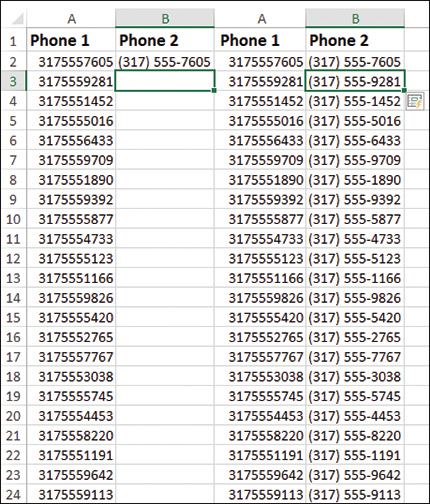
You can use Flash Fill to add characters (right) to plain phone numbers (left).
)
)
To fill cells by using Flash Fill
➜ Type the first value you want in the first cell of the new column, select the second cell in the new column, and then on the Data tab, in the Data Tools group, click Flash Fill. Alternatively, on the Home tab, in the Editing group, click Fill, then click Flash Fill.
Or,
➜ Type the first value you want in the first cell of the new column. Starting in the second cell of the new column, drag the Fill handle through all the cells in the new column that you want to fill, click Auto Fill Options, and then click Flash Fill.
Fill cells by using advanced Fill Series options
Worksheets often use text series (such as January, February, March; or Sunday, Monday, Tuesday) and numeric series (such as 1, 3, 5; or 2021, 2020, 2019). Instead of entering these series manually, you can create them automatically by using the Auto Fill feature. That is, you enter and select the first couple of values in the series, drag the fill handle over the range you want to fill, and then click Fill Series in the AutoFill Options list.
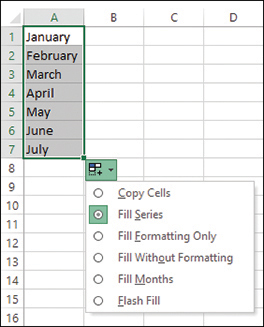
You can use the fill handle and the Fill Series option to extend an existing series.
Instead of using the fill handle to create a series, you can use the Series command to gain more control over the process. By using the Series command, you can specify a direction for the fill (rows or columns); a step value (the value by which each item in the series is changed to produce the next item); a stop value (the value at which Excel should terminate the series); whether you want the series to extend the trend of the initial values; the date units (such as day or month) for a date series; and the series type, which can be one of the following four values:
Linear This option finds the next series value by adding the step value to (or subtracting the step value from) the preceding value in the series.
Growth This option finds the next series value by multiplying the preceding value by the step value.
Date This option creates a series of dates based on the option you select in the Date Unit group (Day, Weekday, Month, or Year).
AutoFill This option works much like the fill handle. You can use it to extend a numeric pattern or a text series (for example, Qtr1, Qtr2, Qtr3).
To fill cells by using the Fill Series command
Enter the starting value in the first cell you want to use for the series. If you want to create a series out of a particular pattern (such as 2, 4, 6, and so on), fill in enough cells to define the pattern.
Select the entire range you want to fill.
On the Home tab, in the Editing group, click Fill, then click Series to open the Series dialog box.
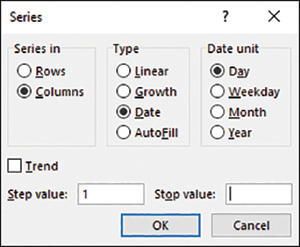
In the Series dialog box, specify the type of series you want to use to fill the cells.
Do either of the following to create the series, starting from the active cell:
Click Rows to create the series in rows.
Click Columns to create the series in columns.
In the Type group, click the type of series you want.
Do any of the following:
If you selected the Date type, click an option in the Date unit group.
If you selected the Linear or Growth type and want to extend a series trend, select the Trend check box.
If you selected a Linear, Growth, or Date series type, enter a number in the Step value box. This number is what Excel uses to generate the next value in the series.
To place a limit on the series, enter a number in the Stop value box.
Click OK to fill in the series and return to the worksheet.