Deploy and Update Operating Systems
- By Andrew Bettany and Andrew Warren
- 8/13/2019
- Skill 1.1: Plan and implement Windows 10 by using dynamic deployment
- Skill 1.2: Plan and implement Windows 10 by using Windows Autopilot
Skill 1.2: Plan and implement Windows 10 by using Windows Autopilot
Within a domain-based environment, deploying new devices to users has become increasingly complex. There are many “moving” parts and components, and each one needs to work precisely to ensure devices are compliant, secure, and usable. This is partly due to the granular nature of the tooling used to ensure that devices comply with strict organizational security requirements. Windows Autopilot is a solution that radically changes this approach while allowing IT administrators to deploy secure and compliant devices.
You need to understand how to plan and implement Windows 10 within an organization using Windows Autopilot. This skill explores the planning, example scenarios, and installation requirements for the application of Windows Autopilot.
Evaluate and select an appropriate deployment option
Windows Autopilot offers a new method of provisioning Windows 10 within an enterprise. Of course, it is not the only deployment choice, and indeed, there will be scenarios in which using Autopilot would be folly.
You need to explore each of the available deployment options. These options include technology such as MDT or Configuration Manager that may be currently used within your organization. Other methods, such as using Windows Autopilot or Microsoft Intune, may be worth employing to achieve your Windows 10 deployment goals.
Listed in Table 1-5 are many different methods that you can use to deploy and configure Windows 10. You need to understand when to use each deployment method.
Table 1-5 Methods for Deploying and Configuring Windows 10
Method |
Description |
|---|---|
Windows Autopilot |
Transform an existing Windows 10 installation, join the device to Azure AD, and enroll it into a Mobile Device Management solution to complete configuration. Deploy Windows 10 on an existing Windows 7 or 8.1 device. |
Windows 10 Subscription Activation |
Upgrade the Windows edition seamlessly without requiring intervention or rebooting of the device. |
Azure AD / MDM |
Cloud-based identity and management solution offering device, app, and security configuration. |
Provisioning Packages |
Small distributable .appx files that securely transform devices to meet organizational requirements. |
In-place Upgrade |
Upgrade an earlier version of Windows to Windows 10 while retaining all apps, user data, and settings. |
Bare-metal |
Deploy Windows 10 to newly built devices or wipe existing devices and deploy fresh Windows 10 images to them. |
Refresh (wipe and load) |
Re-use existing devices. Retain user state (user data, Windows, and app settings). Wipe devices, deploy Windows 10 images to them, and finally, restore the user state. |
Replace |
Purchase new devices. Back up the user state from the current device. Transform or wipe a pre-installed Windows 10 installation and restore the user state. |
Windows Autopilot deployment scenarios
Windows Autopilot simplifies and automates the customization of the Out-Of-Box Experience (OOBE) and seamlessly enrolls your devices to management. Once enrolled into Microsoft Intune, devices are secured, configured, and further managed.
There are several usage scenarios currently available with Windows Autopilot, and additional functionality will be added in the future. You should understand the scenarios shown in Table 1-6 that show when you would use Windows Autopilot as part of your Windows 10 deployment strategy.
Table 1-6 Windows Autopilot Scenarios
Scenario |
Description |
|---|---|
Windows Autopilot for existing devices |
Deploy Windows 10 Version 1809 or later on an existing Windows 7 or Windows 8.1 device. Requires System Center Configuration Manager Current Branch (1806 or later) to replace the operating system and then allow Windows Autopilot to continue. |
Windows Autopilot user-driven mode |
Provision Windows 10 on a new Windows 10 device. Devices will be set up by a member of the organization and configured for that person to use. |
Windows Autopilot self-deploying mode |
Used for transforming Windows 10 devices that will be automatically configured for use as a kiosk terminal, shared computer, or as a digital signage device. Requires Windows 10 Version 1809 or later, and can be performed locally by an administrator or via MDM. |
Windows Autopilot Reset |
Used to redeploy a Windows 10 device. The reset process removes personal files, apps, and settings, and it reapplies a device’s original settings. The connection to Azure AD and Microsoft Intune is retained. A user can sign in to the device using his or her Azure AD credentials and be productive immediately. |
When comparing Autopilot to traditional on-premises deployment methods, such as imaging, there are clear advantages.
Windows images are not required.
Drivers are included with Windows 10 and are pre-installed on the device.
No on-premises deployment infrastructure is required (except if using Windows Autopilot for existing devices).
In the next section, you will learn that devices must have a connection to the internet to use Window Autopilot. If internet access is not available for the Windows Autopilot deployment, then you will need to select an alternative deployment method.
So long as an organization uses cloud-based services—such as Microsoft 365, which includes Azure AD and Microsoft Intune—they will be able to benefit from
Joining devices to Azure AD automatically.
Auto-enrolling your devices into Microsoft Intune.
Lower provisioning costs.
Restricted Administrator account creation during OOBE.
Agile deployment of Windows 10 devices.
Users will be productive more quickly.
Windows Autopilot requirements
There are several requirements and prerequisites that you need to put in place before you can use Windows Autopilot with your Windows 10 devices. If your organization already has a Microsoft 365 subscription, then you will already meet the licensing requirements:
Licensing Requirements
The following licensing requirements must be met:
Devices must be pre-installed with Windows 10 Pro, Pro Education, Pro for Workstations, Enterprise, or Education Version 1703 or higher.
Azure AD Premium P1 or P2.
Microsoft Intune or another MDM solution to manage your devices.
Networking Configuration
The following network configuration requirements must be met:
Devices must have access to the internet.
Devices must be able to access cloud services used by Windows Autopilot:
Using DNS name resolution.
Firewall access through port 80 (for HTTP), port 443 (for HTTPS) and port 123 (for UDP and NTP).
The following URLs need to be accessible:
Azure Ad Configuration Prerequisites
The following Azure AD configuration prerequisites must be met:
Azure AD company branding must be configured.
Azure AD automatic enrollment needs to be configured.
A device must be registered with Azure AD.
Users must have permissions to join devices into Azure AD.
Windows Autopilot Configuration
The following Windows Autopilot configuration prerequisites must be met:
Devices must have their device hardware IDs known by Windows Autopilot.
Devices must have a Windows Autopilot deployment profile assigned.
Implement pilot deployment
Windows Autopilot is not complex to configure and use, though there are several services that need to work together for your users to see a seamless out-of-box experience. After completing the prerequisites needed for Windows Autopilot, you may want to practice using Windows Autopilot to provision Windows 10 in test lab using virtual machines.
Once you have the basic functionality working, you can explore the additional features that are available; these features can be used to streamline the deployment process or personalize the experience for the user. These enhancements currently include:
Device Groups Creating device groups with Azure AD allows you to separate devices into logical groupings.
Dynamic Groups You can use Azure AD Dynamic Groups to simplify device group management. Devices are automatically added to the dynamic group if they meet the group membership criteria outlined in the rules.
Deployment Profiles You can create a single default deployment profile for your whole organization, or you can create additional deployment profiles and assign them to device groups.
Personalization Windows Autopilot allows you to assign a username and a friendly name to a specific device. During OOBE, the friendly name is then shown to the user. This feature requires Windows 10 Version 1809 or newer.
Enrollment Status Page During device enrollment into Microsoft Intune, users will be shown a progress status page, as shown in Figure 1-4.
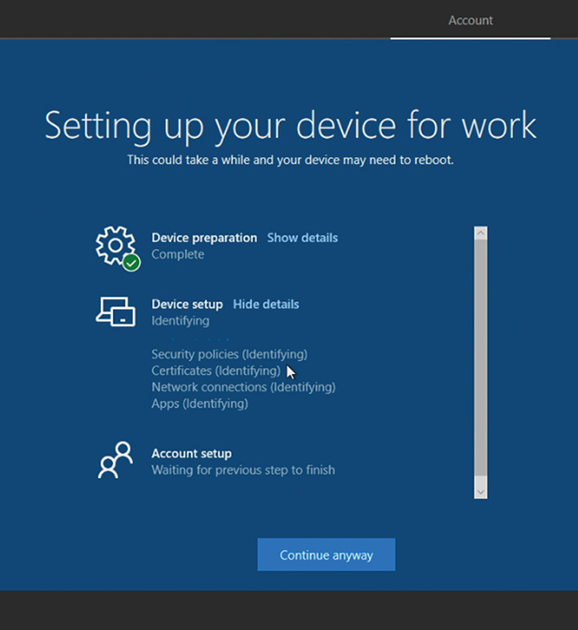
Figure 1-4 Enrollment Status Page
Once you have configured your Windows Autopilot processes and successfully provisioned devices in your test lab, you are ready to deploy Windows Autopilot in your production environment. You should follow best practices for any new technology deployment, and you should first pilot the processes to a small group of new devices and their users.
The pilot phase of the Windows Autopilot rollout should be closely monitored, and feedback should be sought from all stakeholders. Any problems with the pilot deployment should be thoroughly resolved before proceeding to a larger scale rollout.
Create, validate, and assign deployment profiles
Deployment Profiles are used to customize the OOBE for a device or group of devices when using Windows Autopilot. You can create a single default deployment profile of settings for your whole organization, or you can create additional deployment profiles and assign them to device groups.
New functionality has been added to Windows Autopilot with each release of Windows, and this is likely to continue. In Table 1-7, you can see how each version of Windows 10 since Version 1703 has introduced changes to how the Autopilot profile is downloaded.
Table 1-7 Windows Autopilot Profile Download
Windows 10 Version |
Profile Download Behavior |
|---|---|
1703 or 1709 |
The profile is downloaded during OOBE at the network connection page when using a wireless connection. When using a wired connection, the network page is hidden, and the profile is downloaded just prior to the EULA screen (if shown). |
1803 |
The Autopilot profile is downloaded as soon as possible. When using a wired connection, this is downloaded at the start of OOBE. If wireless, it is downloaded after the network connection page is displayed. |
1809 |
The Autopilot profile is downloaded as soon as possible, and it is downloaded again after each reboot. |
At the time of this writing, the available profile settings that you can configure within a Windows Autopilot deployment profile are shown in Table 1-8.
Table 1-8 Windows Autopilot Deployment Profile Settings
Profile Setting |
Description |
|---|---|
Convert All Targeted Devices To Autopilot |
Allows you to convert existing non-Autopilot Intune devices to Windows Autopilot. Devices running Windows 10 Version 1709 can then receive deployment profiles. |
Deployment Mode |
User-driven devices are devices that are associated with the user enrolling the device. Self-Deploying (preview) devices have no user affinity; an example is a kiosk device. If this setting is chosen, the following settings are enabled:
|
Join To Azure AD As |
Azure AD–joined = Cloud-only Hybrid Azure AD–joined (Preview) = Cloud and on-premises Windows Server Active Directory |
End User License Agreement (EULA) |
Windows 10 Version 1709 allows organizations to skip the EULA page during the OOBE. Effectively, this means that organizations accept the EULA terms on behalf of their users. |
Privacy Settings |
Organizations can choose not to ask users about Microsoft-related privacy settings during the OOBE process. |
Hide Change Account Options |
Removes the option for users to restart the OOBE process with a different account. (Requires Windows 10 1809 or later.) |
User Account Type |
Typically, during the OOBE process, a device will automatically be set up with administrator access. This option can be disabled when using Windows Autopilot as you can choose a Standard or Administrator account type. |
Apply Device Name Template |
Allows you to specify a naming convention to automatically name devices. For example, Cycle-%RAND:4% will generate a device name such as Cycle-2432. Windows 10 Version 1809 and later is required. |
Use the following procedure to create a deployment profile using Microsoft Intune for a user-driven device that is to be joined to Azure AD:
Open the Microsoft 365 Device Management portal (at https://devicemanagement.microsoft.com) and sign in with a Global Administrator account.
Navigate to the Device Enrollment node and then select Windows Enrollment.
Select Deployment Profiles under Windows Autopilot Deployment Program.
On the Windows Autopilot Deployment Profiles page, click Create Profile.
On the Create Profile page, enter a profile name and optional description.
Set the Deployment Mode option to User-Driven.
Set the Join To Azure AD option as Azure AD Joined.
Click the Out-Of-Box-Experience (OOBE) item to show the Out-Of-Box-Experience (OOBE) blade.
On the Out-Of-Box-Experience (OOBE) blade, configure the required settings. An example of a configured Out-of-Box-Experience (OOBE) blade is shown Figure 1-5.

Figure 1-5 Out-of-Box Experience (OOBE) blade
On the Out-Of-Box-Experience (OOBE) blade, click OK.
On the Create Profile blade, click Create.
)
Once a deployment profile has been created, it needs to be assigned to a device or group of devices for it to be used. Once assigned, devices will be allocated to the profile during the Windows Autopilot process. To assign the device profile, perform the following steps:
On the Windows Autopilot Deployment Profiles page, select the deployment profile that you want to assign to devices.
On the profile page, under the Manage heading, select Assignments.
On the Assignments page, click Select Groups To Include.
On the Select Groups To Include page, use the Search facility at the top of the page to search for a specific group, or select the group(s) from the list. You can add more than one group by selecting additional groups.
Click Select.
On the Assignments page, you can optionally exclude groups by clicking Exclude and then selecting device groups to exclude.
On the Assignments page, click Save.
On the profile page, select Overview. In the results pane, you will see that the profile has been assigned to several groups; also, you can see if any devices have been included in this assignment.
If no devices have been assigned to the profile, after you have configured the assignments, you should check that selected groups have device members within Azure Active Directory.
Extract device hardware information
The next stage of configuring Windows Autopilot is to extract the device hardware information so that the Autopilot service can recognize devices that will be provisioned using Windows Autopilot.
The device-specific information, which includes hardware device IDs of the devices, needs to be uploaded to Microsoft Intune or to Microsoft Store for Business, and then synchronized to the Windows Autopilot Deployment Service. You will learn how to upload this information in the next section.
Typically, the hardware vendor that supplied the new devices will upload the device-specific information and associate that information with your organization’s Microsoft 365 tenant. If an organization works closely with a Cloud Solution Provider (CSP) partner, then the vendor may pass the file to it for subsequent uploading via the Partner Center.
Alternatively, the vendor can provide you with a list of the required device information in .csv file format so that you can upload the information.
Another useful method is for the organization to extract the device-specific information from devices by running a Windows PowerShell script. This is especially useful if you are deploying a small number of devices using Windows Autopilot (for example, in a test lab environment or if you are reusing existing devices).
You can extract the hardware ID (or hardware hash) from any existing device that device is running Windows 10 Version 1703 or later. Use the Get-WindowsAutoPilotInfo.ps1 PowerShell script, which has been published to the PowerShell Gallery website at https://www.powershellgallery.com/packages/Get-WindowsAutoPilotInfo.
The following script needs to be run on each computer from an elevated Windows PowerShell prompt:
md c:\HWID
Set-Location c:\HWID
Set-ExecutionPolicy Unrestricted
Install-Script -Name Get-WindowsAutoPilotInfo
Get-WindowsAutoPilotInfo.ps1 -OutputFile DeviceID.csv
Once the output file has been created, it can be saved to a location such as a USB drive or network share. The file then needs to be imported to the organization’s preferred cloud service as discussed in the following section.
Import device hardware information to cloud service
With the hardware ID for each device, you need to import the information into one of the cloud-based administration centers and then synchronize this information to the Windows Autopilot deployment service.
Devices must be known to Azure AD and registered to your tenant before you can provision the devices using Autopilot.
The following administrative portals can be used to import the device hardware information:
Microsoft Intune or Microsoft 365 Device Management
Microsoft Store for Business
Microsoft 365 Business Admin Center
Office 365 Admin Center
Partner Center
Depending on the subscription used, there are multiple admin portals that you can use to import the device information. Both Microsoft Intune and Microsoft 365 Device Management offer the same functionality, though they are accessed using different website addresses:
Microsoft Intune: https://portal.azure.com
Microsoft 365 Device Management: https://devicemanagement.microsoft.com
Use the following procedure to add Windows Autopilot devices to a Microsoft 365 tenant by importing a CSV file with its information:
Open the Microsoft 365 Device Management portal and sign in with a Global Administrator account.
Navigate to the Device Enrollment node and select Windows Enrollment.
Under the Windows Autopilot Deployment Program heading, click Devices.
On the Windows Autopilot Devices page, click Import.
On the Add Windows Autopilot Devices page, browse to a .csv file containing the hardware IDs of the devices you want to add, and click Open.
On the Add Windows Autopilot Devices page, the file formatting will be validated; if the rows are formatted correctly, as shown in Figure 1-6, you should click Import.

Figure 1-6 Import devices
On the Windows Autopilot Devices page, the banner should indicate that the import is in progress and show the elapsed time. Importing can take several minutes to complete depending on how many devices are being imported.
When the import process has completed, click Sync on the menu bar. A banner should indicate that the synchronization is in progress. The process might take a few minutes to complete, depending on how many devices are being synchronized.
Once the sync process has been completed, you will see a notification indicating whether the sync was successful and whether some devices have not been imported. Click Refresh to see the new devices that have been added.
)
)
Troubleshoot deployment
Before you can resolve an issue with Windows Autopilot, you need to identify in which part of the overall process the problem is occurring. The Windows Autopilot process can be broken down into logical stages.
Network connectivity Establish an internet connection and connect to the Windows Autopilot service.
Deployment profile and OOBE A deployment profile will be delivered to the device to manage the Out-Of-Box Experience (or OOBE). The OOBE will complete using the settings within the deployment profile.
Azure AD Has Azure AD been configured correctly? For user-driven deployments, users need to enter their Azure AD credentials to join the device to Azure AD.
MDM enrollment issues After being auto enrolled into the MDM service, any policies, settings, and apps will be delivered to the device.
The whole process should result in the device being set up, configured, and ready for the user to be productive.
For a summary of possible troubleshooting areas within these stages, review Table 1-9.
Table 1-9 Windows Autopilot Process Flow
Process |
Troubleshooting |
|---|---|
Network connectivity |
Can the device access the Windows Autopilot services?
|
Deployment Profile & OOBE |
There are settings in the deployment profile that configure the Out-Of-Box Experience. You should focus your troubleshooting on whether
|
Azure AD |
Azure AD needs to be configured prior to deploying devices with Windows Autopilot. Focus your troubleshooting on the following things:
|
MDM enrollment issues |
In the final stage of the Windows Autopilot process, the device will be enrolled into Mobile Device Management. If MDM fails, then policies, settings, and apps will not be deployed to the device. You should focus your troubleshooting on the following things:
|
Error Codes
Whenever a major issue occurs when using Windows Autopilot, an error code will be generated. Some error codes can be viewed on the device whenever a problem occurs during setup. Also, error codes can be viewed using the Event Trace for Windows tool.
Some common error codes relating to Windows Autopilot are shown in Table 1-10.
Table 1-10 Windows Autopilot Error Codes
Error Code |
Description |
|---|---|
0x800705B4 |
This error is caused by the device being either a virtual machine or not having TPM 2.0; therefore, the device is not capable of running Autopilot in self-deploying mode. |
0x801c03ea |
This error means that the device is TPM 2.0 capable but that the TPM still needs to be upgraded from 1.2 to 2.0. |
0x801c0003 |
The error page will report this error code with a message reading, “Something went wrong,” which indicates that the Azure AD join failed. |
0x80180018 |
The error page will report this error code with a message reading, “Something went wrong,” which indicates the MDM enrollment failed. |
0x80070032 |
When Windows Autopilot Reset is used to prepare existing devices to become business ready, you should confirm that the Windows Recovery Environment (WinRE) is correctly configured and enabled on the device; otherwise, you will get this error. |
When troubleshooting, other sources of information include looking in the Event Viewer for issues relating to the deployment profile settings and the OOBE. The relevant logs are located at
Application and Services Logs –> Microsoft –> Windows –> Provisioning-Diagnostics-
Provider –> AutoPilot.
An example log entry might read, “Autopilot policy name not found.”
You can also look in the registry to find evidence of Windows Autopilot failures. The Autopilot deployment service will record information in the registry at this location:
HKLM\SOFTWARE\Microsoft\Provisioning\Diagnostics\AutoPilot.
An example of a problem recorded in the registry would read, “The device has not been registered with Autopilot.”
For more advanced troubleshooting, administrators can use the Event Tracing for Windows (ETW) tool to capture detailed information from Autopilot. This will generate trace files, which can be viewed using the Windows Performance Analyzer.