Deploy and Update Operating Systems
- By Andrew Bettany and Andrew Warren
- 8/13/2019
- Skill 1.1: Plan and implement Windows 10 by using dynamic deployment
- Skill 1.2: Plan and implement Windows 10 by using Windows Autopilot
In this sample chapter from Exam Ref MD-101 Managing Modern Desktops, authors Bettany and Warren help you learn to plan and implement Windows 10 using dynamic deployment and Windows Autopilot.
The MD-101 Windows 10 exam focuses on how to deploy and update Windows 10 in the most efficient manner, with the least amount of administrative effort, and by using modern tools and technologies. You need to understand how to plan and deploy Windows 10 and be able to choose the most appropriate method. Once deployed, you’ll need to manage Windows 10, join the device to Azure Active Directory, and auto-enroll it in Microsoft Intune. You will keep Windows 10 up to date and secured, manage Windows updates, and ensure that updates are aligned with organizational requirements. You will need to understand how modern devices are joined or registered to Azure Active Directory and how to manage authentication of devices and users using the cloud.
Skills covered in this chapter:
Skill 1.1: Plan and implement Windows 10 by using dynamic deployment
Skill 1.2: Plan and implement Windows 10 by using Windows Autopilot
Skill 1.3: Upgrade devices to Windows 10
Skill 1.4: Manage updates
Skill 1.5: Manage device authentication
Skill 1.1: Plan and implement Windows 10 by using dynamic deployment
Windows 10 offers organizations new and exciting methods for deploying the operating system to users. Legacy image creation-based deployment methods will continue to be supported and used. You can expect that the adoption of the new dynamic deployment methods will gain traction in the modern workplace and will be featured in the MD-101 exam. You need to understand when these methods should be implemented over traditional methods.
Evaluate and select an appropriate deployment option
Dynamic provisioning of Windows 10 using modern tools including mobile device management solutions offers organizations new deployment choices. Many of these options were not available when deploying previous versions of Windows using traditional deployment methods. Table 1-1 provides a summary comparison between modern dynamic provisioning and traditional deployment methods, which can also incorporate image creation.
Table 1-1 Provisioning Methods
Dynamic Provisioning Methods |
Traditional Deployment Methods |
|---|---|
Enrollment into Azure Active Directory and Mobile Device Management (such as Microsoft Intune) |
On-premises deployment tools using Windows ADK, Windows Deployment Services, Microsoft Deployment Toolkit, or System Center Configuration Manager |
Provisioning packages using Windows Configuration Designer |
Bare-metal install |
Subscription Activation |
In-place upgrade |
Windows Autopilot |
Wipe-and-load upgrade |
The deployment choices available to an organization may be skewed by the existing investment it has made in traditional deployment methods and infrastructure. This may include reliance upon on-premises tools and procedures, such as using Microsoft Deployment Toolkit (MDT) and System Center Configuration Manager (SCCM) for Windows 7 and newer versions. These tools will continue to be supported and can be used to support traditional deployment methods, such as bare metal, refresh, and replace scenarios.
You should understand the modern alternatives to the traditional methods, and these will be emphasized throughout this book and tested extensively on the MD-101 exam.
Deploying Windows 10 using modern cloud-based deployment and dynamic provisioning methods includes using subscription activation, Windows Autopilot, and Azure Active Directory (Azure AD) join. Ongoing management of Window 10 is then undertaken using Mobile Device Management (MDM), such as Microsoft Intune.
Dynamic provisioning
You should see a theme throughout this book, which is to recommend an alternative method of provisioning client devices to the traditional approach, which would typically include the following stages:
Purchase or re-provision a device.
Wipe the device.
Replace the preinstalled operating system with a customized image.
Join an on-premises Active Directory.
Apply Group Policy settings.
Manage apps using Configuration Manager.
With a cloud-based deployment approach, the stages are simplified to the following:
Purchase or re-provision a device.
Apply a transformation to the preinstalled operating system.
Join Azure AD.
Manage the use of Mobile Device Management.
Use MDM to enforce compliance with corporate policies and to add or remove apps.
There is a significant difference between the two approaches. Dynamic provisioning seeks to avoid the need for on-premises infrastructure and resource intensive reimaging procedures.
Because Windows 10 is updated twice a year to a newer version—with each new version supported for a maximum of 18 months (30 months for Enterprise and Education editions)—maintaining customized deployment images becomes a costly process and burdensome for the IT department.
The types of transformations that are currently available using dynamic provisioning include:
Provisioning packages A provisioning package is created using the Windows Configuration Designer and can be used to send one or more configurations to apps and settings on a device.
Subscription Activation Windows 10 Subscription Activation allows you to automatically upgrade devices with Windows 10 Pro to Windows 10 Enterprise without needing to enter a product key or perform a restart.
Azure AD join with automatic MDM enrollment A device can be joined to Azure AD and automatically enrolled into the organizational MDM solution by having users enter their work or school account details. Once enrolled, MDM will configure the device to the organization’s policies.
The transforms outlined above will be discussed in more detail in later stages of this chapter.
Provisioning packages
Provisioning packages are created using the Windows Configuration Designer (WCD), which is included in the Windows Assessment and Deployment Kit (Windows ADK). You can also download the standalone Windows Configuration Designer app from the Microsoft Store.
If you are used to using Group Policy Objects (GPOs), you could draw some similarities between GPOs and provisioning packages, such as they use very small configuration files and they are used to modify existing Windows 10 installations and configure their runtime settings.
A provisioning package can perform a variety of functions, such as:
Configure the computer name and user accounts.
Add the computer to a domain.
Upgrade the Windows 10 version, such as Windows 10 Home to Windows 10 Enterprise.
Configure the Windows user interface.
Add additional files or install apps.
Remove installed software.
Configure network connectivity settings.
Install certificates.
Implement security settings.
Reset Windows 10.
Run PowerShell scripts.
To create a provisioning package, you should complete the installation process of Windows Configuration Designer using either the Windows ADK or the Microsoft Store. Once you have done so, you are ready to create and deploy your provisioning packages. Start by opening Windows Configuration Designer. On the Start page shown in Figure 1-1, click the option that best describes the type of provisioning that you want to do. If you are uncertain, choose the Advanced Provisioning tile.
)
Figure 1-1 Creating a new provisioning package
Use the following procedure to create your provisioning package to deploy a universal line of business (LOB) app:
Click Advanced Provisioning.
In the New Project wizard, on the Enter Project Details page, in the Name box, type the name for your provisioning package and a meaningful description. For example, type Deploy LOB App1 and then click Next.
On the Choose Which Settings To View And Configure page, choose All Windows Desktop Editions and click Next.
On the Import A Provisioning Package (Optional) page, click Finish. (You can use this option to import settings from a previously configured package that mostly, but not entirely, meets your needs.)
On the Available Customizations page, in View, click All Settings, and then expand Runtime Settings (see Figure 1-2).
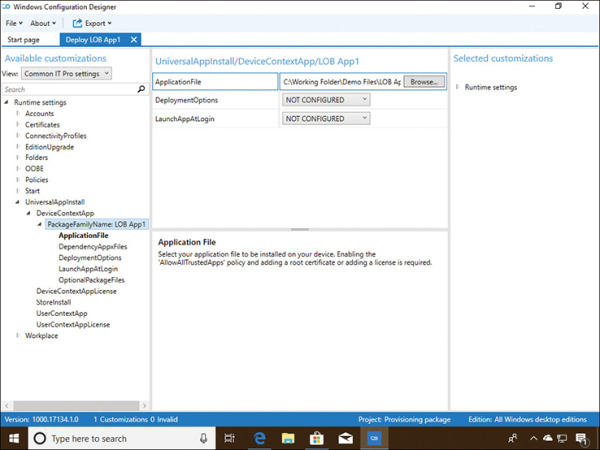
Figure 1-2 Available customizations for your provisioning package
On the Available Customizations page, in the navigation pane, expand UniversalApp-Install, and then click DeviceContextApp.
In the details pane, in the PackageFamilyName text box, type a name for this collection of apps. For example, type LOB App1.
Select the PackageFamilyName: LOB App1 node.
In the ApplicationFile text box, click Browse, and navigate to the .appx file that represents your app, and select it, as shown in Figure 1-2.
In the File menu, click Save and note the location of the saved provisioning package file.
)
You have created a customization for your app, and you are now ready to deploy this customization by applying the provisioning package.
Apply provisioning packages
To apply a provisioning package, you must start by exporting the package. To export your provisioning package, in the Windows Configuration Designer, use the following procedure:
Select the project file from the Recent Projects area of the Start Page or select File and locate the project file. (It should use the name of the project and have an .icdproj file extension.)
On the menu bar, click Export > Provisioning Package.
In the Build wizard, on the Describe The Provisioning Package page, the Name box is already complete with the project name. You can now specify the package version number and vendor information, such as IT Admin. Complete this information and click Next.
On the Select Security Details For The Provisioning Package page, choose whether you want to encrypt or sign your package (or both) and then click Next. (To digitally sign your package, you must have an appropriate digital certificate that users of your package trust.)
On the Select Where To Save The Provisioning Package page, specify where you want to store the package and then click Next.
On the Build The Provisioning Package page, click Build. Your provisioning package is exported to your specified location.
The All Done page appears. Make a note of the package details and then click Finish.
You can now apply the package to client devices and run the .ppkg file.
Once you have configured the settings within the Windows Configuration Designer, you export the provisioning package to a .ppkg file. To secure the .ppkg file, you can optionally choose to encrypt the package and digitally sign it. Once signed, only packages that are trusted can be applied on a client computer.
You can deploy the provisioning package to users by any method, such as email, physical media, or by sharing the file using OneDrive for Business. The settings are applied to the target device by one of the following methods:
Running the .ppkg file
Adding the provisioning package using the Settings app
Use the Add-ProvisioningPackage Windows PowerShell cmdlet
Provisioning packages can be applied to a device during the first-run experience when a device is first turned on by using a USB drive containing the provisioning package or after the out-of-box experience (or “OOBE”) has been completed.
Windows 10 Subscription Activation
Windows 10 requires activation to unlock all the features of the operating system and to comply with the licensing requirements.
Once activated, Windows 10 devices can:
Receive updates
Access all Window 10 features
Access support
There are several types of activation that register the installation of Windows on a device with a standalone or corporate Windows 10 product key.
The three main methods of activation are:
Retail
OEM
Microsoft Volume Licensing (volume activation)
Organizations with Enterprise Agreements (EA) can use volume activation methods. These provide tools and services that allow activation to be automated and deployed at scale. These tools and services include
Active Directory–based activation This is an automated service that, once installed, uses Active Directory Directory Services (AD DS) to store activation objects. This simplifies the maintenance of volume activation services for an enterprise. Activation requests are processed automatically as devices authenticate to the Active Directory domain.
Key Management Service (KMS) This is an automated service that is hosted on a computer within your domain-based network. All volume editions of Windows 10 periodically connect to the KMS host to request activation.
Multiple activation key (MAK) Enterprises purchase product keys that allow a specific number of Windows 10 devices to be activated using the Microsoft activation servers on the internet.
All the above enterprise activation methods utilize services found within traditional on-premises, domain-based environments. An alternative method of activation is required to meet the needs of devices that are registered to cloud-based authentication and identity services, such as Azure Active Directory.
Subscription Activation allows your organization’s Azure AD tenant to be associated with an existing Enterprise Agreement; all valid devices that are connected to that tenant will be automatically activated.
Eligible licenses that can use Subscription Activation include
Windows 10 Enterprise E3 or E5 licenses obtained as part of an Enterprise Agreement
Devices containing a firmware-embedded activation key
Windows 10 Enterprise E3 in CSP (Cloud Solution Provider), which is offered as a subscription for small- and medium-sized organizations, from one to hundreds of users
Organizations must meet the following requirements to implement Subscription Activation:
Enterprise Agreement or a Microsoft Products and Services Agreement (MPSA) associated with the organization’s Azure AD tenant.
Windows 10 Pro or Windows 10 Enterprise is installed on the devices you want to upgrade.
Azure AD for identity management.
All devices are either Azure AD–joined or are members of an AD DS domain that is synchronized to Azure AD using Azure AD Connect.
If all the requirements are met, when a licensed user signs in using his or her Azure AD credentials using a device, the operating system switches from Windows 10 Pro to Windows 10 Enterprise and all Windows 10 Enterprise features are then available. This process takes place without entering a product key and without requiring that users restart their computers.
Azure AD Join with automatic MDM enrollment
You can dynamically provision Windows 10 devices using Azure AD and a Mobile Device Management (MDM) solution, such as Microsoft Intune. Once a device is enrolled into management, Microsoft Intune can deploy compliance and corporate security policies to the device in a similar way (but not the same) as Group Policy objects are used within a domain-based environment to configure computers.
MDM can be used to add or remove apps, restrict device features, and more. Through the application of MDM policies, Azure AD can block or allow access to corporate resources or applications based on the status of the device compliance.
To benefit from the cloud-based dynamic provisioning, you need the following requirements:
Windows 10 Pro or Windows 10 Enterprise Version 1703 (or later)
Azure AD for identity management
A Mobile Device Management solution, such as Microsoft Intune
Manage pilot deployment
Embarking on any new project should be carefully planned ahead of time so that the delivery can be given every chance of success. This is especially applicable when deploying Windows 10 within an enterprise environment.
There are several tools and services available to help evaluate, learn, and implement Windows 10. By following best practices and avoiding making deployment mistakes, you can ensure that your users are productive and that the project is delivered on schedule.
Windows 10 is released using a continuous delivery model known as Windows as a Service, with a new version of Windows 10 available every six months. Therefore, the skills you learn in deploying Windows 10 to your users will be reused again, and often.
It is recommended that administrators choose a group of users and deploy Windows 10 into focused pilot projects to test each version of Windows 10 within their organizations prior to rolling out the operating system to larger cohorts of users.
Plan pilot deployments
In this book, we have focused on the modern deployment technologies that are likely to be tested on the MD-101 exam. Each organization is different, and therefore, you need to determine which deployment method (or methods) you will use. For example, you may choose to deploy new devices to your remote sales force using Windows Autopilot and perform an in-place upgrade of your head office computers using the in-place upgrade method.
To make effective decisions relating to the deployment method, you should perform testing in a non-production environment, and if you are successful, you should proceed to roll out Windows 10 to a small group of users.
By breaking down your Windows 10 deployment project into multiple stages, you can identify any possible issues and determine solutions where available. This will involve documenting and obtaining feedback from stakeholders at each stage. The first stage of deploying the operating system will be with a pilot deployment.
As part of the pilot, it is important to determine the following:
Production hardware, including PCs, laptops, and tablets, meets the minimum hardware requirements for Windows 10.
Peripherals, such as printers, scanners, projectors, and other devices, are compatible with Windows 10.
All required device drivers are available.
All apps required following the deployment will work on Windows 10.
Any existing third-party disk encryption will work with Windows 10 (alternatively replaced with BitLocker Drive Encryption).
Your IT support staff has the necessary skills to support Windows 10.
The pilot is essential because it can be useful to ensure compatibility with existing hardware, apps, and infrastructure, and it provides you with an insight to the gains and potential pitfalls that you are likely to encounter during the later stages of the roll-out program. By reviewing and implementing feedback gained during the pilot phase, you can seek to minimize the future impact of any problems encountered.
If you find that your existing IT support staff does not have the necessary skills to support Windows 10, you may use the pilot deployment phase to identify any training needs; doing so gives you time to implement the recommendations before a larger roll-out. You should also consider your non-technical users, who may require information relating to the new operating system so that their day-to-day productivity is not affected by the adoption of the new operating system.
You can also use the pilot to help to determine user readiness for Windows 10 and to identify any training needs—for both users and IT support staff.
Identify hardware requirements for Windows 10
As part of your planning considerations, you should review the system requirements for installing Windows 10. Windows 10 can run adequately on hardware of a similar specification that supports Windows 8.1. Consequently, most of the computers in use within organizations today are Windows 10–capable. However, to get the best from Windows 10, you might consider installing the operating system on the computers and devices that exceed the minimum specifications described in Table 1-2.
Table 1-2 Minimum Hardware Requirements for Windows 10
Component |
Requirement |
|---|---|
Processor |
A 1 GHz or faster processor or System on a Chip (SoC). |
Memory |
1 GB RAM on 32-bit versions and 2 GB for 64-bit versions. |
Hard disk space |
16 GB for 32-bit versions and 32 GB for 64-bit versions. |
Graphics card |
DirectX 9 or later with a Windows Display Driver Model (WDDM) 1.0 driver. |
Display resolution |
800×600 pixels. |
Internet Connection |
Internet connectivity is required to perform updates and to take advantage of some features. |
Determine hardware compatibility for Windows 10
After you have verified that any new or existing computers on which you intend to install Windows 10 meet the minimum hardware requirements, you need to verify that the operating system also supports any existing hardware devices and peripherals.
If you are purchasing new computers preinstalled with Windows 10, take no further action. However, if you are using existing computers, or you want to attach existing hardware peripherals to your new computers, you must verify compatibility of these older computers and peripherals.
If you have only one or two computers and a few peripheral devices to check, the easiest—and probably quickest—solution is to visit the hardware vendor’s website and check for compatibility of these devices and peripherals. You can then download any required drivers for the version of Windows 10 (32-bit or 64-bit) that you may need to install.
Verify Hardware Compatibility For Multiple Devices
When you have many computers to install or upgrade to Windows 10, it is not feasible to visit each computer and verify device and peripheral compatibility. In this situation, consider using a tool to help determine compatibility.
If you have a traditional on-premises infrastructure, you can use the Microsoft Assessment and Planning Toolkit (MAP) to assess the computer devices attached to your network. MAP can be used to
Determine feasibility to upgrade scanned devices to Windows 10
Determine your organization’s readiness to move to Microsoft Azure, Office 365, or Azure AD
Plan for virtualizing workloads to Hyper-V
Windows Analytics overview
Windows Analytics is a set of tools, solutions, and services that you can use to collate and evaluate data about the state of devices in your environment. These services can be useful when undertaking an enterprise-wide deployment. Windows Analytics includes three solutions, as shown in Table 1-3.
Table 1-3 Windows Analytics Solutions
Solution |
Description |
|---|---|
Device Health |
Extracts the device health history, providing
(See https://docs.microsoft.com/en-us/windows/deployment/update/device-health-get-started.) |
Update Compliance |
Extracts the state of your devices with respect to the following:
(See https://docs.microsoft.com/en-us/windows/deployment/update/update-compliance-get-started.) |
Upgrade Readiness |
Supports upgrade management from Windows 7 and Windows 8.1 to Windows 10 and the Windows as a service model. Upgrade Readiness provides:
(See https://docs.microsoft.com/en-us/windows/deployment/upgrade/upgrade-readiness-get-started.) |
Windows Analytics requires that devices are enrolled in the service so that Windows Analytics can then collect data directly from the device. Other requirements include
An Azure subscription.
Windows Analytics uses Azure Log Analytics, which is deployed in your Azure subscription and accessed using the Azure portal.
A unique commercial ID key is used to link your devices to the Windows Analytics solutions.
Windows 7 SP1, Windows 8.1, or Windows 10 is installed on devices.
Each device needs to have the diagnostic data level configured by using the Upgrade Readiness deployment script or by a policy, which can be deployed using Group Policy or Mobile Device Management.
Manage and troubleshoot provisioning packages
You have already seen how using provisioning packages as part of your dynamic provisioning of Windows 10 can simplify your deployment processes.
The Windows Configuration Designer tool can be installed from the Microsoft Store as an app, which allows it to be regularly updated. Alternatively, you can install the Windows Configuration Designer tool as part of the Windows ADK.
The WCD interface is simple, and common tasks are offered using the available wizards, which can be used to create a provisioning package that can be used in the following environments:
Provision desktop devices Provides the typical settings for Windows 10 desktop devices.
Provision kiosk devices Provides the typical settings for a device that will run a single app.
Provision Windows mobile devices Provides the typical settings for Windows 10 mobile devices.
Provision IoT devices Provides the typical settings for Windows 10 IoT devices.
Provision Surface Hub devices Provides the typical settings for Surface Hub devices.
Provision Holographic devices Provides the typical settings for Windows 10 Holographic devices, such as HoloLens headsets.
Advanced provisioning Enables you to view and configure all available settings. Choose this option if you are unsure which specific package type to use.
Most provisioning packages will be aimed at provisioning Windows 10 desktop devices and will use the advanced configuration option because this allows the greatest customization.
Provisioning packages offer administrators a quick and simplified mechanism to securely configure devices. Once created, the settings within a .ppkg file can be viewed using the WCD and edited using the built-in wizards or by using the advanced editor. When provisioning packages that need to be deployed to remote devices, they can be protected using encryption and signed.
Several usage scenarios for provisioning packages are shown in Table 1-4.
Table 1-4 Usage Scenarios for Provisioning Packages
Scenario |
Phase |
Description |
|---|---|---|
New devices with Windows 10 need to have apps deployed to the devices. |
New device |
Provisioning packages can be used to deploy apps to devices. |
Existing Windows 10 Pro devices need to be upgraded to Windows 10 Enterprise. |
Upgrade |
Provisioning packages can be used to change the Windows edition by deploying product keys or licenses using the Edition Upgrade settings. |
You must update device drivers on Windows 10 devices. |
Maintain |
Provisioning packages can be used to deploy device drivers to devices. |
Troubleshoot provisioning packages
When using provisioning packages, you may need to troubleshoot them if devices are not configured as expected.
There are several areas on which you can focus your attention when troubleshooting provisioning packages, as follows:
Configuration errors and missing customizations
Expired Azure AD Token
Export errors including encryption & signing issues
User issues
Advanced troubleshooting
If you have deployed the .ppkg file to multiple devices, and they have all failed to process the required changes, then you should first inspect the provisioning package. Locate the project file (with the .icdproj file extension) and open it using the WCD. You should then inspect the settings and confirm that they match your expectations and the design specification or change documentation for the provisioning package.
If you use the configuration wizard to configure automatic enrollment into Azure AD, as shown in Figure 1-3, you should ensure that the Bulk Token embedded inside the provisioning package has not expired. By default, this token is set to expire one month after creation, though you can manually set the token expiry date to 180 days after the creation date. If the package is used after the Bulk AAD Token has expired, the package will fail to install. You will need to edit the package, apply for a new Bulk AAD Token, and re-export the package.
)
Figure 1-3 Set up Bulk AAD Token to enroll in Azure AD
Once the customization settings have been verified as correct, you should export the package again. Increment the version number to avoid confusion with the previous version of the package. Packages with the same versioning number will not be applied to the same target device twice.
If issues are suspected with either the encryption or signing of the package, you can export without these enhancements and re-deploy to your test machine to determine whether the issue remains.
For users, devices can be configured by placing the provisioning package on a USB drive and inserting it during the initial OOBE setup phase. Windows Setup should automatically recognize the drive and ask the user if he or she wants to install the provisioning package. If the package is not recognized, check that the file is in the root directory of the USB drive.
There are several tools that you can use to perform advanced troubleshooting for provisioning packages on user devices, including:
Windows Mobile devices The Field Medic app, which is available from the Microsoft Store, can create and export reports.
Desktop devices The Windows Performance Recorder, which is contained in the Windows Performance Toolkit, offers advanced Event Tracing for Windows. The system events recorded by this tool can be analyzed by using Windows Performance Analyzer, which is available from the Microsoft Store.