Start a new plan
- By Cindy M. Lewis, Carl Chatfield, Timothy Johnson
- 5/25/2019
- Practice files
- Create a new plan and set its start date
- Set nonworking days in the project calendar
- Enter the plan title and other properties
- Skills review
- Practice tasks
Set nonworking days in the project calendar
Calendars are the primary means by which you control when each task and resource can be scheduled for work in Project. In later chapters, you will work with other types of calendars; in this chapter, we focus on the project calendar.
The project calendar defines the general working and nonworking days and times for tasks for the entire plan. Project includes multiple calendars, called base calendars, and any one of those calendars can serve as the project calendar for a plan. As Figure 3-2 shows, you select the base calendar to be used as the project calendar in the Project Information dialog box.
)
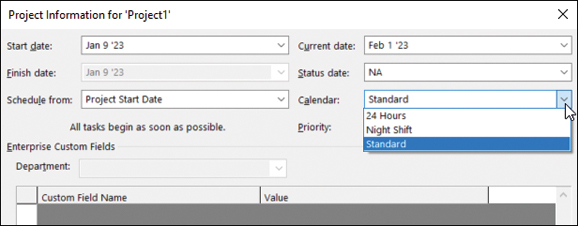
Figure 3-2 Set the plan’s start date, project calendar, and other essential schedule settings in the Project Information dialog box.
 IMPORTANT
If you are using Project Professional instead of Project Standard, be aware that the Project Information dialog box and some other dialog boxes may contain additional options related to Project Online or Project Server. For more information, see Appendix C, “Collaborate: Project, SharePoint, and PWA.”
The Calendar list contains the three base calendars that are included with Project:
24 Hours Has no nonworking time; all time is working time.
Night Shift Covers a night shift schedule of Monday night through Saturday morning, 11:00 P.M. to 8:00 A.M. (23:00 to 08:00), with a 1-hour break each day.
Standard The traditional working day and week, Monday through Friday from 8:00 A.M. to 5:00 P.M. (08:00 to 17:00), with a 1-hour break each day.
Only one of the base calendars serves as the project calendar; the Standard calendar is the default.
Think of the project calendar as your organization’s normal working days and hours. For example, this might be Monday through Friday, 8:00 A.M. through 5:00 P.M. (08:00 to 17:00), with a 1-hour lunch break each day. Your organization or specific resources might have exceptions to this normal working time, such as public holidays or vacation days (personal holidays). You’ll address resource vacations in Chapter 5, “Set up resources.”
You customize calendars as shown in Figure 3-3 in the Change Working Time dialog box, which opens when you click the Change Working Time button on the Project tab.
)
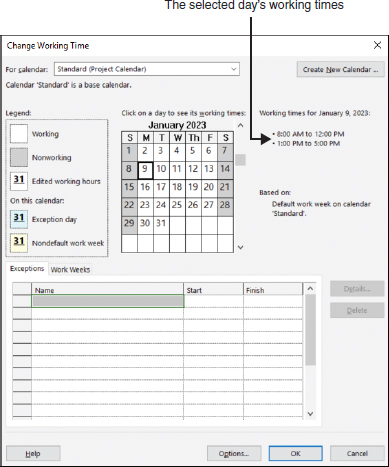
Figure 3-3 You customize a calendar’s working time in the Change Working Time dialog box.
Use this dialog box to set normal working schedules and working time exceptions for individual resources or the entire plan. Other common examples of working time adjustments include the following:
Recurring holidays or other times off that follow a known pattern, such as weekly, monthly, or annually.
Variable working times per week—for example, to address seasonal changes in working times.
Unique working hours for a resource. You’ll adjust such settings in Chapter 5.
To select the project calendar
On the Project tab, in the Properties group, click the Project Information button.
In the Project Information dialog box, in the Calendar box, click the arrow and then click the calendar you want to use as the project calendar.
To set a specific date as nonworking
On the Project tab, in the Properties group, click the Change Working Time button.
On the Exceptions tab in the lower portion of the Change Working Time dialog box, in the Name field, enter a description of the exception.
 TIP
TIPYou don’t need to name calendar exceptions, but it’s a good practice for you or others to identify the reason for the exception.
In the Start and Finish fields, enter or select the dates you want.
Click OK.
To set up a recurring nonworking time
On the Project tab, in the Properties group, click the Change Working Time button.
On the Exceptions tab of the Change Working Time dialog box, in the Name field, enter a description of the recurring exception.
Click in the Start field, and then click Details.
In the Details dialog box, under Recurrence Patterns, select the recurrence values you want, and then click OK.
Click OK to close the Change Working Time dialog box.
To set up a custom work week
On the Project tab, in the Properties group, click the Change Working Time button.
Click the Work Weeks tab in the lower portion of the Change Working Time dialog box.
Click a row below the [Default] value.
Enter a description and the date range you want to apply to the custom work week.
In the Start and Finish fields, enter or select the date range you want to apply to the custom work week.
Click Details.
In the Details dialog box, select the day and time values you want, and then click OK.
Click OK to close the Change Working Time dialog box.