Modify the structure and appearance of text
- 7/23/2019
Apply character formatting
The appearance of your document helps to convey not only the document’s message but also information about the document’s creator—you. A neatly organized document that contains consistently formatted content and appropriate graphic elements, and that doesn’t contain spelling or grammatical errors, invokes greater confidence in your ability to provide any product or service.
Earlier in this chapter, you learned about methods of applying formatting to paragraphs. This topic covers methods of formatting the text of a document. Formatting that you apply to text is referred to as character formatting. In Word documents, you can apply three types of character formatting:
Individual character formats including font, font size, bold, italic, underline, strikethrough, subscript, superscript, font color, and highlight color
Artistic text effects that incorporate character outline and fill colors
Preformatted styles associated with the document template, many of which not only affect the appearance of the text but also convey structural information (such as titles and headings)
When you enter text in a document, it is displayed in a specific font. By default, the font used for text in a new blank document is 11-point Calibri, but you can change the font of any element at any time. The available fonts vary from one computer to another, depending on the apps installed. Common fonts include Arial, Verdana, and Times New Roman.
You can vary the look of a font by changing the following attributes:
Size Almost every font has a range of sizes you can select from. (Sometimes you can set additional sizes beyond those listed. ) The font size is measured in points, from the top of the ascenders (letter parts that go up, as in h) to the bottom of the descenders (letter parts that drop down, as in p). A point is approximately 1/72 of an inch (about 0. 04 centimeters).
Style Almost every font has a range of font styles. The most common are regular (or plain), italic, bold, and bold italic.
Effects Fonts can be enhanced by applying effects, such as underlining, small capital letters (small caps), or shadows.
Character spacing You can alter the spacing between characters by pushing them apart or squeezing them together.
Although some attributes might cancel each other out, they are usually cumulative. For example, you might use a bold font style in various sizes and various shades of green to make words stand out in a newsletter.
You apply character formatting from one of three locations:
Mini Toolbar Several common formatting buttons are available on the Mini Toolbar that appears when you select text.
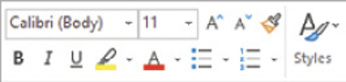
The Mini Toolbar appears temporarily when you select text, becomes transparent when you move the pointer away from the selected text, and disappears if not used
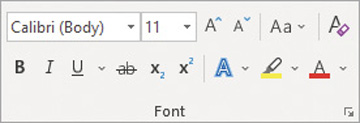
Font group on the Home tab This group includes buttons for changing the font and most of the font attributes you are likely to use.
The most common font formatting commands are available on the Home tab
Font dialog box Less-commonly applied attributes such as small caps and special underlining are available from the Font dialog box.
)
In addition to applying character formatting to change the look of characters, you can apply predefined text effects (sometimes referred to as WordArt) to a selection to add more zing. The available effects match the current theme colors.
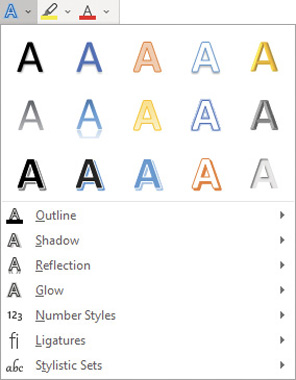
You can apply any predefined effect in the gallery or define a custom effect
These effects are somewhat dramatic, so you’ll probably want to restrict their use to document titles and similar elements to which you want to draw particular attention.
To change the font of selected text
On the Mini Toolbar or in the Font group on the Home tab, in the Font list, select the font you want to apply.
To change the font size of selected text
Do any of the following on the Mini Toolbar or in the Font group on the Home tab:
In the Font Size list, select the font size you want to apply.
In the Font Size box, enter the font size you want to apply (even a size that doesn’t appear in the list). Then press the Enter key.
To increase the font size in set increments, select the Increase Font Size button, or press Ctrl+>.
To decrease the font size in set increments, select the Decrease Font Size button, or press Ctrl+<.
To format selected text as bold, italic, or underlined
On the Mini Toolbar, select the Bold, Italic, or Underline button.
On the Home tab, in the Font group, select the Bold, Italic, or Underline button.
Press Ctrl+B to format the text as bold.
Press Ctrl+I to format the text as italic.
Press Ctrl+U to underline the text.
 TIP
TIPTo quickly apply a different underline style to selected text, select the arrow next to the Underline button on the Home tab, and then in the list, select the underline style you want to apply.
To cross out selected text by drawing a line through it
On the Home tab, in the Font group, select the Strikethrough button.
To display superscript or subscript characters
Select the characters you want to reposition.
On the Home tab, in the Font group, do either of the following:
Select the Subscript button to shift the characters to the bottom of the line.
Select the Superscript button to shift the characters to the top of the line.
To apply artistic effects to selected text
On the Home tab, in the Font group, select the Text Effects and Typography button, and then do either of the following
In the Text Effects and Typography gallery, select the preformatted effect combination that you want to apply.
On the Text Effects and Typography menu, select Outline, Shadow, Reflection, Glow, Number Styles, Ligatures, or Stylistic Sets. Then make selections on the submenus to apply and modify those effects.
To change the font color of selected text
On the Home tab, in the Font group, select the Font Color arrow to display the Font Color menu.
In the Theme Colors or Standard Colors palette, select a color swatch to apply that color to the selected text.
TIPTo apply the current Font Color button color, select the button (not its arrow). To apply a color not shown in the Theme Colors or Standard Colors palette, select More Colors. Then in the Colors dialog box, select the color you want in the honeycomb palette on the Standard page, or select the color gradient or enter color values on the Custom page.
To change the case of selected text
On the Home tab, in the Font group, select the Change Case button and then Sentence case, lowercase, UPPERCASE, Capitalize Each Word, or tOGGLE cASE.
Press Shift+F3 repeatedly to cycle through the standard case options (Sentence case, UPPERCASE, lowercase, and Capitalize Each Word).
 IMPORTANT
The case options vary based on the selected text. If the selection ends in a period, the options do not include Capitalize Each Word. If the selection does not end in a period, the options do not include Sentence case.
To highlight text
Select the text you want to change, and then do either of the following
On the Mini Toolbar or in the Font group on the Home tab, select the Text Highlight Color button to apply the default highlight color.
On the Mini Toolbar or in the Font group on the Home tab, select the Text Highlight Color arrow, and then select a color swatch to apply the selected highlight color and change the default highlight color.
Or
Without first selecting text, do either of the following:
Select the Text Highlight Color button to select the default highlight color.
Select the Text Highlight Color arrow, and then select a color swatch to select that highlight color.
When the pointer changes to a highlighter, drag it across one or more sections of text to apply the highlight.
Select the Text Highlight Color button or press the Esc key to deactivate the highlighter.
To copy formatting to other text
Select anywhere in the text that has the formatting you want to copy.
On the Home tab, in the Clipboard group, do either of the following:
If you want to apply the formatting to only one target, select Format Painter once.
If you want to apply the formatting to multiple targets, double-click Format Painter.
When the pointer changes to a paintbrush, select or drag across the text you want to apply the copied formatting to.
If you activated the Format Painter for multiple targets, repeat step 3 until you finish applying the formatting. Then select the Format Painter button once, or press the Esc key, to deactivate the tool.
To repeat the previous formatting command
Select the text to which you want to apply the repeated formatting. Then do either of the following to repeat the previous formatting command:
On the Quick Access Toolbar, select the Repeat button. n l
Press Ctrl+Y.
Press F4.
To open the Font dialog box
On the Home tab, in the Font group, select the Font dialog box launcher.
Press Ctrl+Shift+F.
To remove character formatting
Select the text from which you want to clear the formatting. Then do any of the following:
Press Ctrl+Spacebar to remove only manually applied formatting (and not styles).
On the Home tab, in the Font group, select the Clear All Formatting button to remove all styles and formatting other than highlighting from selected text.
IMPORTANTIf you have selected an entire paragraph, selecting Clear All Formatting will clear character and paragraph formatting from the paragraph and reset it to the default paragraph style.
On the Home tab, in the Font group, select the Text Highlight Color arrow and then, on the menu, select No Color to remove highlighting.
To change the character spacing
Select the text you want to change.
Open the Font dialog box, and then select the Advanced tab to display character spacing and typographic features.
In the Spacing list, select Expanded or Condensed.
In the adjacent By box, set the number of points you want to expand or condense the character spacing.
In the Font dialog box, select OK.