Unleashing the power of Excel with VBA


- By Bill Jelen and Tracy Syrstad
- 4/10/2019
- Barriers to entry
- Knowing your tools: The Developer tab
- Understanding which file types allow macros
- Macro security
- Overview of recording, storing, and running a macro
- Running a macro
- Understanding the VB Editor
- Understanding shortcomings of the macro recorder
- Next steps
Overview of recording, storing, and running a macro
Recording a macro is useful when you do not have experience writing lines of code in a macro. As you gain more knowledge and experience, you will record macros less frequently.
To begin recording a macro, select Record Macro from the Developer tab. Before recording begins, Excel displays the Record Macro dialog box, as shown in Figure 1-4.
)
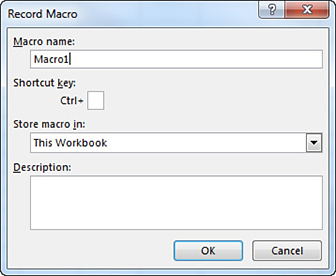
FIGURE 1-4 Use the Record Macro dialog box to assign a name and a shortcut key to the macro being recorded.
Filling out the Record Macro dialog box
In the Macro Name field, type a name for the macro. Be sure to type continuous characters. For example, type Macro1 (without a space), not Macro 1 (with a space). Assuming that you will soon be creating many macros, use a meaningful name for the macro. A name such as FormatReport is more useful than one like Macro1.
The second field in the Record Macro dialog box is a shortcut key. If you type a lowercase j in this field and later press Ctrl+J, this macro runs. Be careful, however, because Ctrl+A through Ctrl+Z (except Ctrl+J) are all already assigned to other tasks in Excel. If you assign a macro to Ctrl+B, you won’t be able to use Ctrl+B for bold anymore. One alternative is to assign the macros to Ctrl+Shift+A through Ctrl+Shift+Z. To assign a macro to Ctrl+Shift+A, you type Shift+A in the shortcut key box.
 CAUTION
You can reuse a shortcut key for a macro. For example, if you assign a macro to Ctrl+C, Excel runs your macro instead of doing the normal action of copy.
In the Record Macro dialog box, choose where you want to save a macro when it is recorded: Personal Macro Workbook, New Workbook, or This Workbook. My recommendation is that you store macros related to a particular workbook in This Workbook.
The Personal Macro Workbook (Personal.xlsm) is not a visible workbook; it is created if you choose to save the recording in the Personal Macro Workbook. This workbook is used to save a macro in a workbook that opens automatically when you start Excel, thereby enabling you to use the macro. After Excel is started, the workbook is hidden. If you want to display it, select Unhide from the View tab.
 TIP
TIP
I do not recommend that you use the personal workbook for every macro you save. Save only those macros that assist you in general tasks—not in tasks that are performed in a specific sheet or workbook.
The fourth box in the Record Macro dialog box is for a description. This description is added as a comment to the beginning of your macro.
After you select the location where you want to store the macro, click OK. Record your macro. For this example, type Hello World in the active cell and press Ctrl+Enter to accept the entry and stay in the same cell. When you are finished recording the macro, click the Stop Recording icon in the Developer tab.
TIP
You also can access a Stop Recording icon in the lower-left corner of the Excel window. Look for a small white square to the right of the word Ready in the status bar. Using this Stop button might be more convenient than returning to the Developer tab. After you record your first macro, this area usually has a Record Macro icon, which is a small dot on an Excel worksheet.