Using Security Center for incident response
- By Yuri Diogenes and Tom Shinder
- 8/23/2018
- Understanding security alerts
- Detection scenarios
- Accessing security alerts
- Investigating a security issue
- Responding to a security alert
Responding to a security alert
Now that you know how to use Security Center to detect an alert and how to investigate a security issue, you can move to the next phase: responding to a security alert. To aid you in this, Security Center supports a feature called security playbook. Security playbooks enable you to create a collection of procedures that can be executed from Security Center when a certain security alert is triggered. Azure Logic Apps is the automation mechanism behind security playbooks.
Before creating a playbook, you should have in mind what you want to automate. Before implementing this feature, answer the following questions:
For which security alert should I automate a response?
What steps should be automated if the conditions for this alert are true?
What steps should be automated if the conditions for this alert are false?
Creating a playbook
In this example, the goal is to create a security playbook that sends an email anytime a high alert is triggered. Follow these steps:
In the left pane of the Security Center window, under Automation & Orchestration, click Playbooks. The Playbook dashboard opens. Assuming this is the first time you’ve created a playbook, the dashboard will be empty, as shown in Figure 5-21.
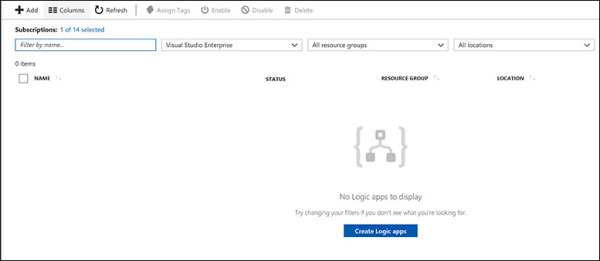
FIGURE 5-21 Creating a new security playbook.
Click the Create Logic App button. The Create Logic App blade appears. (See Figure 5-22.)
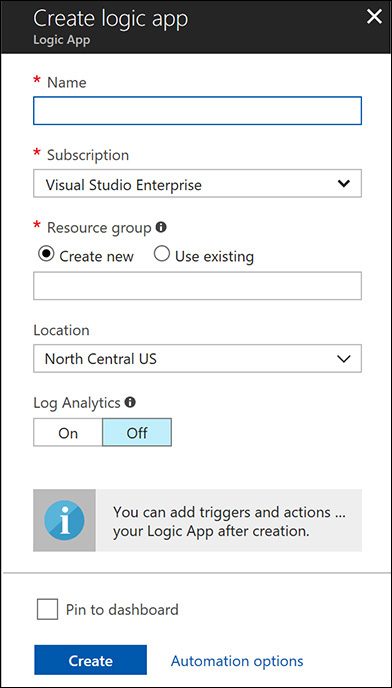
FIGURE 5-22 Creating a new logic app.
In the Name box, type a name for this playbook.
In the Subscription drop-down list, select your subscription type.
In the Resource Group section, select either the Create New or the Use Existing option. If you select the latter, type the name of the existing group in the box below the option buttons.
Select a location from the Location drop-down list.
If you want to monitor your workflow using Log Analytics, you can click the On button in the Log Analytics section. For this example, leave it Off, which is the default.
Click the Create button. The new playbook will appear in the list in the Playbook dashboard. (See Figure 5-23.) If you don’t see it, click Refresh.
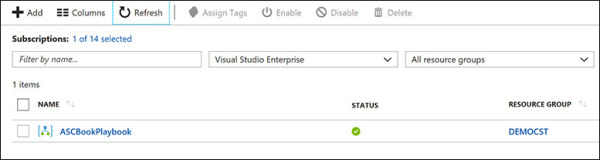
FIGURE 5-23 New playbook successfully created.
)
)
Building the workflow
You’ve created a playbook, but it doesn’t contain any procedures yet. Your next step is to build the workflow for the playbook. Follow these steps:
Click the playbook you just created to edit it.
Under Templates, click Blank Logic App. The Logic Apps Designer dashboard appears.
In the Search box, type Security Center. (See Figure 5-24.)
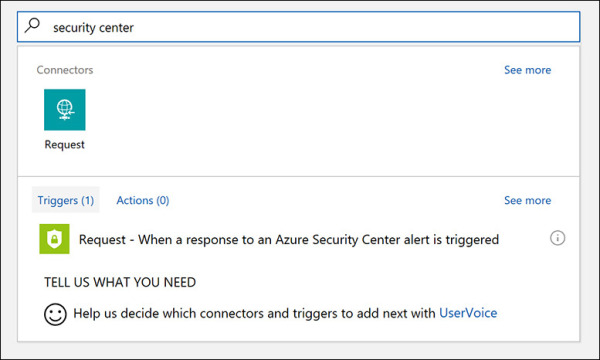
FIGURE 5-24 Using the Security Center template in Logic Apps.
Click the Request – When a Response to an Azure Security Center Alert Is Triggered option.
Click the New Step button. The options shown in Figure 5-25 appear.
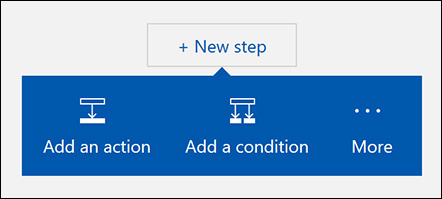
FIGURE 5-25 Adding a new step to the workflow.
Click Add a Condition. The options shown in Figure 5-26 appear.
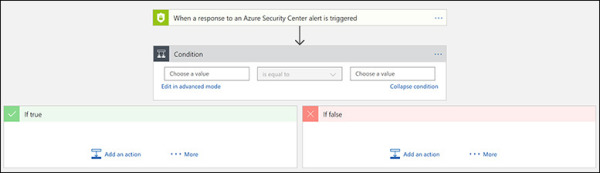
FIGURE 5-26 Adding a new condition to the workflow.
Under Condition, click the first box, and select Alert Severity from the drop-down list that appears. Then click the gray area outside the Condition settings to hide the drop-down list.
Leave the second box with the default option (Is Equal To).
Click in the third box and type Medium.
In the If True section, click Add an Action, and choose Office 365 Outlook from the drop-down list that appears
Open the All Actions drop-down list and choose Office 365 Outlook – Send an Email.
Sign in with your Office 365 or corporate Outlook account. This is the email address that will be used to send the email when this condition is met. You should see a dialog box like the one shown in Figure 5-27.
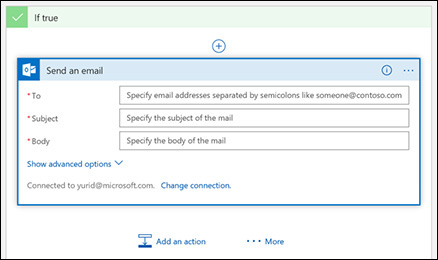
FIGURE 5-27 Email parameters.
Type the destination address in the To field. This is the mailbox that will receive the alert. If you want to send the alert to more than one mailbox, separate each address with a semicolon.
In the Subject field, type a brief message that reflects the intent of the email—for example, High Severity Alert Detected.
In the Body field, type a generic message, and concatenate it with the variables that appear in the drop-down list next to the Send an Email box. (See Figure 5-28.)
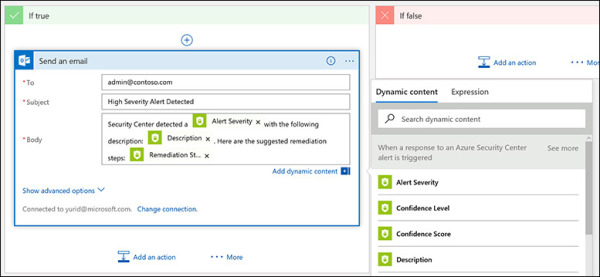
FIGURE 5-28 Description using fixed text and variables.
If you want to trigger an action if the alert is not a high priority, repeat steps 10–15 in the If False section.
Click Save in the upper-left corner of the Logic Apps Designer dashboard.
Click Close in the Logic Apps Designer dashboard and in the playbook’s properties.
)
)
)
Executing a playbook
Now that the playbook contains a workflow, you can execute the playbook. You can do so from two locations: the Security Alerts dashboard or the Investigation dashboard. The following steps demonstrate the execution from the Security Alerts dashboard.
In the left pane of the Security Center window, under Detection, click Security Alerts.
The playbook you created applies to high-severity alerts. To meet this condition, click a high-priority alert.
Click the attacked resource that corresponds to the high-priority alert. A blade for the attacked resource opens.
Click the Run Playbooks button. The Playbooks blade appears. (See Figure 5-29.)
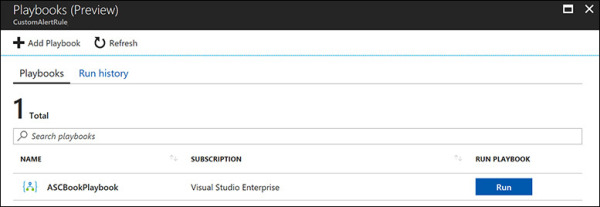
FIGURE 5-29 The Playbooks blade with the playbook you just created.
Click Run. The security playbook runs.
To confirm that the playbook ran correctly, click the Run History tab, click the Refresh button, and check the result. (See Figure 5-30.)
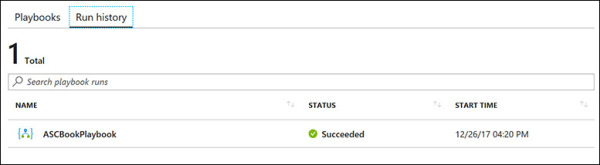
FIGURE 5-30 The Run History tab shows a history of every execution of this playbook.
Check the mailbox you set as the destination for the email generated by the playbook. You should have received an email from Security Center about the alert based on the parameters you set when you created the workflow.
)
)
When you click Run History, the log you see pertains only to the execution of the playbook against the alert you selected. Let’s call it Alert A. If you run the same playbook on a different alert—Alert B—you won’t see an entry for that operation in the history for Alert A. Instead, it will appear in a separate history, for Alert B.
Auditing playbook execution
As noted, you can check whether a playbook was executed against a particular alert by viewing its history. However, this won’t show you whether the playbook was executed against all relevant alerts. For that, you should audit the playbook’s execution. That way, you see its full execution log. Follow these steps to perform this operation:
In the left pane of the Security Center window, under Automation & Orchestration, click Playbooks.
Click the playbook you want to audit.
The playbook’s properties cite the details of all executions, including the date, start time, and duration. You can also filter by date and time. (See Figure 5-31.)
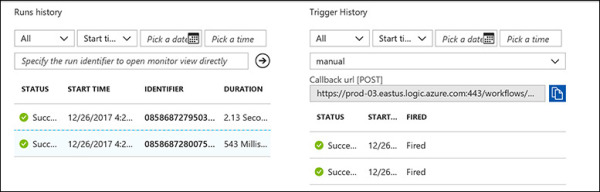
FIGURE 5-31 Complete history of executions for this playbook.
For more details on a particular execution, click the execution line. The Run History blade opens with the Logic App Run dashboard displayed. (See Figure 5-32.)
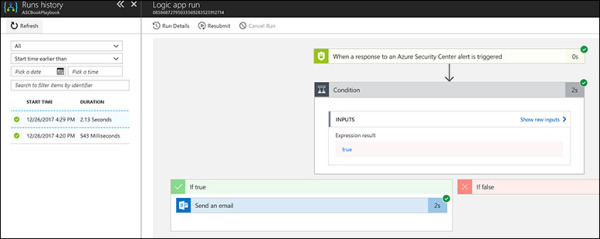
FIGURE 5-32 More details about a particular execution.
Notice that in the workflow, a small green check mark appears in the upper-right corner of each box. This indicates the successful execution of that particular step.
If you don’t see a green check mark, click the step to view the raw data and troubleshoot. For example, if you click the When a Response to an Azure Security Center Alert Is Triggered option, you will see the raw input and output received by the Logic App. (See Figure 5-33.)
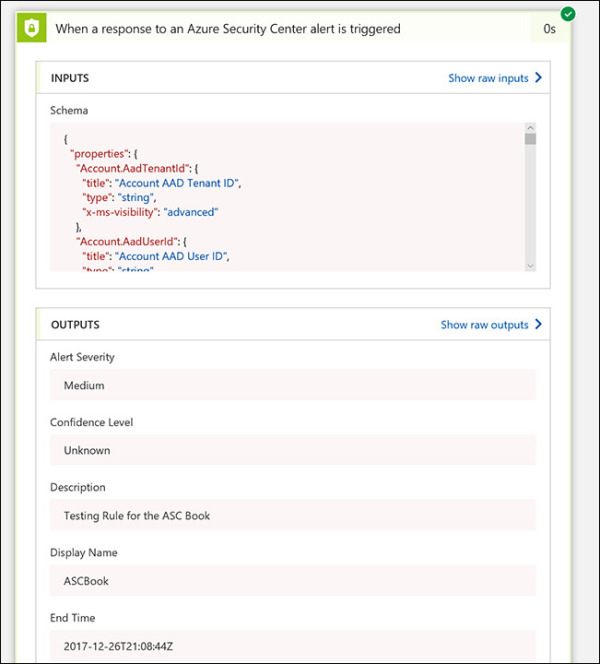
FIGURE 5-33 Raw input and output.
Click Close in the Logic App Run page and in the playbook’s properties.
)
)
)
)
)
)
You can integrate the playbook with solutions from certain partners. For example, you can integrate it with Service Now to create a service ticket when an incident is detected.