Manage high availability and disaster recovery
- By Victor Isakov
- 11/7/2017
Skill 4.4: Implement Availability Groups
Introduced in SQL Server 2012, Availability Groups revolutionized high availability by dropping the reliance on specific hardware and giving you the option of scaling out your database solution. With Availability Groups, high availability is achieved by combining the capabilities of Windows with the Database Engine. Consequently, Availability Groups are hardware, shared storage, and cloud provider agnostic. Don’t automatically use Availability Groups because they are “better than clustering”, or because “clustering is going away.” Both of those assertions are false.
This objective covers how to:
Architect Availability Groups
Configure Windows clustering
Create an Availability Group
Configure read-only routing
Manage failover
Create distributed Availability Group
Architect Availability Groups
Availability Groups have the most complex architecture out of all the high availability technologies, so make sure you understand how they work, their limitations and how best to implement them. Do not be seduced by automatically using Availability Groups because they represent new technology. It is perfectly valid to continue using Failover Clustering as a high availability solution, because it is not going away and Microsoft continues to improve it in every release of Windows Server. An organization should have some operational maturity to successfully manage Availability Groups. Furthermore, certain edge cases may degrade performance. Ideally you should perform a Proof-of-Concept (POC) before deploying Availability Groups into production.
The Availability Group architecture, shown in Figure 4-10, contains the following elements:
Availability group An Availability Group is a container that represents a unit of fail over. An Availability Group can have one or more user databases. When an Availability Group fails over from one replica (a SQL Server instance) to another replica, all of the databases that are part of the Availability Group fail over. This might be particularly important for multi database solutions like Microsoft Biztalk, Microsoft SharePoint, and Microsoft Team Foundation Server (TFS).
Primary replica A primary replica is a SQL Server instance that is currently hosting the Availability Group that contains a user database that can be modified. You can only have one primary instance at any given point in time.
Secondary replica A secondary replica is a SQL Server instance that is hosting a copy of the Availability Group. The user databases within the Availability Group hosted on a secondary replica can’t be modified. Different versions of SQL Server support a different maximum number of secondary replicas:
SQL Server 2012 supports four secondary replicas
SQL Server 2014-2016 supports eight secondary replicas
Failover partner A failover partner is a secondary replica that has been configured as an automatic failover destination. If something goes wrong with a primary replica the Availability Group will be automatically failed over to the secondary replica acting as a failover partner. Different versions of SQL Server support a different maximum number of failover partners:
SQL Server 2012-2016 supports one failover partner
SQL Server 2016 supports two failover partners
Readable secondary replica A readable secondary replica is a secondary replica that has been configured to allow select queries to run against it. When a SQL Server instance acts as a readable secondary the database engine will automatically generate temporary statistics in the [tempdb] system database to help ensure optimal query performance. Furthermore, row-versioning, which also uses the [tempdb] system database, is used by the database engine to remove blocking contention.
Availability group listener An Availability Group listener is a combination of a virtual network name (VNN) and virtual IP (VIP) address that can be used by client applications to connect to the databases hosted within the Availability Group. The VNN and its VIP is stored as a DNS entry in Active Directory (AD). An Availability Group can have multiple Availability Group listeners. The primary use of an Availability Group listener is to provide a level of abstraction from the primary replica. Applications connect to the Availability Group listener and not the current primary replica’s physical server name.
Primary database A primary database is a user database hosted on the primary replica of an Availability Group replica.
Secondary database A secondary database is a user database hosted on any of the secondary replicas of an Availability Group.
)
FIGURE 4-10 Availability group architecture
The primary replica can have multiple roles. Any given SQL Server instance could be both a readable secondary and a failover partner.
Availability Groups work by automatically transmitting up to 60KB transaction log buffers (in memory structures, also referred to as log blocks, that are written to first, before they are flushed to disk using the Write-Ahead-Logging (WAL) protocol) as they fill up or when a commit transaction event occurs. Consequently, the primary database and secondary database can be synchronized in real-time.
Availability groups support two different synchronization modes:
Synchronous commit With synchronous commit mode the secondary replica is kept synchronized synchronously, in real-time. The secondary database is an exact binary match of the primary database. Because the databases are kept in sync, this implies a performance overhead on primary, which can effect performance; both databases wait to be in sync before the commit. Synchronous mode facilitates the failover capability of Availability Groups. Ideally, with synchronous mode you have very low network latency between the primary replica and secondary replica. If there is a network issue between the primary replica and the secondary replica the Availability Group will automatically switch over to asynchronous mode. This allows transactions to still be completed on the synchronous replica if the secondary replica is offline or there is a network issue.
Asynchronous commit With asynchronous mode the secondary replica is kept synchronized asynchronously with no guarantee that the primary database and secondary database are an exact match at any given point in time and space. The primary replica transmits the log buffers as quickly as it can. There should be minimal or no impact to the transactions running in the primary database. Asynchronous mode tolerates a higher network latency, and is typically used between data centers.
Figure 4-11 shows how synchronous commit works between replicas in an Availability Group. The key to the synchronous commit is to harden the log on the secondary replica as quickly as possible and send that acknowledgement back to the primary replica.
A client application starts a transaction in the primary database.
The transaction starts consuming log blocks with operations that need to be performed to complete the transaction.
In the background, the secondary replica is requesting the Log Blocks to be transmitted. The primary and secondary replica need to coordinate what needs to be transmitted using the Log Sequence Number (LSN) and other information.
The log block becomes full or a commit transaction operation is performed. The database engine’s Log Manager persists (flushes) the Log Block to the log file on the disk and to the Log Pool used by Availability Groups.
The Log Capture thread reads the Log Block from the Log Pool and sends it to all secondary replicas.
There is a separate log capture thread for each secondary replica. This allows for parallel updating of secondary replicas.
The log content is compressed and encrypted before being sent out on the network.
The log content is compressed and encrypted before it gets sent to the secondary replica.
The Log Receive thread on the secondary replica receives the Log Block.
The Log Receive thread writes the Log Block to the Log Cache on the secondary replica.
The Redo thread applies the changes from the Log Block to the database as the Log Cache is being written to:
There is a separate redo thread per secondary database.
When the Log Block fills, or a commit log operation is received, the Log Cache is hardened onto the disk where the transaction log of the secondary database is located.
An acknowledgement is sent by the synchronous secondary replica to the primary replica to acknowledge that the log has been hardened. This is the key step because it guarantees that no data loss is possible.
If the Redo thread falls behind the rate at which the Log Blocks are being written to and flushed out of the log cache, it starts reading the log blocks from the transaction log on disk and apply them to the secondary database.
)
FIGURE 4-11 Availability Group Synchronous Commit
Figure 4-12 shows how asynchronous commit works between replicas in an Availability Group. The process is similar to the synchronous commit process, except that the acknowledgement message of a successful commit is sent after the log blocks are persisted locally on the Primary Replica. The key to the asynchronous commit is to minimize the impact on the Primary Replica.
A client application starts a transaction in the primary database.
The transaction starts consuming Log Blocks with operations that need to be performed to complete the transaction.
In the background, the secondary replica requests the Log Blocks to be transmitted. The primary and secondary replica needs to coordinate what needs to be transmitted using the Log Sequence Number (LSN) and other information.
The Log Block becomes full or a commit transaction operation is performed. The database engine’s Log Manager persists (flushes) the Log Blocks to the log file on the disk and to the Log Pool used by Availability Groups.
If all of the secondary replicas are using asynchronous commit mode, the acknowledgement of a successful commit is effectively sent to the client application.
Concurrently, the Log Capture thread reads the Log Blocks from the log pool and transmits them to the secondary replica.
There is one Log Capture thread per replica, so all replicas are synchronized in parallel.
The log content is compressed and encrypted before being sent on the network.
On the secondary replica, the Log Receive thread receives the Log Blocks from the network.
The Log Receive thread writes the received Log Blocks to the Log Cache on the secondary replica.
As the Log Blocks are written to the Log Cache, the Redo thread reads the changes and applies them to the pages of the database so that it will be in sync with the primary database.
When the Log Cache on the secondary becomes full, or a commit transaction log record is received, the contents of the log cache is hardened onto the disk of the secondary replica.
If the Redo thread falls behind the rate at which the Log Blocks are being written to and flushed out of the Log Cache, it starts reading the Log Blocks from the transaction log on disk, applying them to the secondary database.
)
FIGURE 4-12 Availability Group Asynchronous commit
Log stream compression was introduced in SQL Server 2014 as a means of improving the performance of Availability Groups. However, the default behavior of log stream compression has changed in SQL Server 2016:
Log stream compression is disabled by default for synchronous replicas. This helps ensures OLTP performance is not slowed down on the primary replica. Log stream compression consumes more processor resources and adds a latency.
You can change this default behavior by enabling trace flag 9592.
Log stream compression is enabled by default for asynchronous replicas.
You can change this default behavior by enabling trace flag 1462.
Log stream compression is disabled by default for Automatic Seeding to reduce processor usage on the primary replica.
You can change this default behavior by enabling trace flag 9567.
The release of SQL Server 2016 brought support for Basic Availability Groups, which are designed to replace Database Mirroring in Standard Edition. You should no longer be implementing Database Mirroring on SQL Server 2016, because it has been deprecated and is scheduled to be dropped from the product in a future release. Basic Availability Groups are considered a replacement for Database Mirroring, so their limitations “mimic” the limitations of Database Mirroring.
Basic Availability Groups have a number of limitations, including:
Limited to two replicas (primary and secondary).
Only support one database per Availability Group.
Can’t add a replica to an existing Availability Group.
Can’t remove a replica to an existing Availability Group.
Can’t upgrade a basic Availability Group to an advanced Availability Group.
Only supported in Standard Edition.
No read access on secondary replica (no support for readable secondaries).
Backups cannot be performed on the secondary replica.
The pros of using Availability Groups include:
Support for any edition of SQL Server
SQL Server 2016 Standard Edition only supports Basic Availability Groups
Provides automatic failover
Typically, provides faster failover when compared to failover clustering. This is because when there is a failover event in a failover cluster the SQL Server instance has to be started on the node to which you are failing over to. This can potentially take longer as the binaries have to load into memory, memory has to be allocated to the Database Engine and the databases have to be automatically recovered. Typically though, this is not an important factor in reality, as there are other considerations that are more important.
Automatic page repair. Each replica tries to automatically recover from a page corruption incident on its local database. This is limited to certain types of errors that prevent reading a database page.
If the primary replica cannot read a page it broadcasts a request for a correct copy to all the secondary replicas and replaces the corrupt page from the first secondary replica that provides the correct page.
If a secondary replica can’t read a page, it requests a correct copy of the page from the primary replica.
Supports 2 failover partners (with the release of SQL Server 2016).
No data loss is possible between two synchronous replicas, since data is modified on both in real-time.
Does not rely on shared storage, which represents a single point in failure.
Each replica has its own separate copy of the database.
Does not require a SAN, which can be expensive, slow, or not available in various cloud providers.
Typically, can provide much faster performance due to the ability to use local flash storage attached to very fast buses such as PCIe. SANs cannot provide this level of storage performance.
Scope of protection is at the database or database group level.
A group of databases can be protected together, which can be important for software solutions such as Microsoft SharePoint, Microsoft BizTalk, and Microsoft Team Foundation Services (TFS).
Support for up to secondary eight replicas.
Support for both synchronous and asynchronous modes. This flexibility is important for implementing Availability Groups within and between data centers, depending on business requirements and technical constraints.
Read operations can be offloaded from the primary replica to readable secondaries. This allows you to scale out your database solution in certain use cases. This represents one of the major benefits of Availability Groups over other high availability solutions.
Backup and database consistency check operations can be offloaded from the primary replica to the secondary replica.
Secondary replicas support performing log backups and copy-only backups of a full database, file, or filegroup.
The cons of using Availability Groups include:
Replica databases have to use the full recovery model.
Some production database solutions should not use the full recovery model due to the amount of transaction log activity that they incur. An example of this includes the search and logging databases in Microsoft SharePoint.
They are much more difficult to manage.
Logins are not automatically synchronized between replicas. You can take advantage of contained databases to help mitigate this.
SQL Server Agent jobs, alerts, and operators are not automatically synchronized between replicas.
Patching SQL Server instances are more complicated than failover clustering, especially where there is a lot of database modification during any potential outage window. You don’t want the Availability Groups to send a queue to grow to a size such that it can never synchronize, and you will be forced to re-initialize the replica database.
No support for providing a delay between when changes are made on the primary database and the secondary database.
Impacting database performance in certain highly transactional workloads in OLTP database scenarios.
Might not support synchronous mode where your network is unreliable or has a high latency, as in the case between data centers.
Might not be supported by certain applications. Engage your application developers or vendor to determine whether there are potentially any issues.
You are limited with what operations can be performed on a database replica. In such cases, you have to remove the database from the Availability Group first. For example, the following operations can’t be performed on a database that is part of an Availability Group:
Detaching the database
Taking a database offline
Does not fully support Microsoft Distributed Transaction Coordinator (DTC or MSDTC). This depends on the version of SQL Server that you are using and how your applications used the DTC.
SQL Server 2016 has limited support for DTC.
Use Availability Groups for the following use cases:
Providing a high availability solution where there is no shared storage.
Providing a high availability solution where the business does not want to use shared storage. Different reasons include:
Poor performance of your shared storage.
Expense of your shared storage.
Shared storage represents a single point of failure.
Providing high availability or disaster recovery between data centers without having to rely upon geo-clustering/stretch clusters that rely on more complicated and expensive storage synchronization technology.
Offloading reporting from the primary OLTP database. This is where Availability Groups really shine, as they represent the only scale-out technology within SQL Server. This can also be implemented between different sites if users don’t require the data to be 100% up to date, as in the case of a data warehouse where they are reporting on historical data.
Providing high availability between more than three data centers. With SQL Server 2016’s ability to have two failover partners, you can effectively build a triple redundant solution.
SQL Server 2014 introduced the following enhancements to Availability Groups:
Number of secondary replicas was increased to eight.
Increased availability of readable secondaries, such as if the primary replica became unavailable.
Enhanced diagnostics through new functions like is_primary_replica.
New DMVs, such as sys.dm_io_cluster_valid_path_names.
SQL Server 2016 added the following:
Basic Availability Groups with Standard Edition
Distributed Availability Groups
Domain-independent Availability Groups (Active Directory is no longer required)
Improvements in the log transport’s performance
Load balancing between readable secondary replicas
Support for Group Managed Service Accounts (GMSA)
Support for two automatic failover targets
Automatic seeding of databases through the log transport
Limited Microsoft Distributed Transaction Coordinator (MSDTC) support
Support for updatable columnstore indexes on secondary replicas
Support for encrypted databases
Support for SSIS Catalog
Improvements in database level failover triggers
 EXAM TIP
Make sure you familiarize yourself, at least at a high level, with the new Availability Groups features in SQL Server 2016. Undoubtedly, the exam writers will be seduced by writing exam questions that will test on the new SQL Server 2016 features.
Architect readable secondaries
One of the major benefits of Availability Groups is to offload your reports and read-only operations from the primary replica. By offloading read operations to these secondary replicas you remove the contention created readers blocking writers and vice versa. Your read operations are also not competing for the same processor, memory and storage resources as your OLTP operations.
Readable secondaries create temporary statistics inside the [tempdb] system database to help optimize query performance on that particular readable secondary. If you have multiple readable secondaries servicing different reports it is quite possible for each readable secondary to have a different set of temporary statistics.
Readable secondaries do not block the primary replica from continually updating the secondary database. The readable secondary replicas achieve this by taking advantage of snapshot isolation, which in turn relies on row-versioning. Row-versioning heavily relies on the [tempdb] system database, so make sure it is optimally configured on fast storage.
Availability groups allow you to fine tune how applications will be able to connect to these read-only replicas. When you configure a replica to be a readable replica you have the following options:
Read only With a read only secondary database any application will be able to connect to the secondary database.
Read only intent With a read only intent secondary database only “modern” applications that support the ApplicationIntent=ReadOnly or Application Intent=ReadOnly connection string parameter will be able to connect to the secondary database.
If you have a number of readable replicas in your Availability Group you can set up routing rules for how applications will be automatically redirected to a readable secondary when they connect to the Availability Group via the listener.
SQL Server 2016 introduced the ability to configure load-balancing across a set of your readable secondary replicas.
Configure Windows clustering
Availability groups rely on the Windows Server Failover Clustering (WSFC) feature to help facilitate high availability and automatic failover. You need to install WSFC on all of the nodes of your failover cluster, and create a cluster before you can configure an Availability Group in SQL Server.
To practice setting up Availability Groups, set up the following VMs in Hyper-V:
A domain controller (ADDS) for the SQL.LOCAL domain
A SQL Server instance (REPLICA1) joined to SQL.LOCAL
A SQL Server instance (REPLICA2) joined to SQL.LOCAL
A SQL Server instance (REPLICA3) joined to SQL.LOCAL
A Windows file server (STORAGE) joined to the domain:
This server is optional
It is used for the backup files
You could use a share created on the domain controller instead, or either of the SQL Server instances
The following steps show how to install the Windows failover clustering feature
Log into the first node that you plan to set up as an Availability Group as a domain administrator.
Open up Server Manager.
Choose Add Roles And Features from the Manage drop-down list.
In the Add Roles And Features Wizard select the Next button.
Choose the Role-Based Or Feature-Based Installation type and click on Next.
Ensure that the local server is selected in the Server Pool and click on the Next button.
Do not install any roles. Click on the Next button in the Select Server Roles page.
Select the Failover Clustering check box to install the Failover Clustering feature.
The Add Roles And Features Wizard will, by default, want to install the Failover Clustering tools and Powershell modules. Confirm this action by clicking on the Add Features button.
Confirm that you are installing Failover Clustering and the related tools before clicking on the Install button to begin the installation.
Confirm that the installation was successful and click on the Close button to finish the installation. (A reboot might be required, in which case the wizard will prompt you to do that.)
Repeat the above steps on the remaining nodes that will make up the Availability Group replicas. In this chapter, we will be configuring an Availability Group across 3 replicas.
After installing the failover clustering feature on all the planned Availability Group replicas, you need to create a failover cluster.
The following steps show how to install the Windows failover clustering feature:
Open Failover Cluster Manager, which has now been installed on your server.
Click on the Create Cluster action in the right-most pane. This will start the Create Cluster Wizard.
Click on the Next button in the Before You Begin page of the Create Cluster Wizard.
Enter the name of the server that you want to add to the failover cluster and click on the Add button. The Create Cluster Wizard will validate the server’s existence and add it to the bottom text box using its fully qualified domain name (FQDN).
Repeat Step 4 for all of the servers that you wish to add.
Click on the Next button as shown in Figure 4-13.
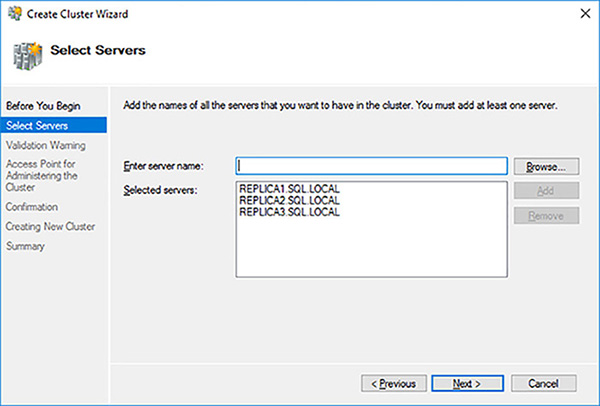
FIGURE 4-13 Selected servers for failover cluster
You need to validate that your Windows servers are capable of running a failover cluster that will be supported by Microsoft. Click on the Next button to run the configuration validation tests.
Click on the Next button in the Before You Begin page of the Validate A Configuration Wizard.
It is a best practice to run all of the cluster validation tests. In your case, as there is no shared stored used in Availability Groups, the validation test might generate some warnings. Click on the Next button to start the validation tests.
Review the servers to test and the tests that will be run. Click on the Next button to start the failover cluster validation tests. Figure 4-14 shows the cluster validation tests executing.
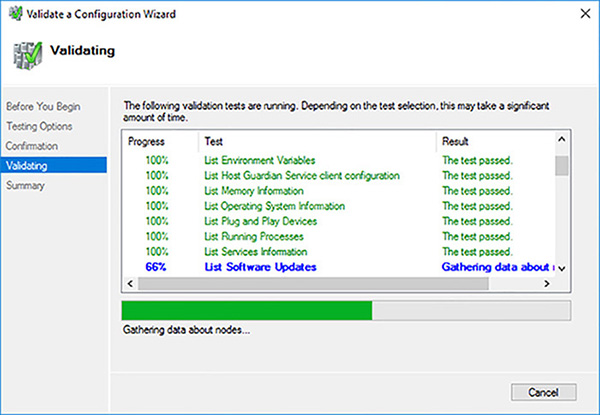
FIGURE 4-14 Cluster validation tests executing
As expected, the shared disk validation test has failed, because there are none. Click on the View Report button to see if there are any other problems.
Review the Failover Cluster Validation Report, shown in Figure 4-15. In this case the failed storage tests, shown in Figure 4-16, are fine because you will not be using shared disks. The network communication warnings, shown in Figure 4-17, are highlighting the lack of redundancy at the network level between the failover cluster’s node. This should be fine. You could, for example, provide redundancy by having multiple NICs in a Windows Server NIC team.
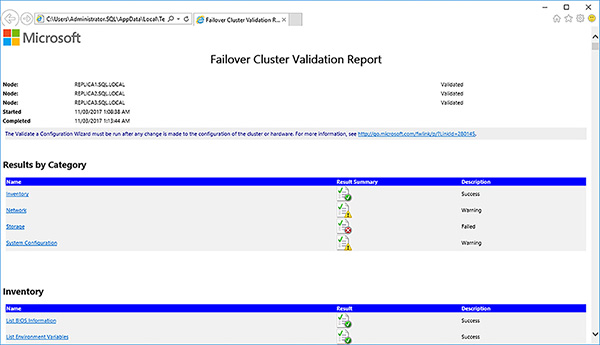
FIGURE 4-15 Failover cluster validation report
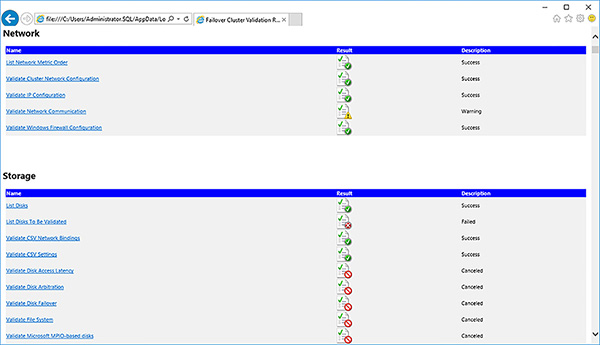
FIGURE 4-16 Failover cluster validation failed storage tests
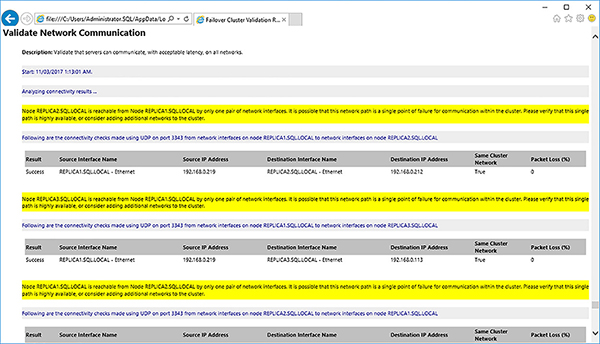
FIGURE 4-17 Failover cluster validation network communication test warnings
Address any errors in the Failover Cluster Validation Report, if any.
Re-run the Failover Cluster Validation Report, as necessary.
Save the Failover Cluster Validation Report. It can be re-run at any time.
Close the Failover Cluster Validation Report.
Close the Validate a Configuration Wizard by clicking on the Finish button.
Provide a NetBIOS name and IP address for the failover cluster, as shown in Figure 4-18.
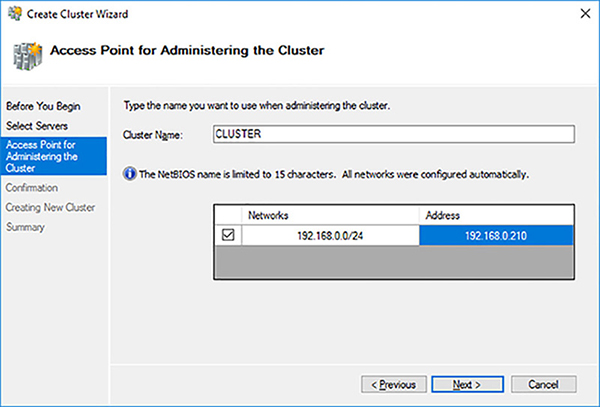
FIGURE 4-18 Availability Group Synchronous Commit
Uncheck the Add All Eligible Storage To The Cluster option, review and then confirm the creation of the failover cluster by clicking on the Next button.
Wait for the failover cluster to be created.
Review the failover cluster creation Summary page. Click on the View Report button to view the detailed failover cluster creation report.
Review and save the Create Cluster report looking out for any errors and warnings.
Close the Create Cluster report.
Click on the Finish button to close the Create Cluster Wizard
)
)
)
)
)
)
You can now leverage your failover cluster to create an Availability Group.
Create an Availability Group
To create an Availability the following prerequisites, need to have been met:
A SQL Server instance must have been installed on all the servers that you plan to be part of an Availability Group.
A failover cluster must have been created.
Availability Groups must be enable for each SQL Server instance.
The following steps show how to enable Availability Groups for a SQL Server instance
Open up SQL Server Configuration Manager.
Right-click on the SQL Server instance and select Properties.
Select the Enable AlwaysOn Availability Group check box, as shown in Figure 4-19. Note the name of the failover cluster that you created earlier.
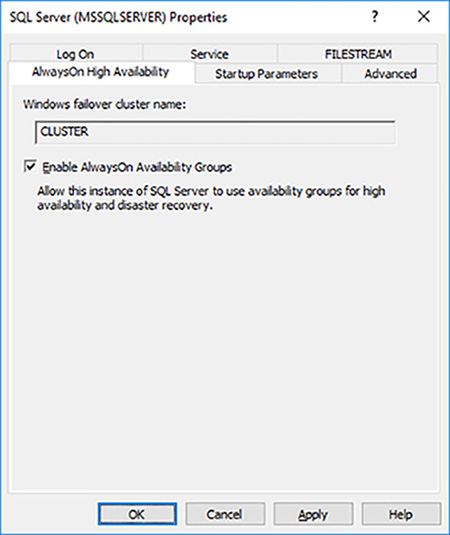
FIGURE 4-19 Enabling Availability Group at the SQL Server instance level
Click on the OK button to close the properties dialog box
Click on the OK button to close the warning. Note that SQL Server Configuration Manager does not automatically restart SQL Server whenever it is required for a change to take effect.
Right-click on the SQL Server instance and restart SQL Server.
)
You can now install an Availability Group within your SQL Server instances. To be able to add a database to an Availability Group the following pre-requisites must be met:
The database must be using full recovery model
A full database backup must have been performed, so that it’s transaction log is not in auto-truncate mode.
The database cannot be in read-only mode
The database cannot be in single-user mode
The database cannot be in auto-close mode
The database cannot be part of an existing Availability Group. Databases can only belong to a single Availability Group at any point in time and space.
The following steps show how to configure an Availability Group with 3 replicas.
Open SQL Server Management Studio.
Expand the AlwaysOn High Availability folder
Right-click on the Availability Groups folder and select New Availability Group Wizard to start the New Availability Group Wizard.
Click on the Next button on the Introduction page of the New Availability Group wizard.
Enter a name for your Availability Group, as shown in Figure 4-20, and click on the Next button.
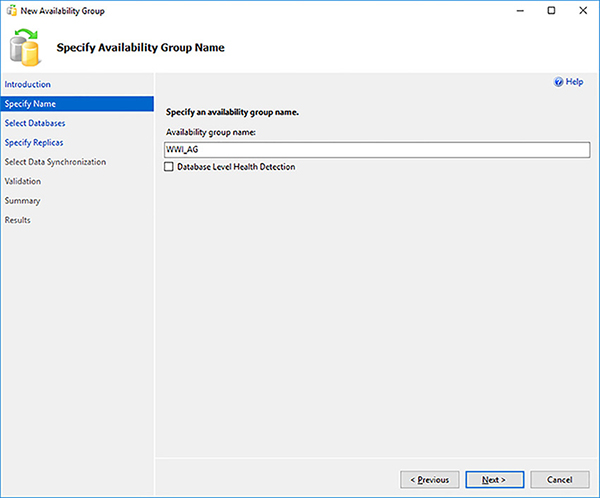
FIGURE 4-20 Availability Group Name
Select the Database Level Health Detection if you want the Availability Group to automatically failover if the Database Engine notices that any database within the Availability Group is no longer online. Although not fool-proof this new feature in SQL Server 2016 is worth enabling for Availability Groups that have multiple databases that represent a multi-database solution.
The Select Databases page allows you to select which databases will be part of the Availability Group. Only databases that meet the pre-requisites will be selectable. Select your database, as shown in Figure 4-21 and click on the Next button.
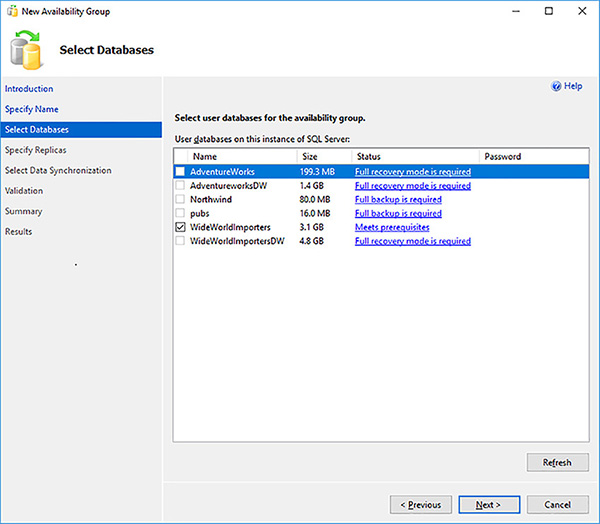
FIGURE 4-21 Availability Group Databases
The Specify Replicas page allows you to select up to 8 replicas for your Availability Group. You can select up to 3 replicas that will provide automatic failover, if required. You are further limited to only 3 synchronous replicas. Click on the Add Replica… button to add a secondary replica.
Connect to the replica by providing the server name and authentication details.
Repeat the above step for any other replicas that you wish to add to the Availability Group.
Check the Automatic Failover (Up to 3) check box for all your failover partner replicas, as shown in Figure 4-68. Notice how the replicas are automatically configured to use synchronous mode.
Select your readable secondaries, as shown in Figure 4-22. Readable secondaries have the following options:
Yes When in a secondary role, allow all connections from all applications to access this secondary in a readable fashion.
Read-only intent When in a secondary role, only allow connections from “modern” applications that support the ApplicationIntent=ReadOnly or Application Intent=ReadOnly connection string parameter.
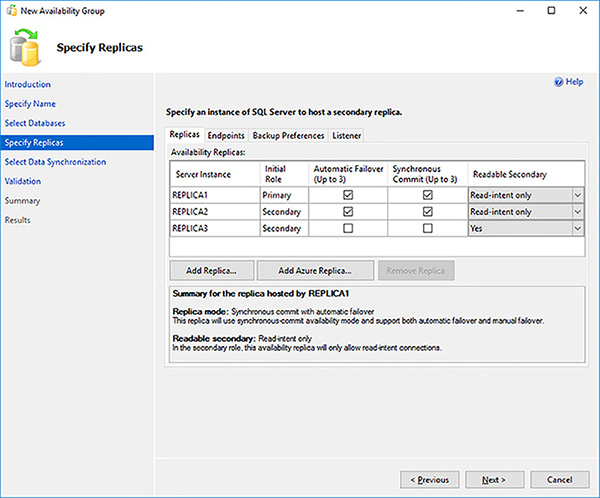
FIGURE 4-22 Availability Group readable secondaries
Click on the Next button.
Review the endpoint configuration for your replicas, as shown in Figure 4-23. Note that by default the endpoints will be encrypted. The default endpoints are fine in most cases. You will need to change the endpoints if your replicas are hosted on the same Window Operating System Environment (OSE). Click on the Next button when you are done.
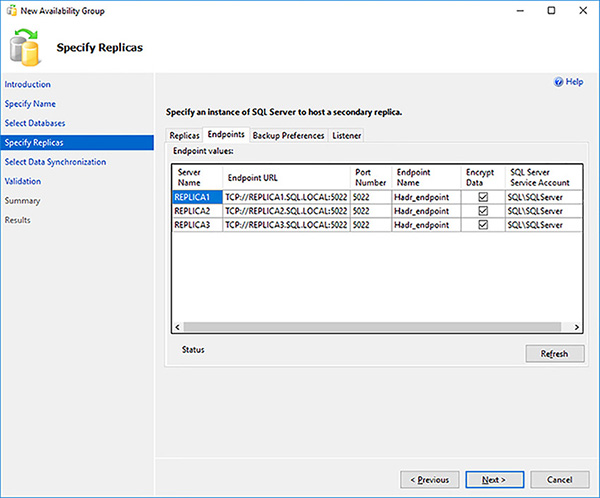
FIGURE 4-23 Availability Group endpoints
Define which replicas you want your backups to be performed on and their relative priority weight, as shown in Figure 4-24. If a number of replica can potentially perform the automated backup based on your preferences, the one with the highest priority will perform the backup. With Availability Groups backups can be performed on different replicas depending on where you want them performed. You backup preference choices are:
Prefer Secondary Automated backups will occur on a secondary replica. If no secondary replica is available, backups will be performed on the primary replica.
Secondary Only Automated backups for this Availability Group must occur on a secondary replica.
Primary Only Automated backups for this Availability Group must occur on a primary replica. Don’t forget that non copy-only full database backups can only be performed on the primary replica.
Any Replica Automated backups for this Availability Group can occur on any replica.
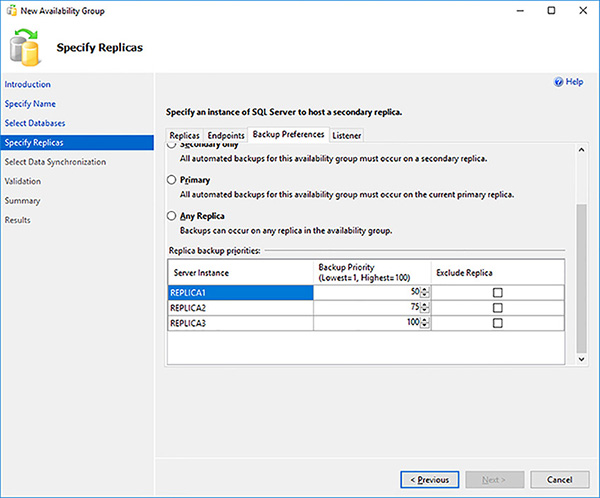
FIGURE 4-24 Availability Group backup preferences
Click on the Listener tab.
Configure the listener by providing the following information, as shown in Figure 4-25, and then click on the Next button:
DNS name
IP address
Port number
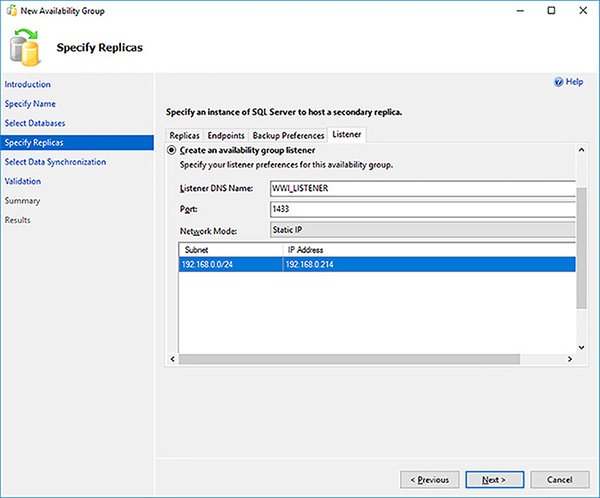
FIGURE 4-25 Availability Group listener configuration
The Create New Availability Group Wizard by default will synchronize the database from the primary replica to all of the secondary replicas through backup and restore operations. Provide the shared network location that will be used to store the database backups, as shown in Figure 4-26. Make sure that all replicas have access to this location.

FIGURE 4-26 Availability Group initial synchronization options
Click on the Next button when the Create New Availability Group Wizard finishes validating the Availability Group creation.
Review the Availability Group creation summary to make sure that all of the configuration details are correct.
Click on the Script drop down list and save the Availability Group creation script for review and change management reasons.
Click on the Finish button to start the Availability Group creation.
This will take some time.
Confirm that the Availability Group was successfully created.
)
)
)
)
)
)
)
Listing 4-3 shows the Transact-SQL script that was generated to configure the Log Shipping solution.
LISTING 4-3 Availability group configuration
--- YOU MUST EXECUTE THE FOLLOWING SCRIPT IN SQLCMD MODE.

:Connect REPLICA1

USE [master]

GO


CREATE ENDPOINT [Hadr_endpoint]

    AS TCP (LISTENER_PORT = 5022)

    FOR DATA_MIRRORING (ROLE = ALL, ENCRYPTION = REQUIRED ALGORITHM AES)

GO


IF (SELECT state FROM sys.endpoints WHERE name = N'Hadr_endpoint') <> 0

BEGIN

    ALTER ENDPOINT [Hadr_endpoint] STATE = STARTED

END

GO


use [master]

GO


GRANT CONNECT ON ENDPOINT::[Hadr_endpoint] TO [SQL\SQLServer]

GO


:Connect REPLICA1

IF EXISTS(SELECT * FROM sys.server_event_sessions WHERE name='AlwaysOn_health')

BEGIN

  ALTER EVENT SESSION [AlwaysOn_health] ON SERVER WITH (STARTUP_STATE=ON);

END

IF NOT EXISTS(SELECT * FROM sys.dm_xe_sessions WHERE name='AlwaysOn_health')

BEGIN

  ALTER EVENT SESSION [AlwaysOn_health] ON SERVER STATE=START;

END

GO


:Connect REPLICA2

USE [master]

GO


CREATE ENDPOINT [Hadr_endpoint]

    AS TCP (LISTENER_PORT = 5022)

    FOR DATA_MIRRORING (ROLE = ALL, ENCRYPTION = REQUIRED ALGORITHM AES)

GO


IF (SELECT state FROM sys.endpoints WHERE name = N'Hadr_endpoint') <> 0

BEGIN

    ALTER ENDPOINT [Hadr_endpoint] STATE = STARTED

END

GO


use [master]

GO


GRANT CONNECT ON ENDPOINT::[Hadr_endpoint] TO [SQL\SQLServer]

GO


:Connect REPLICA2

IF EXISTS(SELECT * FROM sys.server_event_sessions WHERE name='AlwaysOn_health')

BEGIN

  ALTER EVENT SESSION [AlwaysOn_health] ON SERVER WITH (STARTUP_STATE=ON);

END

IF NOT EXISTS(SELECT * FROM sys.dm_xe_sessions WHERE name='AlwaysOn_health')

BEGIN

  ALTER EVENT SESSION [AlwaysOn_health] ON SERVER STATE=START;

END

GO


:Connect REPLICA3

USE [master]

GO


CREATE ENDPOINT [Hadr_endpoint]

    AS TCP (LISTENER_PORT = 5022)

    FOR DATA_MIRRORING (ROLE = ALL, ENCRYPTION = REQUIRED ALGORITHM AES)

GO


IF (SELECT state FROM sys.endpoints WHERE name = N'Hadr_endpoint') <> 0

BEGIN

    ALTER ENDPOINT [Hadr_endpoint] STATE = STARTED

END

GO


use [master]

GO


GRANT CONNECT ON ENDPOINT::[Hadr_endpoint] TO [SQL\SQLServer]

GO


:Connect REPLICA3


IF EXISTS(SELECT * FROM sys.server_event_sessions WHERE name='AlwaysOn_health')

BEGIN

  ALTER EVENT SESSION [AlwaysOn_health] ON SERVER WITH (STARTUP_STATE=ON);

END

IF NOT EXISTS(SELECT * FROM sys.dm_xe_sessions WHERE name='AlwaysOn_health')

BEGIN

  ALTER EVENT SESSION [AlwaysOn_health] ON SERVER STATE=START;

END

GO


:Connect REPLICA1

USE [master]

GO


CREATE AVAILABILITY GROUP [WWI_AG]

WITH (AUTOMATED_BACKUP_PREFERENCE = SECONDARY,

DB_FAILOVER = OFF,

DTC_SUPPORT = NONE)

FOR DATABASE [WideWorldImporters]

REPLICA ON N'REPLICA1' WITH (ENDPOINT_URL = N'TCP://REPLICA1.SQL.LOCAL:5022', FAILOVER_

MODE = AUTOMATIC, AVAILABILITY_MODE = SYNCHRONOUS_COMMIT, BACKUP_PRIORITY = 50,

SECONDARY_ROLE(ALLOW_CONNECTIONS = READ_ONLY)),

    N'REPLICA2' WITH (ENDPOINT_URL = N'TCP://REPLICA2.SQL.LOCAL:5022', FAILOVER_MODE

= AUTOMATIC, AVAILABILITY_MODE = SYNCHRONOUS_COMMIT, BACKUP_PRIORITY = 75, SECONDARY_

ROLE(ALLOW_CONNECTIONS = READ_ONLY)),

    N'REPLICA3' WITH (ENDPOINT_URL = N'TCP://REPLICA3.SQL.LOCAL:5022', FAILOVER_MODE

= MANUAL, AVAILABILITY_MODE = ASYNCHRONOUS_COMMIT, BACKUP_PRIORITY = 100, SECONDARY_

ROLE(ALLOW_CONNECTIONS = ALL));

GO


:Connect REPLICA1

USE [master]

GO


ALTER AVAILABILITY GROUP [WWI_AG]

ADD LISTENER N'WWI_LISTENER' (

WITH IP

((N'192.168.0.214', N'255.255.255.0')

)

, PORT=1433);

GO


:Connect REPLICA2

ALTER AVAILABILITY GROUP [WWI_AG] JOIN;

GO


:Connect REPLICA3

ALTER AVAILABILITY GROUP [WWI_AG] JOIN;

GO


:Connect REPLICA1

BACKUP DATABASE [WideWorldImporters] TO  DISK = N'\\STORAGE\SQL_Backup\REPLICA1\

WideWorldImporters.bak' WITH  COPY_ONLY, FORMAT, INIT, SKIP, REWIND, NOUNLOAD,

COMPRESSION,  STATS = 5

GO


:Connect REPLICA2

RESTORE DATABASE [WideWorldImporters] FROM  DISK = N'\\STORAGE\SQL_Backup\REPLICA1\

WideWorldImporters.bak' WITH  NORECOVERY,  NOUNLOAD,  STATS = 5

GO


:Connect REPLICA3

RESTORE DATABASE [WideWorldImporters] FROM  DISK = N'\\STORAGE\SQL_Backup\REPLICA1\

WideWorldImporters.bak' WITH  NORECOVERY,  NOUNLOAD,  STATS = 5

GO


:Connect REPLICA1

BACKUP LOG [WideWorldImporters] TO  DISK = N'\\STORAGE\SQL_Backup\REPLICA1\

WideWorldImporters_20170310165240.trn' WITH NOFORMAT, NOINIT, NOSKIP, REWIND, NOUNLOAD,

COMPRESSION,  STATS = 5

GO


:Connect REPLICA2

RESTORE LOG [WideWorldImporters] FROM  DISK = N'\\STORAGE\SQL_Backup\REPLICA1\

WideWorldImporters_20170310165240.trn' WITH  NORECOVERY,  NOUNLOAD,  STATS = 5

GO


:Connect REPLICA2

-- Wait for the replica to start communicating

begin try

declare @conn bit

declare @count int

declare @replica_id uniqueidentifier

declare @group_id uniqueidentifier

set @conn = 0

set @count = 30 -- wait for 5 minutes


if (serverproperty('IsHadrEnabled') = 1)

    and (isnull((select member_state from master.sys.dm_hadr_cluster_members where

upper(member_name COLLATE Latin1_General_CI_AS) = upper(cast(serverproperty('ComputerNam

ePhysicalNetBIOS') as nvarchar(256)) COLLATE Latin1_General_CI_AS)), 0) <> 0)

    and (isnull((select state from master.sys.database_mirroring_endpoints), 1) = 0)

begin

    select @group_id = ags.group_id from master.sys.availability_groups as ags where

name = N'WWI_AG'

    select @replica_id = replicas.replica_id from master.sys.availability_replicas

as replicas where upper(replicas.replica_server_name COLLATE Latin1_General_CI_AS) =

upper(@@SERVERNAME COLLATE Latin1_General_CI_AS) and group_id = @group_id

    while @conn <> 1 and @count > 0

    begin

        set @conn = isnull((select connected_state from master.sys.dm_hadr_availability_

replica_states as states where states.replica_id = @replica_id), 1)

        if @conn = 1

        begin

            -- exit loop when the replica is connected, or if the query cannot find the

replica status

            break

        end

        waitfor delay '00:00:10'

        set @count = @count - 1

    end

end

end try

begin catch

    -- If the wait loop fails, do not stop execution of the alter database statement

end catch

ALTER DATABASE [WideWorldImporters] SET HADR AVAILABILITY GROUP = [WWI_AG];

GO


:Connect REPLICA3

RESTORE LOG [WideWorldImporters] FROM  DISK = N'\\STORAGE\SQL_Backup\REPLICA1\

WideWorldImporters_20170310165240.trn' WITH  NORECOVERY,  NOUNLOAD,  STATS = 5

GO


:Connect REPLICA3

-- Wait for the replica to start communicating

begin try

declare @conn bit

declare @count int

declare @replica_id uniqueidentifier

declare @group_id uniqueidentifier

set @conn = 0

set @count = 30 -- wait for 5 minutes


if (serverproperty('IsHadrEnabled') = 1)

    and (isnull((select member_state from master.sys.dm_hadr_cluster_members where

upper(member_name COLLATE Latin1_General_CI_AS) = upper(cast(serverproperty('ComputerNam

ePhysicalNetBIOS') as nvarchar(256)) COLLATE Latin1_General_CI_AS)), 0) <> 0)

    and (isnull((select state from master.sys.database_mirroring_endpoints), 1) = 0)

begin

    select @group_id = ags.group_id from master.sys.availability_groups as ags where

name = N'WWI_AG'

    select @replica_id = replicas.replica_id from master.sys.availability_replicas

as replicas where upper(replicas.replica_server_name COLLATE Latin1_General_CI_AS) =

upper(@@SERVERNAME COLLATE Latin1_General_CI_AS) and group_id = @group_id

    while @conn <> 1 and @count > 0

    begin

        set @conn = isnull((select connected_state from master.sys.dm_hadr_availability_

replica_states as states where states.replica_id = @replica_id), 1)

        if @conn = 1

        begin

            -- exit loop when the replica is connected, or if the query cannot find the

replica status

            break

        end

        waitfor delay '00:00:10'

        set @count = @count - 1

    end

end

end try

begin catch

    -- If the wait loop fails, do not stop execution of the alter database statement

end catch

ALTER DATABASE [WideWorldImporters] SET HADR AVAILABILITY GROUP = [WWI_AG];

GO
EXAM TIP
Make sure you familiarize yourself with the key statements in the Availability Group creation script for the exam.
Configure Quorum Configuration for Availability Group
One of the more important aspects of configuring an Availability Group correctly is to configure the correct quorum configuration. The default Availability Group installation might not configure the optimal quorum configuration. The quorum configuration and forming quorum is the responsible of the WSFC. Consequently, you need to control that at the WSFC level.
Quorum and quorum configuration will be discussed later in this chapter when it covers failover clustering.
Let’s assume that the Availability Group with three replicas that we have configured above have the following topology:
REPLICA1 and REPLICA2 are in one data center
REPLICA3 is in a separate data center
Let’s also assume that REPLICA3 is no longer a failover partner.
In this scenario, you do not want REPLICA3 to participate in the quorum, as it is in a separate data center. There will be a greater latency between it and the other 2 replicas. Likewise, if the network link fails between the data centers it will not be able to communicate with the other replicas. In the worst-case scenario, your entire failover cluster could shut down to protect itself. You do not want REPLICA3 to have a vote.
You are better off by creating an additional witness in the data center where REPLICA1 and REPLICA2 are located.
The following steps show how to change the quorum configuration for your Availability Group:
Open SQL Server Management Studio.
Connect to your primary replica.
Expand the AlwaysOn High Availability folder.
Right-click on your Availability Group and select Show Dashboard.
Click on the View Cluster Quorum Information link in the top right hand corner of the Availability Group dashboard.
Determine the current quorum configuration, as shown in Figure 4-27 and click on the Close button. Initially the Availability Group is using a Node Majority quorum model and replicas REPLICA1, REPLICA2, REPLICA3 all have a vote. You need to change this so that REPLICA3 does not have a vote in the quorum.
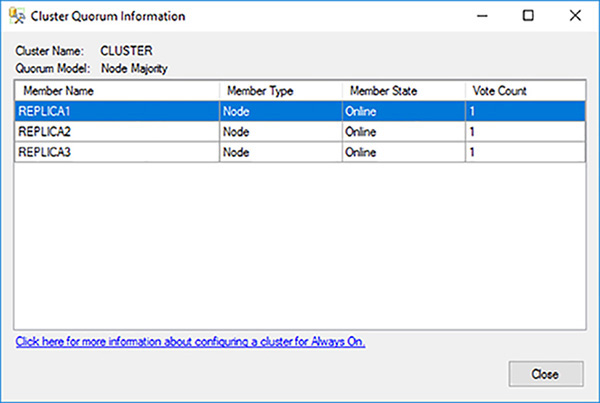
FIGURE 4-27 Initial Availability Group quorum configuration
Close the Cluster Quorum Information dialog box.
Open Failover Cluster Manager.
Connect to the cluster that is being used by the Availability Group.
Right click on your cluster, select the More Actions option and then the Configure Cluster Quorum Settings option to start the Configure Cluster Quorum Wizard.
Read the welcome page of the Configure Cluster Quorum Wizard and click on the Next button.
On the Select Quorum Configuration Option page select the Advanced Quorum configuration option and click on the Next button.
On the Select Voting Configuration page select the Select Nodes option, then uncheck REPLICA3 as a voting node, before clicking on the Next button, as shown in Figure 4-28.
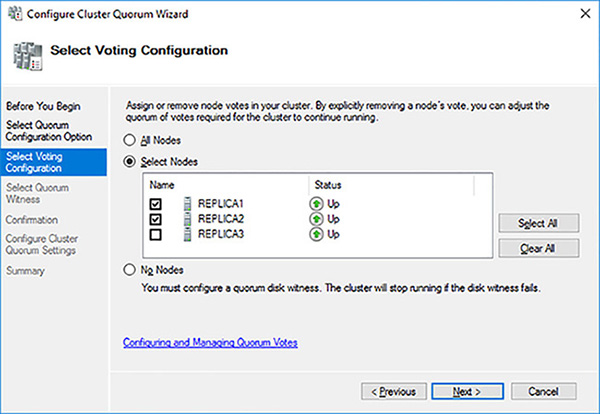
FIGURE 4-28 Select Voting Configuration
On the Select Quorum Witness page select the Configure A File Share Witness option and click on the Next button. In this case, you do not have an odd number of replicas in the same data center. Consequently, you need to add a witness to avoid the “split brain” problem, where a cluster cannot form quorum and effectively shuts down.
Click on the Browse button to create a file share witness.
In the Browse For Shared Folders dialog box type in the name of your file share server and click on the Show Shared Folders button to connect to the file share server and display its shared folders.
There are no suitable folders, so click on the New Shared folder button to create a new file share with the appropriate permissions.
Configure the following properties and click on the OK button:
Share name
Local path of shared folder
Shared folder permissions
Confirm that the file share path is correct and click on the Next button.
Review the new quorum settings are correct before clicking on the Next button.
Ensure that the new quorum settings have been configured correctly before clicking on the Finish button.
Switch back to SQL Server Management Studio and the Availability Group dashboard
Click on the View Cluster Quorum Information link in the top right hand corner of the Availability Group dashboard again to show the new quorum model, as shown in Figure 4-29.
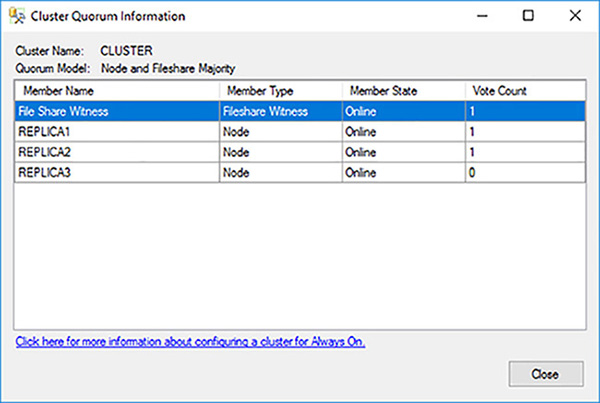
FIGURE 4-29 New Availability Group quorum configuration
Confirm that the new quorum model is a Node and Fileshare majority.
Confirm that REPLICA3 no longer has a vote.
)
)
)
EXAM TIP
Make sure you understand the different quorum models and which models to use for Availability Groups versus failover clusters for the exam.
Configure read-only routing
One of the major benefits of Availability Groups is their ability to scale out read operations or reporting to readable secondaries. Using read-only routing Availability Groups provides the capability of routing connection requests from applications automatically to a readable secondary.
The following conditions must be true for read-only routing to work:
The application must connect to the listener and not to the replica directly.
The application must connect with an explicit read-only request in the connection string.
A readable secondary replica must exist in the Availability Group.
Read-only routing rules have been defined by the database administrator.
To define the read-only routing rules you need to configure the following:
Read-only Routing URL The read-only routing URL is used for routing read-intent connection requests to a specific readable secondary replica. It needs to be specified on each replica that will potentially be running as a readable secondary. It takes effect only when the replica is running in the secondary role.
Read-only Routing List The read-only routing list. It dictates the order in which your read-only connection request will be routed. It takes effect only when a replica is running in the primary role.
Listing 4-4 shows you how to set up the read-only routing URLs
LISTING 4-4 Read-only routing URL
-- Execute the following statements at the Primary to configure Log Shipping

ALTER AVAILABILITY GROUP [WWI_AG]

MODIFY REPLICA ON

N'REPLICA1' WITH

(SECONDARY_ROLE (READ_ONLY_ROUTING_URL = N'TCP://REPLICA1.SQL.LOCAL:1433'));

GO


ALTER AVAILABILITY GROUP [WWI_AG]

MODIFY REPLICA ON

N'REPLICA2' WITH

(SECONDARY_ROLE (READ_ONLY_ROUTING_URL = N'TCP://REPLICA2.SQL.LOCAL:1433'));

GO


ALTER AVAILABILITY GROUP [WWI_AG]

MODIFY REPLICA ON

N'REPLICA3' WITH

(SECONDARY_ROLE (READ_ONLY_ROUTING_URL = N'TCP://REPLICA3.SQL.LOCAL:1433'));

GO
Listing 4-5 shows you how to set up the read-only routing list.
LISTING 4-5 Read-only routing list
-- Execute the following statements at the Primary to configure Log Shipping

ALTER AVAILABILITY GROUP [WWI_AG]

MODIFY REPLICA ON

N'REPLICA1' WITH

(PRIMARY_ROLE (READ_ONLY_ROUTING_LIST=(N'REPLICA2',N'REPLICA3')));

GO


ALTER AVAILABILITY GROUP [WWI_AG]

MODIFY REPLICA ON

N'REPLICA2' WITH

(PRIMARY_ROLE (READ_ONLY_ROUTING_LIST=(N'REPLICA1',N'REPLICA3')));

GO


ALTER AVAILABILITY GROUP [WWI_AG]

MODIFY REPLICA ON

N'REPLICA3' WITH

(PRIMARY_ROLE (READ_ONLY_ROUTING_LIST=(N'REPLICA1',N'REPLICA2')));
The following steps show you how to test whether read-only routing works:
Open SQL Server Management Studio.
Click on the Connect option in Object Explorer and choose Database Engine.
In the Connect To Server dialog box provide the listener name in the Server Name drop down list and click on the Options button.
Click on the Additional Connection Properties tab.
Provide the name of the Availability Group database and the read-only intention connection string parameters, as shown in Figure 4-30.
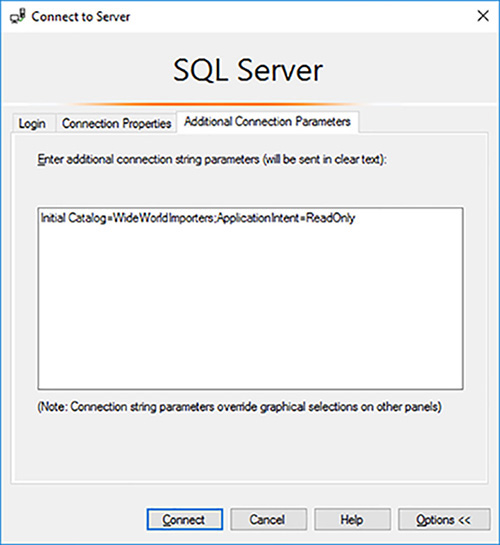
FIGURE 4-30 Read-only intention to connect to listener
Click on the listener in Object Explorer.
Click on New Query in the tool bar to connect to your listener.
Execute the SELECT @@SERVERNAME query. The server name returned should be a secondary replica’s and not the primary replica’s.
Attempt to update a table in the database. You should get an error informing you that you cannot perform this DML operation in a read-only database.
)
SQL Server 2016 introduced the ability to load balance the read-only replicas. Load balancing uses a round-robin algorithm. To load balance between a set of read-only replica simply enclose the set of read-only replicas with parentheses in the read-only routing list option, as shown in Listing 4-6.
LISTING 4-6 Configure load-balancing across read-only replicas
READ_ONLY_ROUTING_LIST = (('REPLICA1','REPLICA2','REPLICA3'), 'REPLICA4', 'REPLICA5')
In this example the read-only connection requests will be load balanced between REPLICA1, REPLICA2 and REPLICA3. If none of these replicas are available, REPLICA4 will be used. If it fails, REPLICA5 will be used.
Monitor Availability Groups
Availability Groups support a dashboard that you can use to see the state of your Availability Groups and perform certain tasks, such performing a failover. It shows important performance indicators that will help you to make better operational decisions. Some of the key metrics that it shows includes:
Synchronization mode and state
Estimate Data Loss
Estimated Recovery Time
Time to restore log
View the Availability Group dashboard by right-clicking on your Availability Group and choosing Show Dashboard.
Figure 4-31 shows the state of the Availability Group from the primary replica. You can view at key metrics such as the send and redo queues, and how long it will take for any replica that is not synchronized to catch up.
)
FIGURE 4-31 Availability Group dashboard at the primary replica
You can add the following metrics to the dashboard by right clicking on the column headings and selecting them:
Issues
Availability Mode
Primary Connection Mode
Secondary Connection Mode
Connection State
Operational State
Last Connect Error No.
Last Connection Error Description
Last Connection Error Timestamp
Quorum Votes
Member State
You can click on the synchronous secondary replica to see its state within the Availability Group. It will not know about the state of the other replicas. It will be synchronized and ready to fall over. No data loss is possible. In the case of the asynchronous secondary replica it will indicate that data loss is possible. This is always the case with asynchronous replicas.
Manage failover
A failover is a process where the primary replica gives up its role to a failover partner. With Availability Groups the failover is at the Availability Group level. During a “normal” failover no data loss will occur. However, any transactions in flight will be lost and have to be rolled back.
During the failover process, the failover target needs to recover its instance of the databases and bring them online as the new primary databases. This process in certain cases can take a long time.
There are three types of failover:
Automatic failover Automatic failover will occur when the WSFC detects that something has failed or the health of either the Availability Group or database has deteriorated sufficiently, based on the Availability Groups configuration. No data loss is possible.
Manual failover Manual failover occurs when you explicitly perform a failover because you need perform some administrative task, such as patching the Windows operating system or SQL Server. You also fail over an Availability Group if you want it to run on another server’s hardware resources. With manual failover no data loss is possible.
Forced failover The RPO defines the maximum acceptable amount of data loss following a disaster incident. With forced failover data loss is possible.
Table 4-3 shows the failover types supported, depending on what synchronization mode the replica is using.
TABLE 4-3 Availability Group Failover options
Failover |
Asynchronous MOde |
Synchronous Mode |
Synchronous Mode with automatic failvover |
|---|---|---|---|
Automatic Failover |
No |
No |
Yes |
Manual Failover |
No |
Yes |
Yes |
Forced Failover |
Yes |
Yes |
Yes (same as manual failover) |
The following steps show you how to perform a manual failover.
Open SQL Server Management Studio.
Connect to your primary replica.
Expand the AlwaysOn High Availability folder.
Right-click on your Availability Group and select Failover to start the Fail Over Availability Group Wizard.
Click on the Next button on the Introduction page.
Review all of the information in the Select New Primary Replica page to ensure that you are not going to lose data due to failover. Read the warnings. Select the new primary replica, as shown in Figure 4-32, and click on the Next button.
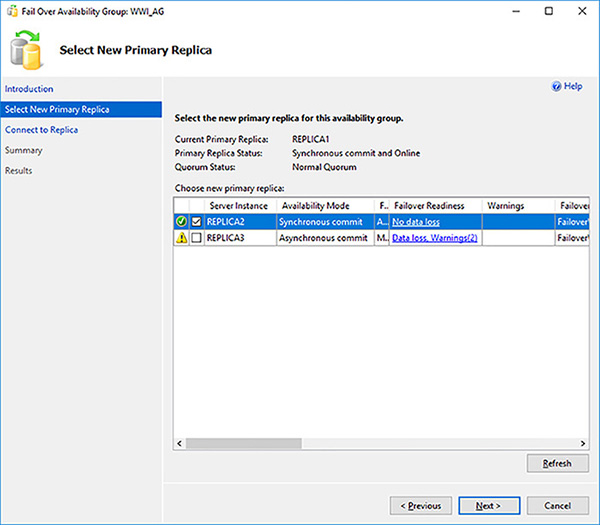
FIGURE 4-32 Specify to failover target
Connect to failover target replica and click on the Next button.
Review the choices made in the Summary page and click on the Finish button to initiate the fail over.
Confirm that the failover has been successful and click on the Close button.
)
Listing 4-7 shows you how to perform an equivalent failover in Transact-SQL. Note that it has to be performed from the failover target replica, not the primary replica.
LISTING 4-7 Manual fail over with no data loss
--- YOU MUST EXECUTE THE FOLLOWING SCRIPT IN SQLCMD MODE.


:Connect REPLICA2


ALTER AVAILABILITY GROUP [WWI_AG] FAILOVER;


GO
The following steps show you how to perform a forced failover.
Open SQL Server Management Studio.
Connect to your primary replica.
Expand the AlwaysOn High Availability folder.
Right-click on your Availability Group and select Failover to start the Fail Over Availability Group Wizard.
Click on the Next button on the Introduction page.
This time, in the Select New Primary Replica page, select the asynchronous commit replica as a failover target. The wizard shows that the asynchronous secondary replica is using asynchronous commit and that only fail over with data loss is supported. Furthermore, there are three warnings.
Click on the warning link and read the 3 warnings, shown in Figure 4-33.
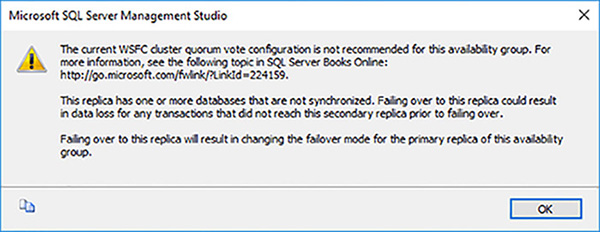
FIGURE 4-33 Fail over warnings
Click on the Close button to close the warning dialog box.
Click on the Next button in the Select New Primary Replica screen.
The next screen in the wizard again warns you about the potential data loss. Select the Click Here To Confirm Failover With Potential Data Loss check box and click on the Next button, as shown in Figure 4-34.

FIGURE 4-34 Potential data loss failover warnings
Connect to the asynchronous target in the Connect To Replica screen and click on the Next button.
Review the choices made and generate the failover script before clicking on the Finish button to initiate the fail over.
Confirm that the failover has been successful and click on the Close button.
Confirm on the Action Require link and read the warning, which is identical to the first error in in Figure 4-34 before closing the wizard.
)
)
)
Listing 4-8 shows you how to perform an equivalent forced failover in Transact-SQL.
LISTING 4-8 Forced failover with potential data loss
--- YOU MUST EXECUTE THE FOLLOWING SCRIPT IN SQLCMD MODE.

:Connect REPLICA3


ALTER AVAILABILITY GROUP [WWI_AG] FORCE_FAILOVER_ALLOW_DATA_LOSS;

GO
Create Distributed Availability Group
Distributed Availability Groups (DAGs) were added in SQL Server 2016 for a number of specific use cases. To best understand where you can use Distributed Availability Groups, it is best to start off with a diagram of what they look like.
Figure 4-35 show the architecture of a Distributed Availability Group. The DAG has the following characteristics:
The operating system environment (OSE) for the primary WSFC (WSFC1) can be different from the secondary WSFC (WSFC2).
The health of primary WSFC (WSFC1) is not affected by the health of the secondary WSFC (WSFC2).
Each WSFC is responsible for maintaining its own quorum mode.
Each WSFC is responsible for its own node voting configuration.
The data is sent only once between the primary Availability Group (AG1) and the secondary Availability Group (AG2).
This is one of the primary benefits of DAGs, especially across WAN links, since otherwise the primary replica in AG1 would have to send the same log records across the network to the three replicas in the secondary Availability Group (AG2).
All of the replicas in the secondary Availability Group (AG2) are read-only.
Automatic failover to the secondary Availability Group (AG2) is not supported.
)
FIGURE 4-35 Distributed Availability Group
To create a distributed Availability Group, perform the following steps:
Create an Availability Group for each WSFC.
Create a listener for each Availability Group.
Create the DAG on the primary Availability Group using the DISTRIBUTED option as shown in Listing 4-9. Note, we will use direct seeding in this example.
LISTING 4-9 Creating an distributed Availability Group on the primary Availability Group
CREATE AVAILABILITY GROUP [DAG]

    WITH (DISTRIBUTED)

  AVAILABILITY GROUP ON

   'AG1' WITH  (

     LISTENER_URL = 'TCP://AG1_LISTENER:5022',

            AVAILABILITY_MODE = ASYNCHRONOUS_COMMIT,

     FAILOVER_MODE = MANUAL,

     SEEDING_MODE = AUTOMATIC

   ),

   'AG2' WITH (

     LISTENER_URL = 'TCP://AG2-LISTENER:5022',

     AVAILABILITY_MODE = ASYNCHRONOUS_COMMIT,

     FAILOVER_MODE = MANUAL,

     SEEDING_MODE = AUTOMATIC

   );

GO
Join the DAG from the secondary Availability Group, as shown in Listing 4-10.
LISTING 4-10 Joining a distributed Availability Group from the secondary Availability Group
ALTER AVAILABILITY GROUP [distributedag]

  JOIN

  AVAILABILITY GROUP ON

   'AG1' WITH (

     LISTENER_URL = 'tcp://ag1-listener:5022',

     AVAILABILITY_MODE = ASYNCHRONOUS_COMMIT,

     FAILOVER_MODE = MANUAL,

     SEEDING_MODE = AUTOMATIC

   ),

   'AG2' WITH (

     LISTENER_URL = 'tcp://ag2-listener:5022',

     AVAILABILITY_MODE = ASYNCHRONOUS_COMMIT,

     FAILOVER_MODE = MANUAL,

     SEEDING_MODE = AUTOMATIC

   );

GO