Manage schedules
- By Joan Lambert
- 1/30/2017
- Objective 3.1: Create and manage calendars
- Objective 3.1 practice tasks
- Objective 3.2: Create appointments, meetings, and events
- Objective 3.2 practice tasks
- Objective 3.3: Organize and manage appointments, meetings, and events
- Objective 3.3 practice tasks
- Objective 3.4: Create and manage notes and tasks
- Objective 3.4 practice tasks
Objective 3.2: Create appointments, meetings, and events
Create appointments and events
Appointments are blocks of time you schedule for only yourself (as opposed to meetings, to which you invite other people). An appointment has a specific start time and end time.
)
Events occur for one or more 24-hour days—for example, a birthday, a vacation week, or anything else occurring on specific days but not beginning and ending at specific times. In all other respects, creating an event is identical to creating an appointment, in that you can specify a location, indicate recurrence, indicate your availability, and attach additional information to the event item.
You can schedule a simple appointment or event directly on the calendar, or provide additional details in an appointment window. The minimum requirements are the subject and the a time. You can also include the appointment location, and enter ancillary information (including formatted text, website links, and even file attachments) in the notes area so that it is readily available to you at the time of the appointment.
)
When creating an appointment, meeting, or event, you indicate your availability (also referred to as Free/Busy time) by marking it as Free, Working Elsewhere, Tentative, Busy, or Out Of Office. The appointment time is color-coded on your calendar to match the availability you indicate. Your availability is visible to other Outlook users on your network, and is also displayed when you share your calendar or send calendar information to other people.
To create a simple appointment with the default settings
In the Calendar module, display the date on which you want to schedule the appointment.
In the Calendar pane, click the desired time slot or drag through consecutive time slots.
Enter the information you want to appear as the appointment subject, and then press Enter.
To open a new appointment window
In the Calendar pane, right-click the desired time slot or drag through consecutive time slots and right-click the selection, and then click New Appointment.
In the Calendar module, on the Home tab, in the New group, click New Appointment.
In the Calendar module, press Ctrl+N.
In any module, on the Home tab, in the New group, click New Items, and then click Appointment.
In any module, press Ctrl+Shift+A.
To create an appointment with custom settings
Open a new appointment window.
In the appointment window, enter the information you want to appear on the calendar in the Subject and Location boxes.
Click or enter the appointment start date in the left Start time list and, if the appointment extends across multiple days, click or enter the appointment end date in the left End time list.
Click or enter the appointment start time in the right Start time list and the appointment end time in the right End time list.
On the Appointment tab, in the Options group, click your availability during the specified appointment time—Free, Working Elsewhere, Tentative, Busy, or Out of Office—in the Show As list.
In the Options group, in the Reminder list, click the length of time prior to the appointment (or None) when you would like Outlook to display a reminder.
On the Appointment tab, in the Actions group, click Save & Close.
To create an appointment from an email message
In the Mail module, drag the message from the Mail pane to the Calendar button on the Navigation Bar.
In the appointment window that opens, edit the appointment details as necessary.
On the Appointment tab, in the Actions group, click Save & Close.
To create an event with default settings
Display the calendar in Day view, Work Week view, Week view, or Month view.
In the Calendar pane, click the space that contains the date (in views other than Month view, the space below the day header and above the time slots).
Enter the event name, and then press Enter.
To create an event with custom settings
In an appointment window header, to the right of the Start time boxes, select the All day event check box.
Create meetings
A primary difficulty when scheduling a meeting is finding a time that works for all the people who need to attend it. Scheduling meetings through Outlook is significantly simpler than other methods of scheduling meetings, particularly when you need to accommodate the schedules of several people. Outlook displays the individual and collective schedules of people within your own organization, and of people outside of your organization who have published their calendars to the Internet. You can review attendees’ schedules to locate a time when everyone is available, or have Outlook find a convenient time for you.
You can send an Outlook meeting invitation (referred to as a meeting request) to any person who has an email account—even to a person who doesn’t use Outlook. You can send a meeting request from any type of email account (such as an Exchange account or an Internet email account).
The meeting window has two pages: the Appointment page and the Scheduling Assistant page. The Appointment page is visible by default. You can enter all the required information directly on the Appointment page, or use the additional features available on the Scheduling Assistant page to find the best time for the meeting.
)
The Room Finder is open by default on the right side of each page of the meeting window. This handy tool helps you to identify dates and times that work for the greatest number of attendees, in addition to available locations. The monthly calendar at the top of the Room Finder indicates the collective availability of the group on each day, as follows:
Dates that occur in the past and nonworking days are gray.
Days when all attendees are available are white (Good).
Days when most attendees are available are light blue (Fair).
Days when most attendees are not available are medium blue (Poor).
Managed conference rooms that are available at the indicated meeting time are shown in the center of the Room Finder. At the bottom of the Room Finder, the Suggested Times list displays attendee availability for appointments of the length of time you have specified for the meeting.
People you invite to meetings are referred to as attendees. By default, the attendance of each attendee is indicated as Required. You can inform noncritical attendees of the meeting by marking their attendance as Optional. You can invite entire groups of people by using a contact group or distribution list. You can also invite managed resources, such as conference rooms and audio/visual equipment, that have been set up by your organization’s Exchange administrator.
A meeting request should have at least one attendee other than you, and must have a start time and an end time. It should also include a subject and a location, but Outlook will send the meeting request without this information if you specifically allow it. The body of a meeting request can include text and web links, and you can also attach files. This is a convenient way to distribute meeting information to attendees ahead of time.
The secondary page of the meeting window is the Scheduling Assistant page, if your email account is part of an Exchange Server network. Otherwise, the secondary page is the Scheduling page, which doesn’t include the Room Finder feature.
)
The Scheduling and Scheduling Assistant pages include a group schedule that shows the status of each attendee’s time throughout your working day. Outlook indicates your suggested meeting time on the group schedule. If free/busy information is available for meeting attendees, the status is indicated by the standard free/busy colors and patterns that match the legend at the bottom of the page. If no information is available (either because Outlook can’t connect to an attendee’s calendar or because the proposed meeting is further out than the scheduling information stored on the server), Outlook shows the time with gray diagonal stripes. The row at the top of the schedule, to the right of the All Attendees heading, indicates the collective schedule of all the attendees.
To open a new meeting window
In the Calendar module, on the Home tab, in the New group, click New Meeting.
In any module, do either of the following:
On the Home tab, in the New group, click New Items, and then click Meeting.
Press Ctrl+Shift+Q.
To create a meeting from an email message
In the message reading window, do either of the following:
On the Message tab, in the Respond group, click the Reply with Meeting button.
Press Ctrl+Alt+R.
To create a meeting from an appointment or event
In an appointment or event window, on the item-specific tab, do either of the following:
In the Attendees group, click Invite Attendees.
In the Show group, click Scheduling Assistant.
To invite attendees and schedule resources
On the Appointment page of the meeting window, enter the email addresses or names of the attendees or resources in the To box.
On the Scheduling or Scheduling Assistant page of the meeting window, enter the email addresses or names of the attendees and resources in the All Attendees list.
Or
On the Appointment page of the meeting window, click the To button.
In the Select Attendees and Resources dialog box, locate and double-click the contacts and managed resources you want to invite, and then click OK.
To invite optional attendees
Invite the attendee by using any of the previously discussed methods.
On the Meeting tab, in the Show group, click Scheduling Assistant.
In the All Attendees list, click the icon immediately to the left of the optional attendee’s name and then, in the list, click Optional Attendee.
To use the Room Finder
To display suggested meeting times, click a date in the Date Navigator at the top of the Room Finder pane.
To update the meeting request, click a meeting time in the Suggested Times list.
Manage calendar items
If you have the same appointment on a regular basis—for example, a bimonthly haircut or a weekly exercise class—you can set it up in your Outlook calendar as a recurring appointment. A recurring appointment can happen at almost any regular interval, such as every Tuesday and Thursday, every other week, or the last day of every month. Configuring an appointment recurrence creates multiple instances of the appointment in your calendar at the time interval you specify. You can set the appointment to recur until further notice, to end after a certain number of occurrences, or to end by a certain date. The individual appointments are linked. When making changes to a recurring appointment, you can choose to update all occurrences or only an individual occurrence of the appointment.
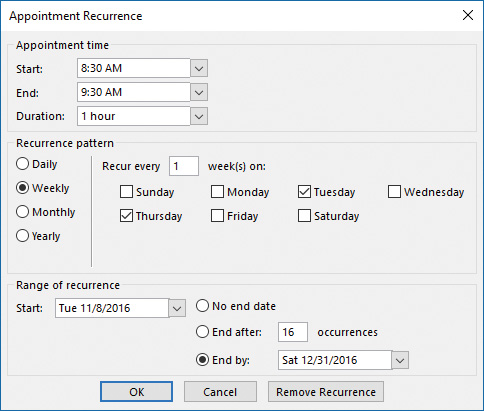
You can configure recurrence at any regular interval
To configure recurrence for calendar items
Do either of the following:
On the item-specific tab of the item window, in the Options group, click Recurrence.
In the Calendar pane, select the calendar item. On the item-specific tool tab, in the Options group, click Recurrence.
In the Appointment Recurrence dialog box, do the following, and then click OK:
In the Recurrence pattern area, click a frequency option.
In the adjacent area, which changes according to the frequency option you select, adjust the settings to reflect the recurrence you want.
In the Range of recurrence area, select the appropriate end date for the series of appointments or events.
To change the time of an existing calendar item
In the Calendar pane, drag the item to a different date or to a different time slot.
In the Calendar pane, in Day view, Work Week view, or Week view, drag the top or bottom border of an appointment or meeting up or down to change the start or end time.
In the Calendar pane, click an appointment or meeting one time to select it, press Ctrl+X, click the time slot to which you want to move the item, and then press Ctrl+V.
In the item window, adjust the Start time and End time settings. Then on the item-specific tab, in the Actions group, click Save & Close.
To create a copy of an existing appointment
In the Calendar pane, display the original appointment day and the day to which you want to copy the appointment.
Hold down the Ctrl key, and drag the appointment to the new date or time slot.
To cancel meetings
In the meeting window, on the Meeting or Meeting Series tab, in the Actions group, click Cancel Meeting.
In the message header, click Send Cancellation.