Apply transitions and animations
- By Joan Lambert
- 1/9/2017
Objective 4.2: Animate slide content
If you are delivering a presentation from your computer, you can keep your audience focused and reinforce your message by animating slide elements such as text and graphics.
Apply animations
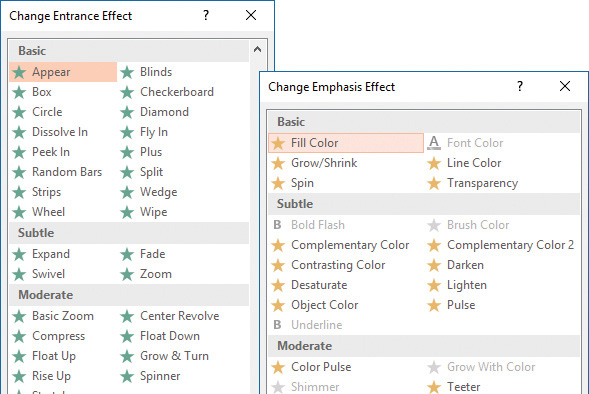
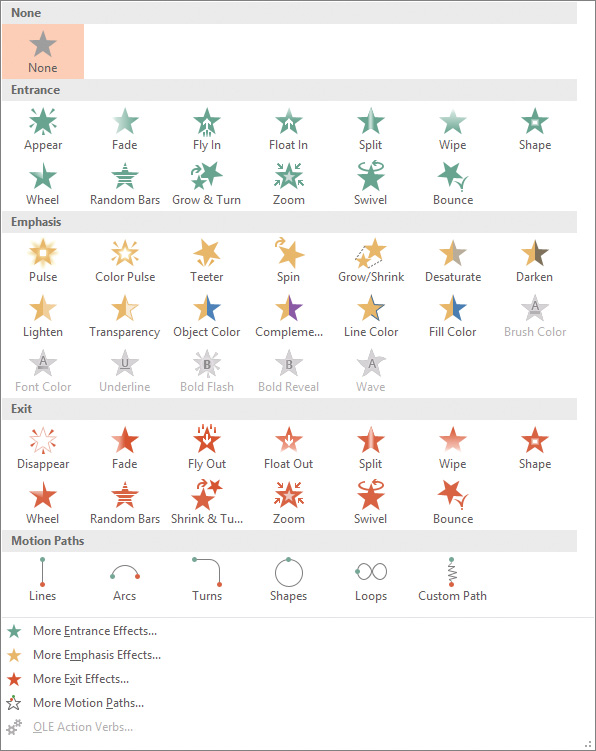
Many common animations are available from the Animation gallery. These animations fall into four categories depending on their purpose:
Entrance Animate the appearance (arrival) of an element on the slide.
Emphasis Draw attention to an element by changing its size or appearance, or by making it move.
Exit Animate the departure of an element from the slide.
Motion Paths Move an element from one location on the slide to another, along a specific path.
You can access additional animations in each category by clicking the More commands at the bottom of the Animation menu. Entrance, Emphasis, and Exit effects are classified in subcategories of Basic, Subtle, Moderate, and Exciting to help you match the effects with the tone of your presentation.
The available effects depend on the currently selected object
Path effects are classified in subcategories of Basic, Lines & Curves, and Special to reflect the type and direction of movement in the motion path.
)
You can build on more than 60 motion paths to precisely animate slide content
You can apply multiple animation effects to an object. On the slide and in the Animation pane, each animation is identified by an adjacent numbered box that indicates the order in which the animations will occur.
)
Numbers identify objects on the slide and corresponding actions in the Animation pane
To apply an animation from the gallery to a selected object
On the Animations tab, in the Advanced Animation group, click Add Animation, and then click the animation you want.
Each entrance effect has a corresponding exit effect
To apply an animation that doesn’t appear in the gallery
On the Animations tab, in the Advanced Animation group, click the Add Animation button, and then at the bottom of the gallery, click the animation category you want.
In the Add Animation Effect dialog box, click the animation you want.
To change the animation applied to a selected object
On the Animations tab, in the Animation group, click Animation Styles, and then click the animation you want to use.
To remove an animation from a selected object
In the Animation gallery, click None.
To apply additional animation to a selected animated object
On the Animations tab, in the Advanced Animation group, click the Add Animation button, and then click the animation you want to add.
To copy the animations applied to a selected object to another object
In the Advanced Animation group, click the Animation Painter button, and then click the object to which you want to copy the animations.
To display the Animation pane
On the Animations tab, in the Advanced Animation group, click the Animation Pane button.
To preview animations
To preview the animation of the selected object, on the Animations tab, in the Preview group, click the Preview button.
To preview all animations on the slide, click a blank area of the slide and then in the Animation pane, click Play All.
To preview some animations, in the Animation pane, click the animation you want to start with, and then click Play From.
Configure animation effects
The animation names reflect the basic action of each animation. After you apply an animation effect, you can fine-tune its action by using the commands on the Animations tab. Depending on the basic action of the animation and the element you are animating, you can configure one or more of the following settings for an animation: Amount, Color, Direction, Number of spokes, Sequence, Shape, and Vanishing point.
The available effect options vary based on the specific animation. Many animations, such as Appear/Disappear, Fade, Grow & Turn/Shrink & Turn, Swivel, Bounce, Pulse, Teeter, Desaturate, Darken, and Lighten don’t have effect options when applied to individual objects, but you can customize other aspects of the animation such as the associated sound, the action of the object after the animation finishes, and the timing aspects such as trigger, duration, and delay.
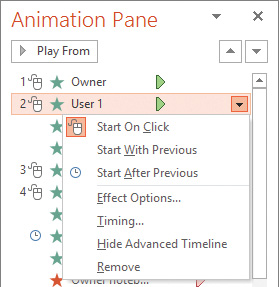
You can manage animations by using tools on the ribbon and in the Animation pane, which displays a visual description of the animation sequence occurring on a slide.
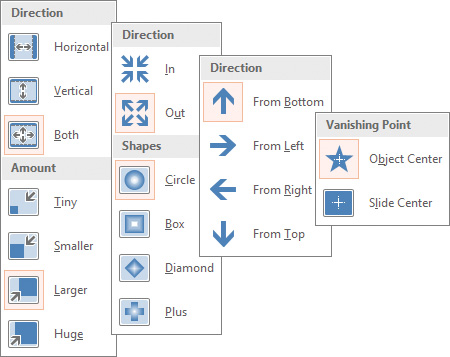
The effect option thumbnails provide visual guidance for making selections
Several information points are visible for each animation:
The number (corresponding to the number next to the animated object on the slide) indicates the order in which a manually triggered animation occurs. An unnumbered animation starts in relation to the numbered animation it follows.
The icon indicates the animation category. A green star indicates an entrance effect, a yellow star indicates an emphasis effect, a red star indicates an exit effect, and a blue double-ended line indicates a motion path. The specific animation is not indicated by the icon.
The description indicates the object being animated.
The Advanced Timeline displays a triangle or bar that indicates the duration of the animation. The color of the triangle or bar corresponds to the animation category (green, yellow, red, or blue).
The timing bar at the bottom of the Animation pane indicates the time scale. The time scale can be modified by clicking the time unit to the left of the timing bar (Seconds, by default) and then clicking Zoom In or Zoom Out.
Pointing to an animation in the Animation pane displays a summary of the animation information in a ScreenTip. Clicking an animation displays an arrow. Clicking the arrow displays a list of actions.
Control the settings for individual animations
Clicking Effect Options in the list displays a dialog box of options specific to the effect.
)
Depending on the type of animation, the refinements you might be able to make include the following:
Change the animation direction.
Specify whether the animation should be accompanied by a sound.
Dim or hide the object after the animation, or make it change to a specific color.
If the animation is applied to text, animate all the text at once, word by word, or letter by letter.
Change the Start, Delay, and Duration settings, repeat the animation, and specify what will trigger its action.
If a slide has more than one level of bullet points, animate different levels separately.
If an object has embedded text, animate the object and the text together (the default) or separately, or animate one but not the other.
Specify whether a sequenced animation progresses forward or backward.
To select an animation for further configuration
On the slide, click the animation number.
In the Animation pane, click the animation number or description.
To configure basic effect options for a selected animation
In the Animation group, click the Effect Options button.
On the Effect Options menu (or in each section of the menu, if it has multiple sections), click the option you want.
To open the Animation Style dialog box of options for an animation
On the Animations tab, click the Animation dialog box launcher.
Or
In the Animation pane, do either of the following:
Click the animation and then click the arrow that appears.
Right-click the animation.
On the menu, click Effect Options.
To configure advanced effect options for a selected animation
Select the animated object, and open the Animation Style dialog box of options.
On the Effect tab, do any of the following:
To add sound to an animation, in the Sound list, click the sound you want.
To dim, hide, or change the color of text or an object after its animation completes, in the After animation list, click the color or effect you want.
To animate all the text in a container at once, in the Animate text list, click All at once.
To animate the text in a container by word, in the Animate text list, click By word.
To animate the text in a container by letter, in the Animate text list, click By letter.
Click OK to close the dialog box and implement the changes.
To change the way multiple paragraphs of text are animated
On the Animations tab, in the Animation group, click Effect Options and then click As One Object, All At Once, or By Paragraph.
Open the Effect Options dialog box. On the Text Animation tab, expand the Group text list and then click As One Object, All Paragraphs At Once, or the paragraph level by which you want to group the text.
To change the order in which text is animated
Open the Effect Options dialog box. On the Text Animation tab, select the In reverse order check box.
Configure motion paths
After you apply a Motion Path animation, you can modify the path that the animation follows. Regardless of whether the motion path is straight, shaped, or curved, it has a start point (a green triangle), a rotation handle, and sizing handles. If a motion path is straight or curved, and doesn’t return to its start point, it also has an end point (a red triangle). You can adjust the path by using any of these tools.
)
Selecting the animation path displays the object in its starting and ending positions
Moving any part of the animation path displays the animated object in both the starting and ending positions so you can gauge the effect of the move. When smart guides are turned on, you can use them to align the animated object with other slide elements.
It is important to note that you can move the animated object independent of its motion path so that the object moves from its original location on the slide to the beginning of the motion path, before following the motion path.
To adjust the height or length of the motion path of a selected animation
Drag the top, bottom, side, or corner handles.
To change the shape of the motion path of a selected animation
On the Animations tab, in the Animation group, click Animation Styles.
On the Animation Styles menu, do either of the following:
In the Motion Paths section, click the shape you want.
Click More Motion Paths. In the Change Motion Path dialog box, click the shape you want, and then click OK.
To rotate the motion path of a selected animation
Drag the rotation handle in a circular motion.
To change the angles of the motion path of a selected animation
On the Animations tab, in the Animation group, click Effect Options.
On the Effect Options menu, in the Path section, click Edit Points.
Drag any angle-change point to modify the path.
)
To begin a motion path in a location other than the object location
Drag the object away from the start point of the motion path.
Drag the start point of the motion path away from the object.
To configure a custom motion path
Drag the object on the path you want it to follow. When you reach the end of the path, press the Escape key.