Create tables and lists
- By Joan Lambert and Steve Lambert
- 2/6/2017
Objective 3.2: Modify tables
Sort table data
You can sort the data within a table by the contents of one or more table columns. Word sorts only the data rows in your table, and not the header row or Total row (if your table includes either of these options).

You can sort the data in a table by multiple columns
To activate a table for editing
Select or click anywhere in the table.
To sort table data
Activate the table for editing.
On the Layout tool tab, in the Data group, click the Sort button. The Sort dialog box opens, with the table’s column headers available in the Sort By and Then By lists. If headers aren’t configured in the table style options, the list entries are (Column 1), (Column 2), and so on.
If your table includes headers and the Sort function didn’t identify them as such, click Header row in the My list has section near the bottom of the dialog box to add the headers to the Sort By and Then By lists.
In the Sort by section, select the primary column by which you want to sort the content. Verify that the Sort function has correctly identified the Type and Using settings, and then click Ascending or Descending to specify the sort order.
If you want to perform a nested sort on additional criteria, repeat step 4 in one or both of the Then by sections.
In the Sort dialog box, click OK.
Modify table structure
You can modify a table’s structure at any time. The basic ways to do so are as follows:
Insert or delete rows or columns.
Change the height or width of the table, columns, or rows.
Modify the alignment and spacing within cells.
Merge multiple cells into one cell or split one cell into multiple cells.
)
This topic reviews methods you can use to accomplish these tasks.
Insert and delete rows and columns
As you develop your table content, you might need to add or remove rows or columns.
To insert a row or column
Point to the left edge of the table, between two rows where you want to insert another, or to the top of the table between two columns where you want to insert another. A gray insertion indicator labeled with a plus sign appears as you approach a possible insertion point (after any existing row or column). When the plus sign turns blue, click to insert the row or column where indicated.
To insert a row at the end of a table, click in the last cell of the last row, and then press Tab to create a new row with the same formatting as the previous row.
Or
Position the cursor in a cell adjacent to which you want to insert a row or column.
On the Layout tool tab, in the Rows & Columns group, do either of the following:
To insert a row, click Insert Above or Insert Below.
To insert a column, click Insert Left or Insert Right.
To insert multiple rows or columns
Select the number of existing rows or columns that you want to insert in the table, adjacent to the location you want to insert them.
On the Layout tool tab, in the Rows & Columns group, do either of the following:
To insert the selected number of rows, click Insert Above or Insert Below.
To insert the selected number of columns, click Insert Left or Insert Right.
To delete a table, rows, or columns
Click anywhere in the table, row, or column you want to delete, or select the rows or columns you want to delete.
On the Layout tool tab, in the Rows & Columns group, on the Delete menu, click Delete Rows, Delete Columns, or Delete Table.
Resize tables, rows, and columns
Some tables are the width of the page and others are narrower to fit their contents without leaving a lot of white space. You can change the dimensions of a table by changing the width of the columns or the height of the rows; you can also change the dimensions of the columns and rows by changing the width of the table.
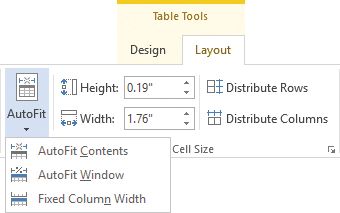
Table, row, and column size can be set in the document, on the ruler, or in the Table Properties dialog box. When working in the document, use the controls located in the Cell Size group on the Layout tool tab.
Some of the many tools for adjusting the row height and column width
When you display the ruler and activate a table, markers on the ruler indicate the table column and row dividers and the margin indents of the active column.
)
Activate any cell to display its dividers and indent markers on the rulers
To open the Table Properties dialog box
Right-click anywhere in the table, and then click Table Properties.
Or
Click anywhere in the table or select any table element.
On the Layout tool tab, in the Table group, click the Properties button.
)
Table and column width can be set by percentage of the available space or in inches
To modify table structure from the Table Properties dialog box
On the Table tab, set the table width in inches or percentage of the page width.
On the Row tab, set the height of the selected rows.
On the Column tab, set the preferred width of the selected column or columns.
On the Cell tab, set the width of selected cells.
To select table elements
Click anywhere in the table, column, row, or cell you want to select. On the Layout tool tab, in the Table group, on the Select menu, click Select Cell, Select Column, Select Row, or Select Table.
To select a table, point to the table, and then click the move handle that appears outside its upper-left corner.
To select a row, point to the left border of the row. When the pointer changes to a white, right-pointing arrow, click once.
To select a column, point to the top border of the column. When the pointer changes to a black, down-pointing arrow, click once.
To select a cell, triple-click the cell or click its left border.
To select adjacent rows, columns, or cells, do either of the following:
Select the first row, column, or cell, hold down the Shift key, and then press the arrow keys.
Drag across the rows, columns, or cells that you want to select.
To select non-adjacent rows, columns, or cells, select the first, hold down the Ctrl key, and then select the others.
To change the size of a selected table
Drag the size handle in the lower-right corner of the table. If you want to maintain the original aspect ratio of the table, hold down the Shift key while dragging the size handle.
On the Table tab of the Table Properties dialog box, specify the table width in inches or percentage of the available page width, and then click OK.
To change the height of a selected row
Drag the row’s bottom border up or down.
Drag the row’s Adjust Table Row marker on the vertical ruler up or down.
On the Layout tool tab, in the Cell Size group, change the Table Row Height setting.
On the Row tab of the Table Properties dialog box, specify the exact or minimum row height, and then click OK.
With multiple rows selected, click the Distribute Rows button in the Cell Size group on the Layout tool tab, or right-click the selection and then click Distribute Rows Evenly.
To change the width of a selected column
Double-click the column’s right border to set it to the narrowest width that fits its content.
Drag the column’s right border to the left or right.
Drag the column’s Move Table Column marker on the horizontal ruler to the left or right.
On the Layout tool tab, in the Cell Size group, change the Table Column Width setting.
On the Column tab of the Table Properties dialog box, specify the column width in inches or percentage of the table width, and then click OK.
To change the width of multiple columns
To equalize the width of contiguous columns, select the columns, and then do either of the following:
On the Layout tool tab, in the Cell Size group, click the Distribute Columns button.
Right-click the selection, and then click Distribute Columns Evenly.
To relatively size all columns into a page-width table, activate the table, and then on the Layout tool tab, in the Cell Size group, click AutoFit and then AutoFit Window.
To fit all columns in a table to their contents, select or click anywhere in the table, and then on the Layout tool tab, in the Cell Size group, click AutoFit and then AutoFit Contents.
Configure cell alignment and spacing
You can specify the alignment of content within table cells not only horizontally—Left, Center, and Right—but also vertically—Top, Center, and Bottom. There are nine alignment combinations in all, available from the Design tool tab. They are visually identified in the Alignment group on the Layout tool tab.
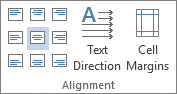
The alignment buttons are arranged and labeled to be easily identifiable
Each cell within a table has internal margins that define the amount of space within the cell that content can occupy. By default, cells have only left and right margins. You can also specify top and bottom margins if you want to ensure that content has a minimum amount of padding for readability.
)
To configure internal and external table cell spacing
Activate the table.
On the Layout tool tab, in the Alignment group, click the Cell Margins button to open the Table Options dialog box.
In the Table Options dialog box, do any of the following, and then click OK.
In the Default cell margins section, enter or select the amount of space you want Word to leave clear of content inside of each cell.
In the Default cell spacing section, if you want to insert blank space between cells, select the Allow spacing between cells check box and then enter the cell spacing in the box.
In the Options section, if you want to prevent the cell size from changing with the content, clear the Automatically resize to fit contents check box.
Merge and split cells
There are many circumstances in which you might want to merge the contents of two cells, either horizontally or vertically, or split one cell into multiple cells. Each of these operations changes the table from a simple grid to a more complex structure.
To create cells that span multiple rows or columns
Select the adjacent cells you want to connect. Then on the Layout tool tab, in the Merge group, click the Merge Cells button.
To divide a selected cell into multiple cells
On the Layout tool tab, in the Merge group, click the Split Cells button.
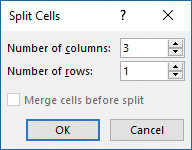
One cell can be split into up to 63 columns and 30 rows
In the Split Cells dialog box, specify the number of columns and rows into which you want to divide the cell, and then click OK.
Manage long tables
A table can run across multiple pages. When it does (or if it might), you can configure the table to display a copy of the header row at the top of each subsequent page. You can’t select or modify the dynamic header row; any changes must be made in the actual table header. Repeating the header row helps readers of a document to more easily interpret data in multipage tables. It also allows assistive devices such as screen readers to correctly interpret the table contents.
In some cases, you might find that you want to manually split a large table into two or more tables, perhaps to move part of the data to another location in the document.
To repeat the table header row on subsequent pages
Position the cursor in the table header row.
Do either of the following:
On the Layout tool tab, in the Data group, click the Repeat Header Rows button.
Open the Table Properties dialog box, display the Row tab, select the Repeat as header row at the top of each page check box, and then click OK.
To split a table
Position the cursor anywhere in the row that you want to be the first row of the new table that Word creates when you split the original table.
On the Layout tool tab, in the Merge group, click the Split Table button.
The active row becomes the header row of the new table.
To duplicate the original table header after splitting a table
Select and copy the original table header.
Position the cursor in the first cell of the new table, and then paste the copied header row.