Manage chat, calling, and meetings
- By Ed Fisher
- 2/12/2022
In this sample chapter from Exam Ref MS-700 Managing Microsoft Teams, you will explore the administrative tasks and policies associated with managing chat, calling, and meetings in Microsoft Teams.
In this chapter, we will look at the administrative tasks and policies associated with managing chat, calling, and meetings. These include enabling the services and configuring policies to control what can, and cannot, be done by end users. This chapter also contains almost everything to do with telephony. Although there are only four main skills in this section of the exam, each one has several topics included, and this section accounts for 30% to 35% of the exam content and may introduce concepts that are new to you if you’re not managing telephony now. We will include URLs to helpful sites so that you can dig deeper if you want.
Skills covered in this chapter:
Skill 2.1: Manage chat and collaboration experiences
Skill 2.2: Manage meeting experiences
Skill 2.3: Manage phone numbers
Skill 2.4: Manage Phone System
Skill 2.1: Manage chat and collaboration experiences
This skill covers how to manage the chat and collaboration experiences for your users. This topic includes policies controlling what is and is not allowed across instant messaging, external collaboration, within channels, and integration with other services.
Configure messaging policies
Messaging policies control what features are available to users of chat and messaging within channels. The Global (Org-wide default) policy will apply to all users unless you create and apply a different policy to others. Although many organizations may need only a single policy, Microsoft Teams is flexible so that you can have different policies based on job type or location.
Messaging policies control all aspects of chat messages, including whether or not users can even use chat, whether messages can be edited or deleted, and what can be included in messages. By default, all users have the Global (Org-wide default) policy applied to them, which enables them to use chat and most features. If your organization needs to be more restrictive, you can modify the Global (Org-wide default) policy. If you need to permit different things for different users, you can create multiple policies to meet your needs. Only one Messaging policy can be applied to any single user, though.
To create a new policy, do the following:
Log on to the TAC at https://admin.teams.microsoft.com.
In the left menu, select Messaging policies.
Click +Add to create a new Messaging policy.
Give the policy a name and a description, as shown in Figure 2-1.
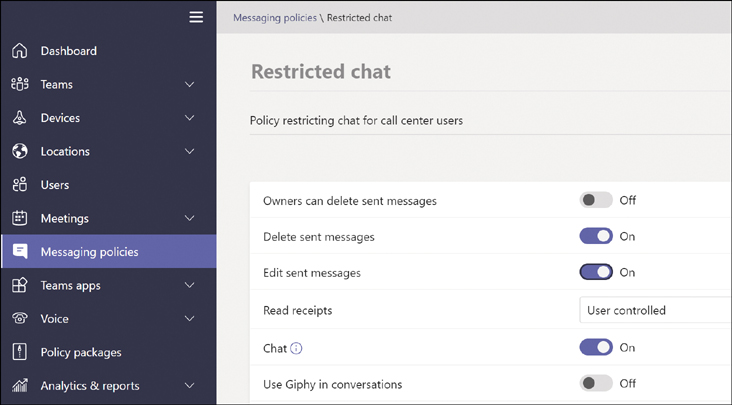
Figure 2-1 Creating a new Messaging policy
Modify the policy to meet your requirements. You may want to prevent users from deleting or editing messages once sent, turn off URL previews, or turn off Giphy or memes or stickers (but that takes all the fun out of things). Consider what you disable, because it will reduce the functionality for guest users. Figure 2-2 shows a more restrictive policy.
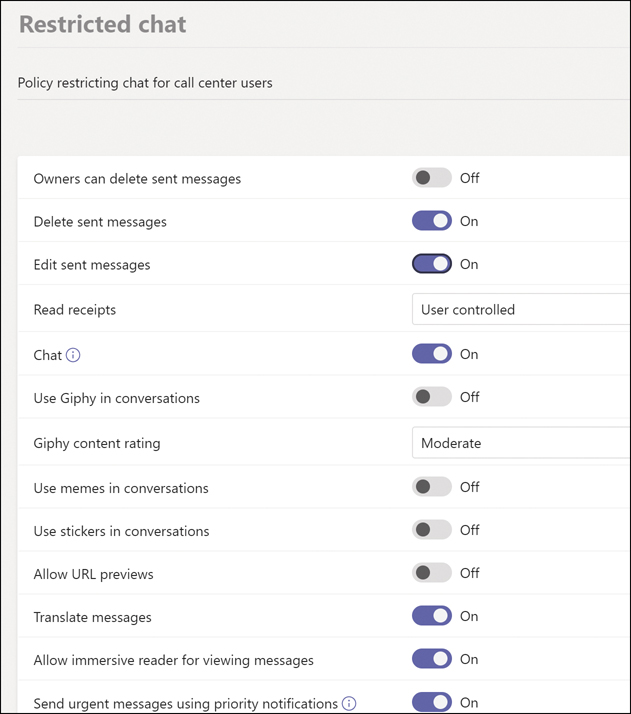
Figure 2-2 A restrictive policy
When done, click Save.
)
)
You can assign Messaging policies directly to users, or you can assign them to groups. In either case, you can use the PowerShell cmdlet New-CsGroupPolicyAssignment, or you can use the TAC. To use the TAC to assign a Messaging policy to a group, follow these steps:
Select the Group policy assignment tab.
Select +Add group.
Enter the name of the group, or enough characters to enable the system to determine which group you intend, then select the search icon.
From the drop-down list, select the policy you wish to apply, as shown in Figure 2-3.
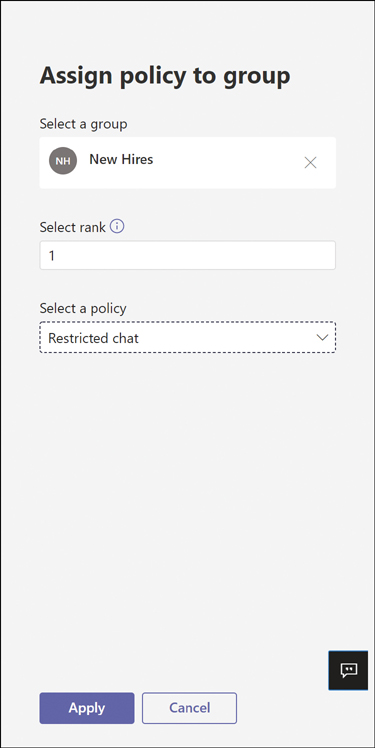
Figure 2-3 Applying a Messaging policy to a group
Select Apply.
 Exam Tip
Multiple policies can be applied to a user who is a member of more than one group. The Select Rank setting enables you to set a relative precedence so that if more than one policy could apply to a user, the policy with the lowest number is the one that would apply. They are not additive; only one policy can apply.
Manage external access
In Skill 1.4 we reviewed how to configure and manage guest access. Here, we are going to look at managing external access, which is not the same, and is often referred to as external federation.
Guest access with Microsoft Teams controls what users who are invited to (and accept) access resources like Teams or Channels can do. Guest access users will have account objects that appear in your organization’s Azure Active Directory. External access users are those in a federated organization who have not been explicitly invited as a guest and who do not have an object in the other organization’s Azure AD.
External access controls how users in one organization can find, call, chat, and hold meetings with users in your organization. Table 2-1 compares what users in your organization can do with guests and with external access users by default.
TABLE 2-1 Your organization’s user interactions with guest users vs. external access users
What your users can do with |
Guest users |
External access users |
|---|---|---|
Interorganizational chat |
Yes |
Yes |
Interorganizational calling |
Yes |
Yes |
Interorganizational presence |
Yes |
Yes |
Interorganizational search |
Yes |
No |
Share files |
Yes |
No |
View interorganizational Out of Office (OOF) |
Yes |
No |
Interorganizational blocking |
Yes |
Yes |
Table 2-2 provides a comparison of what users outside your organization can do within your tenant by default.
TABLE 2-2 What users outside of your organization can do
What users outside your organization can do |
Guest users |
External access users |
|---|---|---|
Access Teams resources |
Yes |
No |
Be added to a group chat |
Yes |
No |
Be invited to a meeting |
Yes |
Yes |
Make private calls |
Yes |
Yes |
View the phone number for dial-in meeting participants |
Yes |
No |
Use IP video |
Yes |
Yes |
Use screen sharing |
Yes |
Yes |
Use Meet Now |
Yes |
No |
Edit sent messages |
Yes |
Yes |
Delete sent messages |
Yes |
Yes |
Use Giphy in conversation |
Yes |
Yes |
Use memes in conversation |
Yes |
Yes |
Use stickers in conversation |
Yes |
Yes |
Presence is displayed |
Yes |
Yes |
Use @mentions |
Yes |
Yes |
The default settings for external access help facilitate fuller collaboration, but security policies may require that you restrict some of these settings. External access can be turned completely off or controlled by the Session Initiation Protocol (SIP) domain with permit and deny entries. You can also enable or disable external access with users of the consumer Skype service. To manage external access, do the following:
Log on to the TAC at https://admin.teams.microsoft.com.
In the left menu, expand Org-wide settings and then select External access.
If you wish to disable external access completely, set Users can communicate with other Skype for Business and Teams users to Off.
If you wish to only disable external access with users of the Skype consumer service, set Users can communicate with Skype users to Off.
To either explicitly permit or explicitly deny specific domains, select +Add a domain.
Add the specific domain DNS name and specify whether to allow or deny it, as shown in Figure 2-4.
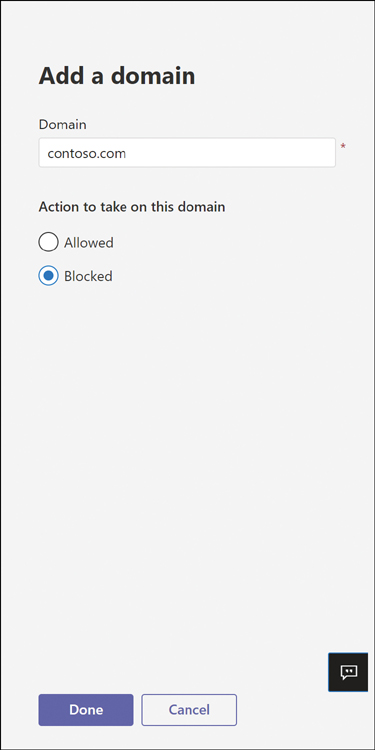
Figure 2-4 Blocking a SIP domain
Select Done.
Manage channels for a team
Teams are, at their most fundamental level, collections of people, and within Microsoft Teams, you can create a team for any grouping of people in your organization and for any purpose. Channels exist within a team and can include chat messages, meeting recordings, files, and other tools. Every team has a General channel (that cannot be deleted), and team owners can create other channels at need, either from scratch or by using templates, which we discussed in Chapter 1. Admins can also create and manage both teams and channels within the TAC.
There are two kinds of channels. The first is the standard channel, and these are available to all members of a team. The second is the private channel, and access is restricted to those who are explicitly added to that channel by an owner or an admin. Private channels can be useful within a larger team if you want to have a more private area, such as when you have guests in a team but need an area that is for employees only and do not want to create a separate team.
To manage channels for a team using the TAC, follow this procedure:
Log on to the TAC at https://admin.teams.microsoft.com.
In the left menu, expand Teams and select Manage teams.
Scroll down the list of your teams, or enter part of the name in the Search box to find your team, and then select the name of the team.
You can see the list of team members on the Members tab. Select the Channels tab.
To create a new channel, select +Add.
Name the channel, enter a description, and choose either Standard or Private from the type drop-down list. Then select Apply.
In the list of channels, select the channel you just created by selecting next to the name so that a check mark appears, then select Edit.
In this window, you can change the name and the description. You cannot change between private and public. If you make any changes, select Apply to save them.
While all members of a team have access to public channels, you must explicitly add team members to private channels. To do this, select the name of the private channel.
In this window, select +Add to add new members. Remember that only existing members of the team can be assigned to a private channel. If you do not see a user you wish to add, go back to the team and ensure they are a member.
When finished, select Apply.
Channels can also be managed by a team owner in the Teams app or Teams web app. To do so:
Log on to Microsoft Teams.
On the Teams tab, browse down to your team, or use Search and select your team.
Select the ellipsis button (or right-click the team), and you will see options for managing the team, including creating new channels.
To manage an existing channel, select the ellipsis button (or right-click the channel) and you will see options for managing the channel, as shown in Figure 2-5.
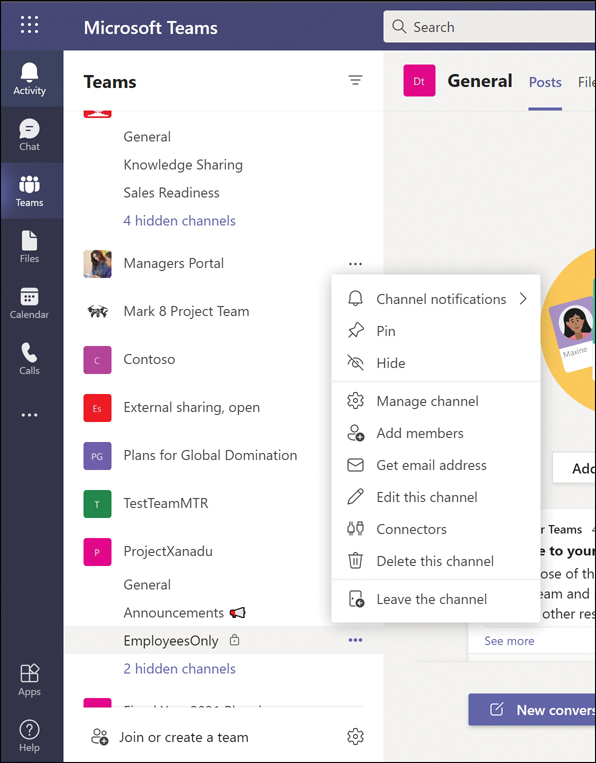
Figure 2-5 Managing a channel; note the padlock icon, which indicates this is a private channel
Just as in the TAC, you can edit the properties of a channel or add new members to a private channel.
There are limitations to private channels you should consider when using them. They do not support all the connectors and tabs and apps that public channels do. They are not copied to a new team if you create one from an existing team that has private channels. Notifications for activities in private channels are not included in missed activity emails. And perhaps most importantly, at present retention policies are not supported. Messages sent to members of private channels are stored in the members’ mailboxes, rather than the team’s mailbox. You can, of course, place retention on users’ mailboxes and run eDiscovery searches against user mailboxes. But if your organization requires retention on the team content and not on the members, you may need to create a private team, rather than a private channel within an existing team, to meet your needs. One other point of note to be clear on: unlike the team itself, once created, a channel cannot be changed from Standard to Private or vice versa. Another reason to be very deliberate when creating a private channel!
Manage private channel creation
By default, just as all users can create teams, any owner of a team can create private channels with the teams they own. You can restrict this if necessary by creating a Teams policy to restrict the ability to create private channels and applying it to users. As an admin, you can then create private channels for teams that require them and meet whatever internal guidelines you have in place for this. To restrict private channel creation for your entire organization, do the following:
Log on to the TAC at https://admin.teams.microsoft.com.
In the left menu, expand Teams, and select Teams policies.
Select the Global (Org-wide default) policy and then select Edit.
Set the Create private channels switch to Off, as shown in Figure 2-6.
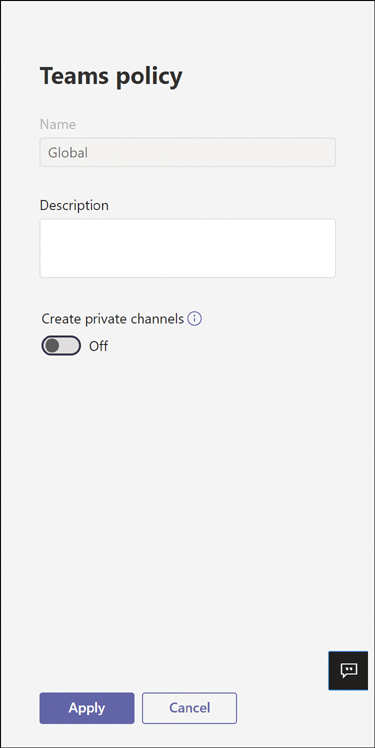
Figure 2-6 The global policy preventing the creation of private channels
Select Apply.
You can create additional Teams policies and assign them to specific users if you need some users to be able to create private channels and prevent others from doing so.
Manage email integration
By default, each team, and each channel within a team, are assigned an email address that can accept mail. Email sent to the team address will appear in the General channel, as will email sent to the General channel address, whereas email sent to any other channel will appear in the appropriate channel. This can be used for including teams or channels in email blasts, to subscribe to RSS feeds, for SMTP-based alerts, and more. You can restrict email access on an organizational level, on a team level, and at a channel level if necessary.
Email addresses are, by default, assigned to every channel in a team from the tenant routing domain and region, such as 0c9188db.M365x397752.onmicrosoft.com@amer.teams.ms. The first eight characters uniquely identify the team and channel, then the tenant name that was created when the tenant was first set up, then the @ sign, then the regional teams domain. In the earlier case, the tenant name is M365x397752.onmicrosoft.com and it was created in the North American (amer) region. Once you add and verify a custom domain in your tenant and set its purpose for email, email addresses will be user-friendlier and assigned in the default SMTP domain. You can assign a different SMTP address if you prefer.
To manage email integration at the organizational level, do the following:
Log on to the TAC at https://admin.teams.microsoft.com.
In the left menu, expand Org-wide settings, then select Teams settings.
Scroll down to Email integration.
You can turn off email integration by setting Allow users to send emails to channel email address to Off, or you can restrict what SMTP domains can send email to teams, as shown in Figure 2-7.
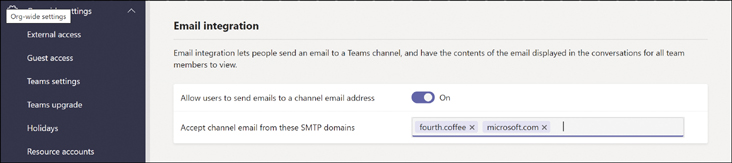
Figure 2-7 The Org-wide settings for email integration
When you are done making changes, scroll down to the bottom of the Teams settings panel and select Save.
)
To change the address of a team, do the following:
As an Exchange admin or recipient admin, log on to the Exchange admin center at https://admin.exchange.microsoft.com.
Expand Recipients and then select Groups.
Find the Office 365 Group that corresponds to the team you wish to update.
Select the group.
Details of the group will be shown in a pop-up window. In the Email addresses section, select Edit.
You can edit the primary email address, or add one or more aliases and then set an alias as the primary, as shown in Figure 2-8.
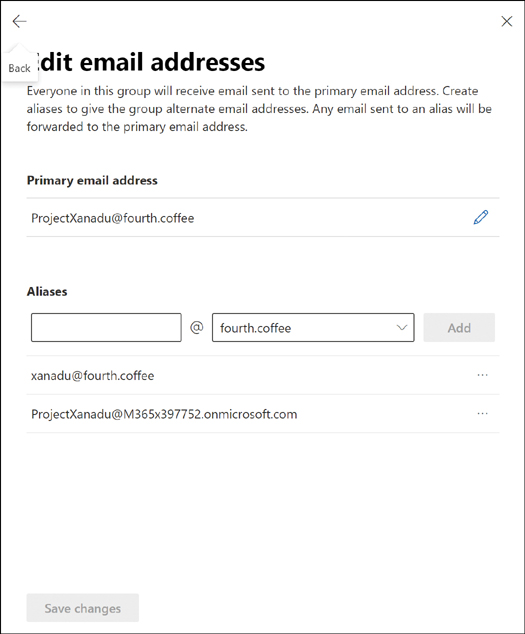
Figure 2-8 Editing the email address for an Office 365 Group
When done, select Save changes.
Configure external access for SharePoint and OneDrive for Business
As you know by now, Microsoft Teams is heavily dependent on SharePoint and OneDrive for Business. Each team has an associated SharePoint site. Each public channel within a team has an associated folder. Ad hoc sharing uses OneDrive for Business. Both fall under compliance and retention policies set at the organizational level to facilitate administration.
As teams may have external guest members, how SharePoint and OneDrive for Business are configured for external access can have a direct impact on using Teams with external guests. Microsoft Teams uses the settings from SharePoint and OneDrive for Business that control sharing of files, including the defaults when sharing. If a team wants to include external users, but the SharePoint admin has blocked external sharing, the more restrictive setting will take precedence and could lead to unexpected results for the team owner. It’s recommended that you use a more open approach to sharing within SharePoint and then implement more restrictive settings on sites that specifically hold more sensitive information, and the Microsoft Teams admin(s) and the SharePoint admin(s) work together to ensure that all settings deployed support the business need and meet specific company policies.
To set Sharing permissions at the organizatonal level, which will then apply to teams, do the following:
Log on to the SharePoint admin center at https://tenantname-admin.sharepoint.com.
In the left menu, expand Policies and select Sharing.
In the External sharing section, select the More external sharing settings link to see all the options, and then set the level of permissions that meets the organization’s broadest requirements. It is also possible, through the Active Sites page in the SharePoint admin center, as well as through PowerShell, to set more granular options for external sharing at the site level. An example of this would be to allow external sharing for team sites for collaboration while blocking the ability to share content from a corporate intranet site. Note that you can also restrict sharing to only specific domains, such as partner domains, if desired, and this can also be configured granularly. Figure 2-9 shows the options for this.

Figure 2-9 External sharing settings for SharePoint and OneDrive for Business
Depending on the desired sharing posture for your organization, you can set default settings for sharing file and folder links, as shown in Figure 2-10. Note that these settings can be changed by the user up to the most permissive external sharing settings applied as previously discussed.

Figure 2-10 Editing the default file and folder link settings
When you are finished making changes, select Save.
)
)
Manage cloud file storage options for collaboration
Microsoft Teams is built to utilize SharePoint and OneDrive for Business for cloud file storage, but it can also integrate with several third-party storage services. This is useful for organizations that have already deployed competing solutions, including Box and DropBox, among others. Teams admins can control which services are available globally in Teams settings. The default is to permit all available, but you may wish to disable one or all to meet corporate compliance or security requirements. To manage which cloud file storage options are available, do the following:
Log on to the TAC at https://admin.teams.microsoft.com.
In the left menu, expand Org-wide settings and then select Teams settings.
Disable any of the third-party solutions you do not want users to access by setting the switch to Off, as shown in Figure 2-11.
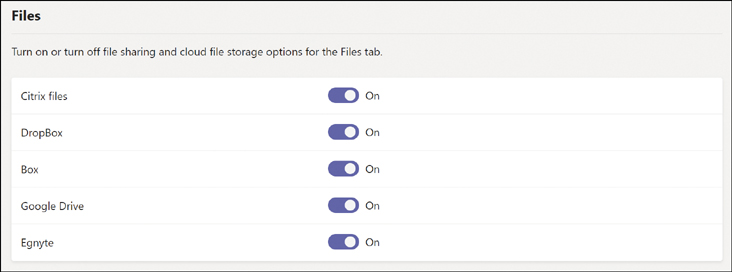
Figure 2-11 Editing the default third-party file sharing services available
Scroll down to the bottom of the window and select Save.
)
)
)
)
)
)