Manage devices and data
- By Andrew Bettany and Andrew Warren
- 9/23/2021
In this sample chapter from Exam Ref MD-100 Windows 10, 2nd Edition, learn how to manage local users, local groups, and devices, configure devices by using local policies, and manage Windows security.
The MD-100 Windows 10 exam focuses on how to manage devices within an enterprise environment, by using a Microsoft 365 subscription, for example. Once you have installed or upgraded devices with Windows 10, you need to know how to join devices to Azure Active Directory. Organizations that do not use the cloud use Active Directory Domain Services, and you must manage both users and devices.
Devices are managed using local or Group Policy, and you have to implement and troubleshoot these policies. To ensure that data and devices remain safe, you must know how to configure Windows security and use Windows Defender Firewall and Windows Defender Antivirus to safeguard Windows 10.
Skills covered in this chapter:
Skill 2.1: Manage local users, local groups, and devices
Skill 2.2: Configure devices by using local policies
Skill 2.3: Manage Windows security
Skill 2.1: Manage local users, local groups, and devices
In this skill, you will review how to manage local users and local groups on Windows 10 devices. If you have experience with an earlier version of Windows, you might be familiar with configuring local users and local groups, as these operations are largely unchanged. Before you use Windows 10 on a device, you must sign in with the credentials for a user account. In an enterprise environment, the device and the user are often used to provide, control, and audit access to resources. Groups may be used for simplifying administration, allowing entities to share a common function or role or require the same set of privileges. You need to understand how local users, local groups, and devices form a key component in Windows security.
Manage local users
A user account is required to log on to a Windows 10 computer, and to secure the device, it should have a password. You need to understand the default user accounts that are created automatically when you install Windows 10 and how to create new user accounts so that users can log on to machines and access resources. In this skill, you will focus on local accounts that are created and operate only on the local device.
Configure local accounts
Local accounts, as the name suggests, exist in the local accounts database on your Windows 10 device; they can only be granted access to local resources and, where granted, exercise administrative rights and privileges on the local computer.
When you first install Windows 10, you are prompted to sign in using a Microsoft account or a Work Account, such as a Microsoft 365 account that is connected to Azure Active Directory. If neither of these options is available or suits your requirements, you can choose an offline account and create a local account to sign in. Thereafter, you can create additional local user accounts as your needs dictate.
Default accounts
In Windows 10, there are three default local user accounts on the computer in the trusted identity store. This is a secure list of users and groups and is stored locally as the Security Accounts Manager (SAM) database in the registry. The three accounts are the Administrator account, the Default Account, and the Guest account.
The default Administrator account cannot be deleted or locked out, but it can be renamed or disabled. When the default administrator account is enabled, it requires a strong password. Another local account called the HelpAssistant account is created and enabled when a Windows Remote Assistance session is run. The HelpAssistant account provides limited access to the computer to the person who provides remote assistance. The HelpAssistant account is automatically deleted if there are no Remote Assistance requests pending.
When you install Windows 10 using a local account, you can create additional user accounts and give these accounts any name that is valid. To be valid, the username
Must be from 1 to 20 characters
Must be unique among all the other user and group names stored on the computer
Cannot contain any of the following characters: / \ [ ] : ; | = , + ? < > " @
Cannot consist exclusively of periods or spaces
The initial user account created at installation is a member of the local Administrators group and therefore can perform any local management task on the device. You can view the installed accounts, including the default accounts, by using the Computer Management console, as shown in Figure 2-1. If you cannot find the Local Users And Groups section within Computer Management, then you are probably running Windows 10 Home Edition, which does not have the Local Users And Groups Microsoft Management Console (MMC) snap-in.
)
FIGURE 2-1 Viewing built-in user accounts
You can also use the net user command and the get-wmiobject -class win32_useraccount Windows PowerShell cmdlet to list the local user accounts on a device.
Manage local user accounts
You can manage local user accounts by using Computer Management (except with Windows 10 Home edition), Control Panel, the Settings app, and Windows PowerShell.
Using Computer Management
To manage user accounts by using Computer Management, right-click Start and then select Computer Management. Expand the Local Users and Groups node and then select Users. To create a new user, right-click the Users node and select New User.
In the New User dialog box, configure the following properties, as shown in Figure 2-2, and then select Create.
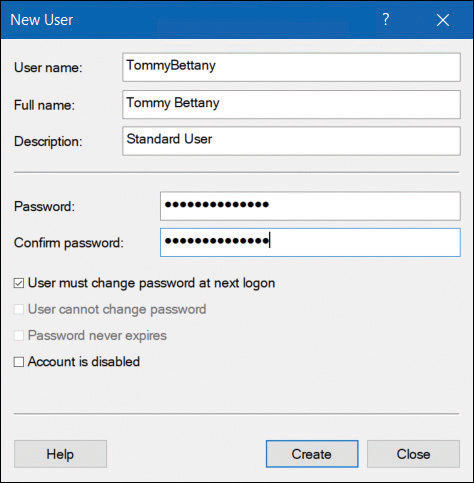
FIGURE 2-2 Adding a user with Computer Management
User Name
Full Name
Password
User Must Change Password At Next Logon
User Cannot Change Password
Password Never Expires
Account Is Disabled
After you have added the new user account, you can modify more advanced properties by double-clicking the user account. On the General tab, you can change the user’s full name and description and password-related options. On the Member Of tab, you can add the user to groups or remove the user from groups. The Profile tab, shown in Figure 2-3, enables you to modify the following properties:
Profile Path This is the path to the location of a user’s desktop profile. The profile stores the user’s desktop settings, such as color scheme, desktop wallpaper, and app settings (including the settings stored for the user in the registry). By default, each user who signs in has a profile folder created automatically in the C:\Users\Username folder. You can define another location here, and you can use a Universal Naming Convention (UNC) name in the form of \\Server\Share\Folder.
Logon Script This is the name of a logon script that processes each time a user signs in. Typically, this will be a BAT or CMD file. You might include commands that map network drives or load apps in this script file. Assigning logon scripts in this way is not usually done. Instead, Group Policy Objects (GPOs) are used to assign logon and startup scripts for domain user accounts.
Home Folder This is a personal storage area where users can save their personal documents. By default, users are assigned subfolders within the C:\Users\Username folder for this purpose. However, you can use either of the following two properties to specify an alternate location:
Local Path A local filesystem path for storage of the user’s personal files. This is entered in the format of a local drive and folder path.
Connect A network location mapped to the specified drive letter. This is entered in the format of a UNC name.
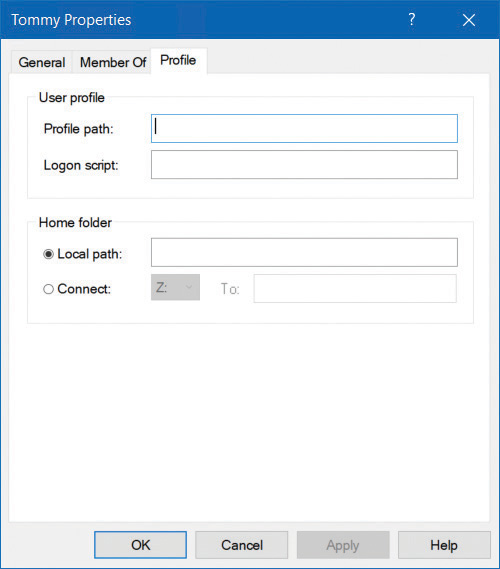
FIGURE 2-3 Modifying the profile properties for a user
Using Control Panel
You can also manage user accounts by opening Control Panel, clicking User Accounts, and then clicking User Accounts again. From here, you can do the following:
Make changes to my account in PC settings Launches the Settings app to enable you to make user account changes
Change your account type Enables you to switch between Standard and Administrator account types
Manage another account Enables you to manage other user accounts on this computer
Change User Account Control settings Launches the User Account Control Settings dialog box from Control Panel
If you are an administrator and you select another local user, you can perform these tasks:
Change the account name Enables you to change your account name.
Change the password Lets you change the password for the user and provide a password hint
Change your account type Enables you to switch between Standard and Administrator account types
Delete the account Allows you to delete the user account and optionally any files associated with their account
Manage another account Enables you to manage other user accounts on this computer
You cannot add new accounts from Control Panel. If you want to add a new local account, use Computer Management, Windows PowerShell, or Add A Family Member in the Family And Other Users section of the Settings app.
Using The Settings App
The preferred way to manage local accounts in Windows 10 is by using the Settings app. From Settings, select Accounts. As shown in Figure 2-4, on the Your Info tab, you can modify your account settings, including these:
Sign in with a Microsoft account instead You can sign out and sign in using a Microsoft account.
Create your picture You can browse for an image or take a selfie if your device has a webcam.
Creating a Microsoft account You can create a new Microsoft account using this option.
)
FIGURE 2-4 Modifying your user account properties in the Settings app
If you need to add a new local user account, select the Family & Other Users section and then select Add Someone Else To This PC.
Windows 10 requires you to then enter that person’s email address, typically the address they use to sign in to Office 365, OneDrive, Skype, Xbox, or Outlook.com.
If you do not have the recipient’s email address, you can still add a local account by using the following procedure:
In the Settings app, select Accounts.
On the Family & other users tab, under Other users, select Add someone else to this PC.
In the How will this person sign in dialog box, select I don’t have this person’s sign-in information.
In the Create account dialog box, select Add a user without a Microsoft account.
On the Create an account for this PC page, type the username, enter a new password twice, provide answers to the three security questions, and then select Next to create the local account. The account is listed under Other users.
Using Windows Powershell
You can view local user accounts using Windows PowerShell, but to add or modify local accounts, you will need to run the cmdlets with elevated privileges.
You can use the following cmdlets to manage local user accounts:
Get-LocalUser Gets local user accounts
New-LocalUser Creates a local user account
Remove-LocalUser Deletes a local user account
Rename-LocalUser Renames a local user account
Disable-LocalUser Disables a local user account
Enable-LocalUser Enables a local user account
Set-LocalUser Modifies a local user account
For example, to add a new local user account called User 03 with a password, run the following cmdlets:
$Password = Read-Host -AsSecureString
<<Enter Password>>
New-LocalUser "User03" -Password $Password -FullName "Third User" -Description "User 3"
Manage local groups
There are several built-in groups with Windows 10, which provide an easy way for users to be granted the same permissions and rights as other group members. Assigning permissions to groups is usually more efficient than applying them to individual users.
You use the Computer Management console, or if you are an administrator, you can create a custom Microsoft Management Console (MMC) and add the Local Users And Groups snap-in, as shown in Figure 2-5, to create and manage local groups.
)
FIGURE 2-5 Default groups in Windows 10
In Figure 2-5, you can see the default built-in local groups (such as Administrators and Device Owners) and a description for each. These built-in groups already have the necessary permissions associated to them to accomplish specific tasks.
If you select the Users or Administrators group, you should see members that you recognize. Administrators have complete and unrestricted access to the computer, whereas users are unable to make accidental or intentional systemwide changes, but they can run most applications that have already been installed on a device.
Built-in local groups
You can add your own groups, change group membership, rename groups, and delete groups. It is best practice to use the built-in groups wherever possible because they already have the appropriate permissions and are familiar to other administrators. Some built-in local groups are special groups that the Windows 10 system requires (and cannot be managed).
Some of the local groups created on Windows 10 devices, together with their uses, are shown in Table 2-1.
TABLE 2-1 Built-in local groups
Local Group |
Description |
|---|---|
Access Control Assistance Operators |
Members of this group can remotely query authorization attributes and permissions for resources on the computer. |
Administrators |
The Administrators group has full permissions and privileges on a Windows 10 device. Members can manage all the objects on the computer. The Administrator and initial user accounts are members of the Administrators local group. |
Backup Operators |
Backup Operators group members have permissions to back up and restore the file system regardless of any NTFS permissions. Backup Operators can access the file system only through the Backup utility. |
Cryptographic Operators |
The Cryptographic Operators group has access to perform cryptographic operations on the computer. |
Device Owners |
Members of this group can change systemwide settings to the computer. |
Distributed COM Users |
The Distributed COM Users group can launch and run Distributed COM objects on the computer. |
Event Log Readers |
Event Log Readers group members can read the event log on the local computer. |
Guests |
The Guests group has very limited access to the computer. In most cases, administrators disable guest access because guest access can pose a potential security risk; instead, most administrators prefer to create specific users. By default, the Guest user account is a member of the Guests local group. |
Hyper-V Administrators |
Members of this group have complete and unrestricted access to all features of Hyper-V if this feature has been installed. |
IIS_IUSRS |
The IIS_IUSRS group is used by Internet Information Services (IIS). By default, the NT AUTHORITY\IUSR user account, used by IIS, is a member of the IIS_IUSRS group. |
Network Configuration Operators |
Members of the Network Configuration Operators group can manage the computer’s network configuration. |
Performance Log Users |
The Performance Log Users group can access and schedule logging of performance counters and create and manage trace counters on a device. |
Performance Monitor Users |
The Performance Monitor Users group can access and view performance counter information on a device. Members of this group can access performance counters both locally and remotely. |
Power Users |
The Power Users group is included in Windows 10 for backward compatibility only. Power Users was a group used on computers running Windows XP and granted members limited administrative rights. |
Remote Desktop Users |
The Remote Desktop Users group members can log on remotely using the Remote Desktop service. |
Remote Management Users |
Members of this group can access WMI resources over management protocols (such as WS-Management via the Windows Remote Management service). This applies only to WMI namespaces that grant access to the user. |
Replicator |
The Replicator group supports directory replication, which is a feature used by domain controllers. |
System Managed Accounts Group |
Members of this group are managed by the system. |
Users |
The Users group is used for end users who require very limited system access. On a fresh copy of Windows 10, members of the Users group are unable to compromise the operating system or program files. By default, all users who have been created on a device, except Guest users, are members of the Users local group. |
As Table 2-1 shows, Administrators group members have full permissions and privileges on a Windows 10 device. A member of the Administrators local group can perform the following tasks:
Access any data on the computer
Assign and manage user rights
Back up and restore all data
Configure audit policies
Configure password policies
Configure services
Create administrative accounts
Create administrative shares
Increase and manage disk quotas
Install and configure hardware device drivers
Install applications that modify the Windows system files
Install the operating system
Install Windows updates, service packs, and hot fixes
Manage disk properties, including formatting hard drives
Manage security logs
Modify groups and accounts that have been created by other users
Modify systemwide environment variables
Perform a system restore
Reenable locked-out and disabled user accounts
Remotely access the registry
Remotely shut down the system
Stop or start any service
Upgrade the operating system
Create and delete groups
Only members of the Administrators group can manage users and groups. When creating a new group, keep in mind that the group name has to be unique on the local computer and cannot be the same as a local username that exists on the computer.
You should make the group name descriptive, and wherever possible, you include a description of the new group’s function. Group names can have up to 256 characters in length and include alphanumeric characters such as spaces, but the backslash (\) is not allowed.
To create a new group, follow these steps:
Right-click Start and select Computer Management.
Open the Local Users and Groups console.
Right-click the Groups folder and select New Group from the context menu.
In the New Group dialog box, enter the group name. (Optionally, you can enter a description for this group.)
To add group members, select the Add button.
In the Select Users dialog box, type the username, then select OK. In the New Group dialog box, you will see that the user has been added to the group.
To create the new group, select the Create button.
To delete a group from the Local Users And Groups console in Computer Management, right-click the group name and choose Delete from the context menu. You will see a warning that deleting a group cannot be undone, and you should select the Yes button to confirm the deletion of the group.
When a group is deleted, all permissions assignments that have been specified for the group will be lost.
Special identity groups
Several special identity groups (sometimes known as special groups) are used by the system or by administrators to allocate access to resources. Membership in special groups is automatic, based on criteria, and you cannot manage special groups through the Local Users And Groups console. Table 2-2 describes the special identity groups that are built into Windows 10.
TABLE 2-2 Built-in special identity groups
Special Identity Group |
Description |
|---|---|
Anonymous Logon |
When a user accesses the computer through an anonymous logon, such as via special accounts created for anonymous access to Windows 10 services, they become members of the Anonymous Logon group. |
Authenticated Users |
This is a useful group because it includes all users who access Windows 10 using a valid username and password. |
Batch |
This group includes users who log on as a batch job operator to run a batch job. |
Creator Owner |
The Creator Owner is the account that created or took ownership of an object, such as a file, folder, printer, or print job. Members of the Creator Owner group have special administrator-level permissions to the resources over which they have ownership. |
Dialup |
This group includes users who log on to the network from a dial-up connection. |
Everyone |
This group includes anyone who accesses the computer. This includes all users, including Guest accounts and all users that are within a domain or trusted domains. Members of the Anonymous Logon group are not included as a part of the Everyone group. |
Interactive |
This group includes all users who use the computer’s resources locally and those who are not using the computer’s resources remotely via a network connection. |
Network |
This group includes users who access the computer’s resources over a network connection. |
Service |
This group includes users who log on as a user account that is used to run a service. |
System |
When Windows 10 needs to access internal functions, it can perform actions as a system user. The process being accessed by the operating system becomes a member of the System group. |
Terminal Server User |
This group includes users who log on through Terminal Server applications. |
Manage users, groups, and devices in Active Directory Domain Services
Once a network grows larger than a few computers, companies and enterprises configure networks as a domain or directory. A large network is managed by using a domain. On-premises environments will use Active Directory Domain Services (AD DS) and cloud-based environments use Azure Active Directory (Azure AD). Using both on-premises and cloud resources is referred to as a hybrid model. Both directory services are responsible for identity-related management. User and device information is stored in a directory, which creates a logical, hierarchical organization of information, represented as objects.
Users are aware that they are part of an Active Directory domain because they will access shared resources by signing into their device using a domain username and password such as user@contoso.com rather than a local or Microsoft account.
AD DS can store millions of objects that can be managed and controlled. Objects typically include shared resources such as servers, volumes, printers, and the network user and computer accounts. AD DS also simplifies the administration of user accounts and stores information about them, such as names, passwords, phone numbers, or information about a computer, like the device name or the last user logged on.
One or more Windows servers can be configured with the domain controller role, which then stores the directory and allows administrators to manage AD DS objects using a console app, such as Active Directory Administrative Center (ADAC).
You will learn later in this chapter how user or computer objects’ properties can also be configured by using local policies or managed at scale by using Group Policy Objects. Computers that are managed by Active Directory are referred to as domain joined.
Use Active Directory users
Within Active Directory (AD), there are two primary objects that you need to know: user accounts and computer accounts. These are two forms of common security principals held in AD, and they allow you to manage the account and control access to resources by the entity (a person or a computer). Within a domain you will create domain user accounts for the person in most scenarios. A domain user will use their domain username and password to sign in to any device on the domain-based network (with the correct permissions). This approach allows administrators to centrally manage user accounts across an organization rather than on each individual device, as with a workgroup environment.
Use Active Directory groups
Active Directory groups allow you to collect user accounts, computer accounts, and other groups into units that can be managed. By controlling groups of objects, administrators can manage permissions to resources at scale. It is best practice for users and other objects to be added to a group and then permissions set at the group level, rather than at the user or computer object level. This way, if a specific user or computer account joins or leaves the organization, the group membership can be dynamically updated by Active Directory. A huge amount of time and effort is therefore saved every time a personnel change occurs.
Two types of groups are available in Active Directory:
Distribution groups Used to create email distribution lists used by email applications, such as Exchange Server, to send emails to the group membership. It is not possible to configure security permissions on distribution groups.
Security groups Used to assign rights and permissions to objects within the group.
User rights are assigned to a security group to determine what members of that group can do using their user account. For example, you may want to add a user to the Backup Operators group in Active Directory. The user will then be granted the ability to back up and restore files and directories that are located on each file server or domain controller in the domain.
Permissions are assigned to the shared resource. Best practice is to assign the permissions to a security group and allow AD to determine who can access the resource and the level of access whenever the resource is accessed. The level of access can be fine-tuned using access control entries (ACEs), such as Full Control or Read, which are stored in the discretionary access control list (DACL) for each resource. The DACL defines the permissions on resources and objects such as file shares or printers.
Active Directory default security groups
You can use several built-in groups with Active Directory. Some commonly used security groups are shown in Table 2-3.
TABLE 2-3 Built-in Active Directory security groups
AD Security Group |
Description |
|---|---|
DnsAdmins |
Members of this group have administrative access to the DNS Server service. |
Domain Admins |
Domain Admins are the designated administrators of the domain. Present on every domain-joined computer within the local Administrators group. Receives rights and permissions granted to the local Administrators group and to the domain’s Administrators group. |
Domain Computers |
All computers and servers that are joined to the domain are members of this group. |
Domain Users |
All users in the domain. |
Enterprise Admins |
Enterprise Admins have permissions to change forest-wide configuration settings. Enterprise Admins are members of the domain’s Administrators group and receive rights and permissions granted to that group. |
IIS_IUSRS |
The IIS_IUSRS group is used by Internet Information Services (IIS). By default, the NT AUTHORITY\IUSR user account, used by IIS, is a member of the IIS_IUSRS group. |
Print Operators |
Members can administer domain-based printers. |
Remote Desktop Users |
The Remote Desktop Users group members can log on remotely using the Remote Desktop service. |
Understand Active Directory
A detailed knowledge of Windows Server and AD DS is outside the scope of the MD-100 exam, but you should know the difference between an on-premises environment and a cloud-based one. Active Directory Domain Services (AD DS), commonly referred to as Active Directory (AD), is a role of associated services that are installed on physical or virtual Windows servers. Simply hosting a Windows Server running the AD DS role on an Azure-based virtual machine is an example of a “lift and shift” deployment to the cloud running AD DS and does not provide an Azure Active Directory (Azure AD) environment.
Windows Server installed with the AD DS role is a complex environment that has benefited organizations for over 20 years and, as such, has many legacy components necessary to support AD feature backward compatibility. In addition to the directory service, technologies are often provisioned when you add the AD DS role to a Windows server, including:
Active Directory Certificate Services (AD CS)
Active Directory Lightweight Directory Services (AD LDS)
Active Directory Federation Services (AD FS)
Active Directory Rights Management Services (AD RMS)
Active Directory Domain Services has the following characteristics (which are not shared by Azure AD):
AD DS is a true directory service, with a hierarchical X.500-based structure.
AD DS uses Domain Name System (DNS) for locating resources.
You can query and manage AD DS using Lightweight Directory Access Protocol (LDAP).
The Kerberos protocol is primarily used for AD DS authentication.
Computer objects represent computers that join an Active Directory domain.
You can manage objects stored in the directory using organizational units (OUs) and Group Policy Objects (GPOs).
You can establish trusts between domains for delegated management.
Manage devices in directories
Microsoft has designed Windows 10 to be managed using cloud-based tools such as Microsoft Intune for remote device management. As more businesses migrate away from traditional on-premises domain environments to the cloud, you will need to understand how to configure devices to register them in Azure Active Directory.
In this section, you will learn how to register a device so that it can be managed by a business or a school using cloud-based services. You will see how to enable Device Registration and the process of joining devices to Azure Active Directory.
Understand device management
Once devices are managed by Azure Active Directory (Azure AD), you can ensure that your users are accessing your corporate resources from devices that meet your standards for security and compliance. To protect devices and resources using Azure AD, users must be allowed to have their Windows 10 devices managed by Azure AD.
Azure AD is a cloud-based identity authentication and authorization service that enables your users to enjoy the benefits of single sign-on (SSO) for cloud-based applications, such as Office 365. Users can easily join their devices to your organization’s Azure AD once you have enabled device joining in the Azure Active Directory Admin Center.
When you are joining devices to an on-premises domain environment, the types of devices that you can join to the domain are quite restrictive; devices, for example, must be running a supported operating system. This means that any users who have devices running Windows 10 Home editions cannot join the company’s on-premises domain. However, Azure AD is less restrictive in this respect; you can add to Azure AD almost any tablet, laptop, smartphone, and desktop computer running a variety of platforms. When you enable users to add their devices to Azure AD, you will manage their enrolled devices by using a mobile device management solution, such as Microsoft Intune, which allows you to manage and provision your users’ devices.
Devices can be managed by Azure AD using two methods:
Joining a device to Azure AD
Registering a device to Azure AD
Azure Ad–Joined Device
Joining a Windows 10 device to Azure AD is like registering a device with Azure AD, but it allows enhanced management capabilities. Once a device has been joined to Azure AD, the local state of a device changes to enable your users to sign into the device using the work or school account instead of a personal account.
An enterprise will typically join its owned devices to Azure AD to allow for cloud-based management of the devices and to grant access to corporate apps and resources.
Organizations of any size can deploy Azure AD Join. Azure AD Join works well in a cloud-only (no on-premises infrastructure) environment. When Azure AD Join is implemented in a hybrid environment, users gain access to both cloud and on-premises apps and resources.
Azure AD–joined devices allow your users to access the following benefits:
Single-Sign-On (SSO) Allows users simplified access to Azure managed SaaS apps, services, and work resources.
Enterprise-compliant roaming User settings can be kept in sync across joined devices using their Azure AD–joined devices (without the need to sign in using a Microsoft account).
Access to Microsoft Store for Business Users can access a Microsoft Store populated with apps chosen by your organization.
Windows Hello Devices can be secured using the enterprise features of Windows Hello.
Restriction of access Devices will only be able to access apps that meet the organizational compliance policy.
Seamless access to on-premises resources Hybrid Azure AD–joined devices can access on-premises resources when connected to the domain network.
Organizations that already have Microsoft 365 or other SaaS apps integrated with Azure AD have the necessary components in place to have devices managed in Azure AD instead of being managed in Active Directory.
Azure Ad–Registered Devices
Once a device is registered into management, it is “known” to Azure AD, and information relating to the device is stored in Azure AD. Effectively, the device is given an identity with Azure AD. You can create conditional access rules to determine whether access to resources from your devices will be granted.
Azure AD–registered devices enable users to use personally owned devices to access your organization’s resources in a controlled manner. Azure AD supports bring-your-own-device (BYOD) scenarios for several types of devices, including devices running Windows 10, iOS, Android, and macOS.
With an Azure AD–registered device, the user will gain access to resources using a work or school Azure AD account at the time they access the resources. All corporate data and apps will be kept completely separated from the personal data and apps on the device. If the personal computer, tablet, or phone that is registered with Azure AD does not meet your corporate standards for security and compliance—for example, if a device is not running a supported version of the operating system, or it has been jail broken—then access to the resource will be denied.
Device Registration enables you to facilitate an SSO experience for users, removing the need for them to repeatedly enter credentials to access resources.
The main reasons to implement Device Registration are:
To enable access to corporate resources from non-domain joined or personally owned devices
To enable SSO for specific apps and/or resources managed by Azure AD
After you enable Device Registration, users can register and enroll their devices in your organizational tenant. After they have enrolled their devices:
Enrolled devices are associated with a specific user account in Azure AD.
A device object is created in Azure AD to represent the physical device and its associated user account.
A user certificate is installed on the user’s device.
Configure device management
Device management requires configuration to ensure that when your users attempt Device Registration, the process will not fail. By default, the setting is enabled, and it allows all Windows 10 devices that present valid credentials to be managed by your Azure AD.
The Azure portal provides a cloud-based location to manage your devices. To allow registration of devices into Azure AD, follow these steps:
Sign in as an administrator to the Azure portal at https://portal.azure.com.
On the left navigation bar, select Azure Active Directory.
In the Manage section, select Devices.
Select Device settings.
On the Device settings blade, ensure that Users may join devices to Azure AD is set to All, as shown in Figure 2-6. If you choose Selected, then select the Selected link and choose the users who can join Azure AD. You can select both individual users and groups of users.
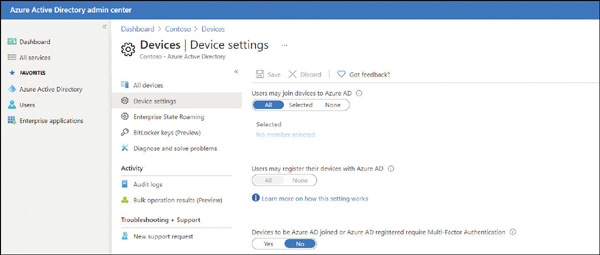
FIGURE 2-6 Enabling Azure AD join
Select Save.
)
Within the Azure AD portal, you can fine-tune the process of registering and joining devices by configuring the device settings as listed in Table 2-4.
TABLE 2-4 Azure AD device configuration settings
Device Setting |
Description |
|---|---|
Users May Join Devices To Azure AD |
The default is All. The Selected option allows you to select users who can join Windows 10 devices to Azure AD. |
Users May Register Their Devices With Azure AD |
Required to allow devices to be registered with Azure AD by users. Options include the following:
|
Additional Local Administrators On Azure AD Joined Devices |
You can assign the users who are granted local administrator rights on a device and added to the Device Administrators role in Azure AD. By default, global administrators in Azure AD and device owners are granted local administrator rights. Requires an Azure AD Premium license. |
Devices To Be Azure AD Joined Or Azure AD Registered Require Multi-Factor Authentication |
Choose whether users are required to use multifactor authentication to join their devices to Azure AD. The default setting is No. This setting is only applicable to Azure AD Join on Windows 10 and BYOD registration for Windows 10, iOS, and Android. This setting does not apply to hybrid Azure AD–joined devices, Azure AD–joined VMs in Azure, and Azure AD–joined devices using Windows Autopilot self-deployment mode. |
Maximum Number Of Devices Per User |
By default, all users can have a maximum of 50 devices in Azure AD. Once this quota is reached, they are not able to add additional devices until one or more of the existing devices are removed. The device quota is across both Azure AD–joined and Azure AD–registered devices. |
Enterprise State Roaming |
You can configure the Enterprise State Roaming settings for specific users or groups. With Azure AD Premium, you can select a subset of your users and enable this feature for them. Without Azure AD Premium, you can only configure Enterprise State Roaming for all users at once. |
Device Management Tasks
Once devices have been registered or joined to Azure AD, they appear in the list within the All Devices section of the Azure Active Directory Admin Center. Devices managed by another management authority, such as Microsoft Intune, are also listed.
To locate a device, you can search using the device name or device ID. Once you have located a device, you can perform additional device management tasks, including the following:
Update devices You can enable or disable devices. You need to be a global administrator in Azure AD to perform this task, which prevents a device from being able to authenticate with Azure AD and thus prevents the device from accessing any Azure AD resources.
Delete devices When a device is retired, or it no longer requires access to your corporate resources, it should be deleted in Azure AD. Deleting a device requires you to be a global administrator in Azure AD or an Intune administrator. Once deleted, all details stored in Azure AD relating to the device—for example, BitLocker keys for Windows devices—are removed. If a device is managed elsewhere, such as in Microsoft Intune, you should ensure that the device has been wiped before deleting the device in Azure AD.
View device ID Each device has a unique device ID that can be used to search for the device; the unique device ID can be used as a reference if you need to use PowerShell during a troubleshooting task.
View device BitLocker key Windows devices managed by Azure AD can have their BitLocker recovery keys stored in Azure AD. You can access this key if the encrypted drive needs to be recovered. To view or copy the BitLocker keys, you need to be the owner of the device or have one of the following roles assigned: Global Administrator, Help desk Administrator, Security Administrator, Security Reader, or Intune Service Administrator.
Connect devices to Azure AD
Once the prerequisites have been configured to allow the Device Registration service to take place, you are able to connect devices to Azure AD.
There are three ways to connect a Windows 10 device to Azure AD:
Joining a new Windows 10 device to Azure AD
Joining an existing Windows 10 device to Azure AD
Registering a Windows 10 device to Azure AD
In this section, you will learn the steps required for each method of connecting Windows 10 to Azure AD.
Join A New Windows 10 Device To Azure Ad
In this method, we will take a new Windows 10 device and join the device to Azure AD during the first-run experience. The device could have been previously prepared using an enterprise deployment method, or it could have been distributed by the original equipment manufacturer (OEM) directly to your employees.
If the device is running either Windows 10 Professional or Windows 10 Enterprise, the first-run experience will present the setup process for company-owned devices.
To join a new Windows 10 device to Azure AD during the first-run experience, use the following steps:
Start the new device and allow the setup process.
On the Let’s start with region. Is this right? page, select the regional setting that you need and select Yes.
On the Is this the right keyboard layout? page, select the keyboard layout settings and select Yes.
On the Want to add a second keyboard layout? page, add a layout or select Skip.
The computer should automatically connect to the internet, but it if it does not, you will be presented with the Let’s connect you to a network page, where you can select a network connection.
On the How would you like to set up? page, choose Set up for an organization and select Next.
On the Sign in with Microsoft page, enter your organization or school account and password and select Next.
On the Choose privacy settings for your device, choose the settings and select Accept.
On the Use Windows Hello with your account page, select OK.
On the More information required page, select Next, provide the additional security verification information, and select Next again.
Depending on organizational settings, your users might be prompted to set up MFA. On the Keep your account secure page, select Next and set up the Microsoft Authenticator.
Depending on organizational settings, your users might be prompted to set up Windows Hello. By default, they will be prompted to set up a PIN. When prompted to set up a PIN, select Set up PIN. You should now be automatically signed in to the device, joined to your organization or school Azure AD tenant, and presented with the desktop.
Join An Existing Windows 10 Device To Azure Ad
In this method, we will take an existing Windows 10 device and join it to Azure AD. You can join a Windows 10 device to Azure AD at any time. Use the following procedure to join the device:
Open the Settings app and then select Accounts.
In Accounts, select the Access work or school tab.
Select Connect.
On the Set up a work or school account page, under Alternate actions, select Join this device to Azure Active Directory, as shown in Figure 2-7.
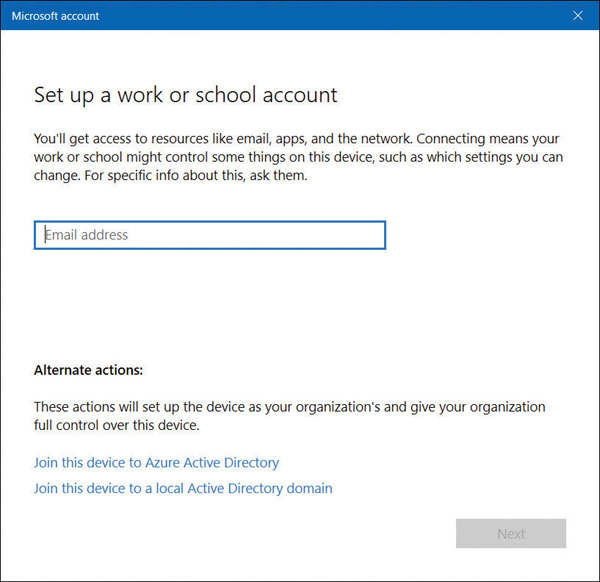
FIGURE 2-7 Joining a device to Azure AD
On the Microsoft account page, enter your email address and select Next.
On the Enter password page, enter your password and select Sign In.
On the Make sure this is your organization page, confirm that the details on screen are correct and select Join.
On the You’re all set! page, select Done.
To verify that your device is connected to your organization or school, check that your Azure AD email address is listed under the Connect button, indicating that it is connected to Azure AD.
)
If you have access to the Azure Active Directory portal, then you can validate that the device is joined to Azure AD by following these steps:
Sign in as an administrator to the Azure portal at https://portal.azure.com.
On the left navigation bar, select Azure Active Directory.
In the Manage section, select Devices > All devices.
Verify that the device is listed, as shown in Figure 2-8.
)
FIGURE 2-8 Viewing All Devices in Azure AD
Register Devices To Azure Ad
You connect a Windows 10 device to Azure Active Directory using the Add Work Or School Account feature found in the Settings app. Device Registration is used to allow devices to be known by both Azure AD and MDM solutions.
In this method, we will take an existing Windows 10 device and register it to Azure AD. Use the following procedure to register the device:
Open the Settings app and then select Accounts.
In Accounts, select the Access work or school tab.
Select Connect.
On the Set up a work or school account page, enter your work or school email address, select Next, and complete the wizard.
To verify that a device is registered to your organization or school Azure AD tenant, users can use these steps:
Open the Settings app and then select Accounts.
In Accounts, select the Access work or school tab.
On the Access work or school page, verify that your organization or school Azure AD email address is listed under the Connect button.
Enroll devices into Microsoft 365
Microsoft 365 is a bundled subscription that includes Office 365, Windows 10, and Enterprise Mobility + Security. Microsoft 365 comes in three primary bundles:
Microsoft 365 Business Premium For small and medium-sized organizations up to 300 users
Microsoft 365 Enterprise For organizations of any size
Microsoft 365 Education For educational establishments
With Microsoft 365, you use Azure Active Directory for your identity and authentication requirements, and you can (and should) enroll Windows 10 into device management so that your users can gain access to corporate resources. Once devices are joined to your Microsoft 365 tenant, Windows 10 becomes fully integrated with the cloud-based services offered by Office 365 and Enterprise Mobility + Security. Microsoft 365 supports other platforms, including Android and iOS, which can also be managed as mobile devices. However, only Windows 10 devices can be joined to Azure AD.
Enroll Devices Into Microsoft 365 Business
When you enroll Windows devices into Microsoft 365 Business, they must be running Windows 10 Pro, version 1703 (Creators Update) or later. If you have any Windows devices running Windows 7 Professional, Windows 8 Pro, or Windows 8.1 Pro, the Microsoft 365 Business subscription entitles you to upgrade them to Windows 10 Pro.
Microsoft 365 Business includes a set of device-management capabilities powered by Microsoft Endpoint Manager. Microsoft 365 Business offers organizations a simplified management console that provides access to a limited number of device management tasks, including the following:
Deploy Windows with Autopilot
Remove company data
Factory reset
Manage office deployment
To enroll a brand-new device running Windows 10 Pro into Microsoft 365 Business, known as a “user-driven enrollment,” follow these steps:
Go through Windows 10 device setup until you get to the How would you like to set up? page, as shown in Figure 2-9.
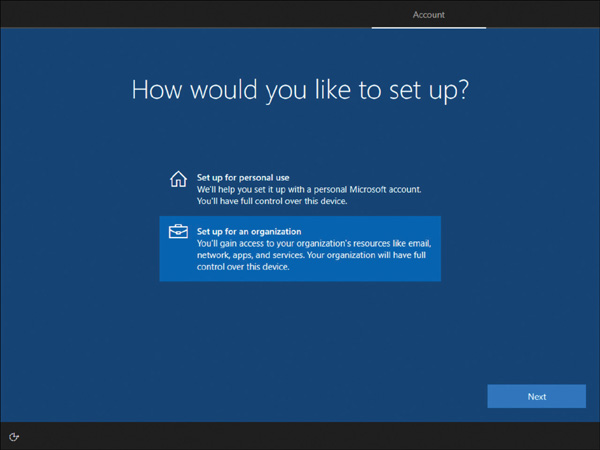
FIGURE 2-9 Windows 10 device setup
Choose Set up for an organization and then enter your username and password for your Microsoft 365 Business Premium subscription (the new user account, not the tenant admin account).
Complete the remainder of the Windows 10 device setup.
The device will be registered and joined to your organization’s Azure AD, and you will be presented with the desktop. You can verify the device is connected to Azure AD by opening the Settings app and clicking Accounts.
On the Your Info page, select Access Work or School.
You should see that the device is connected to your organization. Select your organization name to show the Info and Disconnect buttons.
Select Info to see that your device is managed by your organization and to view your device sync status.
To verify that the device has been granted a Windows 10 Business license, select the Home icon, select System, and then select About.
In the Windows specifications section, the Windows Edition shows Windows 10 Business, as shown in Figure 2-10.
)
)
)
)
FIGURE 2-10 Windows 10 device setup
Although there is no link to Microsoft Intune within the Microsoft 365 Business Admin Center, the subscription includes the use of the full MDM capabilities for iOS, Android, macOS, and other cross-platform device management. To access the Microsoft Endpoint Manager admin center, launch a browser and sign in with your Microsoft 365 Business Premium credentials at https://endpoint.microsoft.com.
To access Intune App Protection in the Azure portal and view the app protection settings for managed Windows 10, Android, and iOS devices, follow these steps:
Sign in to the Microsoft Endpoint Manager admin center at https://endpoint.microsoft.com with your Microsoft 365 Business admin credentials.
In the left navigation bar, select Apps.
In the Apps blade, select App protection policies.
You can now select Create policy from the menu and configure App Protection Policies.