Deploy Windows
- By Andrew Bettany and Andrew Warren
- 7/9/2019
In this sample chapter from Exam Ref MD-100 Windows 10, authors Andrew Bettany and Andrew Warren explain how to deploy Windows 10 and how to perform post-installation configuration. The MD-100 Windows 10 exam focuses on how to install Windows 10 efficiently and with the least amount of administrative effort.
The MD-100 Windows 10 exam focuses on how to install Windows 10 efficiently and with the least amount of administrative effort. You need to understand how to plan and prepare the Windows 10 installation, along with the installation process itself, activation, and any blockers along the way. You’ll be expected to know how to perform an in-place upgrade from another version of Windows and how to migrate user data, configure hardware devices, how to manage device drivers, and how to perform post-installation configuration. For users who operate Windows 10 using a different language, you also will be expected to know how to configure additional languages and regional settings.
Skill 1.1: Deploy Windows 10
Devices will be shipped with a ready-to-use version of Windows. For a number of reasons, you may want to replace it with a newer version of Windows. In a corporate environment, you may need to install Windows 10 on many devices, which requires careful consideration, planning and preparation. This skill explores the requirements and preparations necessary for the deployment of Windows 10.
It is important to select the appropriate edition of Windows 10 for your users. Windows 10 is available across many device types, including tablets, laptops, and desktop computers. Also, also it is available in multiple editions and in both 32-bit and 64-bit architecture versions. You need to choose the appropriate edition and version to provide the necessary capabilities that your users require.
After determining which edition you want to install, consider how best to deploy Windows 10. You can choose between simple interactive installations using local Windows 10 media, or you can deploy Windows 10 to your organization’s devices by using one of several deployment technologies.
Select the appropriate Windows edition
Windows 10 is available in several different editions and you should choose the most appropriate version for your personal or business needs. The specific editions of Windows 10, listed in Table 1-1, are designed to address the varying needs of this diverse user base.
Table 1-1 Windows 10 editions
Edition |
Features |
|---|---|
Windows 10 Home |
Designed primarily for home users and includes similar features to those found in Windows 8.1 Home, plus:
Note that in Windows 10 Home, you cannot control Windows feature and quality updates as was possible on earlier Windows versions; these are received and installed automatically. |
Windows 10 Pro |
Includes the same features as in Windows 10 Home but additionally provides:
In Windows 10 Pro, updates are provided by Windows Update for Business. This provides control over when and how devices can receive Windows feature and quality updates. |
Windows 10 Pro for Workstations |
Includes the same features as in Windows 10 Pro but additionally provides:
In Windows 10 Pro for Workstations, you can utilize powerful PC hardware with up to 4 CPUs and 6 TB of memory. |
Windows 10 Enterprise |
Windows 10 Enterprise builds on the features of Windows 10 Pro, providing additional features of relevance to larger organizations, including:
In addition to the ability to manage updates to Windows with Windows Update for Business, Enterprise customers can also access the Long-Term Servicing Channel (LTSC) deployment version of Windows 10 Enterprise. |
Windows 10 Enterprise LTSC |
This specialized edition of Windows 10 Enterprise receives security and other important updates in the normal way but does not receive feature updates. This enables organizations to know that their environment does not change over time. Windows 10 Enterprise LTSC does not include built-in apps that are subject to change including:
|
Windows 10 Education |
Provides the same features as Windows 10 Enterprise but does not offer support for LTSC. Windows 10 Education is only available through Academic Volume Licensing. |
Windows 10 Mobile & Windows 10 Mobile Enterprise |
Designed for phones and smaller tablets, with broadly the same feature set as the Windows 10 desktop edition. It includes many of the same universal Windows apps as well as a touch-optimized version of Microsoft Office. Microsoft has ended development of the Windows 10 Mobile platform, and the most recent version released in October of 2017, is scheduled to have support end on December 10, 2019. |
Following the Windows 10 April 2018 Update, the Windows 10 S edition was replaced with Windows 10 in S mode. This is a mode of Windows 10 and not an edition. It is designed to be the safest and most stable version of Windows ever. Windows 10 in S mode is a limited, locked-down version of Windows 10. To reduce the total cost of ownership (TCO) you can only install applications from the Microsoft Store and browse the Internet using the Microsoft Edge browser.
Microsoft Edge only.
Bing search engine.
Microsoft Store apps only.
Not able join Active Directory Domain Services (AD DS) domain.
Azure AD Domain Join is available in Windows 10 Pro in S mode and Windows 10 Enterprise in S mode.
PCs ship with one of three versions of Windows 10 in S mode:
Windows 10 Home in S mode
Windows 10 Professional in S mode
Windows 10 Enterprise in S mode
Users can freely opt to leave S mode—for example, to switch to Windows 10 Pro—by installing the Switch out of S mode app from the Microsoft Store. This action is a one-time decision—once you’ve taken the PC out of S mode, it cannot be put it back into S mode.
Also, Microsoft has released Windows 10 Internet of Things (IoT) editions—Windows IoT Core and Windows IoT Enterprise. These can be used to operate small industrial devices, such as control devices and specialist industrial computing systems.
For businesses that require a long period of support for their IoT installations, Microsoft has released Windows 10 IoT Core Long Term Servicing Channel (LTSC) together with Windows 10 IoT Core Services, which provides a subscription with access to 10 years of support for the IoT releases.
Choose 32-Bit or 64-Bit Versions
You can choose between 32-bit and 64-bit versions of all desktop editions of Windows 10. Nowadays, you should choose 64-bit versions unless there is a compelling reason to use 32-bit versions, such as your hardware does not support the 64-bit architecture.
The various edition features described in Table 1-1 are applicable for both 32-bit and 64-bit versions. However, 64-bit versions of Windows 10 do provide a number of advantages, including:
Memory The 64-bit versions of Windows 10 can address more physical memory than 32-bit versions. Specifically, 32-bit versions are physically limited to just under 4 GB of RAM, whereas 64-bit versions of Windows are limited by the edition of Windows 10 installed.
Security Features such as Kernel Patch Protection, mandatory kernel-mode driver signing, and Data Execution Prevention (DEP) are available only in 64-bit versions of Windows 10.
Client Hyper-V This feature is only available on 64-bit versions of Windows 10. Your hardware must also support second-level address translation (SLAT).
Performance The 64-bit processors can handle more data during each CPU clock cycle. This benefit is only realized when running a 64-bit operating system.
 EXAM TIP
You cannot perform a direct upgrade from a 32-bit version of Windows 10 directly to the 64-bit version. Therefore, ensure that you know that in this scenario, you must perform a wipe-and-load installation.
Determine Windows 10 Edition requirements for particular features
A number of general and security features available in some editions of Windows 10 require specialist hardware or software configuration that you should know. This section covers how to
Identify hardware and configuration requirements for general Windows 10 features
Identify hardware and configuration requirements for Windows 10 security features
EXAM TIP
It is important to know that some features of Windows 10 are available only on computers and devices that support specific hardware components.
General Features
These features provide for general usability and functional improvements and include:
Client Hyper-V Enables you to create, manage, and run virtual machines that you can install with different guest operating systems to support, perhaps, earlier line-of-business (LOB) apps that will not run natively on Windows 10. Requirements of the Client Hyper-V feature are:
A 64-bit version of either the Windows 10 Pro or Windows 10 Enterprise edition.
A computer that supports SLAT.
Additional physical memory to support running the virtual machines. A minimum of 2 GBs of additional memory is recommended.
EXAM TIP
To use Client Hyper-V to run virtual machines, you also need additional physical memory in your computer. It is recommended to add at least 2 GB of RAM to support this feature.
Cortana You can use Cortana as a digital assistant to control Windows 10 and perform tasks such as writing email, setting reminders, and performing web searches. Because Cortana is voice-activated and controlled, your Windows 10 device requires a microphone.
Continuum Windows 10 is available on a variety of devices types and form factors. With Continuum, Microsoft endeavors to optimize the user experience across device types by detecting the hardware on your device and changing to that hardware. For example, Windows 10 determines when you are using a non-touch desktop computer and enables traditional interaction with the operating system by use of a mouse. For users of hybrid devices, such as the Microsoft Surface Pro, when you disconnect a keyboard cover, Windows 10 switches to Tablet Mode.
Miracast Windows 10 uses Miracast to connect your Windows device wirelessly to an external monitor or projector. You will need a Miracast-compatible external monitor or projector to use this functionality. If your display device doesn’t support Miracast, you use a Miracast adapter, such as a Microsoft Wireless Display adapter.
Touch Windows 10 is a touch-centric operating system. Although you do not need touch to use Windows 10, some features are made more usable through the use of touch. To use touch, your tablet or display monitor must support touch.
OneDrive Users of OneDrive are entitled to 5 GB free online storage. OneDrive provides this storage. OneDrive functionality is built into the Windows 10 operating system and it is easy to use. You must have a Microsoft account to use OneDrive.
Sync your settings When you use more than one Windows 10 device, it is convenient for your user settings to move with you to the new device. You can use the Sync Your Settings feature of Windows 10 to ensure that settings such as theme, Internet Explorer and Edge settings (including favorites), passwords, language, and ease of access are synchronized between your devices. You must have a Microsoft account to use this feature.
Security Features
Windows 10 also includes a number of features that can help make your device more secure, including:
BitLocker Drive Encryption A Trusted Platform Module (TPM) version 1.2 or higher works with BitLocker to store encryption keys. This helps protect against data theft and offline tampering by providing for whole-drive encryption. Requirements for BitLocker include:
A device installed with either Windows 10 Pro or Windows 10 Enterprise.
Optionally, you should use a TPM. Using a TPM with BitLocker enables Windows to verify startup component integrity. You do not require a TPM in your computer to use BitLocker, but using a TPM does increase the security of the encryption keys.
Device health attestation With the increase in use of users’ own devices, it is important to ensure that Windows 10 devices connecting to your organization meet the security and compliance requirements of your organization. Device health attestation uses measured boot data to help perform this verification. To implement device health attestation, your Windows 10 devices must have TPM version 2.0 or higher.
Secure Boot When Secure Boot is enabled, you can only start the operating system by using an operating system loader that is signed using a digital certificate stored in the UEFI Secure Boot signature database. This helps prevent malicious code from loading during the Windows 10 start process. Requirements for Secure Boot include
Computer firmware that supports Unified Extensible Firmware Interface (UEFI) v2.3.1 Errata B, and for which the Microsoft Windows Certification Authority is in the UEFI signature database.
Multifactor authentication (MFA) This is a process that provides for user authentication based on at least two factors: something the user knows, such as a password; and something the user has, such as a biometric feature (fingerprint or facial features), or a device, such as a cell phone. Requirements for two-factor authentication include:
Biometric devices that support the Windows Biometric Framework, such as a fingerprint reader, a smartphone, or an illuminated infrared camera using Windows Hello.
A biometric attribute, such as facial recognition, iris detection, or a fingerprint.
Virtual Secure Mode This feature moves some sensitive elements of the operating system to trustlets that run in a Hyper-V container that the Windows 10 operating system cannot access. This helps make the operating system more secure. Currently, this is only available in the Windows 10 Enterprise edition.
Virtual Smart Card This feature offers comparable security benefits in two-factor authentication to that provided by physical smart cards. Virtual smart cards require a compatible TPM (version 1.2 or later).
EXAM TIP
If your organization requires the use of Windows Hello and your existing devIces do not have the necessary hardware, then you can use an aftermarket add-on. You can purchase USB-connected infrared cameras, which provide secure facial recognition and USB-connected external fingerprint readers to the specifications required to support Windows Hello.
Perform a clean installation
Although most computers are purchased preinstalled with Windows 10, many organizations prefer to reinstall the operating system to avoid the additional software that original equipment manufacturers (OEMs) often include with their computers. This software is often referred to as bloatware and can include utilities and tools or trial versions of software such as Microsoft Office or anti-spyware software that are unwanted.
As shown in Table 1-2, there are several methods of installing Windows 10 on a device, and you should familiarize yourself with each prior to taking the exam.
Table 1-2 Windows installation methods
Installation Method |
Description |
|---|---|
Install from DVD |
Windows 10 is no longer shipped on DVDs. You can use the downloadable media obtained from the Microsoft Windows 10 website, Microsoft Volume Licensing Service (MVLS), or Visual Studio Subscriptions and burn it to DVD media. |
Install from USB |
Use this method to install the operating system on one computer at a time. Installation from a USB device is quicker than using a DVD. You must modify BIOS or UEFI settings to enable booting from USB. |
Install from Windows Deployment Services |
Requires Windows Deployment Services (WDS), which is a role installed on Windows Server 2019. WDS also requires Dynamic Host Configuration Protocol (DHCP) on the network. The target computer network card must support Pre-Boot Execution Environment (PXE). Using WDS allows automated installation of system images and deployment of Windows to multiple computers simultaneously by using multicast. |
Install an image from Windows Preinstallation Environment (Windows PE) |
Boot the device by using Windows PE, and then use one of the following deployment options.
Both MDT and Configuration Manager are enterprise-level solutions that enable you to deploy Windows to hundreds or thousands of devices at once and configure lite-touch installation (LTI) or zero-touch installation (ZTI) for either minimal user interaction or no user interaction, respectively, during the deployment. |
Install over the network |
Start the computer by using Windows PE and connect to a copy of the installation files stored on a shared network folder. You would use this method when you are unable to use a USB device, WDS, MDT, or Configuration Manager. |
If you intend to start your PC from your installation media, such as a USB drive, you may need to configure your BIOS or UEFI to allow this. This can be achieved by modifying the BIOS or UEFI setting or choosing a custom boot order during the startup process.
During a clean installation on a new hard drive, perform the following steps to install Windows 10.
Insert your installation media and start your computer.
At the Windows Setup screen, choose the appropriate language and regional settings and then click Next.
In the Windows Setup window, click Install Now.
On the Applicable Notices And License Terms page, accept the License Terms and click Next.
On the Which Type Of Installation Do You Want? page, choose Custom: Install Windows Only (Advanced).
On the Where Do You Want To Install Windows? page, select Drive 0 Unallocated Space and click Next.
The installation begins. To install Windows 10 for personal use, perform the following steps:
On the Let’s Start With Region. Is This Right? page, select the regional settings.
On the Is This The Right Keyboard Layout? page, select the keyboard layout settings.
On the Want To Add A Second Keyboard Layout? page, add a layout, or select Skip.
On the Let’s Connect You To A Network page, select a network connection.
On the How Would You Like To Set Up? Page, choose Set Up For Personal Use and click Next.
On the Sign In With Microsoft page, create a local offline account by selecting Offline Account. Or enter your Microsoft account and password or select Create Account.
On the Create A PIN page, click Create PIN and enter a PIN.
On the Link Your Android Or iPhone To This PC page, enter your phone number and click Send and then click Next. Or click Do It Later to skip this step.
On the Protect Your Files With OneDrive page, click Next. Or click Only Save Files To This PC to skip this step.
On the Make Cortana Your Personal Assistant? page, choose whether to enable Cortana.
On the Do More Across Devices With Activity History page, choose whether to enable the timeline feature.
On the Choose Privacy Settings For Your Device page, choose the privacy settings that you require.
The remainder of the setup process will continue.
You are now signed in.
Depending on your hardware performance, Windows should complete the clean install process within 10–15 minutes, and the machine will restart several times. A device with a solid-state drive (SSD) will outperform slower traditional hard drives with spinning platters. During the final stages of installation, the Getting Ready notification appears while Windows installs device drivers specific to the hardware.
Identify an installation strategy
You can choose from among a number of methods when considering how best to install Windows 10. Generally, the size of your organization and the number of devices that you must install will determine the strategy that you select. The available strategies have different prerequisites, and some might require additional software components and configuration before you can begin installing Windows 10. Table 1-3 describes the strategies available.
Table 1-3 Windows 10 installation strategies
Deployment Option |
Description |
|---|---|
High-touch retail media deployment |
Suitable for small organizations with few devices to install with Windows 10. Requires no specialist IT skills or additional services or components. All that is required is one or more copies of the Windows 10 installation media, which can be provided on a DVD, or on a USB storage device, or even from a shared folder on a network file server. |
Low-touch deployment |
Suitable for larger organizations that intend to install a few hundred devices, using limited installer intervention. Because the strategy relies on the use of image deployment and additional services, such as Windows Deployment Services (WDS) and, optionally, Microsoft Deployment Toolkit (MDT), some specialist IT skills are also required. |
Zero-touch deployment |
For very large organizations with thousands of devices. Requires a considerable investment in IT skills to facilitate this strategy. Also requires the use of MDT and System Center Configuration Manager (Current Branch) to deploy Windows 10, using no installer intervention. |
Determine the appropriate installation media
Windows 10 uses an image-based installation and deployment model with the Windows operating system installation files packaged inside an image file that is used as an installation source during the installation process.
A default installation image, Install.wim, is provided on the installation media in the \Sources folder. Although you can choose to use this default image, you can also configure it to create custom installation images that better suit the needs of your organization. Customizations might include:
Selecting a particular edition of Windows 10.
Choosing which Windows features are enabled.
Including Wi-Fi profiles and virtual private network (VPN) profiles.
Adding universal apps or desktop applications.
The Windows Assessment and Deployment Kit (Windows ADK) contains a number of tools that you can use to create and manage Windows 10 images to support your installation needs. These are:
DISM The Deployment Image Servicing and Management (DISM) command-line tool enables you to capture, deploy, and manage Windows images. You can use the tool to install, uninstall, configure, and update Windows features, packages, drivers, and international settings in a .wim file or VHD, which can be either online or offline.
Windows Configuration Designer This tool, as shown in Figure 1-1, enables you to provision Windows 10 features and runtime settings by using provisioning packages (.ppkg) to quickly configure a Windows 10 device without having to install a new image.
)
Figure 1-1 Windows Configuration Designer
You can then deploy these custom images and packages to target computers within your organization that require Windows 10. You can perform this deployment in a number of ways and by using a variety of deployment technologies and tools, depending on the installation strategy you previously selected. Options include:
DVD installation You can create installation DVD media, or you can use a customized image that you created. The device you are installing to requires an optical drive.
USB installation You can use the default or custom Windows images. This method is quicker than DVD, and although it does not require an optical drive, you might need to reconfigure your computer’s BIOS or UEFI firmware settings to support startup from USB.
EXAM TIP
You can perform an unattended installation using these methods, provided an unattended answer file is present on the media. Answer files are discussed in the following section.
WDS deployment To use this method, Dynamic Host Configuration Protocol (DHCP) must be available to network clients on your network, and your target computers running Windows 10 must support Pre-Boot Execution Environment (PXE). Combined with unattended answer files and custom images, you can use this method to deploy multiple images to multiple computers at the same time by using multicast.
Image-based installation By starting your computer into Windows Preinstallation Environment (Windows PE), you can use DISM to apply an image locally to the target computer. Alternatively, you can use MDT and System Center Configuration Manager (Current Branch) to deploy the image and desktop apps to the target devices.
Shared network folder installation You can use Windows PE to start your computer and map a network drive to installation files and images on a network file shared folder. This is a comparatively inefficient method and has been replaced by the other methods previously described.
Windows SIM The Windows System Image Manager (Windows SIM) shown in Figure 1-2 enables you to create installation answer files for use in automated deployments. These answer files contain the configuration options used to install Windows 10. You can then associate these answer files with a local copy of the installation media, perhaps on a USB memory stick to provision Windows 10 using a semi-automated interactive installation.
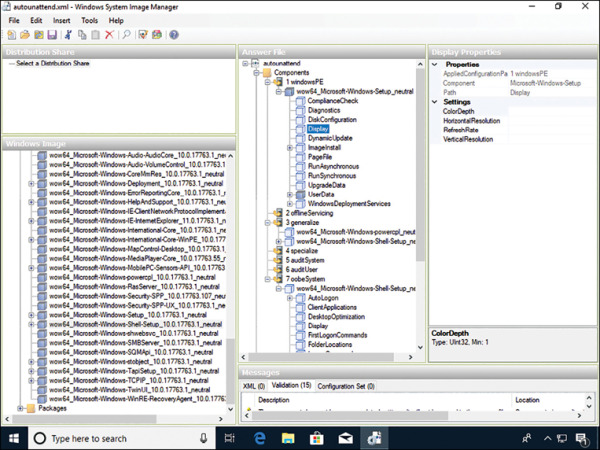
Figure 1-2 Windows System Image Manager
)
Windows PE Windows PE (WinPE) is used to start a computer that is being deployed with Windows 10. It enables access to Windows file systems and is, in essence, a small Windows operating system. You can use the generic Windows PE provided on the product DVD, or you can create your own using tools found in the Windows ADK to address your specific deployment needs. You can then launch Windows PE from a DVD or a USB memory stick or across the network using PXE.
Perform an in-place upgrade
The most efficient method of installing Windows 10 on existing computers is to perform an in-place upgrade. This method is fully supported and recommended by Microsoft.
It is important to understand the terminology used when describing the process of upgrading to Windows 10. Upgrade is often used generically to explain the licensing process of upgrading from an earlier version of Windows to a later version. You can also upgrade the edition of Windows which replaces an existing operating system, such as Windows 7 Home edition to Windows 10. On a semi-annual basis, Windows 10 will automatically perform an in-place upgrade of Windows 10 to the latest version of Windows 10.
When manually upgrading to Windows 10, you update the existing operating system and perform what is called an in-place upgrade on existing hardware. All user data and settings are retained. For most users, this is now the recommended procedure.
Supported upgrade paths
Performing an in-place upgrade can be the simplest option, especially when you have only a few computers to upgrade. However, you cannot perform an in-place upgrade on computers running a Windows version that does not share the same feature set as the edition of Windows 10 that you want to install.
Table 1-4 lists the supported upgrade paths based on the Windows edition.
Table 1-4 Supported upgrade paths to Windows 10
Earlier Windows Edition |
Windows 10 Home |
Windows 10 Pro |
Windows 10 Enterprise |
|---|---|---|---|
Windows 8/8.1 |
X |
|
|
Windows 8/8.1 Pro |
|
X |
|
Windows 8/8.1 Enterprise |
|
|
X |
Windows 7 Starter |
X |
|
|
Windows 7 Home Basic |
X |
|
|
Windows 7 Home Premium |
X |
|
|
Windows 7 Professional |
|
X |
|
Windows 7 Ultimate |
|
X |
|
Windows 7 Enterprise |
|
|
X |
You will notice from Table 1-4 that direct upgrades between different editions are not supported. That is, you cannot upgrade directly from Windows 7 Home to Windows 10 Enterprise.
After you have determined whether your upgrade path is supported, choose how to perform the process of upgrading to Windows 10.
Considerations for Performing an In-Place Upgrade
When determining whether to use the in-place upgrade method to upgrade to Windows 10, consider the following factors.
It is a simple process and is ideal for small groups of computers.
It provides for rollback to the earlier version of Windows.
User and application settings and user data files are retained automatically.
Installed applications are retained; however, retained applications might not work correctly after upgrading from an earlier Windows version.
You do not need to provide for external storage space for data and settings migration.
It does not allow for edition changes and is available only on supported operating systems (see Table 1-4).
It does not provide the opportunity to start with a clean, standardized configuration.
Perform an in-place upgrade to Windows 10
As you have seen, there are three ways to upgrade to Windows 10. The recommended method by Microsoft is to use an in-place upgrade. This is the method that will be utilized for all future upgrades of Windows 10 using Windows Update. Using an in-place upgrade enables you to retain all the users’ applications, data files, and user and application settings. During the in-place upgrade, the Windows 10 setup program automatically retains these settings.
You perform an in-place upgrade to Windows 10 when your users will continue to use their existing computers. To perform an in-place upgrade, complete the following procedure.
Evaluate the user’s computer to determine that it meets minimum hardware requirements for Windows 10 and that Windows 10 supports all hardware.
Verify that all applications work on Windows 10.
Optionally, back up the user’s data files.
Run the Setup.exe program from the root of the Windows 10 installation media.
Choose Upgrade when prompted and complete the setup wizard.
The in-place upgrade process works well and is now the recommended deployment method Microsoft suggests for upgrading devices that run Windows 7 or Windows 8.1 to Windows 10.
Upgrade using installation media
An enterprise will normally obtain Windows 10 media through the volume licensing channel and can download it from the Volume Licensing Service Center (VLSC) at https://www.microsoft.com/licensing/servicecenter/default.aspx. VLSC media use either a Multiple Activation Key (MAK) or Key Management Service (KMS) which is used during the installation process and is tied to the enterprise license agreement with Microsoft.
Alternatively, purchased retail media can be used, which is supplied on a USB thumb drive or by a direct download from the online Microsoft Store.
Another option is to use the Media Creation Tool (MCT), which generates a ready-to-use, bootable USB flash drive. You can also download an ISO file that can be used for the installation, which would need to be burned to a writeable DVD. Media created with the MCT cannot be used for upgrading a Windows Enterprise edition client. When you run the MCT, when prompted, on the What Do You Want To Do? page, click Create Installation Media and then click Next.
If you encounter issues while upgrading to Window 10, you should inspect the installation log file found at C:\Windows\Panther\UnattendGC\SetupAct.log. If you are trying to use the wrong media or if you are trying to upgrade from an unsupported operating system, there should be an entry such as the following:
Info [windeploy.exe] OEM license detected, will not run SetupComplete.cmd
With all upgrades, you must ensure that you understand the requirements for a successful upgrade, such as having at least 2 GB RAM and enough disk space. In the exam, you might face scenarios in which you are asked to upgrade from one architecture to another architecture which is not supported. You may be presented with the current system drive having insufficient disk space. To resolve disk space issues, you could attempt one of the following resolutions to complete the upgrade:
Run Disk CleanUp Wizard, remove any unwanted files, and empty the Recycle Bin.
Uninstall apps, files, and language packs that you do not need.
If possible, expand the volume by using the Disk Management tool.
Move personal files off the system drive and onto another drive or external drive.
If the system fails during the upgrade due to a compatibility issue, you can troubleshoot the cause by reviewing the setupact.log found at: C:\$Windows.~BT\Sources\panther\setupact.log. Some of the most common codes are shown in Table 1-5.
Table 1-5 Setuperr.log errors relating to upgrading
Error Code |
Description |
|---|---|
CsetupHost::Execute result = 0xC1900200 |
PC not meeting the system requirements for Windows 10. |
CsetupHost::Execute result = 0xC190020E |
Insufficient free hard drive space. |
CsetupHost::Execute result = 0xC1900204 |
Migration choice (auto upgrade) not available—wrong Windows 10 SKU or architecture. |
CsetupHost::Execute result = 0xC1900208 |
Compatibility issues found (hard block). |
CsetupHost::Execute result = 0xC1900210 |
No issues found. |
If you want to check the system for compatibility only, you can run Setup.exe with a command-line switch, which will check for compatibility but not perform the actual upgrade.
An example command is:
Setup.exe /Auto Upgrade /Quiet /NoReboot /DynamicUpdate Disable /Compat ScanOnly
Windows 8.1 supports mounting an ISO disk image directly in File Explorer. You can download the Windows 10 ISO and upgrade Windows 8.1 without first having to create installation media such as a DVD or bootable USB. For Windows 7, you must use bootable media, extract the files contained in the ISO, or use a third-party tool to mount the ISO.
A major advantage of upgrading rather than performing a clean installation (sometimes referred to as a wipe-and-load scenario) is that all the applications, settings, and data on the PC are retained during an upgrade. This often results in a much quicker process, and the device can be returned to the user in the shortest possible time.
As part of the pre-upgrade checks, Windows 10 will validate the following.
Whether UEFI is used (UEFI v2.3.1 or later is required for Secure Boot).
System Host is not configured to boot from VHD.
The system is not installed as a Portable Workspace (for example, using Windows To Go).
Details of the setup compatibility checks can be reviewed in the log file found at C:\$WINDOWS.~BT\Sources\Panther\setupact.log. The installation process proceeds in the same way as the in-place upgrade using Windows Update.
Migrate user data
With the rapid adoption of Office 365, more data than ever before is now stored in cloud-based storage such as OneDrive for Business and SharePoint Online. Despite this trend, file server-based shared storage and local storage is still the most common data storage location for businesses.
Both cloud-based and server-based storage data storage backup and migration are outside of the scope of this exam, but you need to know how enterprises can migrate both user data and Windows settings from an earlier version of Windows to Windows 10. The procedure for migrating user data has not changed over the years, but you will be expected to understand the process.
Migrate from previous versions of Windows
The amount of user affinity with their devices is often overlooked by support professionals. If allowed, users can invest significant time and effort to customize and personalize their working environment, and this can include the Windows operating system and applications. When upgrading from an older operating system, it is very common for the user to be presented with a new device running the new version of Windows after the old device is removed. This can sometimes cause significant loss of productivity while the user becomes familiar with the updated operating system and reconfigures settings to their preferences.
The level of user personalization of the device can include the following.
Desktop appearance, sounds, themes, and backgrounds
Start-menu customization
Icons and file associations
Files and folders stored locally
Device and power settings
Application settings, such as autotype and template locations
Migration strategies
You perform a migration to Windows 10 when your users have new computers on which to install Windows 10 and you want to preserve settings and data from their old computers. During the process, you perform the following high-level procedures.
Verify that all existing required applications work on Windows 10.
Ensure that the appropriate edition of Windows 10 is installed on the user’s new computer.
On the new computer, install the required applications.
Back up the user’s data files and settings from the old computer using USMT (User State Migration Tool).
Restore the user’s data files and settings on the new computer using USMT.
You can use either a side-by-side migration or wipe-and-load migration strategy to perform a migration. These migration scenarios are summarized as follows.
A side-by-side migration In this scenario, the source and destination computers for the upgrade are different machines. You install a new computer with Windows 10 and then migrate the data and most user settings from the earlier operating system to the new computer.
A wipe-and-load migration In this scenario, the source and destination computer are the same. You back up the user data and settings to an external location and then install Windows 10 on the user’s existing computer. Afterward, you restore user data and settings.
Perform a Side-by-Side Migration
When you opt to use the side-by-side migration strategy, illustrated in Figure 1-3, use the following procedure to complete the task.
Either obtain a computer with Windows 10 preinstalled or install Windows 10 on a new computer. When Setup.exe prompts you, choose Custom (Advanced). This is the destination computer.
Install the same applications on the destination computer as are presently on the source computer.
Create an external intermediate storage location, such as a file server–shared folder or an external hard drive, for the storage of user data and settings. This storage must be accessible from both the source and destination computers.
Use the USMT to collect the user’s data and settings from the source computer and store them to the external intermediate store.
Use the USMT to collect the user’s data and settings from the external intermediate store and install them in the destination computer.
)
Figure 1-3 Side-by-side migration to Windows 10
Perform a Wipe-and-Load Migration
When you opt to use the wipe-and-load migration strategy, illustrated in Figure 1-4, use the following procedure to complete the task.
Create an external storage location, such as a file server-shared folder or an external hard drive, for the storage of user data and settings.
Use the USMT to collect the user’s data and settings and store them in the external location.
Install Windows 10 on the existing computer. When Setup.exe prompts you, choose Custom (Advanced).
Reinstall the applications on the computer.
Use the USMT to restore the user’s data and settings from the external location.

Figure 1-4 Wipe-and-load migration to Windows 10
Considerations for Performing a Migration
When determining whether to use one of the two migration methods outlined to upgrade to Windows 10, consider the following factors.
You have an opportunity to create a clean installation, free from remnant files and settings.
You can reconfigure the existing disk partitions.
You can upgrade to any Windows 10 edition, irrespective of the earlier Windows edition.
Migration is a more complex process, and you must use migration tools such as User State Migration Tool (USMT) to migrate user data and settings.
You need to provide storage space for user settings and files to be migrated.
Applications are not retained, and you must manually reinstall these.
Perform a user state migration
When computers are being replaced or refreshed on a large scale, the loss of user productivity can be significant. In this scenario, you can use the User State Migration Tool version 10 which is available as part of the Windows ADK.
EXAM TIP
You should always use the version of the Windows ADK for your version of Windows 10. For example, ensure you download Windows ADK, version 1809, if that’s the version of Windows 10 you are deploying. At the time of writing this book, Windows 10 1809 is the current feature release.
The Windows ADK is available from the following Microsoft website at: https://developer.microsoft.com/windows/hardware/windows-assessment-deployment-kit.
User state migration is performed in two phases as follows.
Settings and data are captured (collected) from the source computer and stored in a secure migration store using the ScanState tool.
Captured settings and data are restored on the destination computer, using the LoadState tool.
USMT is a collection of three command-line tools that can be scripted to capture and migrate data efficiently and securely and is intended for performing large-scale automated deployments.
ScanState.exe
LoadState.exe
UsmtUtils.exe
You choose which data is captured, and these settings are stored in migration XML files as follows.
MigApp.xml
MigDocs.xml
MigUser.xml
Custom XML files that you can create
The XML files provide the migration rules that USMT needs to process.
You can also create a Config.xml file that is used to specify files or settings, which will be excluded from the migration.
As part of both migration strategies, you must migrate user data and settings to the destination computer. Consequently, it is important to determine where these data and settings reside. The types of data that USMT can capture and migrate are shown in Table 1-6.
Table 1-6 Data types accessible by USMT
Data Type |
Example |
Description |
|---|---|---|
User data |
Documents, Video, Music, Pictures, Desktop files, Start menu, Quick Launch settings, and Favorites |
Folders from each user profile. |
|
Shared Documents, Shared Video, Shared Music, Shared Desktop files, Shared Pictures, Shared Start menu, and Shared Favorites |
Folders from the Public profiles. |
|
File |
USMT searches fixed drives, collecting files that have any of the file name extensions that are defined in the configuration XML file. |
|
Access control lists (ACLs) |
USMT can migrate the ACL for specified files and folders. |
Operating system components |
Mapped network drives, network printers, folder options, users’ personal certificates, and Internet Explorer settings. |
USMT migrates most standard operating system settings. |
Supported applications settings |
Microsoft Office, Skype, Google Chrome, Adobe Acrobat Reader, Apple iTunes, and more |
USMT will migrate settings for many applications, which can be specified in the MigApp.xml file. Version of each application must match on the source and destination computers. With Microsoft Office, USMT allows migration of the settings from an earlier version of an Office application. |
The following settings are not migrated when you use USMT.
Local printers, hardware-related settings
Device drivers
Passwords
Customized icons for shortcuts
Shared folder permissions
Files and settings, if the operating systems have different languages installed
After you have installed the USMT included in the Windows ADK, you have the following components as described in Table 1-7.
Table 1-7 USMT components
Component |
Description |
|---|---|
ScanState |
Scans a source computer and collects files and settings, writing them to a migration store. (The store file can be password protected and can be compressed and encrypted if required, although you cannot use the /nocompress option with the /encrypt option.) You can turn off the default compression with the /nocompress option. |
LoadState |
Migrates the files and settings from the migration store to the destination computer. |
USMTUtils |
Compresses, encrypts, and validates the migration store files. |
Migration XML files |
MigApp.xml, MigUser.xml, or MigDocs.xml files, and custom XML files USMT uses to configure the process. |
Config.xml |
Used with /genconfig to exclude data from a migration. |
Component manifests |
Controls which operating system settings are to be migrated. These manifests are specific to the operating system and are not modifiable. |
To initiate the collection of the files and settings from the source computer, use the following steps.
Ensure that you have a backup of the source computer.
Close all applications.
Open an elevated command prompt, and run ScanState, using this command:
ScanState \\remotelocation\migration\mystore /config:config.xml / i:migdocs.xml /i:migapp.xml /v:13 /l:scan.log
Run UsmtUtils with the /verify switch to ensure that the migration store is not corrupted, using UsmtUtils /verify C:\mystore\storename.img.
On the destination computer, install the operating system, install any applications that were on the source computer, and then close any open applications.
Run the LoadState command, specifying the same .xml files that you used when you ran ScanState using the command
LoadState \\remotelocation\migration\mystore /config:config.xml / i:migdocs.xml /i:migapp.xml /v:13 /l:load.log
Restart the device and verify whether some of the settings have changed.
The ScanState tool can also migrate user settings from an offline Windows system including the Windows.old folder. A Windows.old folder is created when you perform an in-place upgrade of a modern version of Windows to Windows 10. The ability to access user settings contained within the offline Windows.old folder can be advantageous in the following scenarios.
Improved performance if the Windows.old folder is local
Simplified end-to-end deployment process by migrating data from Windows.old by enabling the migration process to occur after the new operating system is installed
Improved success of migration because files will not be locked for editing while offline
Ability to recover and migrate data from an unbootable computer
The migration can be performed at any time
Configure Windows for additional regional and language support
When Windows 10 was released, it offered support for 111 languages spanning 190 countries and regions. You can download any of the additional languages for Windows 10, which allows users to view menus, dialog boxes, and other user interface items in their preferred languages.
To add an additional input language to your device, perform the following steps.
Open Settings > Time & Language > Language.
Under Language, click Add A Language.
Select the language you want to use from the list or enter the language name in the search bar.
Click Next.
Choose to install the optional language features available for the selected language as shown in Figure 1-5.
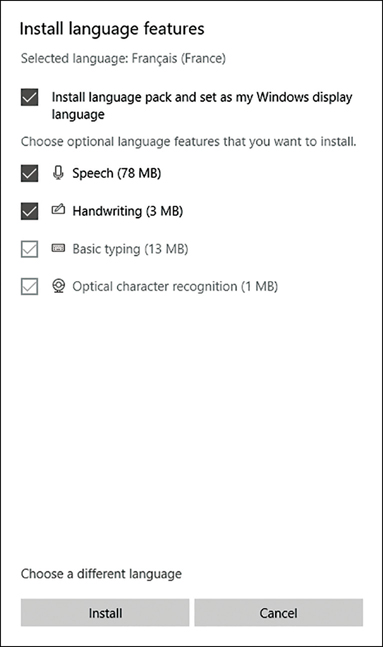
Figure 1-5 Choose a language to install
The language pack is downloaded and installed.
Log out of the device and then sign in to display the new default display language.
When adding an additional language to Windows 10, you can see which language features are available. These include.
Display language
Text-to-speech
Speech recognition
Handwriting support
You also have the option to set the language as your primary Windows display language after the language pack has been installed. There are additional language options available for common languages. Select the installed language and then click the Options button to configure features such as region-specific fonts (such as accents), regional formats, handwriting, pen settings, keyboards, and spell-checking options.
Installing Local Experience Packs
You can also modify the default language used by Windows 10 by adding a Local Experience Pack from the Microsoft Store. These packs perform the same configuration changes as the Language options within the Settings app, allowing you to enhance Windows with your chosen language, including navigation, menus, settings, and help topics.
To add a local language using the Microsoft Store, search for the required language and download it or use the link to add a Local Experience Pack on the Language page within the Settings app. If you need to add a Local Experience Pack to an offline image, you can add the Language Interface Packs (LIPs) .appx files and their associated license files, which can be found in the LocalExperiencePack folder on the Language Pack ISO. OEMs and System Builders with Microsoft Software License Terms can download the Language Pack ISO and Feature on Demand ISO from the Microsoft OEM site or the Device Partner Center. IT Professionals can find ISOs containing all available Language resources on the Microsoft Next Generation Volume Licensing Site at https://licensing.microsoft.com.
EXAM TIP
In previous versions of Windows 10, LIPs are delivered as .cab files, for example, C:\Languages\es-ES\lp.cab. Ensure that you know that since Windows 10, version 1809, LIPs are delivered as Local Experience Packs (LXPs) .appx files, for example, LanguageExperiencePack.am-et.neutral.appx.
After the language is installed, you can set it to be the default language for your device or remove the language. Within the Language page in the Settings app, you can also configure the Administrative Language Settings to copy your international settings to the Windows welcome screen, system accounts, and new user accounts as shown in Figure 1-6. System-wide changes require administrative privileges.
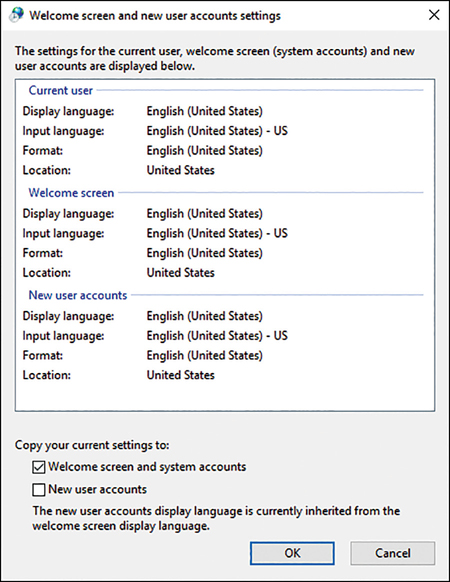
Figure 1-6 Modify Administrative Language Settings
To save space, you can remove language components; for example, you could remove English when deploying devices to non-English regions.
Using the Dism Command Line Tool
You can also use the DISM command prompt to perform deployment of language components. As an example, if you want to modify an offline Windows image to add a language pack, first mount the Windows image, mount the Language Pack ISO and the Features on Demand ISO with File Explorer, and then use the following command.
Dism /Image:"C:\mount\windows" /Add-Package /PackagePath="D:\x64\langpacks\Microsoft-Windows-Client-Language-Pack_x64_fr-fr.cab"
To add the Luxembourgish language, which requires the fr-FR base language and is delivered as an LXP, use the following command.
DISM /Image:"C:\mount\windows" /Add-ProvisionedAppxPackage /PackagePath= "D:\LocalExperiencePack\lb-lu\LanguageExperiencePack.lb-LU.Neutral.appx" /LicensePath: "D:\LocalExperiencePack\lb-lu\License.xml"
To remove the same LIP, which was added through LXP, you would use the following command.
Dism /remove-provisionedappxpackage /packagename:Microsoft.LanguageExperiencePack.lb-LU._neutral__8wekyb3d8bbwe
Once you have completed the configuration, you need to capture the changes by committing the changes to the Windows image using the following command.
Dism /Commit-Image /MountDir:"C:\mount\windows"
Using the Lpksetup Command Line Tool
You can also use the Lpksetup tool to perform language pack operations on language pack CAB files.
To launch the Lpksetup wizard, use the following steps:
Download and then mount the Language Pack ISO.
Press the Windows logo key+R to open the Run dialog box.
Type lpksetup.exe, and then select OK.
Step through the wizard and browse to the Language Pack location on the mounted ISO.
Locate the language pack as shown in Figure 1-7 and click Next.
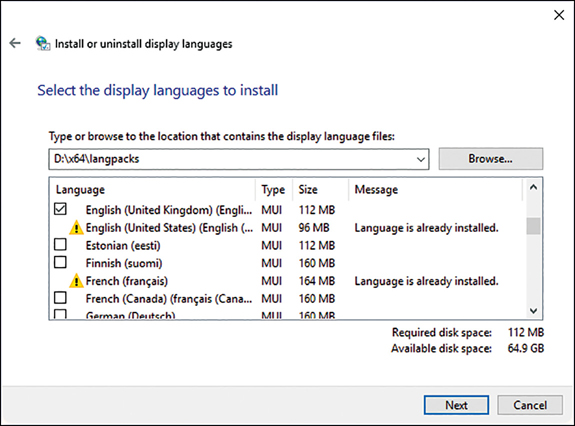
Figure 1-7 Perform language pack operations using Lpksetup
On the Review And Accept The Microsoft Software License Terms dialog box, click I Accept The License Terms and click Next.
The language pack installation completes.
Click Close.
If you want to automate the process or bypass the user interface (UI) and perform unattended or silent-mode language pack installations, you can also use the Lpksetup command-line tool. You need to run Lpksetup using an elevated command prompt. The syntax is:
lpksetup.exe /i * /p <path>
This example installs all language packs that are located on installation media specified in the <path> location. The command-line options available for Lpksetup.exe are shown in Table 1-8.
Table 1-8 Lpksetup.exe command-line options
Option |
Description |
|---|---|
/i |
Installs the specified language packs. If you do not include * or language after/i, you are asked to continue the installation through the UI. |
* |
Wildcard character that represents all language packs found in the language_pack_path or the directory where lpksetup.exe is located. |
Language-region |
Specifies the language pack or packs to be installed or uninstalled. |
/u |
Uninstalls the specified language packs. If you do not include * or a language after /u, you are asked to continue the uninstall through the UI. |
/r |
Suppresses the need to restart after an operation is complete. |
/p language_pack_path |
Indicates the path of the language packs to install. |
/s |
Performs a silent and unattended operation that requires no user input. |
/f |
If the computer is required to restart, forces a restart even if other users are logged on to the computer. |
Implement activation
Activation is a very important part of configuring and managing Microsoft products and remaining within the Microsoft Software License Terms.
In some environments, the activation process will be fully automated, or silent, and it is easy to overlook it. This section explores Windows 10 activation options and procedures that you need to understand.
Like most Microsoft products, Windows 10 requires activation. Activation verifies that your copy of Windows 10 is genuine and that it hasn’t been used on more devices than the license terms allow. Only a valid product key can be used to activate Windows 10. Figure 1-8 shows the current activation status of a computer running Windows 10 Professional.
)
Figure 1-8 Viewing the activation status of Windows 10
You can activate Windows 10 in several ways—by using an Internet-accessible service at Microsoft, by telephone, and by using bulk activation methods such as Key Management Service (KMS) and Active Directory–based activation. This section explores activation and the methods you can use to manage your organization’s Windows 10 activation.
Select an activation method
To activate Windows 10, you might need a product key, a 25-character code which looks like this:
PRODUCT KEY: XXXXX-XXXXX-XXXXX-XXXXX-XXXXX
Not all Windows 10 installations require the use of a product key to activate, relying instead on a digital license (called a digital entitlement in Windows 10, Version 1511). A digital license is a method of activation in Windows 10 that doesn’t require you to enter a product key; instead, digital licenses are connected to your Microsoft account. Once your PC is connected to the Internet and you log in to your Microsoft account, the activation takes place.
You must use a product key for activation when:
You purchase Windows 10 from a retail store or authorized reseller, either as a physical product or as a digital download.
You do not have a digital license.
Your organization has a Microsoft volume licensing agreement for Windows 10.
You purchased a new device on which Windows 10 is preinstalled.
You do not need a product key for activation and can rely on a digital license when:
You upgrade to Windows 10 from an eligible device running a genuine copy of Windows 7 or Windows 8.1.
You purchase Windows 10 from the Microsoft Store.
You purchase Windows 10 Pro upgrade from the Microsoft Store.
You use Windows 10, version 1803 or later on a device with a firmware-embedded activation key.
You are a Windows Insider and upgrade to the newest Windows 10 Insider Preview build on an eligible device that was running an activated earlier version of Windows and Windows 10 Preview.
The method you use to activate Windows 10 is determined by a number of factors, including how you obtained Windows 10 and whether your organization has a volume license agreement in place with Microsoft. The following scenarios determine how you activate Windows 10.
Retail If you purchase Windows 10 from a retail store or from an authorized retailer, it should come with a unique product key, which can be found on a label inside the Windows 10 box. For a digital copy of Windows 10, you should have access to the product key, which may be stored in a digital locker accessible through the retailer’s website. You can enter the key during or after installation to activate your copy of Windows 10.
OEM If you purchase a new computer on which Windows 10 is preinstalled, it comes with a product key, which is included with the device packaging or included as a card or on the Certificate of Authenticity (COA) attached to the device. You can activate Windows by using this product key.
Microsoft volume licensing Microsoft offers several volume licensing programs to suit different organizational sizes and needs. These programs support both Active Directory–based activation and KMS.
EXAM TIP
Retail versions of Windows 10 cannot be activated using volume licensing methods.
Volume Activation Services
For large organizations with many hundreds or even thousands of devices, using manual product key entry and activation is impractical; it is both error prone and time-consuming. For these reasons, Microsoft provides three methods for volume activation. These are:
Key Management Service (KMS) You can use this Windows Server role service to activate Windows 10 in your organization’s network. Client computers connect to the KMS server to activate, thereby negating the need to connect to Microsoft for activation. It is not necessary to dedicate a server computer to perform activation with the KMS role.
EXAM TIP
KMS is designed for organizations with either 25 (physical or virtual) client devices persistently connected to a network or organizations with five or more (physical or virtual) servers. KMS requires a minimum threshold of 25 computers before activation requests will be processed.
Active Directory–based activation Any device running any Windows 10 that is connected to your organization’s domain network and is using a generic volume license key (VLK) can use Active Directory–based activation. Periodically, the client must renew the license from the licensing service. Therefore, for the activation to remain valid, the client device must remain part of your organization’s domain. As with KMS, you do not need to dedicate a server to the Active Directory–based activation role.
EXAM TIP
You cannot use Active Directory–based activation to activate devices running Windows 10 that are not members of your domain.
Multiple Activation Key Multiple Activation Key (MAK) uses special VLKs that can activate a specific number of devices running Windows 10. You can distribute MAKs as part of your organization’s Windows 10 operating system image. This method is ideal for isolated client computers, which will benefit from a one-time activation using the hosted activation services provided by Microsoft.
To use either KMS or Active Directory–based activation to manage your volume activations, the Volume Activation Services server role must be running on a Windows Server 2016 or Windows Server 2019 computer and be configured to use either KMS or Active Directory–based activation. You need to activate the role with Microsoft so that the service can activate devices. This involves entering and validating a KMS host key with Microsoft, either online or by telephone.
An administrator can manage the organization’s volume activations centrally using the Volume Activation Management Tool (VAMT) from a Windows 10 or Windows Server 2016 R2 computer. You can download the VAMT as part of the Windows Assessment and Deployment Kit (Windows ADK).
Activate Windows 10
If you are using one of the volume activation methods, you do not need to perform any task on your Windows 10–based devices because Windows 10 will automatically remain in an activated state whilst the volume license agreement is in place. However, if you are manually managing activation on Windows 10–based devices following installation, you must complete the following procedure.
Click Start > Settings.
Click Update & Security > Activation > Change Product Key.
In the Enter A Product Key dialog box, type your 25-character product key.
On the Activate Windows page, click Next.
When prompted, click Close.
After you have activated Windows 10, you can view the activation status on the Activation tab of the Update & Security section of the Settings app. Also, you can view and manage the activation status of your Windows 10–based product by using the Slmgr.vbs command. For example, Figure 1-8 showed the result of typing the Slmgr.vbs -dli command. You can see that Windows 10 Pro is licensed properly.
Activate Windows 10 Virtual Machines
For Windows 10 virtual machines running on Windows 10, version 1803, a new feature called Inherited Activation allows Windows 10 virtual machines to inherit an activation state from their Windows 10 hosts.
When a user creates a new Windows 10 virtual machine (VM) using a Windows 10 local host, the VM will automatically inherit the activation state from a host machine. Inherited Activation requires that both the host computer and the VM are running Windows 10, version 1803 or later and that the host computer has been activated using a Windows 10 E3 or E5 license.
Troubleshoot activation issues
When a device running Windows 10 is not activated, the user is presented with a watermark on the lower-right corner of the screen requesting that you activate Windows. Additionally, you cannot personalize the device, such as changing wallpaper, accent colors, lock screen, themes, or sync settings between devices.
Unlike earlier versions of Windows, there is no grace period for how long you can use Windows 10 without activation. In the Windows 10 license agreement, users are authorized to use Windows 10 only if they are properly licensed and the software has been properly activated with a genuine product key or by another authorized method.
If you are having trouble activating Windows 10, you could try these actions to resolve common activation issues.
Volume License Activation Renewal
If you are using one of the volume activation methods, and your device falls out of activation, you should ensure that the device has network connectivity and that the user has signed onto the device successfully using their corporate credentials. If the activation process does not trigger automatically within two hours there may be an issue with KMS.
Client computers that use KMS must have their activation status renewed at least once every 180 days. Clients achieve renewal by connecting to the network-located KMS host. By default, devices will attempt to renew their activation every seven days following a reboot, or restart of the KMS client service. If KMS activation fails, then the client will retry every two hours, and after 180 days have elapsed following activation, the device will fall out of activation.
If client devices are within the renewal window but fail to automatically activate (perhaps they are present on the network for only a short time), you can force a manual activation while the device is on the network by running or scripting the command slmgr /ato using administrative privileges.
Checking Activation Status
To check activation status in Windows 10, follow these steps:
Open the Settings App.
Select Update & Security and then click Activation.
View the activation status.
If Windows 10 isn’t activated, click the Troubleshoot link, as shown in Figure 1-9.
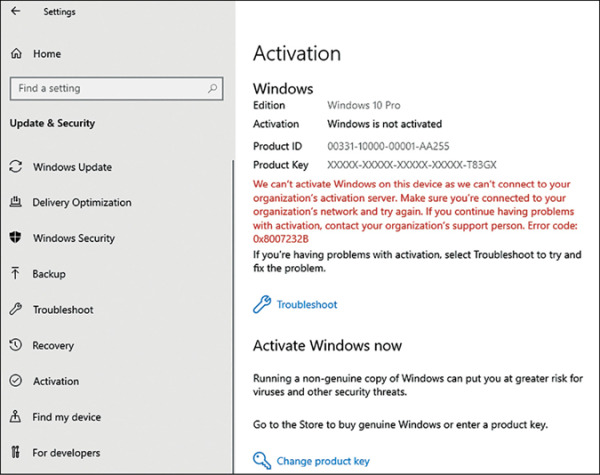
Figure 1-9 Troubleshoot activation
)
)
)
)
)
Activating Windows 10 for the First Time
Most new devices purchased are pre-installed with Windows 10. These devices will automatically activate once the device is connected to the Internet.
If you manually install Windows 10 on a device that has not previously had an activated copy of Windows 10 on it, you’ll need to use a valid product key to activate the device. This scenario also covers if you install a different edition of Windows 10 that wasn’t previously activated on the device. For example, if you install Windows 10 Pro on a device that had Windows 10 Home installed on it, then you will need to provide a valid Windows 10 Pro product key to activate the device.
Activating After Reinstalling Windows 10
If you need to reinstall Windows 10, this could cause issues with your activation status depending on how Windows 10 was originally installed on your device.
If you bought Windows 10 from the Microsoft Store, or if you activated a free upgrade to Windows 10, then you have a digital license for the device.
So long as you reinstall the same edition of Windows 10 onto your device, you won’t need a product key. If you’re asked to enter a product key during reinstallation, you should skip this step. Windows 10 will automatically activate online after the installation is complete.
Activation Issues After a Hardware Configuration Change
If significant hardware changes are made to a device (such as replacing the motherboard), Windows 10 might fall out of activation. Devices running Windows 10, version 1607 or later that have been used with a Microsoft account will have a digital license linked to the device. If the activation error codes 0x803f7001 or 0xC004C008 appear on the Activation page of the Settings app, you should use the Activation troubleshooter to reactivate Windows.
If the motherboard was replaced under warranty—such as by the original equipment manufacturer (OEM)—then the device should reactivate automatically, or a replacement product key should have been provided.
Activating Refurbished Devices Running Windows 10
A refurbished device running Windows 10 can be activated using the product key on the Certificate of Authenticity label that will be attached to the device using the following procedure.
Open the Settings App.
Select Update & Security and then click Activation.
Select Change product key.
Enter the 25-character product key found on the Certificate of Authenticity and follow the instructions.
Use the Activation Troubleshooter
The Activation troubleshooter is available for all users on the Activation tab within the Settings app. If the device has not been activated, running the troubleshooter can locate a digital license linked to the Microsoft account used on the computer and then prompt you to try activation again.
Sometimes when you run the Activation troubleshooter or attempt to activate a device the activation will fail, and an error code and message will be presented to the user.
Common Activation Errors
If you see an error code relating to Windows 10 activation, you can check the list of error codes in Table 1-9 and follow the suggested steps to resolve it. It is not necessary to remember the error codes for the exam, though it is useful to understand the various issues that can arise when activating Windows.
Table 1-9 Windows 10 activation errors
Error |
Description |
|---|---|
0xC004F211 |
Windows reported that the hardware of your device has changed. Use the Activation troubleshooter to reactivate Windows 10 after a hardware change or purchase a new Windows license. |
0xC004F212, 0xC004F034, 0xC004F210, 0xC004E016 |
The product key does not match the installed edition of Windows 10. Re-install the correct edition of Windows 10 or enter a different product key. You might also see this error if the current edition of Windows installed on the device doesn’t match the edition of the digital license. |
0xC004F213 |
Windows reported that no product key was found on your device. A digital license is associated with the device hardware, but this is no longer available if the hardware of the device has changed. Use the Activation troubleshooter to reactivate Windows 10 after a hardware change or purchase a new Windows license. |
0x803f7001 or 0x800704cF |
A valid Windows 10 license couldn’t be found to activate Windows 10. If you have a valid product key, select Change product key, and then enter the 25-character product key. If you don’t have a valid product key, you will need to purchase a new Windows license. |
0xC004C060, 0xC004C4A2, 0xC004C4A2, 0x803FA067L, 0xC004C001, 0xC004C004, 0xC004F004, 0xC004C007, 0xC004F005, 0xC004C00F, 0xC004C010, 0xC004C00E, 0xC004C4A4, 0xC004C4A5, 0xC004B001, 0xC004F010, 0xC004F050 |
The product key entered can’t be used to activate Windows. Enter a different product key or buy a new product key. The activation servers were busy, wait a while and then select Activate. If you upgraded to Windows 10 using the free upgrade offer, Windows 10 should automatically be activated if you didn’t make any significant hardware changes to your device (such as replacing the motherboard). If you continue to have problems with activation, contact customer support. |
0xC004C003 |
The Windows 10 product key entered isn’t valid. Product keys are unique; if a key has already been used, it’s marked as not valid. |
0xC004FC03 |
If you’re not connected to the Internet or your firewall settings are preventing Windows from completing the activation process online, Windows will not be able to activate. You could try to activate Windows by phone. |
0xC004E028 |
This error is shown if a device is already in the process of activation. Wait for the first request to complete. |
0x8007267C |
This error appears if the device is not connected to the Internet or the activation server is temporarily unavailable. |
0xD0000272, 0xC0000272, 0xc004C012, 0xC004C013, 0xC004C014 |
If the activation server is temporarily unavailable, Windows will automatically be activated when the service comes back online. |
0xC004C008, 0xC004C770, 0x803FA071 |
The product key has already been used on another PC, or it’s being used on more PCs than the Microsoft Software License Terms allow. |
0xC004F00F |
You might see this error if a product key for the Enterprise edition of Windows is used to activate Windows 10 Home or Windows 10 Pro. |
0xC004C020 |
A Volume License has been used on more PCs than the Microsoft Software License Terms allow. |
0x8007232B, 0xC004F074, 0xC004F038, 0x8007007B |
A product key for the Enterprise edition of Windows has been used to activate Windows 10 Home or Windows 10 Pro, or a work device is trying to activate, but the device is not connected to the workplace’s network. |
0x80072F8F |
The date and time for the PC is incorrect, or Windows has trouble connecting to the online activation service and can’t verify your product key. Use the network troubleshooter to identify and repair any network problems. |
0xC004E003 |
If third-party software has changed system files, then Windows activation may fail. Restore the system files back to an earlier point in time and try to activate again. |
0x80004005 |
Windows activation has failed. Use the Activation troubleshooter, and if this doesn’t work, you might need to reset your PC. |
0x87e10bc6 |
An error occurred with the activation server or licensing service. Wait a few minutes, try again, and then use the Activation troubleshooter. Alternatively, launch the Microsoft Store app and if the Microsoft Store app shows there was a problem, select Try Again, which should resolve the issue. |