Modify the structure and appearance of text
- 7/23/2019
Structure content manually
At times it’s necessary to manually position text within a paragraph. You can do this by using two different hidden characters: line breaks and tabs. These characters are visible only when the option to show paragraph marks and formatting symbols is turned on.
The hidden characters have distinctive appearances:
A line break character looks like a bent left arrow (↩)
A tab character looks like a right-pointing arrow (→)
You can use a line break, also known as a soft return, to wrap a line of a paragraph in a specific location without ending the paragraph. You might use this technique to display only specific text on a line, or to break a line before a word that would otherwise be hyphenated.
 TIP
TIP
Inserting a line break does not start a new paragraph, so when you apply paragraph formatting to a line of text that ends with a line break, the formatting is applied to the entire paragraph, not only to that line.
![]() SEE ALSO
SEE ALSO
For information about page and section breaks, see “Control what appears on each page” in Chapter 12, “Finalize and distribute documents,” of Microsoft Word 2019 Step by Step by Joan Lambert (Microsoft Press, 2018).
A tab character defines the space between two document elements. For example, you can separate numbers from list items, or columns of text, by using tabs. You can then set tab stops that define the location and alignment of the tabbed text.
)
You can align lines of text in different locations across the page by using tab stops. The easiest way to set tab stops is directly on the horizontal ruler. By default, Word sets left-aligned tab stops every half inch (1. 27 centimeters). (The default tab stops aren’t shown on the ruler. ) To set a custom tab stop, start by selecting the Tab button (located at the intersection of the vertical and horizontal rulers) until the type of tab stop you want appears. Left tab Center tab Right tab Decimal tab Bar tab The tab settings
)
You have the following tab options:
Left Tab Aligns the left end of the text with the tab stop
Center Tab Aligns the center of the text with the tab stop
Right Tab Aligns the right end of the text with the tab stop
Decimal Tab Aligns the decimal point in the text (usually a numeric value) with the tab stop
Bar Tab Draws a vertical line at the position of the tab stop
If you find it too difficult to position tab stops on the ruler, you can set, clear, align, and format tab stops from the Tabs dialog box.
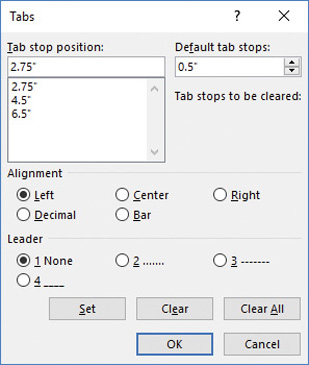
You can specify the alignment and tab leader for each tab
You might also work from this dialog box if you want to use tab leaders—visible marks such as dots or dashes connecting the text before the tab with the text after it. For example, tab leaders are useful in a table of contents to carry the eye from the text to the page number.
When you insert tab characters, the text to the right of the tab character aligns on the tab stop according to its type. For example, if you set a center tab stop, pressing the Tab key moves the text so that its center is aligned with the tab stop.
To display or hide paragraph marks and other structural characters
On the Home tab, in the Paragraph group, select the Show/Hide ¶ button.
Press Ctrl+Shift+* (asterisk).
To insert a line break
Position the cursor where you want to break the line. Then do either of the following
On the Layout tab, in the Page Setup group, select Breaks and then Text Wrapping.
Press Shift+Enter.
To insert a tab character
Position the cursor where you want to add the tab character, and then press the Tab key.
To open the Tabs dialog box
Select any portion of one or more paragraphs that you want to manage tab stops for.
Open the Paragraph dialog box.
In the lower-left corner of the Indents and Spacing tab, select the Tabs button.
To align a tab and set a tab stop
Select any portion of one or more paragraphs that you want to set the tab stop for.
Select the Tab button at the left end of the ruler to cycle through the tab stop alignments, in this order:
Left
Center
Right
Decimal
Bar
When the Tab button shows the alignment you want, select the ruler at the point where you want to set the tab.
TIPWhen you manually align a tab and set a tab stop, Word removes any default tab stops to the left of the one you set.
Or
Open the Tabs dialog box.
In the Tab stop position box, enter the position for the new tab stop.
In the Alignment and Leader areas, set the options you want for this tab stop.
Select Set to set the tab, and then select OK.
To change the position of an existing custom tab stop
Drag the tab marker on the ruler.
Or
Open the Tabs dialog box.
In the Tab stop position list, select the tab stop you want to change.
Select the Clear button to clear the existing tab stop.
Enter the replacement tab stop position in the Tab stop position box, select Set, and then select OK.
To remove a custom tab stop
Drag the tab marker away from the ruler.
In the Tabs dialog box, select the custom tab stop in the Tab stop position list, select Clear, and then select OK.