Implement management and security solutions
- By Mike Pfeiffer, Derek Schauland, Gurvinder Singh, Nicole Stevens
- 2/15/2021
In this sample chapter from Exam Ref AZ-303 Microsoft Azure Architect Technologies, you will learn how to bring your existing workloads into Azure and ensure your cloud environment is as secure as possible.
Organizations are still working out the details of getting to the cloud. With all the hardware and servers running in datacenters and co-location spaces, moving to the cloud still takes a bit of effort.
Architecting solutions in Azure is not just development or infrastructure management in the cloud. It’s much more than that, and you need to understand how the Azure resources an organization needs to operate will sometimes be centered in development and sometimes in infrastructure. It’s up to you to know enough about these topics.
This chapter helps you understand how you can bring your existing workloads to Azure by allowing the use of some familiar resources (IaaS Virtual Machines) and others that may be new (such as serverless computing) to your environment. In addition, the use of multifactor authentication (MFA) is covered here to ensure your cloud environment is as secure as possible. An Azure Solutions Architect might face all these situations in day-to-day work life and needs to be ready for each of them.
Skills covered in this chapter:
■ Skill 2.1: Manage workloads in Azure
■ Skill 2.2: Implement disaster recovery using Azure Site Recovery
■ Skill 2.3: Implement application infrastructure
■ Skill 2.4: Manage security for applications
■ Skill 2.5: Implement application load balancing and network security
■ Skill 2.6: Integrate an Azure virtual network and an on-premises network
■ Skill 2.7: Implement and manage Azure governance solutions
■ Skill 2.8: Implement multifactor authentication (MFA)
Skill 2.1: Manage workloads in Azure
Because most organizations have been operating on infrastructure running in house, there is a significant opportunity to help them migrate these workloads to Azure, which might save some costs and provide efficiencies for these servers that their datacenters might not. Also, some organizations might want to explore getting out of the datacenter business. How can you help your organization or customer move out of a datacenter into the Azure cloud?
The recommended tool for this is Azure Migrate, which offers different options depending on the type of workload you’re migrating (physical or virtual). Azure Site Recovery has not gone away, though it is used primarily for disaster-recovery scenarios where Azure is the target for disaster recovery. See Skill 2-2, “Implement disaster recovery using Azure Site Recovery,” for more info.
Configure the components of Azure Migrate
Azure Migrate uses migration projects to assess and manage any inbound migration of workloads to Azure. To create a migration project and get started, follow these steps:
Determine the workload type to migrate:
■ Servers. Virtual or physical servers
■ Databases. On-premises databases
■ VDI. Virtual Desktop Infrastructure
■ Web Apps. Web-based applications
■ Data Box. Offline data migration to Azure
Add the tools for the selected migration to create a Migrate Project
Perform a migration of the selected workloads to Azure
Azure Migrate Assessment Tools
Before executing the migration of any workload to Azure, with the exception of a Data Box migration, the assessment of the current status of on-premises resources will help determine the type of Azure resources needed, as well as the cost to migrate them to Azure.
There are two assessment tools for migrating servers to Azure:
■ Azure Migrate Server Assessment. This service has been the built-in assessment tool for some time and has roots in Site Recovery. It will discover and review VMware, Hyper-V, and physical servers to determine if they are ready and able to make the transition to Azure.
■ Movere. This assessment tool was a third-party company until late 2019, which was acquired by Microsoft to broaden the tools available for getting resources into Azure. With the assessments performed by Movere, an agent is loaded within the on-premises environment and scans are performed to determine the volume of servers in the environment. Additional information, including SQL Server instances, SharePoint instances, and other applications, are also reported by Movere.
In addition to server assessments, Azure Migrate has tools to review existing web applications with the Web App Migration Assistant and on-premises SQL Server databases with the Database Migration Service. The assessment for SQL Server will also review the fit of the databases discovered within the three Azure offerings for SQL Server: Azure SQL Database, Managed Instance SQL, and SQL Server running on VMs in Azure.
Azure Migrate Server Assessment Tool
The Server Assessment Tool provides the following information to help your organization make the best decisions when preparing to move resources to Azure:
■ Azure Readiness. This tool determines if the servers discovered on-premises are good candidates for moving to Azure.
■ Azure Sizing. This tool estimates the size of a virtual machine once it has migrated to Azure, based on the existing specifications of the on-premises server.
■ Azure Cost Estimation. This server assessment tool will help to estimate the run rate for machines that are migrated to Azure.
No agents are required by the Server Assessment tool. Server assessment is configured as an appliance and runs on a dedicated VM or physical server in the environment being evaluated.
Once an environment has been scanned for assessment, administrators can review the findings of the tool and group servers for specific projects or lifecycles. (The grouping of servers is done after assessment.) Then, groups of servers can be evaluated for migration to Azure.
When reviewing server groups for migration, be sure to consider things like connectivity to Azure and any dependencies that applications or servers being moved may have.
To complete a server environment assessment, perform the following steps:
Locate Azure Migrate within the Azure Portal.
Create an Azure Migrate resource from the Azure portal by selecting Assess and Migrate Servers on the Overview blade, as shown in Figure 2-1.
Select Add Tool(s) to create a project and select assessment and migration tools, as shown in Figure 2-2.
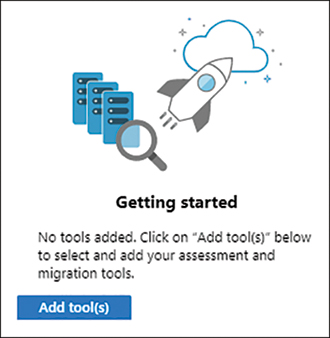
FIGURE 2-2 Assessment and migration tool selection
Enter the details required for the migration project for servers, as shown in Figure 2-3.
Select a Subscription.
Select a Resource Group.
Enter a name for the Azure Migrate project.
Select the Azure Migrate: Server Assessment tool and click Next, as shown in Figure 2-4.
Select the Skip Adding A Migration Tool For Now check box and click Next, as shown in Figure 2-5.
Review the assessment selections made and click Add Tool(s), as shown in Figure 2-6.
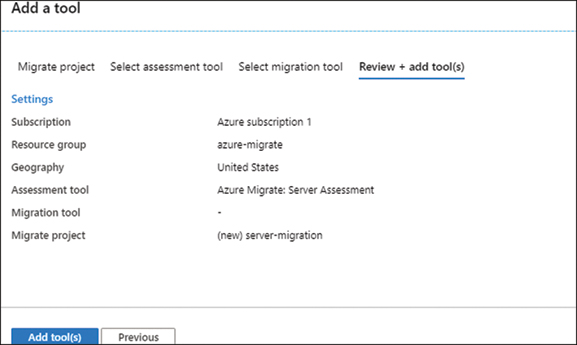
FIGURE 2-6 Review choices and continue
Once the assessment tool has been chosen in Azure, additional setup of the appliance is necessary.
Click Discover under Assessment Tools. The Azure Migrate: Server Assessment dialog box shown in Figure 2-7 below.
To use an appliance, select Discover Using Appliance, as shown in Figure 2-8.
Choose the hypervisor type used in the environment: Hyper-V, VMware, or Physical Servers.
Download the appliance and install it in the environment.
Using a browser, visit the IP address of the appliance, configure it to reach the Azure Migrate project, and then start discovery.
)
)
)
)
)
)
After about 15 minutes, machines that are discovered will begin to appear in the Azure Migrate Discovery Dashboard.
You can also complete a CSV template, which supplies the details of your environment, and then upload it to the Azure Migrate project if you would rather not use the discovery appliance. This is shown in Figure 2-9.
)
To complete a web app assessment and migration, complete the following steps:
Inside the existing Azure Migrate project, select Web Apps from the Migration Goals section of the navigation bar.
Select Add Tool(s) and choose the Azure Migrate: Web App Assessment tool, as shown in Figure 2-10.
Click Next.
Select the Skip Adding A Migration Tool check box and click Next.
After reviewing the configuration, click Add Tool(s).
Once the web app assessment tool has been added, download the Azure App Service Migration Assistant to assess internal web applications. If the application has a public URL, it can be scanned via the public Internet.
Install the assessment tool on any web servers containing applications for migration. IIS 7.5 and administrator access on the server(s) are the minimum requirements to complete an assessment. Currently, PHP and .NET apps are supported for migration, with more application types coming soon.
The migration tool will determine whether the selected websites are ready to migrate to Azure, as shown in Figure 2-11.
Once the assessment tool has reviewed the chosen web applications, click Next to log in to Azure using the provided device code and link provided in the wizard, show in Figure 2-12.
Click Azure Options in the left-side navigation pane and set the Subscription, Resource Group, Destination Site Name, App Service Plan, Region, Azure Migrate Project, and Databases options, as shown in Figure 2-13.
If your application has a database back end, select the Set Up Hybrid Connection To Enable Database Connection option and enter the name of the on-premises database server and the port on which to connect in the On-Premises Database Server field shown when the option is selected.
Click Migrate to migrate the application as is or click the Export ARM Template button on the Azure Options screen to produce the JSON-based ARM template for the application for later deployment to Azure.
The migration progress is shown in Figure 2-14. You will also be able to see the resources once they are migrated in the Azure portal.
)
)
)
)
)
Complete a SQL database assessment and migration using the following steps:
Within the Azure Migrate project, select Databases > Add Tool(s).
Select the Azure Migrate: Database Assessment tool and click Next, as shown in Figure 2-15.
To proceed with a migration if the assessment produces the expected outcome, select the Azure Migrate: Database Migration tool.
If you are assessing production workloads and/or extremely large databases, select the Skip Adding A Migration Tool For Now check box to allow further review of the assessment to correct any issues found.
Once the tools have been added to the migration project, as shown in Figure 2-16, click the Download link to download the Database Migration Assessment tool to start the assessment.
Install and run the Data Migration Assistant Tool on the SQL server(s) to be migrated to Azure.
In the Data Migration Assistant tool, as shown in Figure 2-17, click New to add a new project.
Enter a name for the project and select the following for the SQL server data being migrated:
■ Assessment Type. Choose either database engine or integration services.
■ Source Server Type. Choose either SQL Server or AWS RDS For SQL Server.
■ Target Server Type. Choose from Azure SQL Database, Azure SQL Database Managed Instance, SQL Server On Azure Virtual Machines, or SQL Server.
On the Options screen within the created project, following are the selected (and default) options:
■ Check Database Compatibility. This will check an existing database for any issues that would prevent it from running in Azure SQL.
■ Check Feature Parity. This option looks for unsupported features in the source database.
Select the SQL server(s) and choose the appropriate authentication method(s) for the SQL server:
■ Windows Authentication. Use the currently logged-in Windows credentials to connect.
■ SQL Server Authentication. Use specific credentials stored in the SQL server to connect.
■ Active Directory Integrated Authentication. Use the logged-in Active Directory user for authentication.
■ Active Directory Password Authentication. Use a specific Active Directory user or service account to authenticate.
Select the properties for the connection:
■ Encrypt connection. Check this box if the SQL Server (and/or your organization’s information security team) requires connections to be encrypted.
■ Trust Server Certificate. If the SQL Server is using certificates, the Data Migration Assistant can trust these certificates to simplify future connections.
Click Connect.
From the list of databases found, select any that should be included in the assessment, as shown in Figure 2-18.
Click Add.
Once the databases are added to the assessment, if there are log files or extended events to include, click Browse to locate and include them, as shown in Figure 2-19.
Review the assessment for both feature parity and compatibility and fix any issues found. If there are discrepancies, they will need to be resolved before the migration can proceed.
Click Upload To Azure.
You will be prompted to sign in if you are not already signed in on the computer where the assessment is running.
Select the Subscription and Resource Group and then click Upload.
)
)
)
)
)
Migrating information is straightforward as well, though there must be an existing Azure SQL database in which to migrate the SQL data. You should create this Azure SQL database beforehand because the tools will not build Azure SQL or other types of SQL in Azure as part of the process.
To complete a migration after the assessment of SQL databases, complete the following steps:
In the Data Migration Assessment tool, select the Migrations option.
Specify the source SQL instance and log-in method.
Specify the target Azure SQL Server name and credentials, and then click Connect.
Select the database to migrate and click Next, as shown in Figure 2-20.
Once the preparation completes and has been reviewed, click Generate SQL Script to create a script. A generated script is shown in Figure 2-21.
To push this data to a specified instance of Azure SQL Database using the Data Migration Assistant, click Deploy Schema.
)
)
Migrate virtual desktop infrastructure to Azure
Azure Migrate also allows you to bring virtual desktop infrastructure (VDI) into Azure. The assessment of VDI requires the use of Lakeside: Systrack, a third-party tool, to complete the assessment of VDI environments. The migration process, however, follows the same path as a server migration, allowing workloads from VMware or Hyper-V to be migrated.
Azure Data Box allows offline migration of existing data to Azure. The Data Box itself is a ruggedized NAS that is capable of storing up to 100 TB of data with AES 256 encryption for transporting your data physically to the Azure datacenter(s) for ingestion.
To complete a Data Box offline migration of workloads to Azure, complete the following steps:
From within an Azure Migrate project, select Data Box as the Migration Goal.
Provide the following details about the data being ingested:
■ Subscription. Select the name of the Azure Subscription where the data will be transferred.
■ Resource Group. Select the resource group where the data will be transferred.
■ Transfer Type. Select the type of transfer being performed.
■ Source Country/Region. Select the country or region where the data lives today.
■ Destination Azure Region. Select the region in Azure where the data should reside after transfer.
Click Apply.
Select the appropriate Data Box option for your migration, as shown in Figure 2-22.
Note that Data Box disks provided by Microsoft are only allowed with the following subscription offers:
■ EA. Enterprise Agreement
■ CSP. Cloud solution provider partnership
■ Microsoft Partner Network. Partner organizations
■ Sponsorship. A limited, invite-only Azure subscription offer provided by Microsoft
If you do not have an offer tied to your Azure subscription that meets the above requirements to use a provided Data Box, you can send in data on your own disks. If you provide your own disk, the following requirements apply:
■ Up to 10 disks per order
■ 1 TB per disk
■ Copying data to one storage account
■ $80 per disk import fee
These Data Box options are for offline transfers to Azure. Using the Data Box Gateway, a virtual appliance within your environment, will perform an online data migration to Azure.
Once you have selected a disk option, you will be able to configure the options for your environment (see Figure 2-22). You will choose the following options shown in figure 2-23:
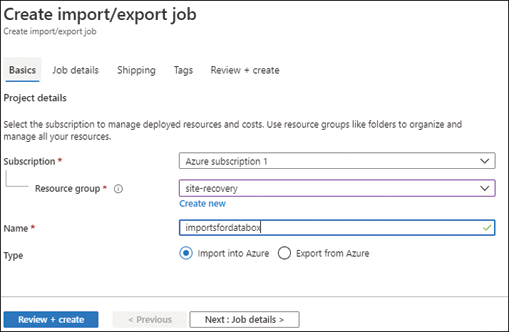
FIGURE 2-23 Configuration options for migration environment
■ Type. Import to or export from Azure.
■ Name. The name of the job to identify it to Azure.
■ Subscription. Select the subscription for the job.
■ Resource Group. Select an existing resource group or create a new one for the job.
After clicking Next: Job Details, you will supply the following information, shown in Figure 2-24:
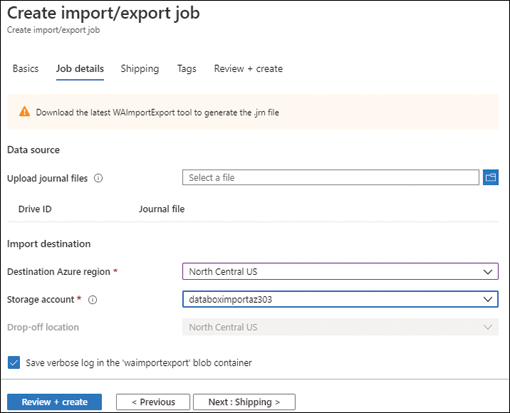
FIGURE 2-24 Provide job details
■ Upload Journal Files. Specify the path to the journal file for each drive being used for import.
■ Import Destination. Specify a storage account to consume ingested data and the region the data will be stored in.
■ Provide Return Shipping Information. Specify the name and address details to allow your disk to be returned along with carrier information as shown in Figure 2-24.
)
Review and confirm your choices.
If you have shipped your own drives for this process, you will need to supply return information.
As discussed above, if you are not using a EA,CSP, Partner, Sponsorship subscription in Azure, or one with a special offer designation, you might be required to use your own drive(s) with Data Box. If that is the case, return shipping information is required, as shown in Figure 2-25.
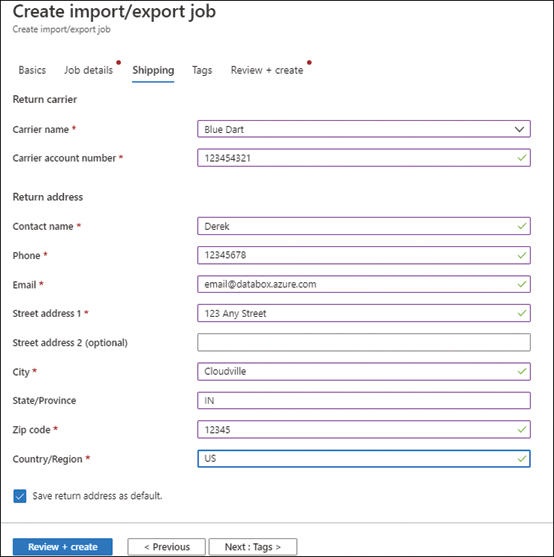
FIGURE 2-25 Return shipping information
There are other assessment and migration tools such as Movere or other third-party tools. These tools might require additional spend to assess your environment. Movere is free and can be used as part of this process because it was acquired by Microsoft, but this book focuses on the Azure tools for assessment and migration.
Implementing Azure Update Management
An organization that is seeking to move workloads to the cloud is probably (hopefully) already ensuring these servers are patched regularly and kept as close to truly up to date as their governance and infosec organizations will allow. Migrating a server to Azure does not necessarily remove this burden from server administration teams. The last thing to cover in this section on workload management and migration is managing updates in the cloud. As you might expect, Azure has a method for that, and here, we will look at the implementation of this feature set.
To configure Azure Update Management, complete the following steps:
Log in to the Azure portal and navigate to a running virtual machine.
In the Operations section of the left navigation menu for the VM, select Update Management.
Supply the following information:
■ Log Analytics Workspace Location. Select the region for the account.
■ Log Analytics Workspace. Choose (or create) a log analytics workspace.
■ Automation Account Subscription. Select the Azure subscription to house this resource.
■ Automation Account. Choose or create an automation account for Update Management.
Click Enable and wait for the deployment to complete (between 5 and 15 minutes).
Once the solution has finished onboarding virtual machines, revisiting the Update Management blade for one or more VMs will display information as it becomes available.
Selecting the Update Agent readiness troubleshooter will help determine which items might interfere with the use of the Update Management solution (see Figure 2-26).
If your VM is running Windows Auto Update, you will want to disable it before proceeding with Update Management in Azure.
)
Once the onboarding process has completed and after waiting for configuration to complete, visit the Update Management blade for a VM to see the Missing Updates for the system, which are broken out by Critical, Security, and Others, as shown in Figure 2-27.
)
)
Selecting an update from the Missing Updates list will open Log Analytics and insert a query looking for that update; running the query will display the update as a result.
When a server has onboarded into Update Management, it can be patched by configuring a schedule for update deployment. To do that, complete the following steps:
From the Update Management blade, click Schedule Update Deployment.
Enter the following information about the schedule:
■ Name. A name for the deployment.
■ Update Classification. The update types to be included.
■ Include/Exclude Updates. Optionally, select the updates to include or exclude.
■ Schedule Settings. When the deployment should happen.
■ Pre/Post Scripts. Any scripts that should run before or after deployment.
■ Maintenance Window. Specify the length of the maintenance window for deploying updates.
■ Reboot Options. Choose the reboot options for the update(s).
Click Create on the update deployment schedule.
The deployment that has been scheduled will be listed on the Deployment Schedule tab. Also, any deployments will be defaulted to 30 minutes after the current time to allow the schedule to push to Azure.
After these items are configured, the updates will be applied as per the schedule that has been set up.
This section took a high-level overview covering the various types of migrations to Azure using built-in Azure tools. As this technology changes and Azure evolves, this will surely expand.