Manage User Accounts and Settings in Windows 10
- 11/12/2015
- Understand user accounts and permissions
- Create and manage user accounts
- Manage account pictures and passwords
- Customize your sign-in options
- Skills review
- Practice tasks
Create and manage user accounts
An administrator can give other people access to the computer in one of three ways:
- Create a user account that is linked to an existing Microsoft account.
- Create a user account that is linked to an email address, and register that account as a Microsoft account.
- Create a local account that isn’t linked to a Microsoft account.
Every user account has an associated user account name and can have a user account picture and a password. Any user can change the following details for his or her account:
- Account name You can change the display name that appears on the Welcome screen and Start menu.
- Account picture You can change the picture that identifies you on the Welcome screen and Start menu.
- Password You can create or change the password.
If you have administrator credentials, you can change these properties for any user account. You can also change the account type from Administrator to Standard User (provided that at least one Administrator account remains on the computer) or vice versa.
You create computer accounts and designate permission levels from the Family & Other Users pane of the Accounts category page of the Settings window.
Important

All types of user accounts are visible in the Family & Other Users pane. However, the processes for managing family accounts and non-family accounts differ, so we cover them separately in the following sections to avoid confusion.
)
You manage other user accounts from this pane, so the lists don’t include your account
Only administrators can create user accounts—if you’re signed in with a standard user account, you don’t have the option to do so. When you create a user account, you must designate whether the user is part of your family group.
When you first add a user account, it is identified in lists by its email address or by the name you give it. You can change the user account name (and delete user accounts) from the Users node of the Computer Management console.
If a person is not going to sign in to a specific computer again, it’s a good idea to delete his or her user account. This will clean up the user account lists and recover the hard-drive space that is used by that user’s data. If you don’t want to delete the user account data, you can disable the account instead of deleting it.
Manage user accounts in the Computer Management console
Some user account management tasks can be completed from the Family & Other Users settings pane, but others must be performed in the Users node of the Computer Management console.
)
To open the Computer Management console, do any of the following:
- Right-click the Start button, and then click Computer Management.
- On the Start menu, click All Apps. In the All Apps list, expand the Windows Administrative Tools folder, and then click Computer Management.
- Enter computer management in the taskbar search box, and then in the Apps section of the search results list, click Computer Management.
To open the Users node, follow these steps in the left pane of the console:
- Expand the System Tools folder.
- Expand the Local Users and Groups folder.
- Click the Users folder.
Manage and monitor family safety settings
Microsoft Family Safety is an impressive system for safeguarding against young family members accidentally accessing inappropriate content on the Internet. It allows you to place restrictions on their computer usage and provides you with reports that you can use to spot problems. Family Safety was introduced with Windows 7, and has evolved with each version of Windows. If you’ve used it in the past, it’s a good idea to revisit it now to make sure the settings are up to date for the way your children use the computer.
Originally, Family Safety was an app through which you could register specific computer user accounts. It was necessary to register a child on each computer he or she used, and Family Safety reported separately on each local account. Since then, Family Safety has evolved into an online service that can monitor your child’s activity on each device he or she signs into that is running Windows.
The key to the successful use of Family Safety is for each child to sign in to Windows 10 computers and devices with his or her own Microsoft account, and for parents to designate the account as a Child account. Family Safety monitors and reports on the websites children visit, the apps they use, the games they play, and the time they spend signed in to the computer.
)
You can review usage and modify settings on the Family page of your Microsoft Account site, or directly through familysafety.microsoft.com, and opt to receive weekly activity reports by email. From the Family page, you can choose to block or allow specific websites or content by rating so that children have access to only age-appropriate information.
Create and manage family user accounts
You can designate a user account as belonging to a family member. When you do, the account is added to your family group. Adults in the family group can manage family safety settings online.
For the safety of your children, all family user accounts must be associated with Microsoft accounts. You can’t create a local account in the Your Family group, or an account linked to an email address that isn’t yet registered as a Microsoft account.
Important
You must sign in to the computer with an administrator account to perform any of the following procedures.
To create a family user account
- In the Settings window, click Accounts, and then click Family & other users.
- In the Family & other users settings pane, click Add a family member to start the wizard.
- On the Add a child or an adult page, click Add a child or Add an adult, and then enter the person’s Microsoft account address in the Enter the email address box. If the person doesn’t have an email address, or has an email address that isn’t yet registered as a Microsoft account, click This person doesn’t have an email address, and then skip to the procedure “To create or register a Microsoft account” in the “Manage settings for any user account” section of this topic.
- After you enter the email address, click Next. The wizard searches the Microsoft account database for the email address.
If the email account is already registered as a Microsoft account, click Confirm on the Add this person? page to add the person to your family group and create a user account for him or her on the computer.
Or
If the email account isn’t already registered as a Microsoft account, the wizard displays a warning.
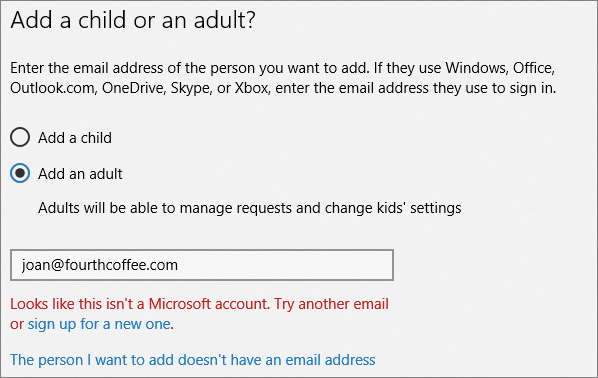
Every family account must be linked to a valid Microsoft account
If the warning appears, do either of the following:
- Enter a registered email address, click Next, and then click Confirm to create the account.
- Click sign up for a new one, and then skip to the procedure “To create or register a Microsoft account” in the “Manage settings for any user account” section of this topic.
When you register an adult family account, the person receives an email message and must click a link in the message and then sign in to his or her Microsoft account to confirm membership in the family group.
Until the family membership is confirmed, the person can sign in to the computer but the account status is shown as Adult, Pending.
)
To change the display name of a family user account
Display the Users node of the Computer Management console.
See Also

Instructions for navigating to the Users node of the Computer Management console are in the sidebar “Manage user accounts in the Computer Management console” earlier in this chapter.
Do any of the following:
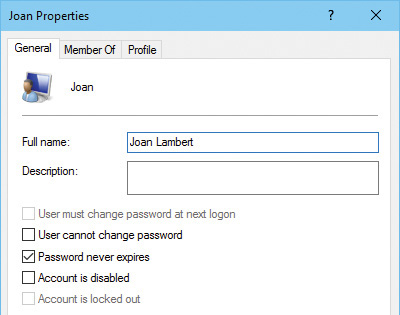
To change the full name that appears in the user account lists, double-click the account name to open the Properties dialog box. Then enter or update the name in the Full name box, and click Apply or OK to make the change.
You can change the display name of a family user account to use something other than that person’s email address
- To change the short name by which Windows identifies the account, right-click the account name in the Users list, and click Rename to activate the name for editing. Then enter the short name you want, and press Enter to complete the change.
To disable a family user account
- On the Accounts page of the Settings window, click Family & other users.
In the Family section of the Family & other users pane, click the account you want to disable to display your options for managing the account.
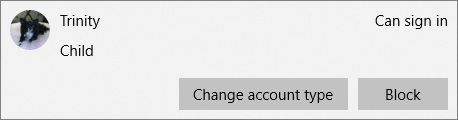
If the user is a family member, you have an option to block the account
- On the account tile, click Block. Windows displays a confirmation request.
- In the Block this person from signing in? box, click Block.
To enable a disabled family user account
- On the Accounts page of the Settings window, click Family & other users.
In the Family section of the Family & other users pane, click the account you want to enable to display your options for managing the account.
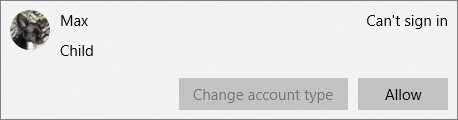
The dimmed Change Account Type button is a quick indicator that an account has been disabled
- On the account tile, click Allow. Windows displays a confirmation request.
- In the Allow this person to sign in? box, click Allow.
To delete a family user account
Ensure that the user has moved or copied personal files from the user account folders and uninstalled or deactivated any apps that require this to free up the user license.
Important
To preserve any files that are saved in the user account folders, back up the folder C:\Users\[UserName] (where [UserName] is the account name of the user).
Display the Users node of the Computer Management console.
See Also
Instructions for navigating to the Users node of the Computer Management console are in the sidebar “Manage user accounts in the Computer Management console” earlier in this chapter.
Right-click the user account you want to delete, and then click Delete. A message box displays a warning.
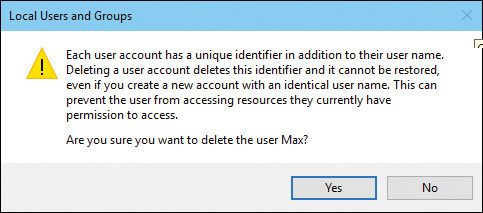
It’s hard to accidentally delete a user account
- In the message box, click Yes to delete the account and all its files.
Create and manage non-family user accounts
Accounts in the Other Users group are not associated with your family safety group. These accounts can certainly belong to members of your family, but they can’t be part of your family safety settings group. Local computer accounts can be created only in the Other Users group.
Important
You must sign in to the computer with an administrator account to perform any of the following procedures.
To create a non-family user account that is linked to an existing Microsoft account
- In the Settings window, click Accounts, and then click Family & other users.
- In the Other users section of the pane, click Add someone else to this PC to start the wizard.
On the How will this person sign in? page, enter the Microsoft account address in the Email or phone box, and then click Next.
The wizard confirms that the email address is a registered Microsoft account.

The user must provide a Microsoft account password to sign in
- Click Finish to complete the process.
To create a local user account
- On the Accounts page of the Settings window, click Family & other users.
- In the Other users section of the pane, click Add someone else to this PC to start the wizard.
- At the bottom of the How will this person sign in? page, click The person I want to add doesn’t have an email address.
At the bottom of the Let’s create your account page, click Add a user without a Microsoft account to get to the interface for creating a local account.
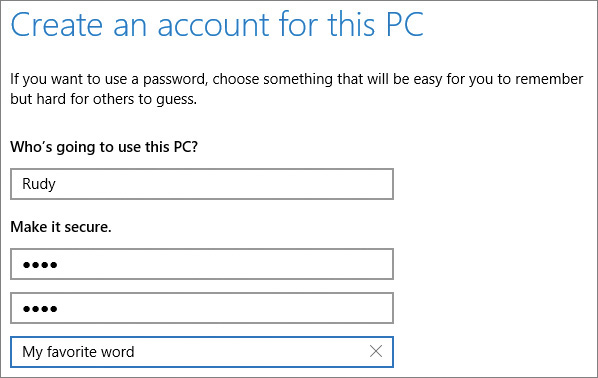
The password hint appears on the Welcome page if you can’t remember your password
- Enter a user name. If you don’t want to create a password for the local account, leave the rest of the boxes blank. Otherwise, enter the password (two times) and an optional password hint. Then click Next to create the account.
Important
If you don’t implement a password, anyone can sign in to your computer by selecting your user account and then clicking Sign In. Your data is especially vulnerable if you travel with your computer or use it in a public place.
To disable a non-family user account
Display the Users node of the Computer Management console.
See Also
Instructions for navigating to the Users node of the Computer Management console are in the sidebar “Manage user accounts in the Computer Management console” earlier in this chapter.
- Double-click the account you want to disable.
- In the Properties dialog box, select the Account is disabled check box. Then click OK.
To enable a disabled non-family user account
- Display the Users node of the Computer Management console.
- Double-click the account you want to enable.
- In the Properties dialog box, clear the Account is disabled check box. Then click OK.
To delete a non-family user account
Ensure that the user has moved or copied personal files from the user account folders and uninstalled or deactivated any apps that require this to free up the user license.
Important
To preserve any files that are saved in the user account folders, back up the folder C:\Users\[UserName] (where [UserName] is the account name of the user).
- Display the Settings window, click Accounts, and then click Family & other users.
In the Other users section of the Family & other users pane, click the account you want to delete, to display your options for managing the account.
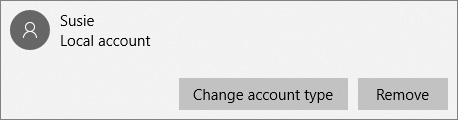
You can remove non-family accounts directly from the Family & Other Users pane
On the account tile, click Remove. Windows displays a confirmation request.
In the message box, click Delete account and data.
Windows deletes the account and then returns to the Other Users pane.
)
Manage settings for any user account
Windows 10 has two built-in accounts, Administrator and Guest, which don’t have passwords assigned. When Windows creates the first user-specific administrator account, it disables the default Administrator account. The Guest account is inactive by default (and disabled on computers that are part of a domain.) You can activate the Guest account to give someone temporary, limited access to your computer without having to create a user account for that person.
Another method of giving someone limited access is to restrict the account so that it can access only one app. Access restriction works only with Store apps that are already installed on your computer.
When creating a family or non-family user account, if you don’t supply an email address, the wizard displays a page on which you can create a new outlook.com email address or register an existing email address as a Microsoft account. The email address that you provide will receive a confirmation email message and must respond to it to activate the account.
It’s simple to register an email address as a Microsoft account
To activate the built-in Guest account
- Display the Users node of the Computer Management console.
- Double-click the disabled Guest account.
- In the Properties dialog box, clear the Account is disabled check box, and then click Apply or OK.
To grant administrative permissions to an account
- In the Settings window, click Accounts, and then click Family & other users.
Click the account you want to modify, to display your options. Then click Change account type.
- In the Account type list, click Administrator. Then click OK.
)
To revoke administrative permissions
- In the Accounts category of settings, display the Family & other users pane.
- Click the account, and then click Change account type.
- In the Account type list, click Standard User. Then click OK.
To restrict an account to one Store app
- In the Accounts category of settings, display the Family & other users pane.
- At the bottom of the pane, click Set up assigned access.
- In the Choose which account will have assigned access area, click Choose an account (or, if the pane already displays a restricted account, click the account).
In the Choose which app this account can access area, click Choose an app (or click the currently selected app) and then in the Choose an app pane, click the app you want to assign (or click Don’t start an app when the account is signed in to remove the assigned access).
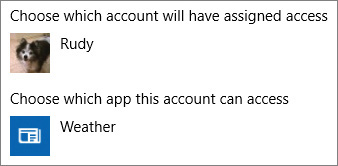
You can restrict a user account to a specific Store app
Restart the computer to complete the access assignment process.
TIP

When you sign in to Windows 10 with an assigned access account, you have access only to the assigned app. To sign out of an assigned access account, press Ctrl+Alt+Del.
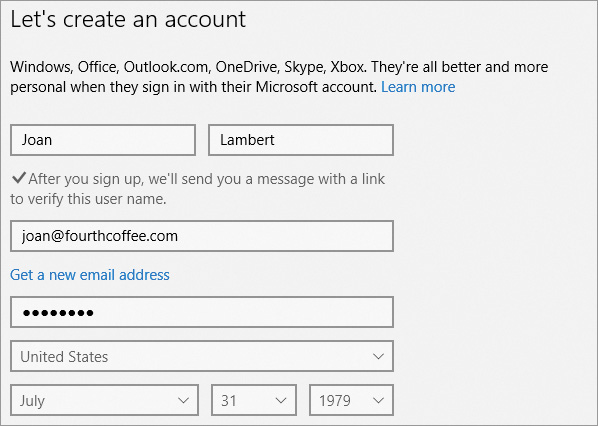
To create or register a Microsoft account
- On the Let’s create an account page, provide the requested information, and then click Next.
- If you want to, clear the check boxes permitting Microsoft to send and track information for marketing purposes. Then click Next.
- On the final page of the wizard, click Finish.
To switch from a Microsoft account to a local account
- In the Settings window, click Account, and then click Your account.
- In the Your account settings pane, click Sign in with a local account instead.
- In the Switch to a local account window, enter your Microsoft account password to confirm your identity, and then click Next.
- Provide a user account name for the local account. If you don’t want to use a password, leave the rest of the entries blank. Otherwise, fill in the password and password hint entries.
- Click Next, and then click Sign out and finish.
To connect a local account to a Microsoft account
- Display the Your account settings pane, and click Sign in with a Microsoft account instead.
- On the Make it yours page, enter the email address and password of your Microsoft account, and then click Sign In.
- On the Enter your old password one last time page, enter the password of the local user account that you’re connecting to your Microsoft account. (If the local user account didn’t have a password, leave this box blank.) Then click Next.
- Enter your local account password to confirm your identity, and then click Next.
Enter your Microsoft account email address, and then click Next.
A code will be sent to that email address, or you can open the list below the question about how you want to get the code, and choose to receive it in a text message. After you receive the code, return to this process and enter it in the box provided. Then click Finish.
TIP
The verification code arrives quickly and is valid for only a short time, so check your email or text messages for the code and finish the account creation process promptly. If the code expires before you complete the process, you can click the Back button on the code page and request another code.
- Click Sign out and finish to return to your profile, where you can add an account picture to the local account.